微服务之十四如何在 Ocelot 网关中配置多实例 Swagger 访问
一、介绍
当我们开发基于微服务的应用程序的时候,有一个环节总是跳不过去的,那就是要创建 WebApi,然后,我们的应用程序基于 WebApi 接口去访问。在没有 Swagger 以前,我们开发好了 Web API 接口,也要写大量的接口文档。不写不行吗?当然不行,如果你不写这些文档,别人如何使用你的接口呢?难道每个接口都要和写接口的人进行沟通吗?那沟通成本就太大了,也浪费了不必要的时间。只从我们有了 Swagger 后,只需要简单的配置一下,就可以生成有关接口的详细文档,并且,可以调用执行,对于使用的人和开发的人都省去了不少力气。
但是,我们现在有一个问题,在我们的解决方案中,有多个 WebApi 的实例程序,并且每个 API 的实例程序都配置了自己的 Swagger ,方便使用。但是这样也出现了另外一个问题,我们有多个 API 实例程序,每个实例程序都对应一个 Swagger 程序,我们要访问的时候,该怎么操作呢?很多人就会说,访问哪个就打开哪个的 Swagger 程序,当然,如果你不怕繁琐,当然可以这么做。既然这么繁琐,别人也肯定遇到过,那针对这个问题,肯定就有相应的解决方案。
说起解决方案,其实,我们也很容易想起来。我们创建一个公共的、基于 WebAPI 的网关项目,在这个网关项目里,我们配置 Swagger,然后,通过访问网关的 Swagger 就可以访问各个 API 实例程序的 Swagger 。
二、开始我们
废话不多说,我们就开始,我们今天的配置和演示。这个解决方案的项目数不多,有3个 WEB API 的项目,他们都是基于 Net 5.0的,可以跨平台的。在这个解决方案中,由于我们要使用到服务发现和网关的配置,需要在各个需要的项目中引入 Consul、Swashbuckle.AspNetCore、 Ocelot 和 Ocelot.Provider.Consul 等项目。具体操作如下:
1、准备工作。
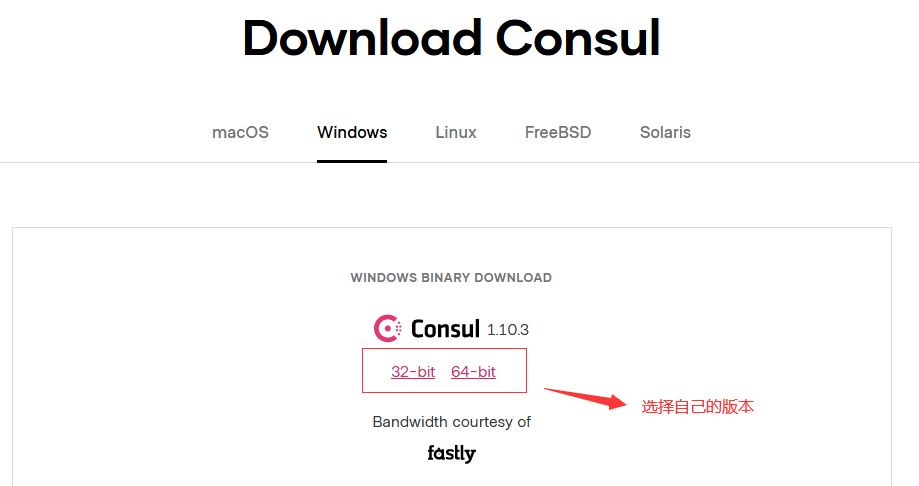
我们在开始我们的项目之前,需要现在 Consul,我这里下载的 Windows 64 位版本的,因为这个是测试的,如果在生产环境,可以根据需要下载 Linux 版本。
下载地址:https://www.consul.io/downloads
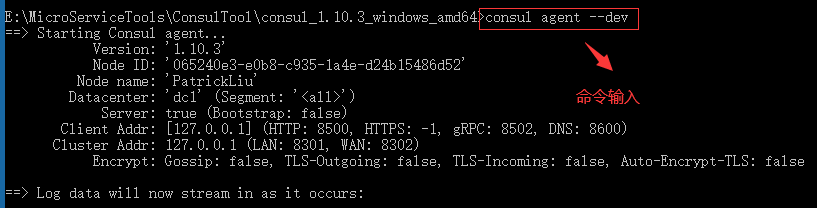
启动Consul 服务的命令也很简单,在下载目录里面,在地址栏里输入:cmd回车,打开命令窗口。然后输入命令:consul agent -dev。截图如下:
2、项目源码
1】、第一个 WABAPI 实例程序。
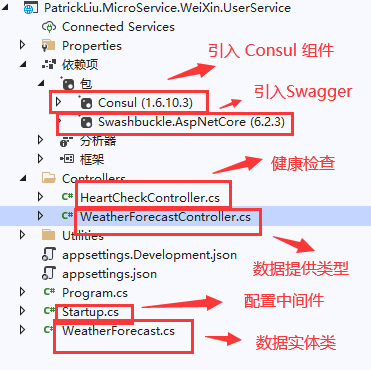
(1)、项目截图
(2)、项目源码
由于该项目使用了 Consul 进行服务发现管理,在项目创建之初,必须通过 Nuget 安装 Consul 组件,同时也必须引入 Swashbuckle.AspNetCore ,它支持对 Swagger 的实现。
A、创建一个 WebAPI 的项目,项目名称是:PatrickLiu.MicroService.WeiXin.UserService。
B、通过Nuget 分别引入:Consul 和 Swashbuckle.AspNetCore 组件包。
C、扩展 Consul 服务,在根目录下,创建一个 Utilities 文件,在该文件夹下创建一个类:ConsulManager.cs


- 1 using Consul;
- 2 using Microsoft.AspNetCore.Builder;
- 3 using Microsoft.Extensions.Configuration;
- 4 using System;
- 5
- 6 namespace PatrickLiu.MicroService.WeiXin.UserService.Utilities
- 7 {
- 8 /// <summary>
- 9 /// 该类型扩展了 IApplicationBuilder 类型,用于实现 Consul 的服务注册的工作。
- 10 /// </summary>
- 11 public static class ConsulManager
- 12 {
- 13 /// <summary>
- 14 /// 扩展方法,实现 WebApi 服务注册 Consul 中心。
- 15 /// </summary>
- 16 /// <param name="app">应用程序生成器。</param>
- 17 /// <param name="configuration">配置系统的访问类型。</param>
- 18 /// <param name="consulClient">Consul 的客户端类型。</param>
- 19 /// <returns></returns>
- 20 public static void UseConsul(this IApplicationBuilder app, IConfiguration configuration, IConsulClient consulClient)
- 21 {
- 22 RegisterConsul(configuration,consulClient);
- 23 }
- 24
- 25 /// <summary>
- 26 /// 该方法实现核心的 Consul 注册和健康检查。
- 27 /// </summary>
- 28 /// <param name="configuration">配置系统的访问类型。</param>
- 29 /// <param name="consulClient">Consul 的客户端类型。</param>
- 30 private static void RegisterConsul(IConfiguration configuration, IConsulClient consulClient)
- 31 {
- 32 var consulGroupName = configuration["ConsulGroup"];
- 33 var ip = configuration["IP"];
- 34 var port = int.Parse(configuration["Port"]);
- 35 var serviceID = $"{consulGroupName}_{ip}_{port}";
- 36
- 37 AgentServiceCheck checkService = new AgentServiceCheck() {
- 38 HTTP = $"http://{ip}:{port}/HeartCheck",
- 39 Interval=TimeSpan.FromSeconds(6),
- 40 Timeout=TimeSpan.FromSeconds(2),
- 41 DeregisterCriticalServiceAfter=TimeSpan.FromSeconds(2)
- 42 };
- 43
- 44 AgentServiceRegistration agentServiceRegistration = new AgentServiceRegistration() {
- 45 Name = consulGroupName,
- 46 Address = ip,
- 47 Port = port,
- 48 ID = serviceID,
- 49 Check= checkService
- 50 };
- 51
- 52 consulClient.Agent.ServiceRegister(agentServiceRegistration);
- 53 }
- 54 }
- 55 }
D、在 appsettings.json 文件中,增加 Consul 的配置:"ConsulGroup": "UserService"
- 1 {
- 2 "Logging": {
- 3 "LogLevel": {
- 4 "Default": "Information",
- 5 "Microsoft": "Warning",
- 6 "Microsoft.Hosting.Lifetime": "Information"
- 7 }
- 8 },
- 9 "AllowedHosts": "*",
- 10 "ConsulGroup": "UserService" //配置点
- 11 }
AppSettings
E、配置 Startup.cs。
- 1 using Consul;
- 2 using Microsoft.AspNetCore.Builder;
- 3 using Microsoft.AspNetCore.Hosting;
- 4 using Microsoft.Extensions.Configuration;
- 5 using Microsoft.Extensions.DependencyInjection;
- 6 using Microsoft.Extensions.Hosting;
- 7 using Microsoft.OpenApi.Models;
- 8 using System;
- 9 using PatrickLiu.MicroService.WeiXin.UserService.Utilities;
- 10
- 11 namespace PatrickLiu.MicroService.WeiXin.UserService
- 12 {
- 13 /// <summary>
- 14 /// dotnet PatrickLiu.MicroService.WeiXin.UserService.dll --urls="http://*:9156" --ip="127.0.0.1" --port=9156
- 15 ///
- 16 /// dotnet PatrickLiu.MicroService.WeiXin.UserService.dll --urls="http://*:9157" --ip="127.0.0.1" --port=9157
- 17 /// </summary>
- 18 public class Startup
- 19 {
- 20 /// <summary>
- 21 /// 通过构造函数注入配置访问的实例。
- 22 /// </summary>
- 23 /// <param name="configuration">配置访问器。</param>
- 24 public Startup(IConfiguration configuration)
- 25 {
- 26 Configuration = configuration;
- 27 }
- 28
- 29 /// <summary>
- 30 /// 获取配置访问器的实例。
- 31 /// </summary>
- 32 public IConfiguration Configuration { get; }
- 33
- 34 /// <summary>
- 35 /// 注入的容器的服务实例。
- 36 /// </summary>
- 37 /// <param name="services"></param>
- 38 public void ConfigureServices(IServiceCollection services)
- 39 {
- 40 services.AddSingleton<IConsulClient>(c=> new ConsulClient(config=> {
- 41 config.Datacenter = "dc1";
- 42 config.Address =new Uri("http://localhost:8500");
- 43 }));
- 44 services.AddControllers();
- 45 services.AddSwaggerGen(c =>
- 46 {
- 47 c.SwaggerDoc("user", new OpenApiInfo { Title = "UserService", Version = "v1" });
- 48 });
- 49 }
- 50
- 51 /// <summary>
- 52 /// 配置 Http 请求的处理管道。
- 53 /// </summary>
- 54 /// <param name="app">应用程序生成器。</param>
- 55 /// <param name="env">WebHost 环境。</param>
- 56 /// <param name="consul">Consul 的客户端。</param>
- 57 public void Configure(IApplicationBuilder app, IWebHostEnvironment env,IConsulClient consul)
- 58 {
- 59 if (env.IsDevelopment())
- 60 {
- 61 app.UseDeveloperExceptionPage();
- 62 }
- 63
- 64 app.UseSwagger();
- 65 app.UseSwaggerUI(option=> {
- 66 option.SwaggerEndpoint("/swagger/user/swagger.json", "UserService v1");
- 67 });
- 68
- 69 app.UseRouting();
- 70
- 71 app.UseAuthorization();
- 72 app.UseConsul(Configuration,consul);
- 73
- 74 app.UseEndpoints(endpoints =>
- 75 {
- 76 endpoints.MapControllers();
- 77 });
- 78 }
- 79 }
- 80 }
Startup.cs
F、配置心跳服务的检查类型。
- using Microsoft.AspNetCore.Mvc;
- namespace PatrickLiu.MicroService.WeiXin.UserService.Controllers
- {
- /// <summary>
- /// 心跳检查的控制器。
- /// </summary>
- [Route("[controller]")]
- [ApiController]
- public class HeartCheckController : ControllerBase
- {
- /// <summary>
- /// 心跳检测的结果 。
- /// </summary>
- /// <returns></returns>
- [HttpGet]
- public IActionResult Get()
- {
- return Ok();
- }
- }
- }
HeartCheckController
G、扩展类型,为了对外区别是否进行了轮训,增加了一个端口 属性。
- using System;
- namespace PatrickLiu.MicroService.WeiXin.UserService
- {
- public class WeatherForecast
- {
- public DateTime Date { get; set; }
- public int TemperatureC { get; set; }
- public int TemperatureF => 32 + (int)(TemperatureC / 0.5556);
- public string Summary { get; set; }
- public int Port { get; set; }//增加的属性
- }
- }
WeatherForecast
H、数据提供类型的控制器。
- 1 using Microsoft.AspNetCore.Mvc;
- 2 using Microsoft.Extensions.Configuration;
- 3 using Microsoft.Extensions.Logging;
- 4 using System;
- 5 using System.Collections.Generic;
- 6 using System.Linq;
- 7
- 8 namespace PatrickLiu.MicroService.WeiXin.UserService.Controllers
- 9 {
- 10 /// <summary>
- 11 /// 获取天气的控制器。
- 12 /// </summary>
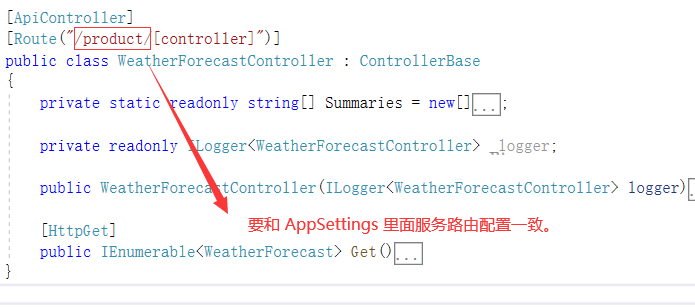
- 13 [ApiController]
- 14 [Route("/user/[controller]")]
- 15 public class WeatherForecastController : ControllerBase
- 16 {
- 17 #region 私有字段
- 18
- 19 private static readonly string[] Summaries = new[]
- 20 {
- 21 "Freezing", "Bracing", "Chilly", "Cool", "Mild", "Warm", "Balmy", "Hot", "Sweltering", "Scorching"
- 22 };
- 23
- 24 private readonly ILogger<WeatherForecastController> _logger;
- 25
- 26 #endregion
- 27
- 28 #region 构造函数
- 29
- 30 /// <summary>
- 31 /// 初始化类型的新实例。
- 32 /// </summary>
- 33 /// <param name="logger">初始化日志对象。</param>
- 34 /// <param name="configuration">初始化配置对象。</param>
- 35 public WeatherForecastController(ILogger<WeatherForecastController> logger, IConfiguration configuration)
- 36 {
- 37 _logger = logger;
- 38 Configuration = configuration;
- 39 }
- 40
- 41 #endregion
- 42
- 43 #region 实例属性
- 44
- 45 /// <summary>
- 46 /// 获取配置对象。
- 47 /// </summary>
- 48 public IConfiguration Configuration { get; }
- 49
- 50 #endregion
- 51
- 52 #region 核心方法
- 53
- 54 /// <summary>
- 55 /// 获取天气。
- 56 /// </summary>
- 57 /// <returns></returns>
- 58 [HttpGet]
- 59 public IEnumerable<WeatherForecast> Get()
- 60 {
- 61 var rng = new Random();
- 62 return Enumerable.Range(1, 5).Select(index => new WeatherForecast
- 63 {
- 64 Date = DateTime.Now.AddDays(index),
- 65 TemperatureC = rng.Next(-20, 55),
- 66 Summary = Summaries[rng.Next(Summaries.Length)],
- 67 Port = int.Parse(Configuration["Port"])//增加的代码。
- 68 })
- 69 .ToArray();
- 70 }
- 71
- 72 #endregion
- 73 }
- 74 }
WeatherForecastController
(3)、项目说明。
在 Startup.cs 文件里,我们配置Consul和 Swagger,具体的代码很简单,就不多说了。
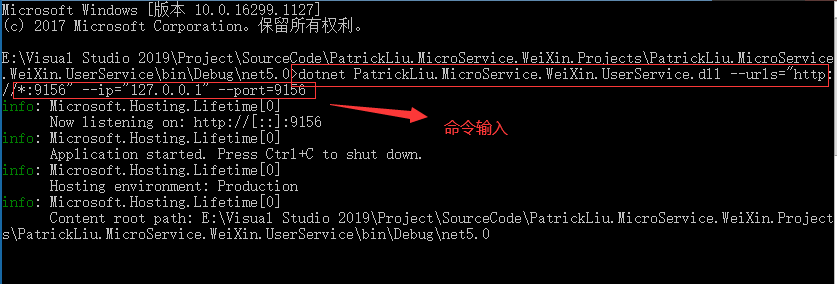
该项目启动两个实例。启动代码如下:
dotnet PatrickLiu.MicroService.WeiXin.UserService.dll --urls="http://*:9157" --ip="127.0.0.1" --port=9157
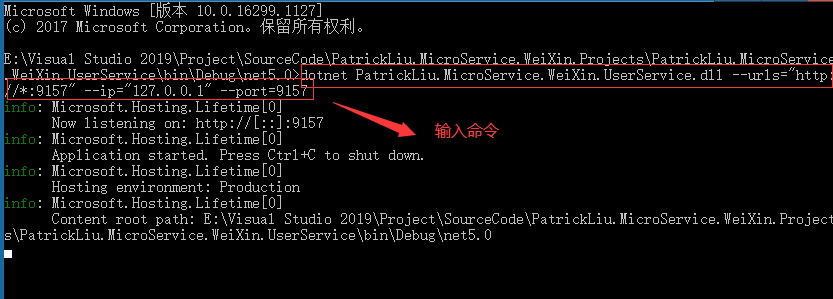
dotnet PatrickLiu.MicroService.WeiXin.UserService.dll --urls="http://*:9156" --ip="127.0.0.1" --port=9156
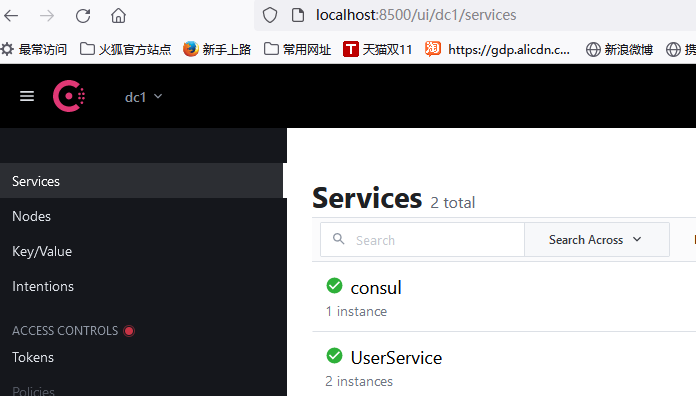
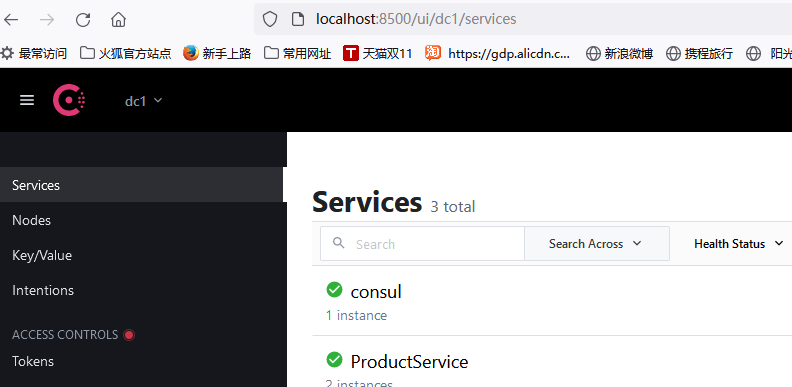
Consul 管理的服务。如图:
2】、第二个 WEB API 实例程序。
其实,第一个 WebAPI 项目和第二个 WebAPI 项目 是相同的,只是有一些配置的区别,没有本质的区别。
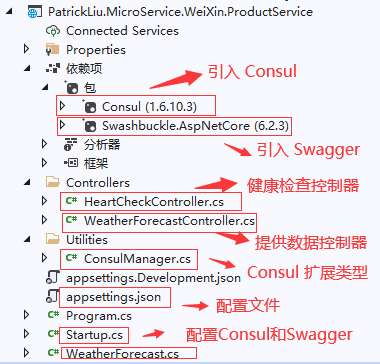
(1)、项目截图
(2)、项目源码
由于该项目使用了 Consul 进行服务发现管理,在项目创建之初,必须通过 Nuget 安装 Consul 组件,同时也必须引入 Swashbuckle.AspNetCore ,它支持对 Swagger 的实现。
A、创建一个 WebAPI 的项目,项目名称是:PatrickLiu.MicroService.WeiXin.ProductService。
B、通过Nuget 分别引入:Consul 和 Swashbuckle.AspNetCore 组件包。
C、扩展 Consul 服务,在根目录下,创建一个 Utilities 文件,在该文件夹下创建一个类:ConsulManager.cs。
- 1 using Consul;
- 2 using Microsoft.AspNetCore.Builder;
- 3 using Microsoft.Extensions.Configuration;
- 4 using System;
- 5
- 6 namespace PatrickLiu.MicroService.WeiXin.ProductService.Utilities
- 7 {
- 8 /// <summary>
- 9 /// Consul 的扩展类型,便于在 Http管道中注册 Consul。
- 10 /// </summary>
- 11 public static class ConsulManager
- 12 {
- 13 /// <summary>
- 14 /// 注册 Consul 服务实例。
- 15 /// </summary>
- 16 /// <param name="app">应用程序生成器。</param>
- 17 /// <param name="configuration">配置系统的访问器。</param>
- 18 /// <param name="consulClient">Consul 的客户端类型。</param>
- 19 /// <returns></returns>
- 20 public static void UseConsul(this IApplicationBuilder app, IConfiguration configuration, IConsulClient consulClient)
- 21 {
- 22 RegisterConsul(configuration,consulClient);
- 23 }
- 24
- 25 /// <summary>
- 26 /// 实现 Consul 的真正注册。
- 27 /// </summary>
- 28 /// <param name="configuration">配置系统的访问器。</param>
- 29 /// <param name="consulClient">Consul 的客户端类型。</param>
- 30 private static void RegisterConsul(IConfiguration configuration, IConsulClient consulClient)
- 31 {
- 32 var consulGroupName = configuration["ConsulGroup"];
- 33 var ip = configuration["IP"];
- 34 var port = int.Parse(configuration["Port"]);
- 35 var serviceID = $"{consulGroupName}_{ip}_{port}";
- 36
- 37 AgentServiceCheck checkService = new AgentServiceCheck() {
- 38 HTTP = $"http://{ip}:{port}/HeartCheck",
- 39 Interval=TimeSpan.FromSeconds(6),
- 40 Timeout=TimeSpan.FromSeconds(2),
- 41 DeregisterCriticalServiceAfter=TimeSpan.FromSeconds(2)
- 42 };
- 43
- 44 AgentServiceRegistration agentServiceRegistration = new AgentServiceRegistration() {
- 45 Name = consulGroupName,
- 46 Address = ip,
- 47 Port = port,
- 48 ID = serviceID,
- 49 Check= checkService
- 50 };
- 51
- 52 consulClient.Agent.ServiceRegister(agentServiceRegistration);
- 53 }
- 54 }
- 55 }
ConsulManager
D、在 appsettings.json 文件中,增加 Consul 的配置:"ConsulGroup": "ProductService"。
- 1 {
- 2 "Logging": {
- 3 "LogLevel": {
- 4 "Default": "Information",
- 5 "Microsoft": "Warning",
- 6 "Microsoft.Hosting.Lifetime": "Information"
- 7 }
- 8 },
- 9 "AllowedHosts": "*",
- 10 "ConsulGroup": "ProductService"//注册服务名称
- 11 }
AppSettings
E、配置 Startup.cs。
- 1 using Consul;
- 2 using Microsoft.AspNetCore.Builder;
- 3 using Microsoft.AspNetCore.Hosting;
- 4 using Microsoft.AspNetCore.Mvc;
- 5 using Microsoft.Extensions.Configuration;
- 6 using Microsoft.Extensions.DependencyInjection;
- 7 using Microsoft.Extensions.Hosting;
- 8 using Microsoft.Extensions.Logging;
- 9 using PatrickLiu.MicroService.WeiXin.ProductService.Utilities;
- 10 using System;
- 11 using System.Collections.Generic;
- 12 using System.Linq;
- 13 using System.Threading.Tasks;
- 14
- 15 namespace PatrickLiu.MicroService.WeiXin.ProductService
- 16 {
- 17 /// <summary>
- 18 /// dotnet PatrickLiu.MicroService.WeiXin.ProductService.dll --urls="http://*:9158" --ip="127.0.0.1" --port=9158
- 19 ///
- 20 /// dotnet PatrickLiu.MicroService.WeiXin.ProductService.dll --urls="http://*:9159" --ip="127.0.0.1" --port=9159
- 21 /// </summary>
- 22 public class Startup
- 23 {
- 24 /// <summary>
- 25 ///
- 26 /// </summary>
- 27 /// <param name="configuration"></param>
- 28 public Startup(IConfiguration configuration)
- 29 {
- 30 Configuration = configuration;
- 31 }
- 32
- 33 /// <summary>
- 34 ///
- 35 /// </summary>
- 36 public IConfiguration Configuration { get; }
- 37
- 38 /// <summary>
- 39 ///
- 40 /// </summary>
- 41 /// <param name="services"></param>
- 42 public void ConfigureServices(IServiceCollection services)
- 43 {
- 44 services.AddSingleton<IConsulClient>(new ConsulClient(c=> {
- 45 c.Datacenter = "dc1";
- 46 c.Address = new Uri("http://localhost:8500");
- 47 }));
- 48
- 49 services.AddSwaggerGen(a =>
- 50 {
- 51 a.SwaggerDoc("product", new Microsoft.OpenApi.Models.OpenApiInfo() { Title = "ProductService", Version = "v1" });
- 52 });
- 53 services.AddControllers();
- 54 }
- 55
- 56 /// <summary>
- 57 ///
- 58 /// </summary>
- 59 /// <param name="app"></param>
- 60 /// <param name="env"></param>
- 61 /// <param name="consul"></param>
- 62 public void Configure(IApplicationBuilder app, IWebHostEnvironment env,IConsulClient consul)
- 63 {
- 64 if (env.IsDevelopment())
- 65 {
- 66 app.UseDeveloperExceptionPage();
- 67 }
- 68
- 69 app.UseRouting();
- 70
- 71 app.UseConsul(Configuration,consul);
- 72
- 73 app.UseSwagger();
- 74 app.UseSwaggerUI(options=> {
- 75 options.SwaggerEndpoint("/swagger/product/swagger.json", "ProductService-V1");
- 76 });
- 77 app.UseAuthorization();
- 78
- 79 app.UseEndpoints(endpoints =>
- 80 {
- 81 endpoints.MapControllers();
- 82 });
- 83 }
- 84 }
- 85 }
Startup.cs
F、配置心跳服务的检查类型。
- using Microsoft.AspNetCore.Mvc;
- namespace PatrickLiu.MicroService.WeiXin.ProductService.Controllers
- {
- /// <summary>
- /// 心跳检查控制器。
- /// </summary>
- [Route("[controller]")]
- [ApiController]
- public class HeartCheckController : ControllerBase
- {
- /// <summary>
- /// 心跳检测方法。
- /// </summary>
- /// <returns></returns>
- [HttpGet]
- public IActionResult Get()
- {
- return Ok();
- }
- }
- }
HeartCheckController
(3)、项目说明。
在 Startup.cs 文件里,我们配置Consul和 Swagger,具体的代码很简单,就不多说了。
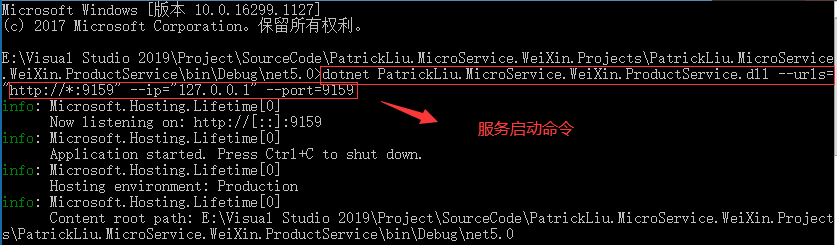
该项目启动两个实例。启动代码如下:
dotnet PatrickLiu.MicroService.WeiXin.ProductService.dll --urls="http://*:9158" --ip="127.0.0.1" --port=9158

dotnet PatrickLiu.MicroService.WeiXin.ProductService.dll --urls="http://*:9159" --ip="127.0.0.1" --port=9159
Consul 管理的产品服务。截图如下:
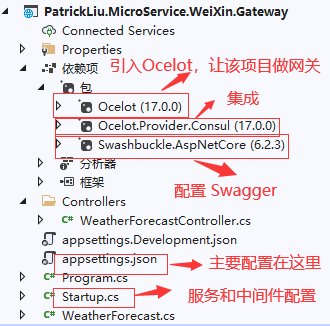
3】、我们的 Ocelot 网关实例程序。
这个项目是我们的关键先生,首先,我们在该项目中还是要引入 Ocelot、Ocelot.Provider.Consul 和 Swashbuckle.AspNetCore,引入完成后就开始我们的配置。
(1)、项目截图
(2)、项目源码
A、创建一个 WebAPI 的项目,项目名称是:PatrickLiu.MicroService.WeiXin.Gateway。
B、在 Startup 文件配置:Ocelot、Ocelot.Consul和 Swagger。
- 1 using Microsoft.AspNetCore.Builder;
- 2 using Microsoft.AspNetCore.Hosting;
- 3 using Microsoft.Extensions.Configuration;
- 4 using Microsoft.Extensions.DependencyInjection;
- 5 using Microsoft.Extensions.Hosting;
- 6 using Microsoft.OpenApi.Models;
- 7 using Ocelot.DependencyInjection;
- 8 using Ocelot.Middleware;
- 9 using Ocelot.Provider.Consul;
- 10
- 11 namespace PatrickLiu.MicroService.WeiXin.Gateway
- 12 {
- 13 /// <summary>
- 14 /// dotnet PatrickLiu.MicroService.WeiXin.Gateway.dll --urls="http://*:5000" --ip="127.0.0.1" --port=5000
- 15 /// </summary>
- 16 public class Startup
- 17 {
- 18 /// <summary>
- 19 /// 通过构造函数注入配置系统。
- 20 /// </summary>
- 21 /// <param name="configuration">配置系统。</param>
- 22 public Startup(IConfiguration configuration)
- 23 {
- 24 Configuration = configuration;
- 25 }
- 26
- 27 /// <summary>
- 28 /// 获取配置系统。
- 29 /// </summary>
- 30 public IConfiguration Configuration { get; }
- 31
- 32 /// <summary>
- 33 /// 注册服务。
- 34 /// </summary>
- 35 /// <param name="services"></param>
- 36 public void ConfigureServices(IServiceCollection services)
- 37 {
- 38 services.AddSwaggerGen(c=> {
- 39 c.SwaggerDoc("v1",new OpenApiInfo() { Title="Gateway API", Version="v1" });
- 40 });
- 41 services.AddOcelot().AddConsul();
- 42 services.AddControllers();
- 43 }
- 44
- 45 /// <summary>
- 46 /// 配置 Http 的请求处理管道和中间件。
- 47 /// </summary>
- 48 /// <param name="app">应用程序的生成器。</param>
- 49 /// <param name="env">Web 宿主的环境。</param>
- 50 public void Configure(IApplicationBuilder app, IWebHostEnvironment env)
- 51 {
- 52 if (env.IsDevelopment())
- 53 {
- 54 app.UseDeveloperExceptionPage();
- 55 }
- 56
- 57 app.UseRouting();
- 58 app.UseAuthorization();
- 59
- 60 app.UseSwagger();
- 61 //1、第一步,这里不需要以 /swagger 开头
- 62 app.UseSwaggerUI(o => {
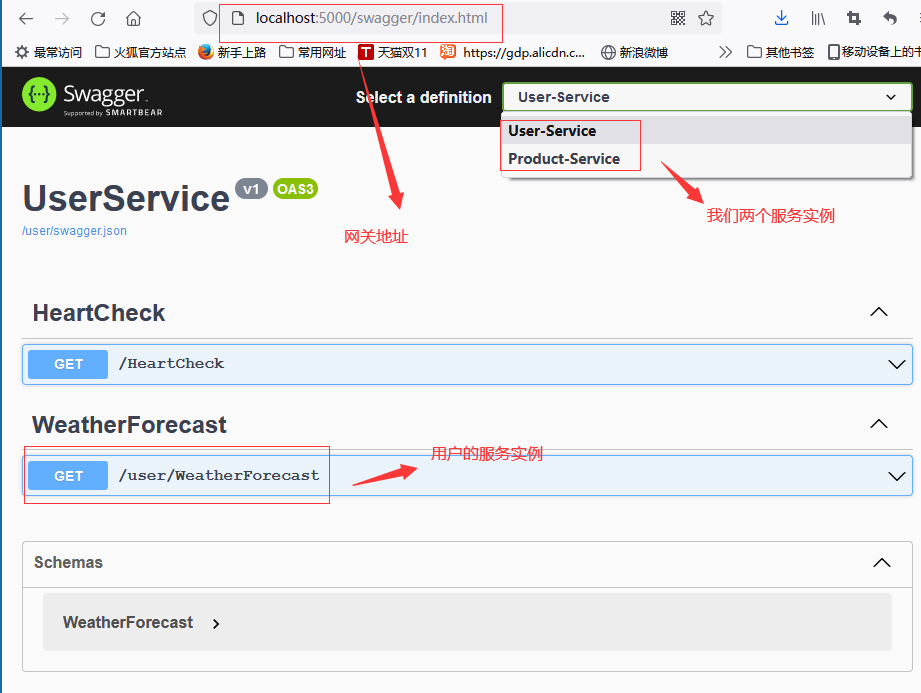
- 63 o.SwaggerEndpoint("/user/swagger.json", "User-Service");
- 64 o.SwaggerEndpoint("/product/swagger.json", "Product-Service");
- 65 });
- 66
- 67 app.UseEndpoints(endpoints =>
- 68 {
- 69 endpoints.MapControllers();
- 70 });
- 71
- 72 app.UseOcelot();
- 73 }
- 74 }
- 75 }
Startup
C、这是我们的重中之重,在 AppSettings 里面配置。
- 1 {
- 2 "Logging": {
- 3 "LogLevel": {
- 4 "Default": "Information",
- 5 "Microsoft": "Warning",
- 6 "Microsoft.Hosting.Lifetime": "Information"
- 7 }
- 8 },
- 9 "AllowedHosts": "*",
- 10 "Routes": [
- 11 {
- 12 "DownstreamPathTemplate": "/swagger/product/swagger.json", //下游配置也要和各自服务里面的配置一致。这是第二点
- 13 "DownstreamScheme": "http",
- 14 "UpstreamPathTemplate": "/product/swagger.json", //上游配置,这里也不需要/swagger 开头,和网关配置一致。这是第二点
- 15 "UpstreamHttpMethod": [ "Get", "Post", "Put", "Delete" ],
- 16 "ServiceName": "ProductService",
- 17 "UseServiceDiscovery": true
- 18 },
- 19 {
- 20 "DownstreamPathTemplate": "/swagger/user/swagger.json", //下游配置也要和各自服务里面的配置一致。这是第二点
- 21 "DownstreamScheme": "http",
- 22 "UpstreamPathTemplate": "/user/swagger.json", //上游配置,这里也不需要/swagger 开头,和网关配置一致。这是第二点
- 23 "UpstreamHttpMethod": [ "Get", "Post", "Put", "Delete" ],
- 24 "ServiceName": "UserService",
- 25 "UseServiceDiscovery": true
- 26 },
- 27 //swagger 上配置
- 28 {
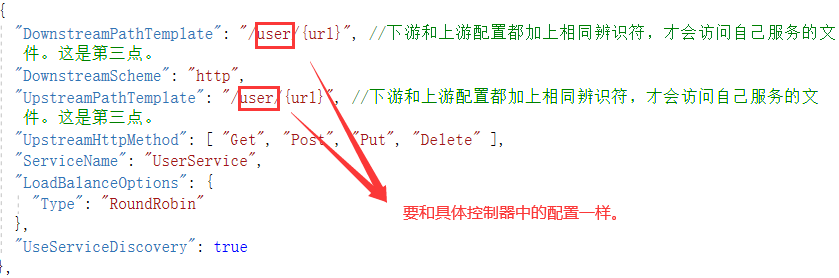
- 29 "DownstreamPathTemplate": "/user/{url}", //下游和上游配置都加上相同辨识符,才会访问自己服务的文件。这是第三点。
- 30 "DownstreamScheme": "http",
- 31 "UpstreamPathTemplate": "/user/{url}", //下游和上游配置都加上相同辨识符,才会访问自己服务的文件。这是第三点。
- 32 "UpstreamHttpMethod": [ "Get", "Post", "Put", "Delete" ],
- 33 "ServiceName": "UserService",
- 34 "LoadBalanceOptions": {
- 35 "Type": "RoundRobin"
- 36 },
- 37 "UseServiceDiscovery": true
- 38 },
- 39 {
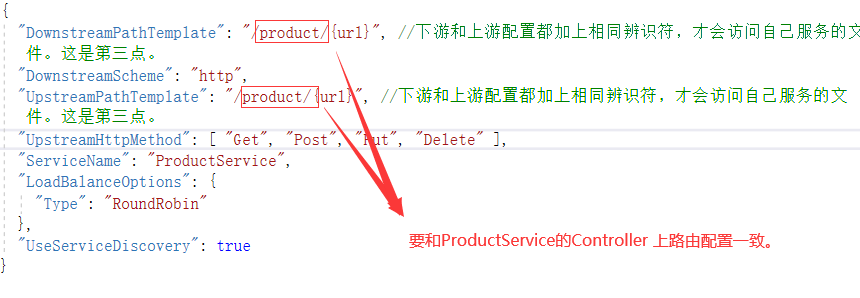
- 40 "DownstreamPathTemplate": "/product/{url}", //下游和上游配置都加上相同辨识符,才会访问自己服务的文件。这是第三点。
- 41 "DownstreamScheme": "http",
- 42 "UpstreamPathTemplate": "/product/{url}", //下游和上游配置都加上相同辨识符,才会访问自己服务的文件。这是第三点。
- 43 "UpstreamHttpMethod": [ "Get", "Post", "Put", "Delete" ],
- 44 "ServiceName": "ProductService",
- 45 "LoadBalanceOptions": {
- 46 "Type": "RoundRobin"
- 47 },
- 48 "UseServiceDiscovery": true
- 49 }
- 50 ],
- 51 "GlobalConfiguration": {
- 52 "BaseUrl": "http://localhost:5000",
- 53 "ServiceDiscoveryProvider": {
- 54 "Host": "localhost",
- 55 "Port": 8500,
- 56 "Type": "Consul"
- 57 }
- 58 }
- 59 }
AppSettings
(3)、项目说明。
在 Startup.cs 文件里,我们配置Consul和 Swagger,具体的代码很简单,就不多说了。
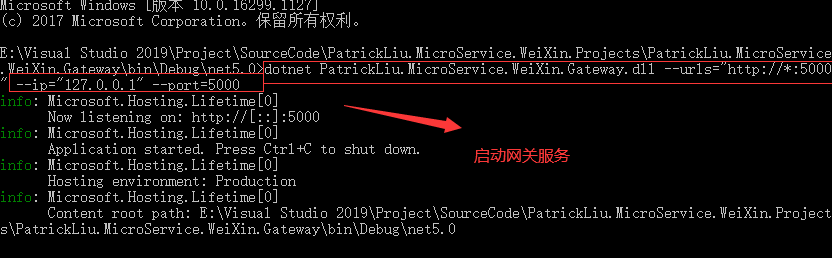
该项目启动一个实例。启动代码如下:
dotnet PatrickLiu.MicroService.WeiXin.Gateway.dll --urls="http://*:5000" --ip="127.0.0.1" --port=5000
3、效果如图
4、关键点说明。
1】、在网关项目的 Startup.cs 文件的 ConfigServices和 Configure 配置。在 Configure 里面配置不需要以 /swagger 开头。切记。
- 1 /// <summary>
- 2 /// 注册服务。
- 3 /// </summary>
- 4 /// <param name="services"></param>
- 5 public void ConfigureServices(IServiceCollection services)
- 6 {
- 7 services.AddSwaggerGen(c=> {
- 8 c.SwaggerDoc("v1",new OpenApiInfo() { Title="Gateway API", Version="v1" });
- 9 });
- 10 services.AddOcelot().AddConsul();
- 11 services.AddControllers();
- 12 }
- 1 /// <summary>
- 2 /// 配置 Http 的请求处理管道和中间件。
- 3 /// </summary>
- 4 /// <param name="app">应用程序的生成器。</param>
- 5 /// <param name="env">Web 宿主的环境。</param>
- 6 public void Configure(IApplicationBuilder app, IWebHostEnvironment env)
- 7 {
- 8 if (env.IsDevelopment())
- 9 {
- 10 app.UseDeveloperExceptionPage();
- 11 }
- 12
- 13 app.UseRouting();
- 14 app.UseAuthorization();
- 15
- 16 app.UseSwagger();
- 17 //1、第一步,这里不需要以 /swagger 开头
- 18 app.UseSwaggerUI(o => {
- 19 o.SwaggerEndpoint("/user/swagger.json", "User-Service");
- 20 o.SwaggerEndpoint("/product/swagger.json", "Product-Service");
- 21 });
- 22
- 23 app.UseEndpoints(endpoints =>
- 24 {
- 25 endpoints.MapControllers();
- 26 });
- 27
- 28 app.UseOcelot();
- 29 }
如果这个网关只是单纯的做网关,可以把其他代码全部注释或者删掉,只是保留 services.AddOcelot().AddConsul() 和 app.UseOcelot() ,没问题。但是如果要在这里做Swagger 配置,就不能把其他代码注释。
2】、Swagger 上游配置,这里也不需要以/swagger 开头,和网关配置一致。下游配置也要和各自服务里面的配置一致。这是第二点。

3】、Ocelot 路由配置:/下游和上游配置都加上相同辨识符,才会访问自己服务的文件。
A、网关中用户的服务配置要和API中 Controller 上的路由配置要一致。

B、网关中产品的服务配置要和API中 Controller 上的路由配置要一致。
三、总结
好了,今天就写到这里了。在网关中配置 Swagger ,就不用我们跳来跳去,去查看接口文档,便于我们的使用和维护,这个功能很实用,当初配置的时候有很多坑,我现在已经填的差不多了。俗话说,笨鸟先飞,把这东西记录下来,便于自己以后查阅,也许能帮助其他需要的人,都是不错的事情。不忘初心,我们继续努力。我们每天进步一点点,老天是不会辜负努力的人。
微服务之十四如何在 Ocelot 网关中配置多实例 Swagger 访问的更多相关文章
- 庐山真面目之六微服务架构Consul集群、Ocelot网关集群和Nginx版本实现
庐山真面目之六微服务架构Consul集群.Ocelot网关集群和Nginx版本实现 一.简介 在上一篇文章<庐山真面目之五微服务架构Consul集群.Ocelot网关和Nginx版本实 ...
- 庐山真面目之七微服务架构Consul集群、Ocelot网关集群和IdentityServer4版本实现
庐山真面目之七微服务架构Consul集群.Ocelot网关集群和IdentityServer4版本实现 一.简介 在上一篇文章<庐山真面目之六微服务架构Consul集群.Ocelot网 ...
- 微服务(入门四):identityServer的简单使用(客户端授权)
IdentityServer简介(摘自Identity官网) IdentityServer是将符合规范的OpenID Connect和OAuth 2.0端点添加到任意ASP.NET核心应用程序的中间件 ...
- .Net微服务实践(三):Ocelot配置路由和请求聚合
目录 配置 路由 基本配置 占位符 万能模板 优先级 查询参数 请求聚合 默认聚合 自定义聚合 最后 在上篇.Net微服务实践(二):Ocelot介绍和快速开始中我们介绍了Ocelot,创建了一个Oc ...
- .Net微服务实践(二):Ocelot介绍和快速开始
目录 介绍 基本原理 集成方式 快速开始 创建订单服务 创建产品服务 创建网关 运行验证 最后 上篇.Net微服务实践(一):微服务框架选型 我们对微服务框架整体做了介绍,接下来我们从网关Ocelot ...
- “全栈2019”Java第二十四章:流程控制语句中决策语句switch下篇
难度 初级 学习时间 10分钟 适合人群 零基础 开发语言 Java 开发环境 JDK v11 IntelliJ IDEA v2018.3 文章原文链接 "全栈2019"Java第 ...
- .Net微服务实践(四)[网关]:Ocelot限流熔断、缓存以及负载均衡
目录 限流 熔断 缓存 Header转化 HTTP方法转换 负载均衡 注入/重写中间件 后台管理 最后 在上篇.Net微服务实践(三)[网关]:Ocelot配置路由和请求聚合中我们介绍了Ocelot的 ...
- Spring Cloud构建微服务架构(四)分布式配置中心
Spring Cloud Config为服务端和客户端提供了分布式系统的外部化配置支持.配置服务器为各应用的所有环境提供了一个中心化的外部配置.它实现了对服务端和客户端对Spring Environm ...
- 基于docker部署的微服务架构(四): 配置中心
原文:http://www.jianshu.com/p/b17d65934b58%20 前言 在微服务架构中,由于服务数量众多,如果使用传统的配置文件管理方式,配置文件分散在各个项目中,不易于集中管理 ...
随机推荐
- rabbitmqctl 命令行管理工具
1. 用户管理 用户管理包括增加用户,删除用户,查看用户列表,修改用户密码. (1) 新增一个用户 rabbitmqctl add_user Username Password (2) 删除一个用户 ...
- Jmeter扩展组件开发(7) - 自定义java请求的开发
CODE package com.demo;import org.apache.jmeter.config.Arguments;import org.apache.jmeter.protocol.ja ...
- Docker系列(24)- 实战:DockerFile制作tomcat镜像
实战:DockerFile制作tomcat镜像 step-1 准备镜像文件 tomcat压缩包,jdk压缩包! step-2 编写dockerfile文件,官方命名Dockerfile,build会自 ...
- CF183D-T-shirtx【dp,贪心】
正题 题目链接:https://www.luogu.com.cn/problem/CF183D 题目大意 \(n\)个人,\(m\)种衣服,给出每个人喜欢某件衣服的概率,你可以选择\(n\)件衣服带过 ...
- 用Fiddler抓不到https的包?因为你姿势不对!往这看!
前言 刚入行测试的小伙伴可能不知道,Fiddler默认抓http的包,如果要抓https的包,是需要装证书的!什么鬼证书?不明白的话继续往下看. Fiddler 抓取 https 数据 第一步:下载 ...
- Spatial Analyst Tools(Spatial Analyst 工具)
Spatial Analyst Tools 1.区域分析 # Process: 以表格显示分区几何统计 arcpy.gp.ZonalGeometryAsTable_sa("", & ...
- python中\t、\n含义
\t :代表着四个空格也就是一个tab \n:代表着换行
- 利用python爬取全国水雨情信息
分析 我们没有找到接口,所以打算利用selenium来爬取. 代码 import datetime import pandas as pd from bs4 import BeautifulSoup ...
- django-admin和django-admin.py的区别
问题 django初学者在使用django-admin创建项目时容易出现无法创建的错误,这是因为网上很多教程用的都是django-admin.py创建的项目,不出意外的话,你输入相同的命令会发现项目没 ...
- Java版人脸检测详解上篇:运行环境的Docker镜像(CentOS+JDK+OpenCV)
欢迎访问我的GitHub https://github.com/zq2599/blog_demos 内容:所有原创文章分类汇总及配套源码,涉及Java.Docker.Kubernetes.DevOPS ...