Sentinel整合Dubbo限流实战(分布式限流)
之前我们了解了 Sentinel 集成 SpringBoot实现限流,也探讨了Sentinel的限流基本原理,那么接下去我们来学习一下Sentinel整合Dubbo及 Nacos 实现动态数据源的限流以及分布式限流。
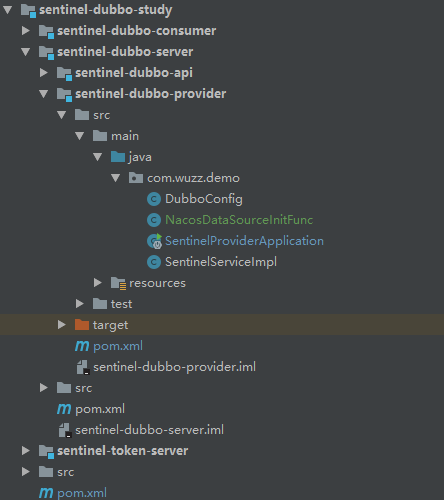
先来看一下我的工程目录:
单服务的限流:
Provider :
首先从 api 模块开始:

其中只是定义了一个接口:
public interface SentinelService {

    String sayHello(String txt);

}
接下去来编写服务端的代码。
1.首先需要添加我们需要的依赖:
<dependency>

    <groupId>com.wuzz.demo</groupId>

    <artifactId>sentinel-dubbo-api</artifactId>

    <version>1.0-SNAPSHOT</version>

</dependency>

<dependency>

    <groupId>org.apache.dubbo</groupId>

    <artifactId>dubbo</artifactId>

    <version>2.7.</version>

</dependency>

<dependency>

    <groupId>org.apache.curator</groupId>

    <artifactId>curator-recipes</artifactId>

    <version>4.0.</version>

</dependency>

<dependency>

    <groupId>com.alibaba.csp</groupId>

    <artifactId>sentinel-dubbo-adapter</artifactId>

    <version>1.6.</version>

</dependency>
<dependency>
    <groupId>com.alibaba.csp</groupId>
    <artifactId>sentinel-transport-simple-http</artifactId>
    <version>1.6.3</version>
</dependency>
2.我们需要编写接口的实现类并且发布成Dubbo服务:
@Service//把当前服务发布成dubbo服务

public class SentinelServiceImpl implements SentinelService {

    @Override

    public String sayHello(String txt) {

        return "hello world :" + LocalDateTime.now();

    }

}
3.添加 Dubbo相关配置,这里采用注解的方式:
@Configuration

@DubboComponentScan("com.wuzz.demo")

public class DubboConfig {

    @Bean

    public ApplicationConfig applicationConfig(){

        ApplicationConfig applicationConfig=new ApplicationConfig();

        applicationConfig.setName("sentinel-dubbo");

        applicationConfig.setOwner("wuzz");

        return applicationConfig;

    }

    @Bean

    public RegistryConfig registryConfig(){

        RegistryConfig registryConfig=new RegistryConfig();

        registryConfig.setAddress("zookeeper://192.168.1.101:2181");

        return registryConfig;

    }

    @Bean

    public ProtocolConfig protocolConfig(){

        ProtocolConfig protocolConfig=new ProtocolConfig();

        protocolConfig.setName("dubbo");

        protocolConfig.setPort();

        return protocolConfig;

    }

}
4.配置文件 application.properties:
server.port =
5.编写主启动类:
@SpringBootApplication

public class SentinelProviderApplication {

    public static void main(String[] args) throws IOException {

        initFlowRules();

        SpringApplication.run(SentinelProviderApplication.class, args);

        System.in.read();

    }

    //初始化规则

    private static void initFlowRules() {

        List<FlowRule> rules = new ArrayList<>(); //限流规则的集合

        FlowRule flowRule = new FlowRule();

        flowRule.setResource("com.wuzz.demo.SentinelService:sayHello(java.lang.String)");//资源(方法名称、接口)

        flowRule.setCount();//限流阈值 qps=10

        flowRule.setGrade(RuleConstant.FLOW_GRADE_QPS);//限流阈值类型(QPS 或并发线程数)

        //流量控制手段(直接拒绝、Warm Up、匀速排队)

        flowRule.setControlBehavior(RuleConstant.CONTROL_BEHAVIOR_DEFAULT);

        flowRule.setLimitApp("sentinel-web");//流控针对的调用来源,若为 default 则不区分调用来源

        rules.add(flowRule);

        FlowRuleManager.loadRules(rules);

    }

}
设置限流的基准:
Service Provider 用于向外界提供服务,处理各个消费者的调用请求。为了保护 Provider 不被激增的流量拖垮影响稳定性,可以给 Provider 配置 QPS 模式的限流,这样当每秒的请求量超过设定的阈值时会自动拒绝多的请求。限流粒度可以是服务接口和服务方法两种粒度。若希望整个服务接口的 QPS 不超过一定数值,则可以为对应服务接口资源(resourceName 为接口全限定名)配置 QPS 阈值;若希望服务的某个方法的 QPS 不超过一定数值,则可以为对应服务方法资源(resourceName 为接口全限定名:方法签名)配置 QPS 阈值.
LimitApp:
很多场景下,根据调用方来限流也是非常重要的。比如有两个服务 A 和 B 都向 Service Provider 发起调用请求,我们希望只对来自服务 B 的请求进行限流,则可以设置限流规则的 limitApp 为服务 B 的名称。Sentinel Dubbo Adapter 会自动解析 Dubbo 消费者(调用方)的 application name 作为调用方名称(origin),在进行资源保护的时候都会带上调用方名称。若限流规则未配置调用方(default),则该限流规则对所有调用方生效。若限流规则配置了调用方则限流规则将仅对指定调用方生效。
注:Dubbo 默认通信不携带对端 application name 信息,因此需要开发者在调用端手动将 applicationname 置入 attachment 中,provider 端进行相应的解析。Sentinel Dubbo Adapter 实现了一个 Filter 用于自动从 consumer 端向 provider 端透传 application name。若调用端未引入 Sentinel DubboAdapter,又希望根据调用端限流,可以在调用端手动将 application name 置入 attachment 中,key 为dubboApplication.
ControlBehavior:
当 QPS 超过某个阈值的时候,则采取措施进行流量控制。流量控制的手段包括以下几种:直接拒绝、Warm Up、匀速排队。对应 FlowRule 中的 controlBehavior 字段
- 直接拒绝(RuleConstant.CONTROL_BEHAVIOR_DEFAULT)方式是默认的流量控制方式,当QPS超过任意规则的阈值后,新的请求就会被立即拒绝,拒绝方式为抛出FlowException。这种方式适用于对系统处理能力确切已知的情况下,比如通过压测确定了系统的准确水位时
- Warm Up(RuleConstant.CONTROL_BEHAVIOR_WARM_UP)方式,即预热/冷启动方式,当系统长期处于低并发的情况下,流量突然增加到qps的最高峰值,可能会造成系统的瞬间流量过大把系统压垮。所以warmup,相当于处理请求的数量是缓慢增加,经过一段时间以后,到达系统处理请求个数的最大值
- 匀速排队(RuleConstant.CONTROL_BEHAVIOR_RATE_LIMITER)方式会严格控制请求通过的间隔时间,也即是让请求以均匀的速度通过,对应的是漏桶算法它的原理是,以固定的间隔时间让请求通过。当请求过来的时候,如果当前请求距离上个通过的请求通过的时间间隔不小于预设值,则让当前请求通过;否则,计算当前请求的预期通过时间,如果该请求的预期通过时间小于规则预设的 timeout 时间,则该请求会等待直到预设时间到来通过;反之,则马上抛出阻塞异常。可以设置一个最长排队等待时间: flowRule.setMaxQueueingTimeMs(5 * 1000); // 最长排队等待时间:5s这种方式主要用于处理间隔性突发的流量,例如消息队列。想象一下这样的场景,在某一秒有大量的请求到来,而接下来的几秒则处于空闲状态,我们希望系统能够在接下来的空闲期间逐渐处理这些请求,而不是在第一秒直接拒绝多余的请求。
Consumer :
1.添加依赖:
<dependency>

  <groupId>com.wuzz.demo</groupId>

  <artifactId>sentinel-dubbo-api</artifactId>

  <version>1.0-SNAPSHOT</version>

</dependency>

<dependency>

  <groupId>org.apache.dubbo</groupId>

  <artifactId>dubbo</artifactId>

  <version>2.7.</version>

</dependency>

<dependency>

  <groupId>org.apache.curator</groupId>

  <artifactId>curator-recipes</artifactId>

  <version>4.0.</version>

</dependency>

<dependency>

  <groupId>org.apache.dubbo</groupId>

  <artifactId>dubbo-spring-boot-starter</artifactId>

  <version>2.7.</version>

</dependency>
2.consumer主要是对外提供服务的,我们需要一个controller:
@RestController

public class SentinelController {

    @Reference(timeout = ,check = false)

    SentinelService sentinelService;//proxy$0

    @GetMapping("/say")

    public String sayHello(){

        RpcContext.getContext().setAttachment("dubboApplication","sentinel-web");

        return sentinelService.sayHello("test");

    }

    @GetMapping("/say2")

    public String sayHello2(){

        return sentinelService.sayHello("test2");

    }

}
3.主启动类:
@SpringBootApplication

public class SentinelConsumerApplication {

    public static void main(String[] args) {

        SpringApplication.run(SentinelConsumerApplication.class, args);

    }

}
4.配置文件 application.properties :
server.port =

dubbo.registry.address=zookeeper://192.168.1.101:2181

dubbo.scan.base-packages=com.wuzz.demo

dubbo.application.name=sentinel-web
服务端及客户端代码编写完毕,这个时候我们需要先启动Sentinel-Dashboard 以便直观的去看到限流的效果。然后启动服务端,并且在启动时加入 JVM 参数 -Dcsp.sentinel.dashboard.server=localhost:8080 指定控制台地址和端口。其他具体的参数如下:
-server

-XX:MaxHeapSize=128m

-Xms256m

-Xmx256m

-XX:PermSize=128M

-XX:MaxPermSize=256m

-Dproject.name=app-demo

-Dcsp.sentinel.dashboard.server=localhost:

-Dcsp.sentinel.log.use.pid=true
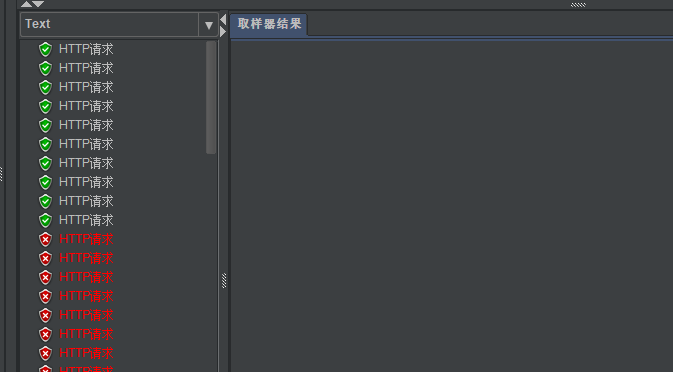
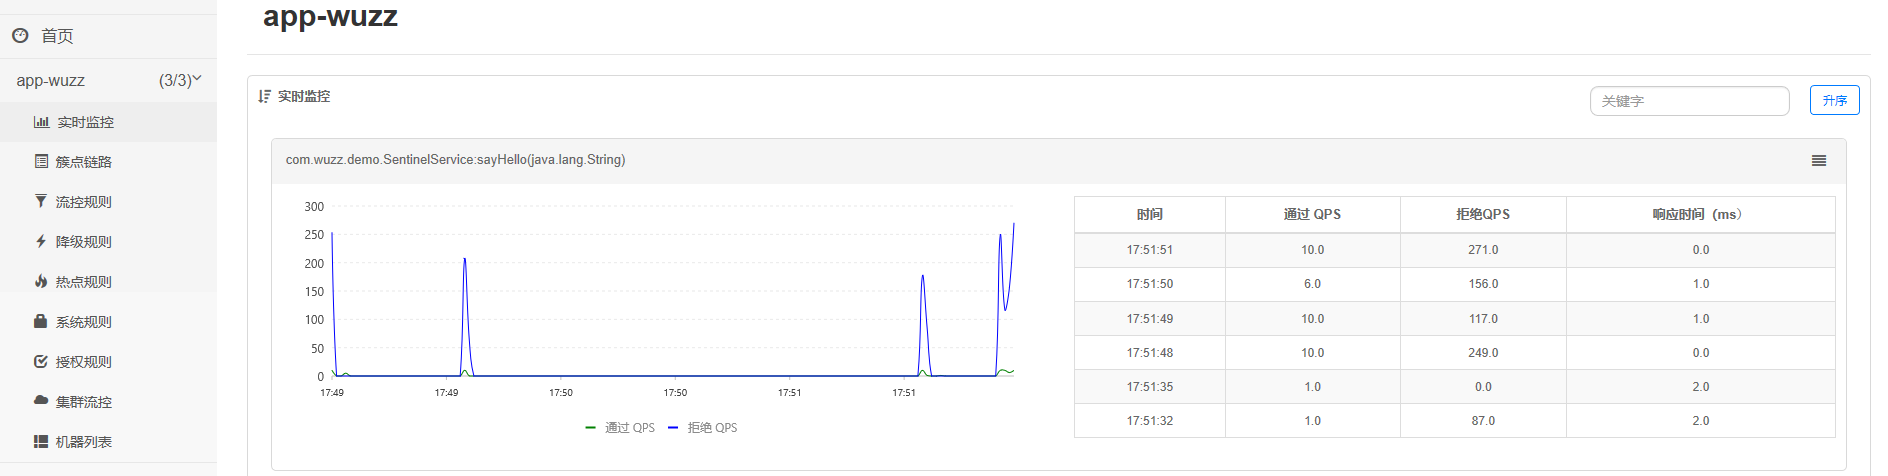
然后启动客户端,通过 JMeter 进行压测,结果如下:
另一方面我们启动了 Sentinel-Dashboard 所以我们可以通过控制台查看:

如何实现分布式限流:
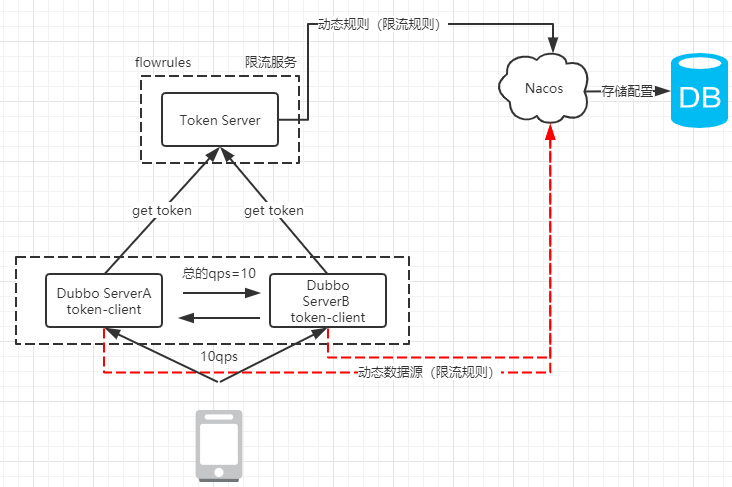
为什么要使用集群流控呢?假设我们希望给某个用户限制调用某个 API 的总 QPS 为 50,但机器数可能很多(比如有 100 台)。这时候我们很自然地就想到,找一个 server 来专门来统计总的调用量,其它的实例都与这台 server 通信来判断是否可以调用。这就是最基础的集群流控的方式。
另外集群流控还可以解决流量不均匀导致总体限流效果不佳的问题。假设集群中有 10 台机器,我们给每台机器设置单机限流阈值为 10 QPS,理想情况下整个集群的限流阈值就为 100 QPS。不过实际情况下流量到每台机器可能会不均匀,会导致总量没有到的情况下某些机器就开始限流。因此仅靠单机维度去限制的话会无法精确地限制总体流量。而集群流控可以精确地控制整个集群的调用总量,结合单机限流兜底,可以更好地发挥流量控制的效果。
集群流控中共有两种身份:
- Token Client:集群流控客户端,用于向所属 Token Server 通信请求 token。集群限流服务端会返回给客户端结果,决定是否限流。
- Token Server:即集群流控服务端,处理来自 Token Client 的请求,根据配置的集群规则判断是否应该发放 token(是否允许通过)。
要想使用集群流控功能,我们需要在应用端配置动态规则源,并通过 Sentinel 控制台实时进行推送。如下图所示:
搭建 Token-Server:
1.添加pom依赖:
<dependency>

  <groupId>com.alibaba.csp</groupId>

  <artifactId>sentinel-cluster-server-default</artifactId>

  <version>1.6.</version>

</dependency>

<dependency>

  <groupId>com.alibaba.csp</groupId>

  <artifactId>sentinel-datasource-nacos</artifactId>

  <version>1.6.</version>

</dependency>

<dependency>

  <groupId>com.alibaba.csp</groupId>

  <artifactId>sentinel-transport-simple-http</artifactId>

  <version>1.6.</version>

</dependency>
2.dubbo中利用Nacos实现动态数据源要求实现 InitFunc 接口:
public class NacosDataSourceInitFunc implements InitFunc {

    private final String remoteAddress="localhost"; //nacos 配置中心的服务host

    private final String groupId="SENTINEL_GROUP";

    private final String FLOW_POSTFIX="-flow-rules"; //dataid(names+postfix)

    //意味着当前的token-server会从nacos上获得限流的规则

    @Override

    public void init() throws Exception {

        ClusterFlowRuleManager.setPropertySupplier(namespace ->{

            ReadableDataSource<String, List<FlowRule>> rds=

                    new NacosDataSource<List<FlowRule>>(remoteAddress,groupId,namespace+FLOW_POSTFIX,

                            source -> JSON.parseObject(source,new TypeReference<List<FlowRule>>(){}));

            return rds.getProperty();

        });

    }

}
然后需要在META-INF/services 下添加拓展点文件 com.alibaba.csp.sentinel.init.InitFunc 。其内容就是我们的实现:
com.wuzz.demo.NacosDataSourceInitFunc
3.主启动类:
public class ClusterServer {

    public static void main(String[] args) throws Exception {

        ClusterTokenServer tokenServer=new SentinelDefaultTokenServer();

        ClusterServerConfigManager.loadGlobalTransportConfig(

                new ServerTransportConfig().setIdleSeconds().setPort());

        ClusterServerConfigManager.loadServerNamespaceSet(Collections.singleton("app-wuzz")); //设置成动态

        tokenServer.start();

    }

}
启动Sentinel-dashboard:
java -Dserver.port= -Dcsp.sentinel.dashboard.server=localhost: -Dproject.name=sentinel-dashboard -XX:MaxHeapSize=128m -Xms256m -Xmx256m -XX:PermSize=128M -XX:MaxPermSize=256m -jar sentinel-dashboard-1.6..jar
启动nacos以及增加配置:Data Id=app-wuzz-flow-rules,Group=SENTINEL_GROUP
[

    {

        "resource":"com.wuzz.demo.SentinelService:sayHello(java.lang.String)",

        "grade":, //限流模式 qps

        "count":, // 限流总阈值

        "clusterMode":true, //集群模式 true

        "clusterConfig":{

            "flowId":,//全局唯一ID

            "thresholdType":,//阈值模式,全局阈值

            "fallbackToLocalWhenFail":true //client连接失败使用本地限流模式

        }

    }

]
启动 Token-Server 并且添加以下JVM参数,将其加入到 Sentinel-Dashboard中进行管理:
-server -Dproject.name=app-wuzz -Dcsp.sentinel.dashboard.server=localhost: -Dcsp.sentinel.log.use.pid=true
电脑内存不足加入 -XX:MaxHeapSize=128m -Xms256m -Xmx256m -XX:PermSize=128M -XX:MaxPermSize=256m。服务启动之后,在$user.home$/logs/csp/ 可以找到sentinel-record.log.pid*.date文件,如果看到日志文件中获取到了远程服务的信息,说明token-server启动成功了,也可以通过Sentinel-Dashboard看到注册的列表:

Provider :
1.添加pom依赖:
<dependency>

  <groupId>com.alibaba.csp</groupId>

  <artifactId>sentinel-cluster-client-default</artifactId>

  <version>1.6.</version>

</dependency>

<dependency>

  <groupId>com.alibaba.csp</groupId>

  <artifactId>sentinel-datasource-nacos</artifactId>

  <version>1.6.</version>

</dependency>
2.在META-INF/services 下添加拓展点文件 com.alibaba.csp.sentinel.init.InitFunc 。其内容就是我们的实现,刚刚哎token-server中配置的是直接从Nacos中获取。在服务端配置如下:
public class NacosDataSourceInitFunc implements InitFunc {

    private final String CLUSTER_SERVER_HOST="localhost"; //token-server的地址

    private final int CLUSTER_SERVER_PORT=;

    private final int REQUEST_TIME_OUT=; //请求超时时间

    private final String APP_NAME="app-wuzz"; //namespace

    //nacos的配置()

    private final String remoteAddress="localhost"; //nacos 配置中心的服务host

    private final String groupId="SENTINEL_GROUP";

    private final String FLOW_POSTFIX="-flow-rules"; //dataid(names+postfix)

    //意味着当前的token-server会从nacos上获得限流的规则

    @Override

    public void init() throws Exception {

        //加载集群-信息

        loadClusterClientConfig();

        registryClusterFlowRuleProperty();

    }

    private void loadClusterClientConfig(){

        ClusterClientAssignConfig assignConfig=new ClusterClientAssignConfig();

        assignConfig.setServerHost(CLUSTER_SERVER_HOST);

        assignConfig.setServerPort(CLUSTER_SERVER_PORT);

        ClusterClientConfigManager.applyNewAssignConfig(assignConfig);

        ClusterClientConfig clientConfig=new ClusterClientConfig();

        clientConfig.setRequestTimeout(REQUEST_TIME_OUT);

        ClusterClientConfigManager.applyNewConfig(clientConfig);

    }

    //注册动态数据源

    private void registryClusterFlowRuleProperty(){

        ReadableDataSource<String, List<FlowRule>> rds=

                new NacosDataSource<List<FlowRule>>(remoteAddress,groupId,APP_NAME+FLOW_POSTFIX,

                        source -> JSON.parseObject(source,new TypeReference<List<FlowRule>>(){}));

        FlowRuleManager.register2Property(rds.getProperty());

    }

}
3.修改主启动类:
@SpringBootApplication

public class SentinelProviderApplication {

    public static void main(String[] args) throws IOException {//表示当前的节点是集群客户端

        ClusterStateManager.applyState(ClusterStateManager.CLUSTER_CLIENT);

        SpringApplication.run(SentinelProviderApplication.class, args);

        System.in.read();

    }

}
启动服务端并且将其加入到Sentinel-Dashboard中,另外这里再添加JVM参数的时候需要注意,这里的project-name要包含在token-server中配置的namespace中,token server 会根据客户端对应的 namespace(默认为 project.name 定义的应用名)下的连接数来计算总的阈值,我这里设置成app-wuzz.:
-server

-XX:MaxHeapSize=128m

-Xms256m

-Xmx256m

-XX:PermSize=128M

-XX:MaxPermSize=256m

-Dproject.name=app-wuzz

-Dcsp.sentinel.dashboard.server=localhost:

-Dcsp.sentinel.log.use.pid=true
服务启动之后,在$user.home$/logs/csp/ 可以找到sentinel-record.log.pid*.date文件,如果看到日志文件中获取到了token-server的信息,说明连接成功了。
由于我们要实现分布式限流,也就是需要部署我们的局群服务,我们可以利用IDEA来实现:添加一个 SentinelProviderApplication。同时运行两个程序:
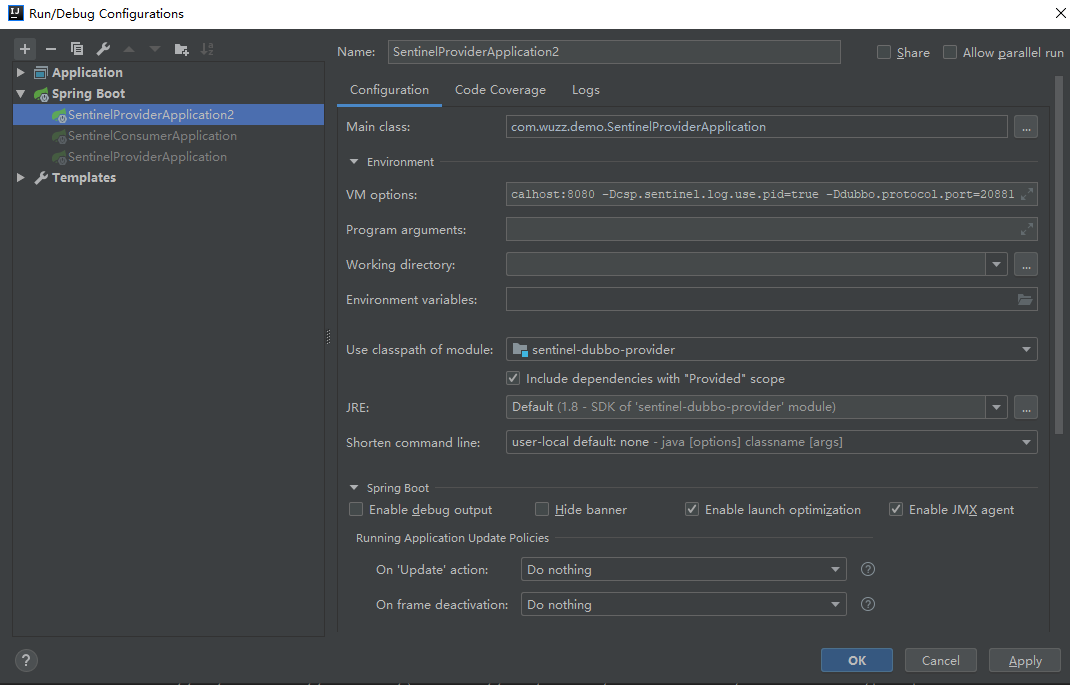
这里 JVM 参数需要多增加一个 -Ddubbo.protocol.port=20881 才可以。然后我们启动两个服务及客户端。通过JMeter 压测就可以看到结果(多发几次请求),我们也可以直接看Sentinel-Dashboard:
就这样实现了分布式限流。
Sentinel整合Dubbo限流实战(分布式限流)的更多相关文章
- sentinel整合dubbo
<dependency> <groupId>com.alibaba.csp</groupId> <artifactId>sentinel-dubbo-a ...
- Spring Cloud Gateway 整合阿里 Sentinel网关限流实战!
大家好,我是不才陈某~ 这是<Spring Cloud 进阶>第八篇文章,往期文章如下: 五十五张图告诉你微服务的灵魂摆渡者Nacos究竟有多强? openFeign夺命连环9问,这谁受得 ...
- 分布式限流组件-基于Redis的注解支持的Ratelimiter
原文:https://juejin.im/entry/5bd491c85188255ac2629bef?utm_source=coffeephp.com 在分布式领域,我们难免会遇到并发量突增,对后端 ...
- 基于kubernetes的分布式限流
做为一个数据上报系统,随着接入量越来越大,由于 API 接口无法控制调用方的行为,因此当遇到瞬时请求量激增时,会导致接口占用过多服务器资源,使得其他请求响应速度降低或是超时,更有甚者可能导致服务器宕机 ...
- 2流高手速成记(之八):基于Sentinel实现微服务体系下的限流与熔断
我们接上回 上一篇中,我们进行了简要的微服务实现,也体会到了SpringCloudAlibaba的强大和神奇之处 我们仅改动了两个注释,其他全篇代码不变,原来的独立服务就被我们分为了provider和 ...
- Redis实现的分布式锁和分布式限流
随着现在分布式越来越普遍,分布式锁也十分常用,我的上一篇文章解释了使用zookeeper实现分布式锁(传送门),本次咱们说一下如何用Redis实现分布式锁和分布限流. Redis有个事务锁,就是如下的 ...
- 限流(三)Redis + lua分布式限流
一.简介 1)分布式限流 如果是单实例项目,我们使用Guava这样的轻便又高性能的堆缓存来处理限流.但是当项目发展为多实例了以后呢?这时候我们就需要采用分布式限流的方式,分布式限流可以以redis + ...
- 【分布式架构】--- 基于Redis组件的特性,实现一个分布式限流
分布式---基于Redis进行接口IP限流 场景 为了防止我们的接口被人恶意访问,比如有人通过JMeter工具频繁访问我们的接口,导致接口响应变慢甚至崩溃,所以我们需要对一些特定的接口进行IP限流,即 ...
- Spring Cloud Gateway限流实战
欢迎访问我的GitHub https://github.com/zq2599/blog_demos 内容:所有原创文章分类汇总及配套源码,涉及Java.Docker.Kubernetes.DevOPS ...
随机推荐
- 外网无法ping自己的linux服务器
Linux默认是允许Ping响应的,系统是否允许Ping由2个因素决定的:A.内核参数,B.防火墙,需要2个因素同时允许才能允许Ping,2个因素有任意一个禁Ping就无法Ping. 具体的配置方法如 ...
- 阅读《Effective Java》每条tips的理解和总结(1)
<Effective Java>这本书的结构是90来条tips,有长有短,每条tip都值的学习.这里根据对书中每条tip的理解做简短的总结,方便日后回顾.持续更新~ 1. 考虑用静态方法代 ...
- mybatis多个参数时传参方式
第一种方案 DAO层的函数方法 Lecture getLecture(Integer id, Integer parentId); 对应的mapper.xml <select id=" ...
- Day01_课后练习题
1.(将摄氏温度转化华氏温度)编写一个从控制台读取摄氏温度并将他转变为华氏温度并予以显示的程序.转换公式如下. Fahrenheit = (9 / 5) * celsius + 32 这里是这个程序 ...
- DI,依赖注入,给对象赋值 ,get,set,list,set,map,properties对象赋值
- php array_pop()函数 语法
php array_pop()函数 语法 作用:删除数组中的最后一个元素.博智达 语法:array_pop(array) 参数: 参数 描述 array 必需.规定数组. 说明:返回数组的最后 ...
- TCP UDP 包的最大字节
UDP 1500,常见会设置为1024 如: ]; TCP 60*1024 UDP如果设置为1024,但是实际发送超出1024,会直接接不到应答,所以,如果你的其他命令都能正常接收,而这个命令莫名其妙 ...
- 进阶3: zookeeper-3.4.9.tar.gz和hbase-1.2.4-bin.tar.gz 环境搭建(hbase 伪分布式)
前提条件: 成功安装了 jdk1.8, hadoop2.7.3 注意条件: zookeeper,hbase 版本必须要和hadoop 安装版本相互兼容,否则容易出问题: 本次:安装包 zookee ...
- 插头DP讲解+[BZOJ1814]:Ural 1519 Formula 1(插头DP)
1.什么是插头$DP$? 插头$DP$是$CDQ$大佬在$2008$年的论文中提出的,是基于状压$D$P的一种更高级的$DP$多用于处理联通问题(路径问题,简单回路问题,多回路问题,广义回路问题,生成 ...
- Python 学习笔记(基础语法 restful 、 Flask 和 Requests)
input 函数 #!/usr/bin/env python3 name = input("\n\n按下 enter 键后退出.") print(name) print() 在 p ...