SpringMVC整合Mybatis的流程
前提:如何要整合SpringMVC 与Mybatis,首先要会配置SpringMVC
第一部分:配置SpringMVC
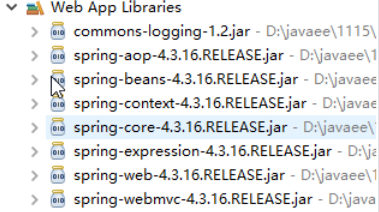
第一步:导入jar包

第二步:构建一个请求
<%@ page language="java" contentType="text/html; charset=UTF-8"

    pageEncoding="UTF-8"%>

<!DOCTYPE html PUBLIC "-//W3C//DTD HTML 4.01 Transitional//EN" "http://www.w3.org/TR/html4/loose.dtd">

<html>

<head>

<meta http-equiv="Content-Type" content="text/html; charset=UTF-8">

<title>Insert title here</title>

</head>

<body>

  <a href="${pageContext.request.contextPath }/say.do">say</a>

</body>

</html>
第三步:配置核心控制器
<?xml version="1.0" encoding="UTF-8"?>

<web-app version="3.0" xmlns="http://java.sun.com/xml/ns/javaee" xmlns:xml="http://www.w3.org/XML/1998/namespace" xmlns:xsi="http://www.w3.org/2001/XMLSchema-instance" xsi:schemaLocation="http://java.sun.com/xml/ns/javaee http://java.sun.com/xml/ns/javaee/web-app_3_0.xsd ">

   <!-- 配置核心控制器拦截所有的请求 -->

   <servlet>

     <servlet-name>dispatcherServlet</servlet-name>

     <servlet-class>org.springframework.web.servlet.DispatcherServlet</servlet-class>

     <!-- 指定配置文件的路径 -->

     <init-param>

       <param-name>contextConfigLocation</param-name>

       <param-value>classpath:spring-mvc.xml</param-value>

     </init-param>

   </servlet>

   <servlet-mapping>

     <servlet-name>dispatcherServlet</servlet-name>

     <url-pattern>*.do</url-pattern>

   </servlet-mapping>

</web-app>
第四步:创建一个业务控制器
@Controller //组件注解

public class HelloController {

    @RequestMapping(value="/say")

    public String say(){

        System.out.println("HelloWorld!");

        return "/hello.jsp";

    }

}
第五步:创建Spring配置文件
<?xml version="1.0" encoding="UTF-8"?>

<beans xmlns="http://www.springframework.org/schema/beans"

    xmlns:xsi="http://www.w3.org/2001/XMLSchema-instance" xmlns:context="http://www.springframework.org/schema/context"

    xsi:schemaLocation="http://www.springframework.org/schema/beans http://www.springframework.org/schema/beans/spring-beans.xsd

        http://www.springframework.org/schema/context http://www.springframework.org/schema/context/spring-context-4.3.xsd">

    <!-- 配置组件扫描器 -->

    <context:component-scan base-package="cn.px.controller"></context:component-scan>

</beans>
第六步:创建一个返回页面
<%@ page language="java" contentType="text/html; charset=UTF-8"

    pageEncoding="UTF-8"%>

<!DOCTYPE html PUBLIC "-//W3C//DTD HTML 4.01 Transitional//EN" "http://www.w3.org/TR/html4/loose.dtd">

<html>

<head>

<meta http-equiv="Content-Type" content="text/html; charset=UTF-8">

<title>Insert title here</title>

</head>

<body>

  你好世界

</body>

</html>
问题:为什么需要配置核心控制器。
答:因为我们只能在网站的入口(web.xml)拦截了所有的请求,我们才能做到请求与方法的一一对应!!
问题:为什么需要配置<init-param>
答:因为我们希望指定自定义的配置文件路径。如果使用框架默认的路径可以不配置
问题:为什么需要配置<context:component-scan>
答:因为我们是通过组件注解(@Controller)的方式,将类的对象加载到容器里面。所以必须要配置
第二部分:配置Mybatis
第一步:导入jar包

第二步:创建配置文件
--注意:Mybatis的配置文件使用DTD规范文件的。所以需要通过DTD规则文件生成。
问题:为什么配置文件使用xml
答:就是因为大部分的IDE(开发工具)对xml有提示功能的。
问题:为什么xml会有提示功能呢?
答:因为xml的标签有约束文件来约束标签与标签之间的关系。开发工具通过约束文件来提供对应的标签。
问题:xml的约束文件有哪些呢?
答:DTD 以及 schema
问题:为什么有一些xml文件Eclipse直接支持提示了呢?
答:因为这个xml的文件的规则文件已经内置在Eclipse开发工具里面了。
问题:Mybatis的DTD,Eclipse工具默认是没有的,怎么办?
答:那么我们需要在Eclipse里面配置它!!!
这也告诉了我们,任何框架,只要使用XML配置,它就必须要提供DTD或者Schema。
<?xml version="1.0" encoding="UTF-8"?>

<!DOCTYPE configuration PUBLIC "-//mybatis.org//DTD Config 3.0//EN" "mybatis-3-config.dtd" >

<configuration>

    <environments default="sms">

      <!-- 任何配置文件,的参数都可以在框架代码里面找到!! -->

      <!-- 大部分的框架,对配置文件的解释的所在类的分包的包名,configuration以及缩写、builder以及缩写 -->

      <environment id="sms">

        <transactionManager type="JDBC"></transactionManager>

        <dataSource type="POOLED">

          <!-- property 对应的就是set方法-->

          <property name="driver" value="org.gjt.mm.mysql.Driver"/>

          <property name="url" value="jdbc:mysql://localhost:3306/sms"/>

          <property name="username" value="root"/>

          <property name="password" value="123456"/>

        </dataSource>

      </environment>

    </environments>

</configuration>
第三步:创建帮助类MybatisUtils
public class MybatisUtils {

    public static final SqlSessionFactory SSF=MybatisUtils.getSSF();

    private static final ThreadLocal<SqlSession> THREAD_LOCAL=new ThreadLocal<>();

    /**

     * 获得会话工厂

     * @return

     */

    private  static SqlSessionFactory getSSF() {

        try {

            Reader reader = Resources.getResourceAsReader("mybatis-config.xml");

            SqlSessionFactoryBuilder builder = new SqlSessionFactoryBuilder();

            return builder.build(reader);

        } catch (IOException e) {

            e.printStackTrace();

        }

        return null;

    }

    /**

     * 获得会话

     * @return

     */

    public static SqlSession getSession(){

        if(THREAD_LOCAL.get()==null){

            SqlSession session = SSF.openSession();

            THREAD_LOCAL.set(session);

        }

        return THREAD_LOCAL.get();

    }

    /**

     * 关闭会话

     */

    public static void close(){

        if(THREAD_LOCAL.get()!=null){

            SqlSession session = THREAD_LOCAL.get();

            session.close();

            THREAD_LOCAL.remove();

        }

    }

    public static void main(String[] args) {

        System.out.println(MybatisUtils.getSession());

    }

}
第四步:创建映射接口
public interface StudentMapper {

    /**

     * 插入学生

     * @param student

     * @return

     */

    int insert(Student student);

}
第五步:创建并加载映射文件
<?xml version="1.0" encoding="UTF-8"?>

<!DOCTYPE mapper PUBLIC "-//mybatis.org//DTD Mapper 3.0//EN" "mybatis-3-mapper.dtd" >

<mapper namespace="cn.px.mapper.StudentMapper">

   <insert id="insert">

    INSERT INTO tb_student    (stu_name, stu_age, stu_password) VALUES (#{stuName}, #{stuAge}, #{stuPassword})

   </insert>

</mapper>
<mappers>

    <mapper  resource="cn/px/mapper/xml/StudentMapper.xml"/>

</mappers>
第六步:测试插入数据
public class StudentMapperTest {

    @Test

    public void insert(){

        //第一步:获得操作对象

        SqlSession session = MybatisUtils.getSession();

        StudentMapper studentMapper = session.getMapper(StudentMapper.class);

        Student student=new Student();

        student.setStuName("张三");

        int count = studentMapper.insert(student);

        System.out.println(count);

        session.commit();

        MybatisUtils.close();

    }
实体类
public class Student {

    private String stuId;

    private String stuName;

    private String stuAge;

    private String stuPassword;

    public String getStuId() {

        return stuId;

    }

    public void setStuId(String stuId) {

        this.stuId = stuId;

    }

    public String getStuName() {

        return stuName;

    }

    public void setStuName(String stuName) {

        this.stuName = stuName;

    }

    public String getStuAge() {

        return stuAge;

    }

    public void setStuAge(String stuAge) {

        this.stuAge = stuAge;

    }

    public String getStuPassword() {

        return stuPassword;

    }

    public void setStuPassword(String stuPassword) {

        this.stuPassword = stuPassword;

    }

}
第三部分:整合SpringMVC与Mybatis
问题:为什么需要SpringMVC整合Mybatis?
答:因为我们希望Mybatis可以使用Spring框架里面的事务代理机制。
问题:Spring框架的事务代理依赖什么东西?
答:Spring JDBC里面的数据源!!
所以所谓的SpringMVC整合Mybatis就是,就是让Mybatis抛弃自己实现的数据源,在使用Spring提供的数据源。
那么整合步骤:
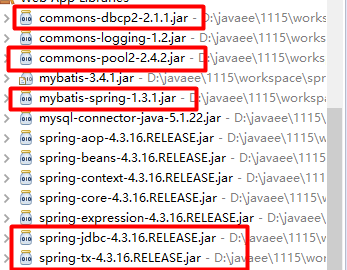
第一步:导入jar包

第二步:配置文件
<?xml version="1.0" encoding="UTF-8"?>

<beans xmlns="http://www.springframework.org/schema/beans"

    xmlns:xsi="http://www.w3.org/2001/XMLSchema-instance"

    xmlns:tx="http://www.springframework.org/schema/tx"

    xsi:schemaLocation="http://www.springframework.org/schema/beans http://www.springframework.org/schema/beans/spring-beans.xsd

        http://www.springframework.org/schema/tx http://www.springframework.org/schema/tx/spring-tx-4.3.xsd">

    <!-- 1.配置数据源 -->

    <bean name="dataSource" class="org.apache.commons.dbcp2.BasicDataSource" destroy-method="close">

        <!-- 四要素 -->

        <property name="driverClassName" value="org.gjt.mm.mysql.Driver" />

        <property name="url" value="jdbc:mysql://localhost:3306/sms" />

        <property name="username" value="root" />

        <property name="password" value="123456" />

    </bean>

    <!-- 2.配置会话工厂 -->

    <!-- 默认情况下:mybatis是不支持spring的数据源的 -->

    <!-- 问题:那么我们如何可以让mybatis支持spring的数据源呢? -->

    <!-- 答:需要一个整合包 mybatis-spirng.jar

    SqlSessionFactoryBean:作用就是让Mybatis可以通过Spring的数据源创建会话工厂的

     -->

    <bean name="sqlSessionFactory" class="org.mybatis.spring.SqlSessionFactoryBean">

       <!-- 指定数据源 -->

       <property name="dataSource" ref="dataSource"></property>

       <!-- 加载映射文件的路径 -->

       <property name="mapperLocations" value="classpath:cn/px/mapper/xml/*Mapper.xml"></property>

    </bean>

    <!-- 3.配置扫描器,将映射接口的动态对象创建,并且注入到spring容器里面 -->

    <!-- 默认情况下:spring是不支持通过接口创建对象!!而Mybatis就是通过接口创建对象的

         问题:Spring必须要实现类创建可以注入到容器,而Mybatis就是使用接口创建动态对象的。不能兼容Spring的要求。怎么办呢?

         答:整合包提供了一个映射接口扫描器,用于通过映射接口创建了对象,并且可以创建的对象注入到容器里面

         -根据表述扫描器必要要的两个条件

         1.需要会话工厂

         2.必须要指定映射接口的路径

     -->

     <bean class="org.mybatis.spring.mapper.MapperScannerConfigurer">

        <property name="sqlSessionFactoryBeanName" value="sqlSessionFactory"></property>

        <property name="basePackage" value="cn.px.mapper"></property>

        <!-- 指定扫描注解 -->

        <property name="annotationClass" value="org.apache.ibatis.annotations.Mapper"></property>

     </bean>

    <!-- 4.配置事务代理,编程式事务 -->

    <!-- 注意:Mybatis是的spring jdbc的事务代理 -->

    <!-- 创建事务代理对象 -->

    <bean name="tx" class="org.springframework.jdbc.datasource.DataSourceTransactionManager">

       <!-- 指定数据源 -->

        <property name="dataSource" ref="dataSource"></property>

     </bean>

     <!-- 启动事务代理 -->

    <tx:annotation-driven/>

</beans>
SpringMVC整合Mybatis的流程的更多相关文章
- JAVAEE——SpringMVC第一天:介绍、入门程序、架构讲解、SpringMVC整合MyBatis、参数绑定、SpringMVC和Struts2的区别
1. 学习计划 第一天 1.SpringMVC介绍 2.入门程序 3.SpringMVC架构讲解 a) 框架结构 b) 组件说明 4.SpringMVC整合MyBatis 5.参数绑定 a) Sp ...
- Maven SpringMVC整合Mybatis
关于Spring的核心理念和Mybatis的优点网上已经有很多文档做了说明.这篇博客,只记录springmvc整合mybatis时常见的知识点,以及注意事项,它只有最精简的几个模块,以帮助初学者迅速搭 ...
- eclipse 创建maven 项目 动态web工程完整示例 maven 整合springmvc整合mybatis
接上一篇: eclipse 创建maven 项目 动态web工程完整示例 eclipse maven工程自动添加依赖设置 maven工程可以在线搜索依赖的jar包,还是非常方便的 但是有的时候可能还需 ...
- springmvc整合mybatis 配置文件
使用SSM(Spring.SpringMVC和Mybatis)已经有三个多月了,项目在技术上已经没有什么难点了,基于现有的技术就可以实现想要的功能,当然肯定有很多可以改进的地方.之前没有记录SSM整合 ...
- eclipse下maven springMVC 整合 mybatis
参考文档:http://blog.csdn.net/zhshulin/article/details/37956105 1.搭建maven工程,具体参见我另一篇博客:http://www.cnbl ...
- springmvc整合mybatis详细教程
需求:整合springmvc和mybatis 整合的目标是:控制层采用springmvc,持久层使用mybatis 整合思想 dao层: 1.SqlMapConfig.xml.空文件即可.但是需要头文 ...
- SpringMvc 整合mybatis项目搭建
1.使用idea创建maven项目 2.在项目src目录下 添加java文件夹 并设置类型为sources,添加resource文件夹 设置为resources 4.修改pom文件 添加引用 < ...
- springMVC整合mybatis,spring
使用spring-mvc创建一个项目的过程 spring的配置十分复杂,很难记忆. 这篇博客用于记录springmvc整合创建过程,虽然步骤有点多,但是每一步都很容易理解,便于以后忘记后参考和记忆. ...
- springmvc整合mybatis框架源码 bootstrap
A集成代码生成器 [正反双向(单表.主表.明细表.树形表,开发利器)+快速构建表单 下载地址 ; freemaker模版技术 ,0个代码不用写,生成完整的一个模块,带页面.建表sql脚本,处理类 ...
随机推荐
- Windows -- 使用批处理文件.bat删除旧文件
Windows -- 写一个批处理文件.bat删除旧文件 1. 批处理文件 del_old_file.bat rem 删除D:\temp目录下7天前的文件 Forfiles /p D:\temp ...
- Linux Mint如何添加windows分享的网络打印机?
1.安装samba sudo apt-get install samba 2.找到系统打印机选项 通过 Menu-->>控制中心-->>系统管理找到 Printers选项,双击 ...
- P4013 数字梯形问题 网络流
题目描述 给定一个由 nn 行数字组成的数字梯形如下图所示. 梯形的第一行有 mm 个数字.从梯形的顶部的 mm 个数字开始,在每个数字处可以沿左下或右下方向移动,形成一条从梯形的顶至底的路径. 分别 ...
- Linux:Day18(上) dns服务基础进阶
DNS:Domain Name Service,协议(C/S,53/udp,53/tcp):应用层协议. BIND:Bekerley Internat Name Domain,ISC(www.isc. ...
- Swing 混合布局
案例一:Border边境边界 package swing; /** * swing 混合布局 */ import java.awt.*; import javax.swing.*; public cl ...
- 【c的文件操作】文本文件和二进制文件(内存映像)的不同 文件结尾判断feof , EOF
查看 stdio.h 可以看到如下定义: #define EOF (-1) #define _IOEOF 0x0010 #define feof(_stream) ((_stream)- ...
- Cnario Player 接入视频采集卡采集外部音视频信号测试
测试产品 型号: TC-D56N1-30P采集卡 参数: 1* HDMI 1.4输入, PCIe 接口为PCI-Express x4(Gen2), 最高支持4096x2160@30Hz, 支持1920 ...
- 正则去除字符串中的html标签,但不去除<br>标签
一.去除html标签 filterHTMLTag(msg) { var msg = msg.replace(/<\/?[^>]*>/g, ''); //去除HTML Tag msg ...
- Oracle计算两天两个日期间相差的天数
Oracle计算两天两个日期间相差的天数: select to_date('19930411','yyyymmdd')-to_date('19890507','yyyymmdd') from dual ...
- POJ2385——Apple Catching
$Apple~Catching$ Time Limit: 1000MS Memory Limit: 6553 ...
