python学习------模块
包(package)
time模块
random模块
os模块
sys模块
json & pickle
shelve模块
xml模块
configparser模块
hashlib模块
subprocess模块
logging模块
re模块
模块(modue)的概念
在计算机程序开发过程中,随着程序代码越写越多,在一个文件里代码就会越来越长,越来越不容易维护。
为了编写可维护的代码,我们把很多函数分组,分别放到不同的文件里,这样,每个文件包含的代码就相对较少,很多编程语言都采用这种组织代码的方式。在Python中,一个.py文件就称之为一个模块(Module)。
使用模块有什么好处?
最大的好处是大大提高了代码的可维护性。
其次,编写代码不必从零开始。当一个模块编写完毕,就可以被其他地方引用。我们在编写程序的时候,也经常引用其他模块,包括Python内置的模块和来自第三方的模块。
所以,模块一共三种:
- python标准库
- 第三方模块
- 应用程序自定义模块
另外,使用模块还可以避免函数名和变量名冲突。相同名字的函数和变量完全可以分别存在不同的模块中,因此,我们自己在编写模块时,不必考虑名字会与其他模块冲突。但是也要注意,尽量不要与内置函数名字冲突。
模块导入方法
1 import 语句
- import module1[, module2[,... moduleN]
当我们使用import语句的时候,Python解释器是怎样找到对应的文件的呢?答案就是解释器有自己的搜索路径,存在sys.path里。
- ['', '/usr/lib/python3.4', '/usr/lib/python3.4/plat-x86_64-linux-gnu',
- '/usr/lib/python3.4/lib-dynload', '/usr/local/lib/python3.4/dist-packages', '/usr/lib/python3/dist-packages']
因此若像我一样在当前目录下存在与要引入模块同名的文件,就会把要引入的模块屏蔽掉。
2 from…import 语句
- from modname import name1[, name2[, ... nameN]]
这个声明不会把整个modulename模块导入到当前的命名空间中,只会将它里面的name1或name2单个引入到执行这个声明的模块的全局符号表。
3 From…import* 语句
- from modname import *
这提供了一个简单的方法来导入一个模块中的所有项目。然而这种声明不该被过多地使用。大多数情况, Python程序员不使用这种方法,因为引入的其它来源的命名,很可能覆盖了已有的定义。
4 运行本质
- #1 import test
- #2 from test import add
无论1还是2,首先通过sys.path找到test.py,然后执行test脚本(全部执行),区别是1会将test这个变量名加载到名字空间,而2只会将add这个变量名加载进来。
包(package)
如果不同的人编写的模块名相同怎么办?为了避免模块名冲突,Python又引入了按目录来组织模块的方法,称为包(Package)。
举个例子,一个abc.py的文件就是一个名字叫abc的模块,一个xyz.py的文件就是一个名字叫xyz的模块。
现在,假设我们的abc和xyz这两个模块名字与其他模块冲突了,于是我们可以通过包来组织模块,避免冲突。方法是选择一个顶层包名:
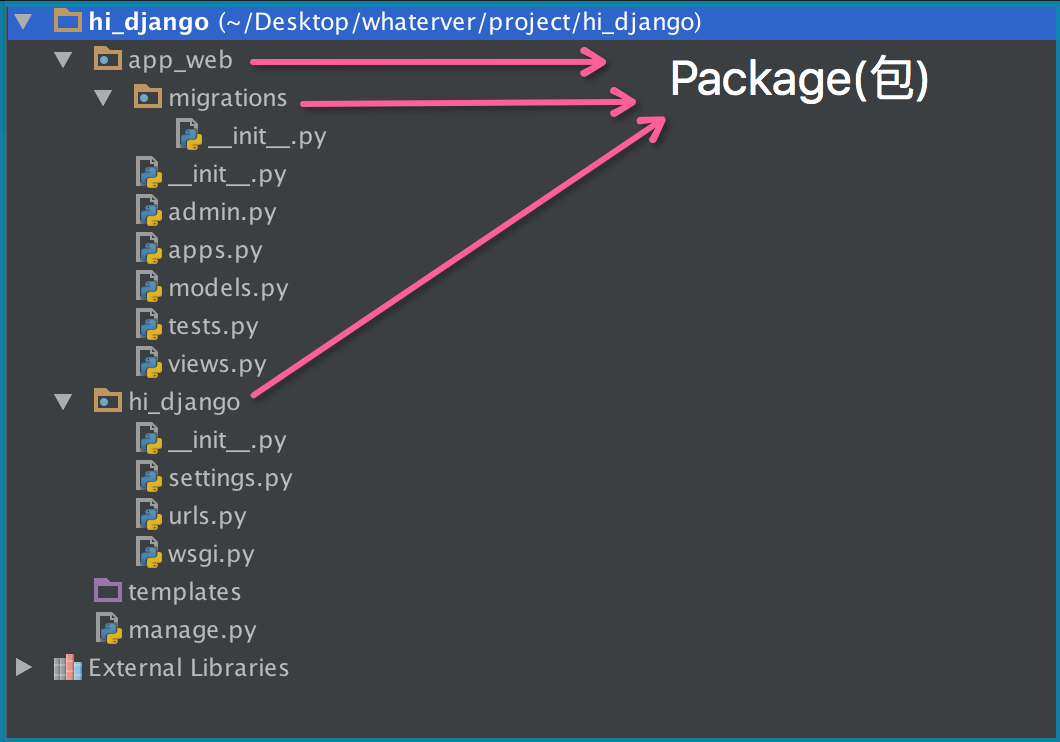
引入了包以后,只要顶层的包名不与别人冲突,那所有模块都不会与别人冲突。现在,view.py模块的名字就变成了hello_django.app01.views,类似的,manage.py的模块名则是hello_django.manage。
请注意,每一个包目录下面都会有一个__init__.py的文件,这个文件是必须存在的,否则,Python就把这个目录当成普通目录(文件夹),而不是一个包。__init__.py可以是空文件,也可以有Python代码,因为__init__.py本身就是一个模块,而它的模块名就是对应包的名字。
调用包就是执行包下的__init__.py文件
注意点(important)
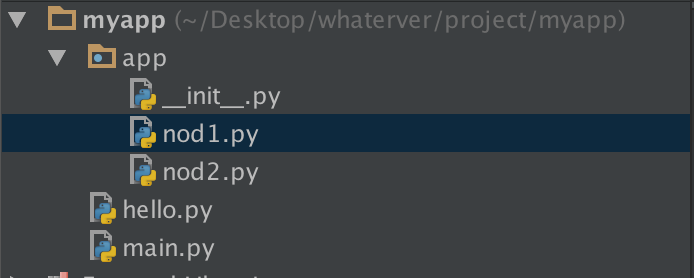
1--------------
在nod1里import hello是找不到的,有同学说可以找到呀,那是因为你的pycharm为你把myapp这一层路径加入到了sys.path里面,所以可以找到,然而程序一旦在命令行运行,则报错。有同学问那怎么办?简单啊,自己把这个路径加进去不就OK啦:
- import sys,os
- BASE_DIR=os.path.dirname(os.path.dirname(os.path.abspath(__file__)))
- sys.path.append(BASE_DIR)
- import hello
- hello.hello1()
2 --------------
- if __name__=='__main__':
- print('ok')
“Make a .py both importable and executable”
如果我们是直接执行某个.py文件的时候,该文件中那么”__name__ == '__main__'“是True,但是我们如果从另外一个.py文件通过import导入该文件的时候,这时__name__的值就是我们这个py文件的名字而不是__main__。
这个功能还有一个用处:调试代码的时候,在”if __name__ == '__main__'“中加入一些我们的调试代码,我们可以让外部模块调用的时候不执行我们的调试代码,但是如果我们想排查问题的时候,直接执行该模块文件,调试代码能够正常运行!s
3
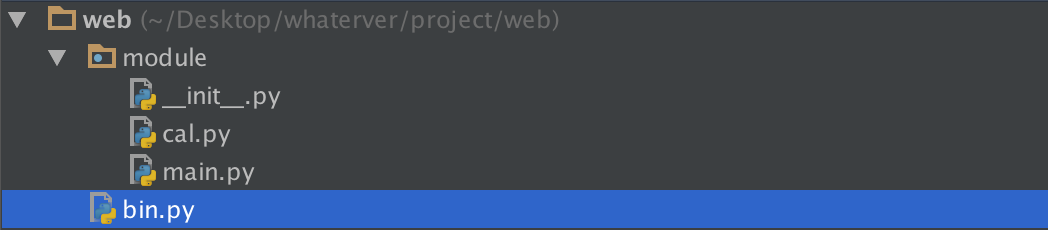
- ##-------------cal.py
- def add(x,y):
- return x+y
- ##-------------main.py
- import cal #from module import cal
- def main():
- cal.add(1,2)
- ##--------------bin.py
- from module import main
- main.main()
- # from module import cal 改成 from . import cal同样可以,这是因为bin.py是我们的执行脚本,
- # sys.path里有bin.py的当前环境。即/Users/yuanhao/Desktop/whaterver/project/web这层路径,
- # 无论import what , 解释器都会按这个路径找。所以当执行到main.py时,import cal会找不到,因为
- # sys.path里没有/Users/yuanhao/Desktop/whaterver/project/web/module这个路径,而
- # from module/. import cal 时,解释器就可以找到了。
注意
time模块(* * * *)
三种时间表示
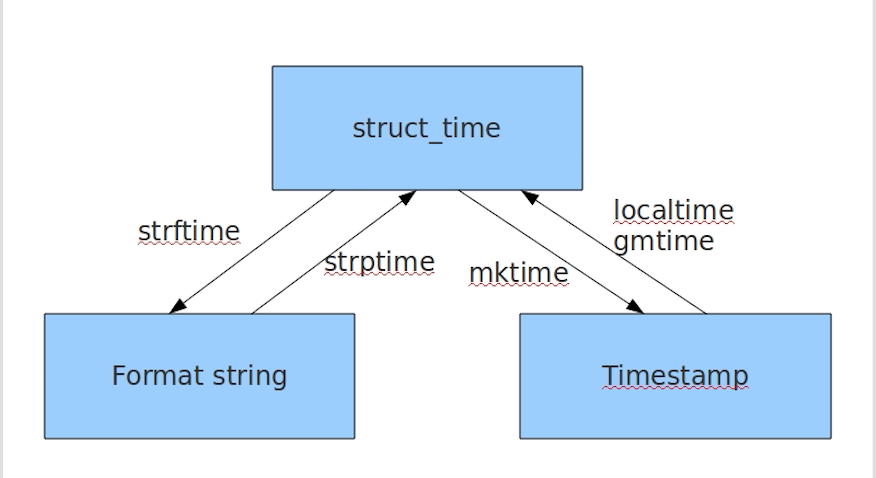
在Python中,通常有这几种方式来表示时间:
- 时间戳(timestamp) : 通常来说,时间戳表示的是从1970年1月1日00:00:00开始按秒计算的偏移量。我们运行“type(time.time())”,返回的是float类型。
- 格式化的时间字符串
- 元组(struct_time) : struct_time元组共有9个元素共九个元素:(年,月,日,时,分,秒,一年中第几周,一年中第几天,夏令时)
- import time
- # 1 time() :返回当前时间的时间戳
- time.time() #1473525444.037215
- #----------------------------------------------------------
- # 2 localtime([secs])
- # 将一个时间戳转换为当前时区的struct_time。secs参数未提供,则以当前时间为准。
- time.localtime() #time.struct_time(tm_year=2016, tm_mon=9, tm_mday=11, tm_hour=0,
- # tm_min=38, tm_sec=39, tm_wday=6, tm_yday=255, tm_isdst=0)
- time.localtime(1473525444.037215)
- #----------------------------------------------------------
- # 3 gmtime([secs]) 和localtime()方法类似,gmtime()方法是将一个时间戳转换为UTC时区(0时区)的struct_time。
- #----------------------------------------------------------
- # 4 mktime(t) : 将一个struct_time转化为时间戳。
- print(time.mktime(time.localtime()))#1473525749.0
- #----------------------------------------------------------
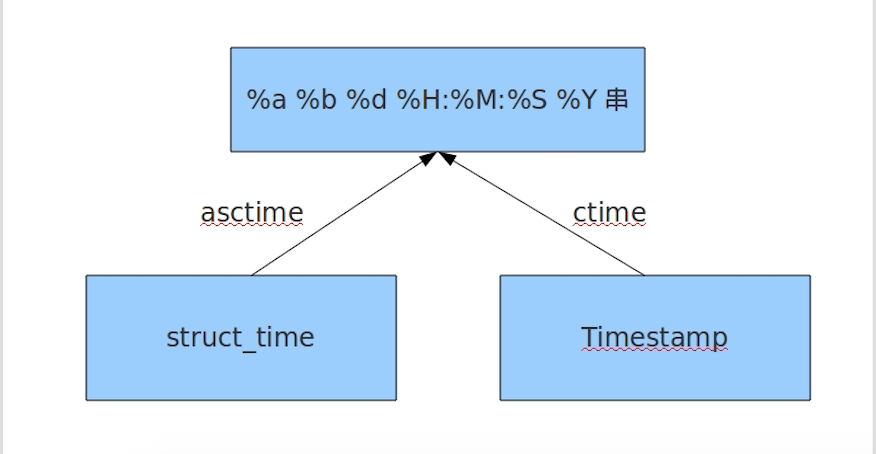
- # 5 asctime([t]) : 把一个表示时间的元组或者struct_time表示为这种形式:'Sun Jun 20 23:21:05 1993'。
- # 如果没有参数,将会将time.localtime()作为参数传入。
- print(time.asctime())#Sun Sep 11 00:43:43 2016
- #----------------------------------------------------------
- # 6 ctime([secs]) : 把一个时间戳(按秒计算的浮点数)转化为time.asctime()的形式。如果参数未给或者为
- # None的时候,将会默认time.time()为参数。它的作用相当于time.asctime(time.localtime(secs))。
- print(time.ctime()) # Sun Sep 11 00:46:38 2016
- print(time.ctime(time.time())) # Sun Sep 11 00:46:38 2016
- # 7 strftime(format[, t]) : 把一个代表时间的元组或者struct_time(如由time.localtime()和
- # time.gmtime()返回)转化为格式化的时间字符串。如果t未指定,将传入time.localtime()。如果元组中任何一个
- # 元素越界,ValueError的错误将会被抛出。
- print(time.strftime("%Y-%m-%d %X", time.localtime()))#2016-09-11 00:49:56
- # 8 time.strptime(string[, format])
- # 把一个格式化时间字符串转化为struct_time。实际上它和strftime()是逆操作。
- print(time.strptime('2011-05-05 16:37:06', '%Y-%m-%d %X'))
- #time.struct_time(tm_year=2011, tm_mon=5, tm_mday=5, tm_hour=16, tm_min=37, tm_sec=6,
- # tm_wday=3, tm_yday=125, tm_isdst=-1)
- #在这个函数中,format默认为:"%a %b %d %H:%M:%S %Y"。
- # 9 sleep(secs)
- # 线程推迟指定的时间运行,单位为秒。
- # 10 clock()
- # 这个需要注意,在不同的系统上含义不同。在UNIX系统上,它返回的是“进程时间”,它是用秒表示的浮点数(时间戳)。
- # 而在WINDOWS中,第一次调用,返回的是进程运行的实际时间。而第二次之后的调用是自第一次调用以后到现在的运行
- # 时间,即两次时间差。
- help(time)
- help(time.asctime)
random模块(* *)
- import random
- print(random.random())#(0,1)----float
- print(random.randint(1,3)) #[1,3]
- print(random.randrange(1,3)) #[1,3)
- print(random.choice([1,'',[4,5]]))#
- print(random.sample([1,'',[4,5]],2))#[[4, 5], '23']
- print(random.uniform(1,3))#1.927109612082716
- item=[1,3,5,7,9]
- random.shuffle(item)
- print(item)
- import random
- def v_code():
- code = ''
- for i in range(5):
- num=random.randint(0,9)
- alf=chr(random.randint(65,90))
- add=random.choice([num,alf])
- code += str(add)
- return code
- print(v_code())
- 验证码
验证码
os模块(* * * *)
os模块是与操作系统交互的一个接口
- os.getcwd() 获取当前工作目录,即当前python脚本工作的目录路径
- os.chdir("dirname") 改变当前脚本工作目录;相当于shell下cd
- os.curdir 返回当前目录: ('.')
- os.pardir 获取当前目录的父目录字符串名:('..')
- os.makedirs('dirname1/dirname2') 可生成多层递归目录
- os.removedirs('dirname1') 若目录为空,则删除,并递归到上一级目录,如若也为空,则删除,依此类推
- os.mkdir('dirname') 生成单级目录;相当于shell中mkdir dirname
- os.rmdir('dirname') 删除单级空目录,若目录不为空则无法删除,报错;相当于shell中rmdir dirname
- os.listdir('dirname') 列出指定目录下的所有文件和子目录,包括隐藏文件,并以列表方式打印
- os.remove() 删除一个文件
- os.rename("oldname","newname") 重命名文件/目录
- os.stat('path/filename') 获取文件/目录信息
- os.sep 输出操作系统特定的路径分隔符,win下为"\\",Linux下为"/"
- os.linesep 输出当前平台使用的行终止符,win下为"\r\n",Linux下为"\n"
- os.pathsep 输出用于分割文件路径的字符串 win下为;,Linux下为:
- os.name 输出字符串指示当前使用平台。win->'nt'; Linux->'posix'
- os.system("bash command") 运行shell命令,直接显示
- os.environ 获取系统环境变量
- os.path.abspath(path) 返回path规范化的绝对路径
- os.path.split(path) 将path分割成目录和文件名二元组返回
- os.path.dirname(path) 返回path的目录。其实就是os.path.split(path)的第一个元素
- os.path.basename(path) 返回path最后的文件名。如何path以/或\结尾,那么就会返回空值。即os.path.split(path)的第二个元素
- os.path.exists(path) 如果path存在,返回True;如果path不存在,返回False
- os.path.isabs(path) 如果path是绝对路径,返回True
- os.path.isfile(path) 如果path是一个存在的文件,返回True。否则返回False
- os.path.isdir(path) 如果path是一个存在的目录,则返回True。否则返回False
- os.path.join(path1[, path2[, ...]]) 将多个路径组合后返回,第一个绝对路径之前的参数将被忽略
- os.path.getatime(path) 返回path所指向的文件或者目录的最后存取时间
- os.path.getmtime(path) 返回path所指向的文件或者目录的最后修改时间
sys模块(* * *)
- sys.argv 命令行参数List,第一个元素是程序本身路径
- sys.exit(n) 退出程序,正常退出时exit(0)
- sys.version 获取Python解释程序的版本信息
- sys.maxint 最大的Int值
- sys.path 返回模块的搜索路径,初始化时使用PYTHONPATH环境变量的值
- sys.platform 返回操作系统平台名称
进度条:
- import sys,time
- for i in range(10):
- sys.stdout.write('#')
- time.sleep(1)
- sys.stdout.flush()
json & pickle(* * * *)
之前我们学习过用eval内置方法可以将一个字符串转成python对象,不过,eval方法是有局限性的,对于普通的数据类型,json.loads和eval都能用,但遇到特殊类型的时候,eval就不管用了,所以eval的重点还是通常用来执行一个字符串表达式,并返回表达式的值。
- import json
- x="[null,true,false,1]"
- print(eval(x))
- print(json.loads(x))
什么是序列化?
我们把对象(变量)从内存中变成可存储或传输的过程称之为序列化,在Python中叫pickling,在其他语言中也被称之为serialization,marshalling,flattening等等,都是一个意思。
序列化之后,就可以把序列化后的内容写入磁盘,或者通过网络传输到别的机器上。
反过来,把变量内容从序列化的对象重新读到内存里称之为反序列化,即unpickling。
json
如果我们要在不同的编程语言之间传递对象,就必须把对象序列化为标准格式,比如XML,但更好的方法是序列化为JSON,因为JSON表示出来就是一个字符串,可以被所有语言读取,也可以方便地存储到磁盘或者通过网络传输。JSON不仅是标准格式,并且比XML更快,而且可以直接在Web页面中读取,非常方便。
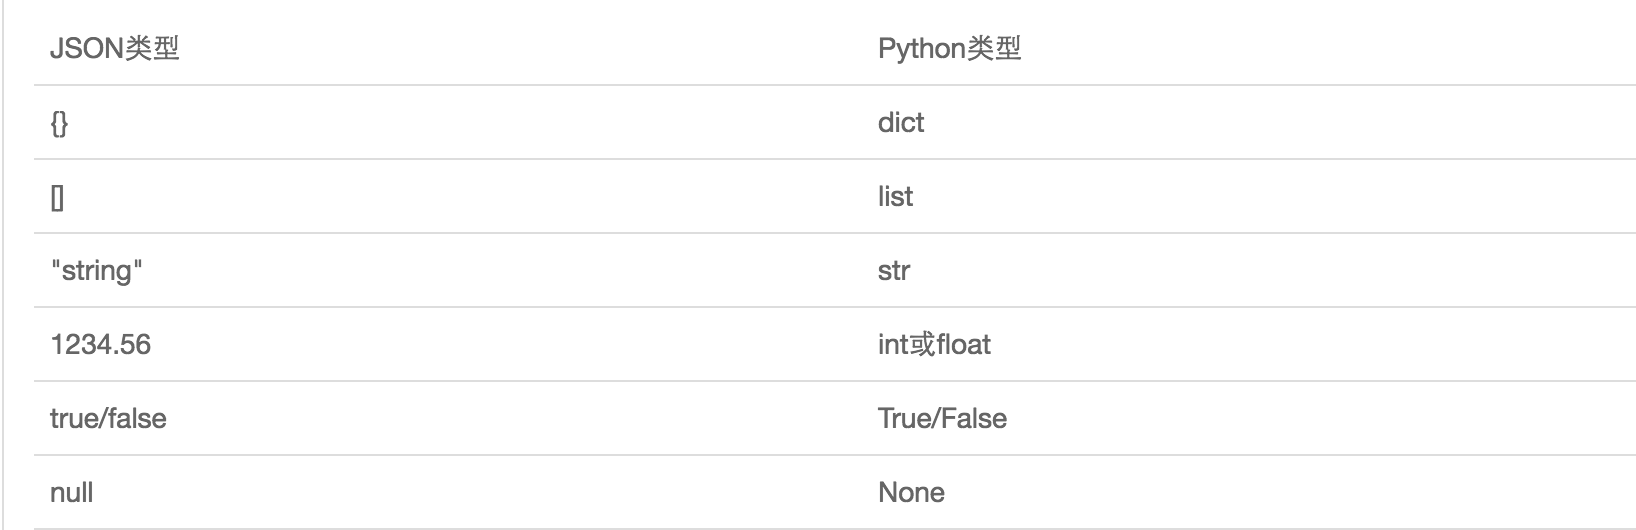
JSON表示的对象就是标准的JavaScript语言的对象,JSON和Python内置的数据类型对应如下:
- #----------------------------序列化
- import json
- dic={'name':'alvin','age':23,'sex':'male'}
- print(type(dic))#<class 'dict'>
- j=json.dumps(dic)
- print(type(j))#<class 'str'>
- f=open('序列化对象','w')
- f.write(j) #-------------------等价于json.dump(dic,f)
- f.close()
- #-----------------------------反序列化<br>
- import json
- f=open('序列化对象')
- data=json.loads(f.read())# 等价于data=json.load(f)
- import json
- #dct="{'1':111}"#json 不认单引号
- #dct=str({"1":111})#报错,因为生成的数据还是单引号:{'one': 1}
- dct='{"1":"111"}'
- print(json.loads(dct))
- #conclusion:
- # 无论数据是怎样创建的,只要满足json格式,就可以json.loads出来,不一定非要dumps的数据才能loads
注意点
pickle
- ##----------------------------序列化
- import pickle
- dic={'name':'alvin','age':23,'sex':'male'}
- print(type(dic))#<class 'dict'>
- j=pickle.dumps(dic)
- print(type(j))#<class 'bytes'>
- f=open('序列化对象_pickle','wb')#注意是w是写入str,wb是写入bytes,j是'bytes'
- f.write(j) #-------------------等价于pickle.dump(dic,f)
- f.close()
- #-------------------------反序列化
- import pickle
- f=open('序列化对象_pickle','rb')
- data=pickle.loads(f.read())# 等价于data=pickle.load(f)
- print(data['age'])
Pickle的问题和所有其他编程语言特有的序列化问题一样,就是它只能用于Python,并且可能不同版本的Python彼此都不兼容,因此,只能用Pickle保存那些不重要的数据,不能成功地反序列化也没关系。
shelve模块(* * *)
shelve模块比pickle模块简单,只有一个open函数,返回类似字典的对象,可读可写;key必须为字符串,而值可以是python所支持的数据类型
- import shelve
- f = shelve.open(r'shelve.txt')
- # f['stu1_info']={'name':'alex','age':'18'}
- # f['stu2_info']={'name':'alvin','age':'20'}
- # f['school_info']={'website':'oldboyedu.com','city':'beijing'}
- #
- #
- # f.close()
- print(f.get('stu_info')['age'])
xml模块(* *)
xml是实现不同语言或程序之间进行数据交换的协议,跟json差不多,但json使用起来更简单,不过,古时候,在json还没诞生的黑暗年代,大家只能选择用xml呀,至今很多传统公司如金融行业的很多系统的接口还主要是xml。
xml的格式如下,就是通过<>节点来区别数据结构的:
- <?xml version="1.0"?>
- <data>
- <country name="Liechtenstein">
- <rank updated="yes">2</rank>
- <year>2008</year>
- <gdppc>141100</gdppc>
- <neighbor name="Austria" direction="E"/>
- <neighbor name="Switzerland" direction="W"/>
- </country>
- <country name="Singapore">
- <rank updated="yes">5</rank>
- <year>2011</year>
- <gdppc>59900</gdppc>
- <neighbor name="Malaysia" direction="N"/>
- </country>
- <country name="Panama">
- <rank updated="yes">69</rank>
- <year>2011</year>
- <gdppc>13600</gdppc>
- <neighbor name="Costa Rica" direction="W"/>
- <neighbor name="Colombia" direction="E"/>
- </country>
- </data>
xml数据
xml协议在各个语言里的都 是支持的,在python中可以用以下模块操作xml:
- import xml.etree.ElementTree as ET
- tree = ET.parse("xmltest.xml")
- root = tree.getroot()
- print(root.tag)
- #遍历xml文档
- for child in root:
- print(child.tag, child.attrib)
- for i in child:
- print(i.tag,i.text)
- #只遍历year 节点
- for node in root.iter('year'):
- print(node.tag,node.text)
- #---------------------------------------
- import xml.etree.ElementTree as ET
- tree = ET.parse("xmltest.xml")
- root = tree.getroot()
- #修改
- for node in root.iter('year'):
- new_year = int(node.text) + 1
- node.text = str(new_year)
- node.set("updated","yes")
- tree.write("xmltest.xml")
- #删除node
- for country in root.findall('country'):
- rank = int(country.find('rank').text)
- if rank > 50:
- root.remove(country)
- tree.write('output.xml')
自己创建xml文档:
- import xml.etree.ElementTree as ET
- new_xml = ET.Element("namelist")
- name = ET.SubElement(new_xml,"name",attrib={"enrolled":"yes"})
- age = ET.SubElement(name,"age",attrib={"checked":"no"})
- sex = ET.SubElement(name,"sex")
- sex.text = ''
- name2 = ET.SubElement(new_xml,"name",attrib={"enrolled":"no"})
- age = ET.SubElement(name2,"age")
- age.text = ''
- et = ET.ElementTree(new_xml) #生成文档对象
- et.write("test.xml", encoding="utf-8",xml_declaration=True)
- ET.dump(new_xml) #打印生成的格式
创建xml文档
configparser模块(* *)
来看一个好多软件的常见文档格式如下:
- [DEFAULT]
- ServerAliveInterval = 45
- Compression = yes
- CompressionLevel = 9
- ForwardX11 = yes
- [bitbucket.org]
- User = hg
- [topsecret.server.com]
- Port = 50022
- ForwardX11 = no
如果想用python生成一个这样的文档怎么做呢?
- import configparser
- config = configparser.ConfigParser()
- config["DEFAULT"] = {'ServerAliveInterval': '',
- 'Compression': 'yes',
- 'CompressionLevel': ''}
- config['bitbucket.org'] = {}
- config['bitbucket.org']['User'] = 'hg'
- config['topsecret.server.com'] = {}
- topsecret = config['topsecret.server.com']
- topsecret['Host Port'] = '' # mutates the parser
- topsecret['ForwardX11'] = 'no' # same here
- config['DEFAULT']['ForwardX11'] = 'yes'<br>
- with open('example.ini', 'w') as configfile:
- config.write(configfile)
- import configparser
- config = configparser.ConfigParser()
- #---------------------------------------------查
- print(config.sections()) #[]
- config.read('example.ini')
- print(config.sections()) #['bitbucket.org', 'topsecret.server.com']
- print('bytebong.com' in config)# False
- print(config['bitbucket.org']['User']) # hg
- print(config['DEFAULT']['Compression']) #yes
- print(config['topsecret.server.com']['ForwardX11']) #no
- for key in config['bitbucket.org']:
- print(key)
- # user
- # serveraliveinterval
- # compression
- # compressionlevel
- # forwardx11
- print(config.options('bitbucket.org'))#['user', 'serveraliveinterval', 'compression', 'compressionlevel', 'forwardx11']
- print(config.items('bitbucket.org')) #[('serveraliveinterval', '45'), ('compression', 'yes'), ('compressionlevel', '9'), ('forwardx11', 'yes'), ('user', 'hg')]
- print(config.get('bitbucket.org','compression'))#yes
- #---------------------------------------------删,改,增(config.write(open('i.cfg', "w")))
- config.add_section('yuan')
- config.remove_section('topsecret.server.com')
- config.remove_option('bitbucket.org','user')
- config.set('bitbucket.org','k1','')
- config.write(open('i.cfg', "w"))
增删改查
hashlib模块(* *)
用于加密相关的操作,3.x里代替了md5模块和sha模块,主要提供 SHA1, SHA224, SHA256, SHA384, SHA512 ,MD5 算法
- import hashlib
- m=hashlib.md5()# m=hashlib.sha256()
- m.update('hello'.encode('utf8'))
- print(m.hexdigest()) #5d41402abc4b2a76b9719d911017c592
- m.update('alvin'.encode('utf8'))
- print(m.hexdigest()) #92a7e713c30abbb0319fa07da2a5c4af
- m2=hashlib.md5()
- m2.update('helloalvin'.encode('utf8'))
- print(m2.hexdigest()) #92a7e713c30abbb0319fa07da2a5c4af
以上加密算法虽然依然非常厉害,但时候存在缺陷,即:通过撞库可以反解。所以,有必要对加密算法中添加自定义key再来做加密。
- import hashlib
- # ######## 256 ########
- hash = hashlib.sha256('898oaFs09f'.encode('utf8'))
- hash.update('alvin'.encode('utf8'))
- print (hash.hexdigest())#e79e68f070cdedcfe63eaf1a2e92c83b4cfb1b5c6bc452d214c1b7e77cdfd1c7
python 还有一个 hmac 模块,它内部对我们创建 key 和 内容 再进行处理然后再加密:
- import hmac
- h = hmac.new('alvin'.encode('utf8'))
- h.update('hello'.encode('utf8'))
- print (h.hexdigest())#320df9832eab4c038b6c1d7ed73a5940
subprocess模块(* * * *)
当我们需要调用系统的命令的时候,最先考虑的os模块。用os.system()和os.popen()来进行操作。但是这两个命令过于简单,不能完成一些复杂的操作,如给运行的命令提供输入或者读取命令的输出,判断该命令的运行状态,管理多个命令的并行等等。这时subprocess中的Popen命令就能有效的完成我们需要的操作。
The subprocess module allows you to spawn new processes, connect to their input/output/error pipes, and obtain their return codes.
This module intends to replace several other, older modules and functions, such as: os.system、os.spawn*、os.popen*、popen2.*、commands.*
这个模块一个类:Popen。
- #Popen它的构造函数如下:
- subprocess.Popen(args, bufsize=0, executable=None, stdin=None, stdout=None,stderr=None, preexec_fn=None, close_fds=False, shell=False,<br> cwd=None, env=None, universal_newlines=False, startupinfo=None, creationflags=0)
- # 参数args可以是字符串或者序列类型(如:list,元组),用于指定进程的可执行文件及其参数。
- # 如果是序列类型,第一个元素通常是可执行文件的路径。我们也可以显式的使用executeable参
- # 数来指定可执行文件的路径。在windows操作系统上,Popen通过调用CreateProcess()来创
- # 建子进程,CreateProcess接收一个字符串参数,如果args是序列类型,系统将会通过
- # list2cmdline()函数将序列类型转换为字符串。
- #
- #
- # 参数bufsize:指定缓冲。我到现在还不清楚这个参数的具体含义,望各个大牛指点。
- #
- # 参数executable用于指定可执行程序。一般情况下我们通过args参数来设置所要运行的程序。如
- # 果将参数shell设为True,executable将指定程序使用的shell。在windows平台下,默认的
- # shell由COMSPEC环境变量来指定。
- #
- # 参数stdin, stdout, stderr分别表示程序的标准输入、输出、错误句柄。他们可以是PIPE,
- # 文件描述符或文件对象,也可以设置为None,表示从父进程继承。
- #
- # 参数preexec_fn只在Unix平台下有效,用于指定一个可执行对象(callable object),它将
- # 在子进程运行之前被调用。
- #
- # 参数Close_sfs:在windows平台下,如果close_fds被设置为True,则新创建的子进程将不会
- # 继承父进程的输入、输出、错误管道。我们不能将close_fds设置为True同时重定向子进程的标准
- # 输入、输出与错误(stdin, stdout, stderr)。
- #
- # 如果参数shell设为true,程序将通过shell来执行。
- #
- # 参数cwd用于设置子进程的当前目录。
- #
- # 参数env是字典类型,用于指定子进程的环境变量。如果env = None,子进程的环境变量将从父
- # 进程中继承。
- #
- # 参数Universal_newlines:不同操作系统下,文本的换行符是不一样的。如:windows下
- # 用’/r/n’表示换,而Linux下用’/n’。如果将此参数设置为True,Python统一把这些换行符当
- # 作’/n’来处理。
- #
- # 参数startupinfo与createionflags只在windows下用效,它们将被传递给底层的
- # CreateProcess()函数,用于设置子进程的一些属性,如:主窗口的外观,进程的优先级等等。
parameter
简单命令:
- import subprocess
- a=subprocess.Popen('ls')# 创建一个新的进程,与主进程不同步
- print('>>>>>>>',a)#a是Popen的一个实例对象
- '''
- >>>>>>> <subprocess.Popen object at 0x10185f860>
- __init__.py
- __pycache__
- log.py
- main.py
- '''
- # subprocess.Popen('ls -l',shell=True)
- # subprocess.Popen(['ls','-l'])
subprocess.PIPE
在创建Popen对象时,subprocess.PIPE可以初始化stdin, stdout或stderr参数。表示与子进程通信的标准流。
- import subprocess
- # subprocess.Popen('ls')
- p=subprocess.Popen('ls',stdout=subprocess.PIPE)#结果跑哪去啦?
- print(p.stdout.read())#这这呢:b'__pycache__\nhello.py\nok.py\nweb\n'
这是因为subprocess创建了子进程,结果本在子进程中,if 想要执行结果转到主进程中,就得需要一个管道,即 : stdout=subprocess.PIPE
subprocess.STDOUT
创建Popen对象时,用于初始化stderr参数,表示将错误通过标准输出流输出。
Popen的方法
- Popen.poll()
- 用于检查子进程是否已经结束。设置并返回returncode属性。
- Popen.wait()
- 等待子进程结束。设置并返回returncode属性。
- Popen.communicate(input=None)
- 与子进程进行交互。向stdin发送数据,或从stdout和stderr中读取数据。可选参数input指定发送到子进程的参数。 Communicate()返回一个元组:(stdoutdata, stderrdata)。注意:如果希望通过进程的stdin向其发送数据,在创建Popen对象的时候,参数stdin必须被设置为PIPE。同样,如 果希望从stdout和stderr获取数据,必须将stdout和stderr设置为PIPE。
- Popen.send_signal(signal)
- 向子进程发送信号。
- Popen.terminate()
- 停止(stop)子进程。在windows平台下,该方法将调用Windows API TerminateProcess()来结束子进程。
- Popen.kill()
- 杀死子进程。
- Popen.stdin
- 如果在创建Popen对象是,参数stdin被设置为PIPE,Popen.stdin将返回一个文件对象用于策子进程发送指令。否则返回None。
- Popen.stdout
- 如果在创建Popen对象是,参数stdout被设置为PIPE,Popen.stdout将返回一个文件对象用于策子进程发送指令。否则返回 None。
- Popen.stderr
- 如果在创建Popen对象是,参数stdout被设置为PIPE,Popen.stdout将返回一个文件对象用于策子进程发送指令。否则返回 None。
- Popen.pid
- 获取子进程的进程ID。
- Popen.returncode
- 获取进程的返回值。如果进程还没有结束,返回None。
supprocess模块的工具函数
- supprocess模块提供了一些函数,方便我们用于创建进程来实现一些简单的功能。
- subprocess.call(*popenargs, **kwargs)
- 运行命令。该函数将一直等待到子进程运行结束,并返回进程的returncode。如果子进程不需要进行交 互,就可以使用该函数来创建。
- subprocess.check_call(*popenargs, **kwargs)
- 与subprocess.call(*popenargs, **kwargs)功能一样,只是如果子进程返回的returncode不为0的话,将触发CalledProcessError异常。在异常对象中,包 括进程的returncode信息。
- check_output(*popenargs, **kwargs)
- 与call()方法类似,以byte string的方式返回子进程的输出,如果子进程的返回值不是0,它抛出CalledProcessError异常,这个异常中的returncode包含返回码,output属性包含已有的输出。
- getstatusoutput(cmd)/getoutput(cmd)
- 这两个函数仅仅在Unix下可用,它们在shell中执行指定的命令cmd,前者返回(status, output),后者返回output。其中,这里的output包括子进程的stdout和stderr。
- import subprocess
- #
- # subprocess.call('ls',shell=True)
- '''
- hello.py
- ok.py
- web
- '''
- # data=subprocess.call('ls',shell=True)
- # print(data)
- '''
- hello.py
- ok.py
- web
- '''
- #
- # subprocess.check_call('ls',shell=True)
- '''
- hello.py
- ok.py
- web
- '''
- # data=subprocess.check_call('ls',shell=True)
- # print(data)
- '''
- hello.py
- ok.py
- web
- '''
- # 两个函数区别:只是如果子进程返回的returncode不为0的话,将触发CalledProcessError异常
- #
- # subprocess.check_output('ls')#无结果
- # data=subprocess.check_output('ls')
- # print(data) #b'hello.py\nok.py\nweb\n'
演示
交互命令:
终端输入的命令分为两种:
- 输入即可得到输出,如:ifconfig
- 输入进行某环境,依赖再输入,如:python
需要交互的命令示例
待续
logging模块(* * * * *)
一 (简单应用)
- import logging
- logging.debug('debug message')
- logging.info('info message')
- logging.warning('warning message')
- logging.error('error message')
- logging.critical('critical message')
输出:
WARNING:root:warning message
ERROR:root:error message
CRITICAL:root:critical message
可见,默认情况下Python的logging模块将日志打印到了标准输出中,且只显示了大于等于WARNING级别的日志,这说明默认的日志级别设置为WARNING(日志级别等级CRITICAL > ERROR > WARNING > INFO > DEBUG > NOTSET),默认的日志格式为日志级别:Logger名称:用户输出消息。
二 灵活配置日志级别,日志格式,输出位置
- import logging
- logging.basicConfig(level=logging.DEBUG,
- format='%(asctime)s %(filename)s[line:%(lineno)d] %(levelname)s %(message)s',
- datefmt='%a, %d %b %Y %H:%M:%S',
- filename='/tmp/test.log',
- filemode='w')
- logging.debug('debug message')
- logging.info('info message')
- logging.warning('warning message')
- logging.error('error message')
- logging.critical('critical message')
查看输出:
cat /tmp/test.log
Mon, 05 May 2014 16:29:53 test_logging.py[line:9] DEBUG debug message
Mon, 05 May 2014 16:29:53 test_logging.py[line:10] INFO info message
Mon, 05 May 2014 16:29:53 test_logging.py[line:11] WARNING warning message
Mon, 05 May 2014 16:29:53 test_logging.py[line:12] ERROR error message
Mon, 05 May 2014 16:29:53 test_logging.py[line:13] CRITICAL critical message
可见在logging.basicConfig()函数中可通过具体参数来更改logging模块默认行为,可用参数有
filename:用指定的文件名创建FiledHandler(后边会具体讲解handler的概念),这样日志会被存储在指定的文件中。
filemode:文件打开方式,在指定了filename时使用这个参数,默认值为“a”还可指定为“w”。
format:指定handler使用的日志显示格式。
datefmt:指定日期时间格式。
level:设置rootlogger(后边会讲解具体概念)的日志级别
stream:用指定的stream创建StreamHandler。可以指定输出到sys.stderr,sys.stdout或者文件(f=open('test.log','w')),默认为sys.stderr。若同时列出了filename和stream两个参数,则stream参数会被忽略。
format参数中可能用到的格式化串:
%(name)s Logger的名字
%(levelno)s 数字形式的日志级别
%(levelname)s 文本形式的日志级别
%(pathname)s 调用日志输出函数的模块的完整路径名,可能没有
%(filename)s 调用日志输出函数的模块的文件名
%(module)s 调用日志输出函数的模块名
%(funcName)s 调用日志输出函数的函数名
%(lineno)d 调用日志输出函数的语句所在的代码行
%(created)f 当前时间,用UNIX标准的表示时间的浮 点数表示
%(relativeCreated)d 输出日志信息时的,自Logger创建以 来的毫秒数
%(asctime)s 字符串形式的当前时间。默认格式是 “2003-07-08 16:49:45,896”。逗号后面的是毫秒
%(thread)d 线程ID。可能没有
%(threadName)s 线程名。可能没有
%(process)d 进程ID。可能没有
%(message)s用户输出的消息
三 logger对象
上述几个例子中我们了解到了logging.debug()、logging.info()、logging.warning()、logging.error()、logging.critical()(分别用以记录不同级别的日志信息),logging.basicConfig()(用默认日志格式(Formatter)为日志系统建立一个默认的流处理器(StreamHandler),设置基础配置(如日志级别等)并加到root logger(根Logger)中)这几个logging模块级别的函数,另外还有一个模块级别的函数是logging.getLogger([name])(返回一个logger对象,如果没有指定名字将返回root logger)
先看一个最简单的过程:
- import logging
- logger = logging.getLogger()
- # 创建一个handler,用于写入日志文件
- fh = logging.FileHandler('test.log')
- # 再创建一个handler,用于输出到控制台
- ch = logging.StreamHandler()
- formatter = logging.Formatter('%(asctime)s - %(name)s - %(levelname)s - %(message)s')
- fh.setFormatter(formatter)
- ch.setFormatter(formatter)
- logger.addHandler(fh) #logger对象可以添加多个fh和ch对象
- logger.addHandler(ch)
- logger.debug('logger debug message')
- logger.info('logger info message')
- logger.warning('logger warning message')
- logger.error('logger error message')
- logger.critical('logger critical message')
先简单介绍一下,logging库提供了多个组件:Logger、Handler、Filter、Formatter。Logger对象提供应用程序可直接使用的接口,Handler发送日志到适当的目的地,Filter提供了过滤日志信息的方法,Formatter指定日志显示格式。
(1)
Logger是一个树形层级结构,输出信息之前都要获得一个Logger(如果没有显示的获取则自动创建并使用root Logger,如第一个例子所示)。
logger = logging.getLogger()返回一个默认的Logger也即root Logger,并应用默认的日志级别、Handler和Formatter设置。
当然也可以通过Logger.setLevel(lel)指定最低的日志级别,可用的日志级别有logging.DEBUG、logging.INFO、logging.WARNING、logging.ERROR、logging.CRITICAL。
Logger.debug()、Logger.info()、Logger.warning()、Logger.error()、Logger.critical()输出不同级别的日志,只有日志等级大于或等于设置的日志级别的日志才会被输出。
- logger.debug('logger debug message')
- logger.info('logger info message')
- logger.warning('logger warning message')
- logger.error('logger error message')
- logger.critical('logger critical message')
只输出了
2014-05-06 12:54:43,222 - root - WARNING - logger warning message
2014-05-06 12:54:43,223 - root - ERROR - logger error message
2014-05-06 12:54:43,224 - root - CRITICAL - logger critical message
从这个输出可以看出logger = logging.getLogger()返回的Logger名为root。这里没有用logger.setLevel(logging.Debug)显示的为logger设置日志级别,所以使用默认的日志级别WARNIING,故结果只输出了大于等于WARNIING级别的信息。
(2) 如果我们再创建两个logger对象:
- ##################################################
- logger1 = logging.getLogger('mylogger')
- logger1.setLevel(logging.DEBUG)
- logger2 = logging.getLogger('mylogger')
- logger2.setLevel(logging.INFO)
- logger1.addHandler(fh)
- logger1.addHandler(ch)
- logger2.addHandler(fh)
- logger2.addHandler(ch)
- logger1.debug('logger1 debug message')
- logger1.info('logger1 info message')
- logger1.warning('logger1 warning message')
- logger1.error('logger1 error message')
- logger1.critical('logger1 critical message')
- logger2.debug('logger2 debug message')
- logger2.info('logger2 info message')
- logger2.warning('logger2 warning message')
- logger2.error('logger2 error message')
- logger2.critical('logger2 critical message')
结果:
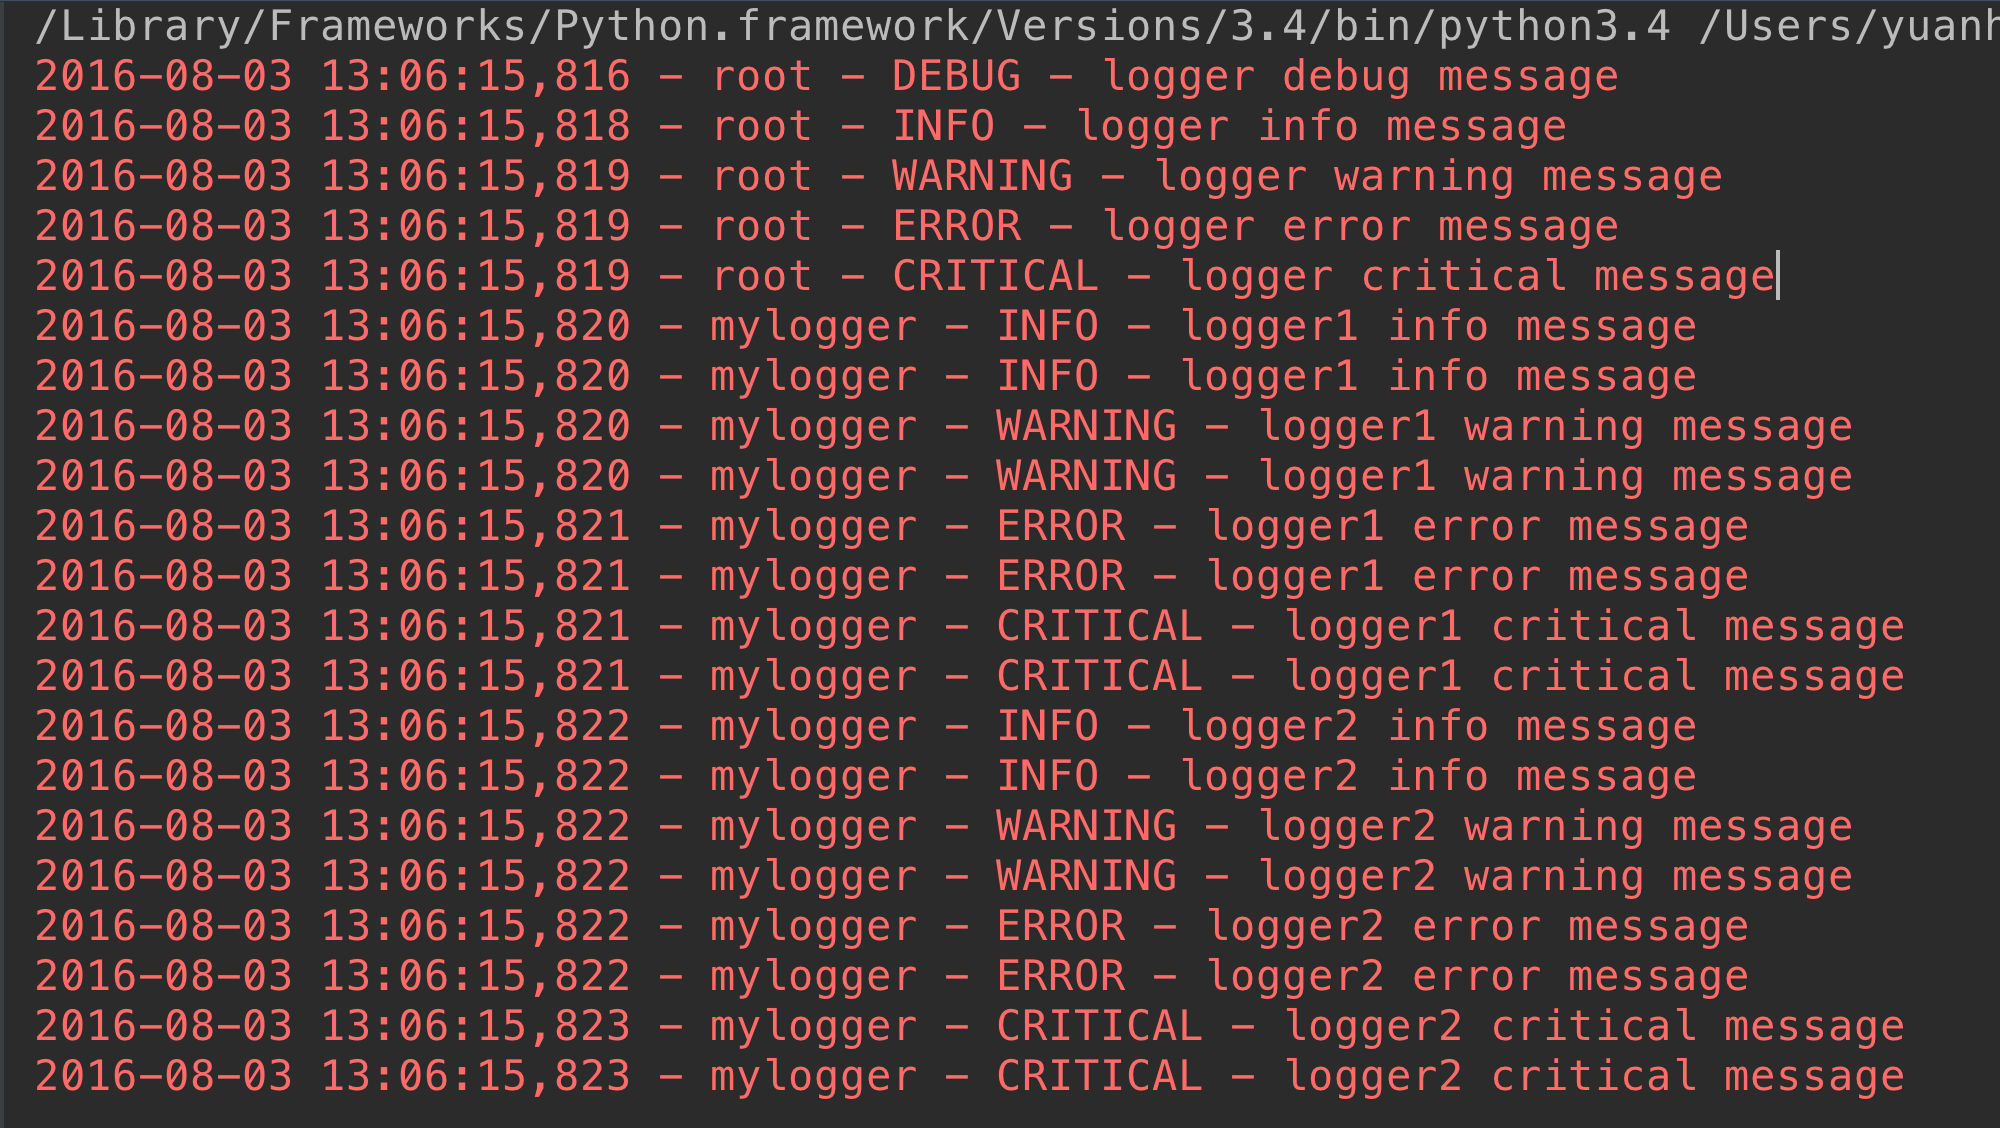
这里有两个个问题:
<1>我们明明通过logger1.setLevel(logging.DEBUG)将logger1的日志级别设置为了DEBUG,为何显示的时候没有显示出DEBUG级别的日志信息,而是从INFO级别的日志开始显示呢?
原来logger1和logger2对应的是同一个Logger实例,只要logging.getLogger(name)中名称参数name相同则返回的Logger实例就是同一个,且仅有一个,也即name与Logger实例一一对应。在logger2实例中通过logger2.setLevel(logging.INFO)设置mylogger的日志级别为logging.INFO,所以最后logger1的输出遵从了后来设置的日志级别。
<2>为什么logger1、logger2对应的每个输出分别显示两次?
这是因为我们通过logger = logging.getLogger()显示的创建了root Logger,而logger1 = logging.getLogger('mylogger')创建了root Logger的孩子(root.)mylogger,logger2同样。而孩子,孙子,重孙……既会将消息分发给他的handler进行处理也会传递给所有的祖先Logger处理。
ok,那么现在我们把
# logger.addHandler(fh)
# logger.addHandler(ch) 注释掉,我们再来看效果:
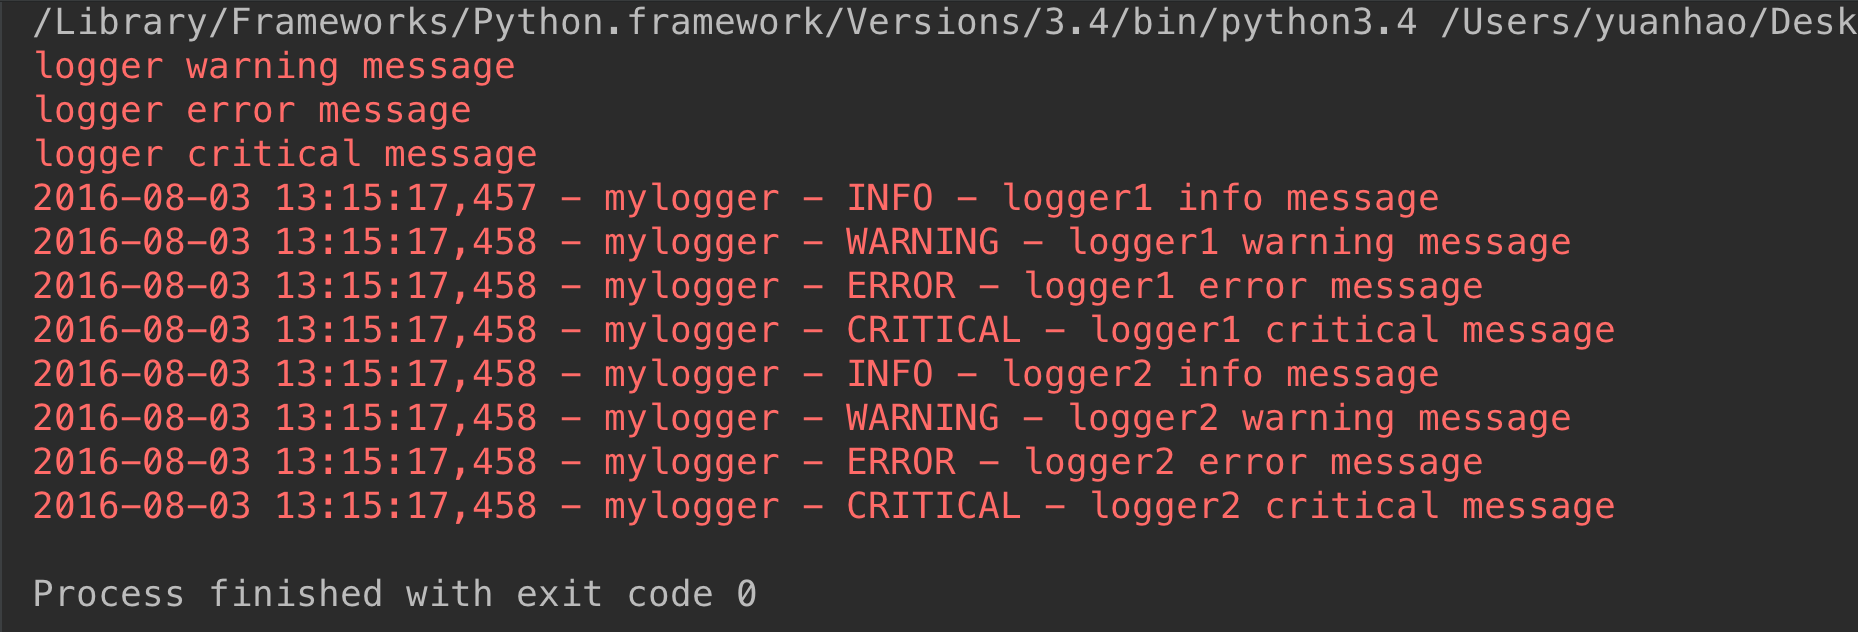
因为我们注释了logger对象显示的位置,所以才用了默认方式,即标准输出方式。因为它的父级没有设置文件显示方式,所以在这里只打印了一次。
孩子,孙子,重孙……可逐层继承来自祖先的日志级别、Handler、Filter设置,也可以通过Logger.setLevel(lel)、Logger.addHandler(hdlr)、Logger.removeHandler(hdlr)、Logger.addFilter(filt)、Logger.removeFilter(filt)。设置自己特别的日志级别、Handler、Filter。若不设置则使用继承来的值。
<3>Filter
限制只有满足过滤规则的日志才会输出。
比如我们定义了filter = logging.Filter('a.b.c'),并将这个Filter添加到了一个Handler上,则使用该Handler的Logger中只有名字带 a.b.c前缀的Logger才能输出其日志。
filter = logging.Filter('mylogger')
logger.addFilter(filter)
这是只对logger这个对象进行筛选
如果想对所有的对象进行筛选,则:
filter = logging.Filter('mylogger')
fh.addFilter(filter)
ch.addFilter(filter)
这样,所有添加fh或者ch的logger对象都会进行筛选。
完整代码1:
- import logging
- logger = logging.getLogger()
- # 创建一个handler,用于写入日志文件
- fh = logging.FileHandler('test.log')
- # 再创建一个handler,用于输出到控制台
- ch = logging.StreamHandler()
- formatter = logging.Formatter('%(asctime)s - %(name)s - %(levelname)s - %(message)s')
- fh.setFormatter(formatter)
- ch.setFormatter(formatter)
- # 定义一个filter
- filter = logging.Filter('mylogger')
- fh.addFilter(filter)
- ch.addFilter(filter)
- # logger.addFilter(filter)
- logger.addHandler(fh)
- logger.addHandler(ch)
- logger.setLevel(logging.DEBUG)
- logger.debug('logger debug message')
- logger.info('logger info message')
- logger.warning('logger warning message')
- logger.error('logger error message')
- logger.critical('logger critical message')
- ##################################################
- logger1 = logging.getLogger('mylogger')
- logger1.setLevel(logging.DEBUG)
- logger2 = logging.getLogger('mylogger')
- logger2.setLevel(logging.INFO)
- logger1.addHandler(fh)
- logger1.addHandler(ch)
- logger2.addHandler(fh)
- logger2.addHandler(ch)
- logger1.debug('logger1 debug message')
- logger1.info('logger1 info message')
- logger1.warning('logger1 warning message')
- logger1.error('logger1 error message')
- logger1.critical('logger1 critical message')
- logger2.debug('logger2 debug message')
- logger2.info('logger2 info message')
- logger2.warning('logger2 warning message')
- logger2.error('logger2 error message')
- logger2.critical('logger2 critical message')
完整代码2:
- #coding:utf-8
- import logging
- # 创建一个logger
- logger = logging.getLogger()
- logger1 = logging.getLogger('mylogger')
- logger1.setLevel(logging.DEBUG)
- logger2 = logging.getLogger('mylogger')
- logger2.setLevel(logging.INFO)
- logger3 = logging.getLogger('mylogger.child1')
- logger3.setLevel(logging.WARNING)
- logger4 = logging.getLogger('mylogger.child1.child2')
- logger4.setLevel(logging.DEBUG)
- logger5 = logging.getLogger('mylogger.child1.child2.child3')
- logger5.setLevel(logging.DEBUG)
- # 创建一个handler,用于写入日志文件
- fh = logging.FileHandler('/tmp/test.log')
- # 再创建一个handler,用于输出到控制台
- ch = logging.StreamHandler()
- # 定义handler的输出格式formatter
- formatter = logging.Formatter('%(asctime)s - %(name)s - %(levelname)s - %(message)s')
- fh.setFormatter(formatter)
- ch.setFormatter(formatter)
- #定义一个filter
- #filter = logging.Filter('mylogger.child1.child2')
- #fh.addFilter(filter)
- # 给logger添加handler
- #logger.addFilter(filter)
- logger.addHandler(fh)
- logger.addHandler(ch)
- #logger1.addFilter(filter)
- logger1.addHandler(fh)
- logger1.addHandler(ch)
- logger2.addHandler(fh)
- logger2.addHandler(ch)
- #logger3.addFilter(filter)
- logger3.addHandler(fh)
- logger3.addHandler(ch)
- #logger4.addFilter(filter)
- logger4.addHandler(fh)
- logger4.addHandler(ch)
- logger5.addHandler(fh)
- logger5.addHandler(ch)
- # 记录一条日志
- logger.debug('logger debug message')
- logger.info('logger info message')
- logger.warning('logger warning message')
- logger.error('logger error message')
- logger.critical('logger critical message')
- logger1.debug('logger1 debug message')
- logger1.info('logger1 info message')
- logger1.warning('logger1 warning message')
- logger1.error('logger1 error message')
- logger1.critical('logger1 critical message')
- logger2.debug('logger2 debug message')
- logger2.info('logger2 info message')
- logger2.warning('logger2 warning message')
- logger2.error('logger2 error message')
- logger2.critical('logger2 critical message')
- logger3.debug('logger3 debug message')
- logger3.info('logger3 info message')
- logger3.warning('logger3 warning message')
- logger3.error('logger3 error message')
- logger3.critical('logger3 critical message')
- logger4.debug('logger4 debug message')
- logger4.info('logger4 info message')
- logger4.warning('logger4 warning message')
- logger4.error('logger4 error message')
- logger4.critical('logger4 critical message')
- logger5.debug('logger5 debug message')
- logger5.info('logger5 info message')
- logger5.warning('logger5 warning message')
- logger5.error('logger5 error message')
- logger5.critical('logger5 critical message')
应用:
- import os
- import time
- import logging
- from config import settings
- def get_logger(card_num, struct_time):
- if struct_time.tm_mday < 23:
- file_name = "%s_%s_%d" %(struct_time.tm_year, struct_time.tm_mon, 22)
- else:
- file_name = "%s_%s_%d" %(struct_time.tm_year, struct_time.tm_mon+1, 22)
- file_handler = logging.FileHandler(
- os.path.join(settings.USER_DIR_FOLDER, card_num, 'record', file_name),
- encoding='utf-8'
- )
- fmt = logging.Formatter(fmt="%(asctime)s : %(message)s")
- file_handler.setFormatter(fmt)
- logger1 = logging.Logger('user_logger', level=logging.INFO)
- logger1.addHandler(file_handler)
- return logger1
re模块(* * * * *)
就其本质而言,正则表达式(或 RE)是一种小型的、高度专业化的编程语言,(在Python中)它内嵌在Python中,并通过 re 模块实现。正则表达式模式被编译成一系列的字节码,然后由用 C 编写的匹配引擎执行。
字符匹配(普通字符,元字符):
1 普通字符:大多数字符和字母都会和自身匹配
>>> re.findall('alvin','yuanaleSxalexwupeiqi')
['alvin']
2 元字符:. ^ $ * + ? { } [ ] | ( ) \
元字符之. ^ $ * + ? { }
- import re
- ret=re.findall('a..in','helloalvin')
- print(ret)#['alvin']
- ret=re.findall('^a...n','alvinhelloawwwn')
- print(ret)#['alvin']
- ret=re.findall('a...n$','alvinhelloawwwn')
- print(ret)#['awwwn']
- ret=re.findall('a...n$','alvinhelloawwwn')
- print(ret)#['awwwn']
- ret=re.findall('abc*','abcccc')#贪婪匹配[0,+oo]
- print(ret)#['abcccc']
- ret=re.findall('abc+','abccc')#[1,+oo]
- print(ret)#['abccc']
- ret=re.findall('abc?','abccc')#[0,1]
- print(ret)#['abc']
- ret=re.findall('abc{1,4}','abccc')
- print(ret)#['abccc'] 贪婪匹配
注意:前面的*,+,?等都是贪婪匹配,也就是尽可能匹配,后面加?号使其变成惰性匹配
- ret=re.findall('abc*?','abcccccc')
- print(ret)#['ab']
元字符之字符集[]:
- #--------------------------------------------字符集[]
- ret=re.findall('a[bc]d','acd')
- print(ret)#['acd']
- ret=re.findall('[a-z]','acd')
- print(ret)#['a', 'c', 'd']
- ret=re.findall('[.*+]','a.cd+')
- print(ret)#['.', '+']
- #在字符集里有功能的符号: - ^ \
- ret=re.findall('[1-9]','45dha3')
- print(ret)#['4', '5', '3']
- ret=re.findall('[^ab]','45bdha3')
- print(ret)#['4', '5', 'd', 'h', '3']
- ret=re.findall('[\d]','45bdha3')
- print(ret)#['4', '5', '3']
元字符之转义符\
反斜杠后边跟元字符去除特殊功能,比如\.
反斜杠后边跟普通字符实现特殊功能,比如\d
\d 匹配任何十进制数;它相当于类 [0-9]。
\D 匹配任何非数字字符;它相当于类 [^0-9]。
\s 匹配任何空白字符;它相当于类 [ \t\n\r\f\v]。
\S 匹配任何非空白字符;它相当于类 [^ \t\n\r\f\v]。
\w 匹配任何字母数字字符;它相当于类 [a-zA-Z0-9_]。
\W 匹配任何非字母数字字符;它相当于类 [^a-zA-Z0-9_]
\b 匹配一个特殊字符边界,比如空格 ,&,#等
- ret=re.findall('I\b','I am LIST')
- print(ret)#[]
- ret=re.findall(r'I\b','I am LIST')
- print(ret)#['I']
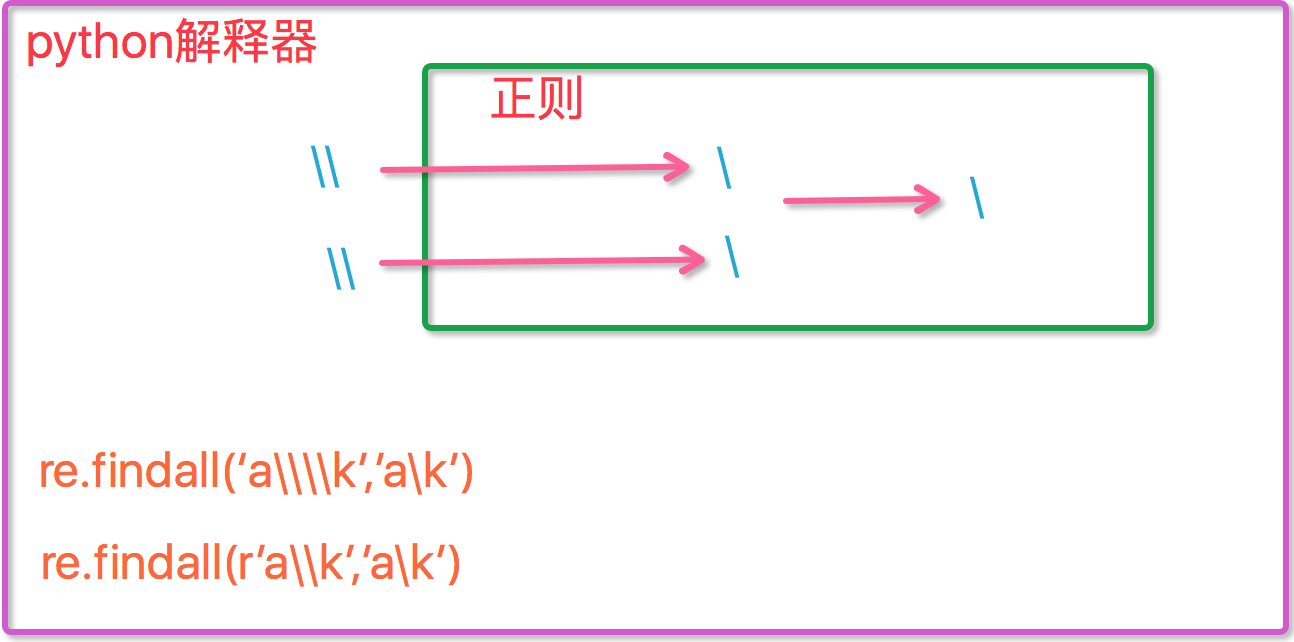
现在我们聊一聊\,先看下面两个匹配:
- #-----------------------------eg1:
- import re
- ret=re.findall('c\l','abc\le')
- print(ret)#[]
- ret=re.findall('c\\l','abc\le')
- print(ret)#[]
- ret=re.findall('c\\\\l','abc\le')
- print(ret)#['c\\l']
- ret=re.findall(r'c\\l','abc\le')
- print(ret)#['c\\l']
- #-----------------------------eg2:
- #之所以选择\b是因为\b在ASCII表中是有意义的
- m = re.findall('\bblow', 'blow')
- print(m)
- m = re.findall(r'\bblow', 'blow')
- print(m)
元字符之分组()
- m = re.findall(r'(ad)+', 'add')
- print(m)
- ret=re.search('(?P<id>\d{2})/(?P<name>\w{3})','23/com')
- print(ret.group())#23/com
- print(ret.group('id'))#
元字符之|
- ret=re.search('(ab)|\d','rabhdg8sd')
- print(ret.group())#ab
re模块下的常用方法
- import re
- #
- re.findall('a','alvin yuan') #返回所有满足匹配条件的结果,放在列表里
- #
- re.search('a','alvin yuan').group() #函数会在字符串内查找模式匹配,只到找到第一个匹配然后返回一个包含匹配信息的对象,该对象可以
- # 通过调用group()方法得到匹配的字符串,如果字符串没有匹配,则返回None。
- #
- re.match('a','abc').group() #同search,不过尽在字符串开始处进行匹配
- #
- ret=re.split('[ab]','abcd') #先按'a'分割得到''和'bcd',在对''和'bcd'分别按'b'分割
- print(ret)#['', '', 'cd']
- #
- ret=re.sub('\d','abc','alvin5yuan6',1)
- print(ret)#alvinabcyuan6
- ret=re.subn('\d','abc','alvin5yuan6')
- print(ret)#('alvinabcyuanabc', 2)
- #
- obj=re.compile('\d{3}')
- ret=obj.search('abc123eeee')
- print(ret.group())#
- import re
- ret=re.finditer('\d','ds3sy4784a')
- print(ret) #<callable_iterator object at 0x10195f940>
- print(next(ret).group())
- print(next(ret).group())
注意:
- import re
- ret=re.findall('www.(baidu|oldboy).com','www.oldboy.com')
- print(ret)#['oldboy'] 这是因为findall会优先把匹配结果组里内容返回,如果想要匹配结果,取消权限即可
- ret=re.findall('www.(?:baidu|oldboy).com','www.oldboy.com')
- print(ret)#['www.oldboy.com']
补充1:
- import re
- print(re.findall("<(?P<tag_name>\w+)>\w+</(?P=tag_name)>","<h1>hello</h1>"))
- print(re.search("<(?P<tag_name>\w+)>\w+</(?P=tag_name)>","<h1>hello</h1>"))
- print(re.search(r"<(\w+)>\w+</\1>","<h1>hello</h1>"))
补充2:
- #匹配出所有的整数
- import re
- #ret=re.findall(r"\d+{0}]","1-2*(60+(-40.35/5)-(-4*3))")
- ret=re.findall(r"-?\d+\.\d*|(-?\d+)","1-2*(60+(-40.35/5)-(-4*3))")
- ret.remove("")
- print(ret)
print(random.randint(1,3)) #[1,3]print(random.randrange(1,3)) #[1,3)print(random.choice([1,'23',[4,5]]))#23print(random.sample([1,'23',[4,5]],2))#[[4, 5], '23']print(random.uniform(1,3))#1.927109612082716item=[1,3,5,7,9]random.shuffle(item)print(item)计算器作业
- import re
- s = '1 - 2 * ( (60-30 +(-40/5) * (9-2*5/3 + 7 /3*99/4*2998 +10 * 568/14 )) - (-4*3)/ (16-3*2) )'
- # 计算乘除返回值
- # 1.使用'*'或者'/'切割,拿到a,b
- # 2.计算浮点数a,b结果,返回结果
- def atom_cal(exp):
- if '*' in exp:
- a,b = exp.split('*')
- return str(float(a) * float(b))
- elif '/' in exp:
- a,b = exp.split('/')
- return str(float(a) / float(b))
- # 格式化--/+-/-+/++等符号,方便计算
- def format_exp(exp):
- exp = exp.replace('--','+')
- exp = exp.replace('-+','-')
- exp = exp.replace('+-','-')
- exp = exp.replace('++','+')
- return exp
- # 使用正则拿到乘除法算式,再使用atom_exp函数计算乘除法结果,并返回结果
- # 1.使用re模块的search方法,筛选乘除法,正则表达式:\d+(\.\d+)?[*/]-?\d+(\.\d+)?
- # 2.调用atom_cal函数计算拿到筛选后的乘除算式
- # 3.将计算结果替换到原算式位置
- # 4.返回计算完结果
- def mul_div(exp):
- while True:
- ret = re.search('\d+(\.\d+)?[*/]-?\d+(\.\d+)?',exp)
- if ret:
- atom_exp = ret.group()
- res = atom_cal(atom_exp)
- exp = exp.replace(atom_exp,res)
- else:
- return exp
- # 使用正则拿到加减进行加减运算
- # 1.使用re模块的findall方法,筛选加减法,正则表达式:[+-]?\d+(?:\.\d+)?
- # 2.创建结果变量
- # 3.拿到所有算式,结果相加
- def add_sub(exp):
- ret = re.findall('[+-]?\d+(?:\.\d+)?',exp)
- exp_sum = 0
- for i in ret:
- exp_sum += float(i)
- return exp_sum
- # 计算每个算式的结果
- # 1.调用乘除法函数(mul_div),先算乘除结果
- # 2.格式化计算符号(--/+-/-+/++),方便加减计算
- # 3.调用加减法函数(add_sub),计算加减
- # 4.返回计算结果
- def cal(exp):
- exp = mul_div(exp)
- exp = format_exp(exp)
- exp_sum = add_sub(exp)
- return exp_sum
- # 主函数
- # 1.去空格
- # 2.使用正则拿到所有括号内的算式,正则表达式:\([^()]+\)
- # 3.通过re模块的search方法分别取每个算式
- # 4.让拿到的括号中的每个算式使用cal函数进行计算
- # 5.将计算的结果替换到原算式位置
- # 6.解决最外层计算符号
- # 7.返回最终计算结果
- def main(exp):
- exp = exp.replace(' ','')
- while True:
- ret = re.search('\([^()]+\)',exp)
- if ret:
- inner_bracked = ret.group()
- res = str(cal(inner_bracked))
- exp = exp.replace(inner_bracked,res)
- exp = format_exp(exp)
- else:
- break
- return cal(exp)
- ret = main(s)
- print(ret)
- print(eval(s))
python学习------模块的更多相关文章
- [Python学习] 模块三.基本字符串
于Python最重要的数据类型包含字符串.名单.元组和字典.本文重点介绍Python基础知识. 一.字符串基础 字符串指一有序的字符序列集合,用单引號.双引號.三重(单 ...
- python学习——模块和包
在之前常用模块中我们已经初步了解了模块的导入,今天来说学习一下模块和包.我们可以把模块理解成每一个python文件.而包就是多个能解决一类问题的python文件全部放在一起.OK
- python 学习 模块
在计算机程序的开发过程中,随着程序代码越写越多,在一个文件里代码就越来越长,越来越不容易 维护, 为了编写可维护的代码,我们把很多函数分组,分别放到不同的文件里,这样,每个文件包含的代码就相对较少,很 ...
- python学习-模块与包(九)
9.4查看模块内容 dir(): 返回模块或类所包含的全部程序单元(包括变量.函数.类和方法等) __all__:模块本身提供的变量,不会展示以下划线开头的程序单元.另使用from xx import ...
- Python学习基础笔记(全)
换博客了,还是csdn好一些. Python学习基础笔记 1.Python学习-linux下Python3的安装 2.Python学习-数据类型.运算符.条件语句 3.Python学习-循环语句 4. ...
- python学习笔记-(九)模块
基础知识 1. 定义 模块:用来从逻辑上组织python代码(变量,函数,类,逻辑----实现一个功能),本质就是.py结尾的python文件(文件名:test.py,对应的模块就是test) 包:用 ...
- python学习笔记五 模块上(基础篇)
模块学习 模块,用一砣代码实现了某个功能的代码集合. 类似于函数式编程和面向过程编程,函数式编程则完成一个功能,其他代码用来调用即可,提供了代码的重用性和代码间的耦合.而对于一个复杂的功能来,可能需要 ...
- Python学习 Part4:模块
Python学习 Part4:模块 1. 模块是将定义保存在一个文件中的方法,然后在脚本中或解释器的交互实例中使用.模块中的定义可以被导入到其他模块或者main模块. 模块就是一个包含Python定义 ...
- python学习第五讲,python基础语法之函数语法,与Import导入模块.
目录 python学习第五讲,python基础语法之函数语法,与Import导入模块. 一丶函数简介 1.函数语法定义 2.函数的调用 3.函数的文档注释 4.函数的参数 5.函数的形参跟实参 6.函 ...
随机推荐
- 自制操作系统Antz(13) 显示图片
显示图片只是在多媒体课上看着bmp格式图片的突发奇想,然后就实现在了我自己的操作系统 Antz系统更新地址 Linux内核源码分析地址 Github项目地址 效果图: 显示图片的原理 在之前显卡操作时 ...
- Linux内核源码分析 day01——内存寻址
前言 Linux内核源码分析 Antz系统编写已经开始了内核部分了,在编写时同时也参考学习一点Linux内核知识. 自制Antz操作系统 一个自制的操作系统,Antz .半图形化半命令式系统,同时嵌入 ...
- Bugku-CTF之备份是个好习惯
Day17 备份是个好习惯 听说备份是个好习惯 http://123.206.87.240:8002/web16/
- Docker Swarm Mode 学习笔记(创建 Swarm 集群)
Swarm 集群由管理节点与工作节点组成. 初始化集群 使用命令:docker swarm init 如果你的 Docker 主机有多个网卡, 拥有多个 IP 地址, 必须使用 --advertise ...
- 后台启动mysql
https://blog.csdn.net/codemacket/article/details/77719323
- Qt对象树
Qt提供了一种机制,能够自动.有效的组织和管理继承自QObject的Qt对象,这种机制就是对象树.子对象动态分配空间不需要释放.
- Selenium常见问题
1.使用python打开Chrome浏览器时,出现Chrome正受到自动测试软件的控制的提示 解决: 在浏览器配置里加个参数,忽略掉这个警告提示语,disable_infobars option = ...
- HTTP 方法:Get与Post分析
GET - 从指定的资源请求数据 POST - 向指定的资源提交要被处理的数据 GET 方法 GET 请求可被缓存 GET 请求保留在浏览器历史记录中 GET 请求可被收藏为书签 GET 请求不应在处 ...
- Mysql 索引之B+tree
InnoDB使用的是聚簇索引,将主键组织到一棵B+树中,而行数据就储存在叶子节点上,若使用"where id = 14"这样的条件查找主键,则按照B+树的检索算法即可查找到对应的叶 ...
- 【笔记】Rancher2.1容器云平台新特性
2018年10月6日,Rancher2.1版本正式发布.相比Rancher2.0版本,提供了许多新的特性: 1.支持集群和项目级别的硬件资源配额管理:2.支持3个节点的Rancher Server的管 ...