pytest使用小结
一、pytest简洁和好处
- 自动发现测试用例 testloader
- 断言方便 ,自定义错误提示 assert 正则匹配
- 灵活运行指定的测试用例,指定模块,制定测试类,测试用例 -k 标签化,回归 正向 冒烟 登陆
- 环境管理灵活。
- 丰富的插件,测试报告,插件介绍 allure(比较成熟的测试报告体系,unittest不支持这个插件)
- 和unittest / nose兼容,pytest中标签、生成allure、分析最慢的测试用例和unittest兼容
unittest的好处:
1.标准库,兼容性好
2.更加容易理解
pytest和unittest兼容是有条件的,pytest使用以下功能就不能和unittes兼容:
- parametrize
- fixture(autouse=True的可以) 不能和setUp同时使用
- Custom hooks
二、自动发现测试用例原理,命名方式
- 文件名必须以test_*.py 和 *_test.py开头或结尾,
- 如果有类名,必须以Test开头,没有__init__函数,测试方法名以test_开头的函数
- 没有类,那么以函数为单位的函数名必须以test_开头
三、断言: 自定义提示文案
assert 1==1, "提示文案"
四、运行方式
1.在控制台指定执行范围
- 在指定文件中输入pytest,此时会收集该文件中所有测试用例
- 指定某个模块,例如 pytest test_demo1.py
- 指定某个目录及其子目录的所有测试文件,pytest 文件名,例pytest testcase
- 指定某个模块下某个类的某个用例,pytest 模块名::类名::方法名,例pytest test_demo2.py::TestDemo2::test_success
- 指定某个模块下的某个方法,pytest 模块名::方法名,例pytest test_demo1.py::test_fail
- python -m pytest/unittest
2.编辑器
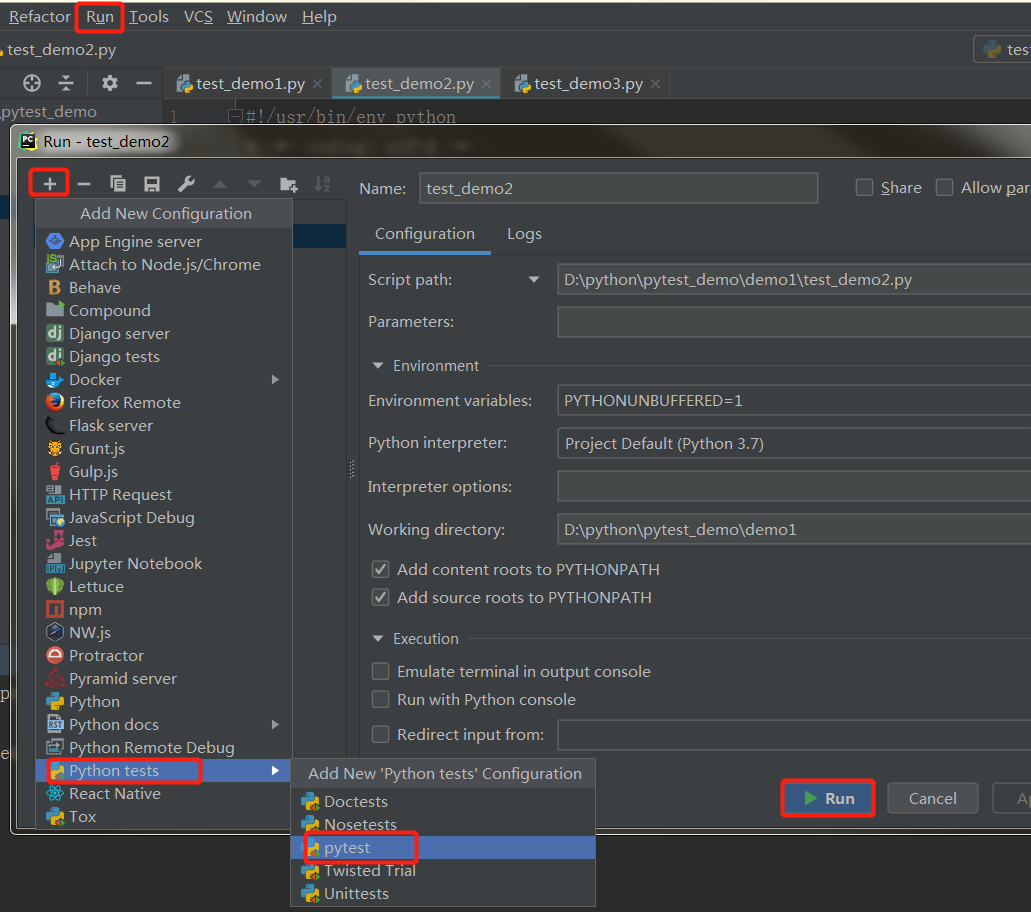
Run -->Run...-->Edit Configurations-->+ -->python test -->pytest -->Run

3.通过python代码执行pytest
直接执行pytest.main(),自动查找当前目录下,以test_开头的文件或者以_test结尾的py文件

五、自定义查找规则(在根目录下pytest.ini)
[pytest]

python_files =

  test_*.py

  check_*.py

  example_*.py

python_functions = *_test

python_classes = *Suite
四、mark随机测试(冒烟测试,给测试用例打标签)
第一步:mark注册,新建ini文件
#pytest.ini
[pytest]

markers =

  login

  demo
第二步:
1.把标签贴到测试用例(方法)上,一个测试用例上可以贴多个标签,标签不仅可以贴到测试用例上,还可以贴到测试类上
@pytest.mark.标签名
2.贴标签第二种方法:标记在测试类中,固定写法
pytestmark = [pytest.mark.标签名, pytest.mark.标签名]
import pytest

class TestDemo4:

    pytestmark = [pytest.mark.login]

    # @pytest.mark.login

    def test_demo_4(self):

        assert 1 == 1
第三步:运行的时候指定标签,在Terminal输入pytest -m "mark1 and not mark2"
注意:一定要使用双引号,单引号会报错
五、跳过函数
@pytest.mark.skip(reason='out-of-data api')
# skipif 当满足某个条件时就跳过
@pytest.mark.skipif(sys.plafform == "win32", reason="does not run on windows")
# 跳过预见错误
@pytest.mark.xfail(gen.__version__ < '0.2.0', reason='not supported until v0.2.0')
def test_api():
id_1 = gen.unique_id()
id_2 = gen.unique_id()
assert id_1 != id_2
六、pytest的用例执行顺序
pytest有自己内置的执行顺序规则,一般从上到下,可以通过安装插件pytest.ordering:run your tests in order
七、参数化
ddt数据驱动只是unittest支持数据驱动的一种库 ddt != 数据驱动
ddt模块不能和fixture共用,所以要换用pytest的参数化实现ddt
参数化会和unittest冲突,因为setUp这些东西都不会运行了!要改成pytest,不要继承unittest.TestCase
方法一:使用pytest.mark.parametrize()方式进行参数化
import pytest

Data = [1, 2, 3]

@pytest.mark.parametrize("data", Data)

def test_mock(data):

    print('测试开始')

    assert data == 2, "备注信息"
方法二:使用pytest.fixture()方式进行参数化,fixture装饰的函数可以作为参数传入其他函数
1.在固件中添加返回值
2.然后在测试方法中传入固件
3.在测试方法中,用固件名来表示其返回值
test_demo.py
import pytest

class TestDemo1:

    # 定义参数列表

    list_a = [1, 2, 3]

    # 定义固件名is_success,并设置返回值

    @pytest.fixture(params=list_a)

    def is_success(self, request):

        return request.param

    # 在测试方法中传入固件名

    @pytest.mark.success

    def test_success(self, is_success):

        assert is_success == 1
方法三:测试数据和用例分离
可以采用conftest.py文件存储参数化数据和函数,模块下的用例执行时,会自动读取conftest.py文件中的数据
1.先定义一个固件is_success
conftest.py
import pytest

# 准备测试数据

list_a = [1, 2, 3]

# params中需要传入list

@pytest.fixture(params=list_a)

def is_success(request):

    return request.param
2.在测试类中传入固件名称
test_demo4.py
import pytest

class TestDemo4:

    @pytest.mark.test

    def test_demo_4(self, is_success):

        # print('测试一下')

        assert is_success == 1
八、fixture的使用(原文链接:https://blog.csdn.net/BearStarX/article/details/101000516)
fixture相对于setUp和tearDown来说的优势:
- 命名方式灵活,不局限于setUp和tearDown这几个命名
- conftest.py配置里可以实现数据共享,不需要import就能自动找到一些配置
- scope = "module"可以实现多个.py跨文件共享前置
- scope = "session"可以实现多个.py跨文件使用一个session来完成多个用例
通过yield生成器实现了前置条件和后置条件的组合
1.先在根目录conftest.py文件中定义一个名为init_web的固件
import pytest

@pytest.fixture()

def init_web():

  print("启动浏览器")

  yield driver

  print("关闭浏览器")
2.作为参数传到测试用例中
def test_demo(init_web):
3.接收这个东西
driver = init_web
import pytest

class TestDemo3:

    @pytest.mark.login

    def test_demo3(self, init_web):

        driver = init_web

        assert driver == 2
注意:
1.pytest 运行默认不会打印固件中print(),如果想打印,那么使用python -m login -s 或者 pytest --capture=no
九、重运行
安装插件:pip install pytest -rerunfailures
pytest --reruns 3 --reruns-delay 5
十、测试报告
各种插件地址:https://plugincompat.herokuapp.com/
html:--html=\report\demo.html
需要安装:
pip install pytest-html
# log
--resultlog=report/demo.txt 相对路径
# xml,jenkins使用
--junitxml=report/demo.xml
# html
--html=report/demo.html
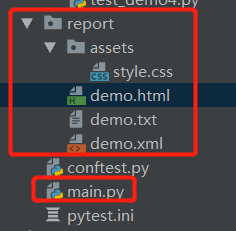
main.py
import pytest
import time

if __name__ == '__main__':
  ts = time.time()

    pytest.main(['-m test', '-s',

                 '--resultlog=report/{}.txt'.format(ts),

                 '--junitxml=report/demo.xml',

                 '--html=report/demo.html'])
在Terminal输入:python main.py
查看结果:在根目录下会生成一个含有各种报告的report文件夹
pytest使用小结的更多相关文章
- pytest进阶之html测试报告
前言 Pytest系列已经写了几篇文章了,也不知道对多少人有帮助,总之对于我自己来说该掌握的都已经掌握了,那么今天我们再来说说pytest如何生成一个完整的html测试报告,让你在吹牛逼的路上再多一份 ...
- pytest进阶之fixture
前言 学pytest就不得不说fixture,fixture是pytest的精髓所在,就像unittest中的setup和teardown一样,如果不学fixture那么使用pytest和使用unit ...
- pytest框架之命令行参数2
前言 上篇博客说到命令行执行测试用例的部分参数如何使用?今天将继续更新其他一些命令选项的使用,和pytest收集测试用例的规则! pytest执行用例命令行参数 --collect-only:罗列出所 ...
- 自动化冒烟测试 Unittest , Pytest 哪家强?
前言:之前有一段时间一直用 Python Uittest做自动化测试,觉得Uittest组织冒烟用例比较繁琐,后来康哥提示我使用pytest.mark来组织冒烟用例 本文讲述以下几个内容: 1.Uni ...
- 手把手教你搭建Pytest+Allure2.X环境详细教程,生成让你一见钟情的测试报告(非常详细,非常实用)
简介 宏哥之前在做接口自动化的时候,用的测试报告是HTMLTestRunner,虽说自定义模板后能满足基本诉求,但是仍显得不够档次,高端,大气,遂想用其他优秀的report框架替换之.一次偶然的机会, ...
- 手把手教你Pytest+Allure2.X定制报告详细教程,给自己的项目量身打造一套测试报告-02(非常详细,非常实用)
简介 前边一篇文章是分享如何搭建pytest+Allure的环境,从而生成一份精美的.让人耳目一新的测试报告,但是有的小伙伴或者童鞋们可能会问,我能不能按照自己的想法为我的项目测试结果量身打造一份属于 ...
- pytest学习笔记二 fixtrue
前言 官方文档关于fixture功能的解释如下: The purpose of test fixtures is to provide a fixed baseline upon which test ...
- pytest的使用
一.python安装 1.windows(server): 双击python-3.6.7-amd64.exe执行安装流程,使用默认安装方式即可. 安装完成后查看是否安装成功: C:\Users\Adm ...
- 《带你装B,带你飞》pytest修炼之路1- 简介和环境准备
1. pytest简介 pytest是python的一种单元测试框架,与python自带的unittest测试框架类似,但是比unittest框架使用起来更简洁,效率更高.根据pytest的官方网站介 ...
随机推荐
- hacker101 CTF 学习记录(二)
前言 无 Easy-Postbook 拿到功能有点多,先扫一遍目录 .Ds_Store没有啥东西,page是个静态页面 随便注册个账号,登录后已经有2篇文章,第一篇文章的id是1 自己创建文章,将ur ...
- 本机ping不通虚拟机,但虚拟机可以ping通本机时怎么解决
在各自网络都连接的情况下,本机ping不通虚拟机,但虚拟机可以ping通本机时解决方案: 1.linux虚拟机中连接方式选择NAT模式 2.本地启动VMnet8,然后选择VMnet8的属性,手动输入和 ...
- 《Java从入门到失业》第四章:类和对象(4.2):String类
4.2String类 这一节,我们学习第一个类:String类.String翻译成汉语就是“字符串”,是字符的序列.我们知道,在Java中,默认采用Unicode字符集,因此字符串就是Unicode字 ...
- 【转】PHP面试总结
文章出处:https://www.cnblogs.com/codetao/p/6418127.html
- in多值优化
〇.问题 今天ocp群里有人问 SELECT * FROM table WHERE id IN(11,2,3,44,...) 在in里面有大量数据4000+,有什么 好的处理方式吗? 我的优化方案的总 ...
- 跟我一起学.NetCore之静态文件处理的那些事
前言 如今前后端分离开发模式如火如荼,开发职责更加分明(当然前后端一起搞的模式也没有完全褪去):而对于每个公司产品实施来说,部署模式会稍有差别,有的会单独将前端文件部署为一个站点,有的会将前端文件和后 ...
- python链表从尾到头的顺序返回一个ArrayList
思路:获取链表的值,添加入列表中,反转列表即可获得ArrayList # -*- coding:utf-8 -*- # class ListNode: # def __init__(self, x): ...
- 北京数途科技有限公司--EAM MAXIMO介绍
一.EAM概述: EAM( Enterprise Asset Management)即企业资产维护管理系统 ,它是面向资产密集型(Asset-intensive)企业的企业信息化 解决方案的总称,其前 ...
- Spring Boot学习(二)搭建一个简易的Spring Boot工程
第一步:新建项目 新建一个SpringBoot工程 修改项目信息 勾选项目依赖和工具 选择好项目的位置,点击[Finish] 第二步:项目结构分析 新建好项目之后的结构如下图所示,少了很多配置文件: ...
- Spring学习(八)AOP详解
文章更新时间:2020/04/06 一.一个例子 在上面的例子中,包租婆的核心业务就是签合同,收房租,那么这就够了,灰色框起来的部分都是重复且边缘的事,交给中介商就好了,这就是 AOP 的一个思想:让 ...
