使用轮询&长轮询实现网页聊天室
前言
如果有一个需求,让你构建一个网络的聊天室,你会怎么解决?
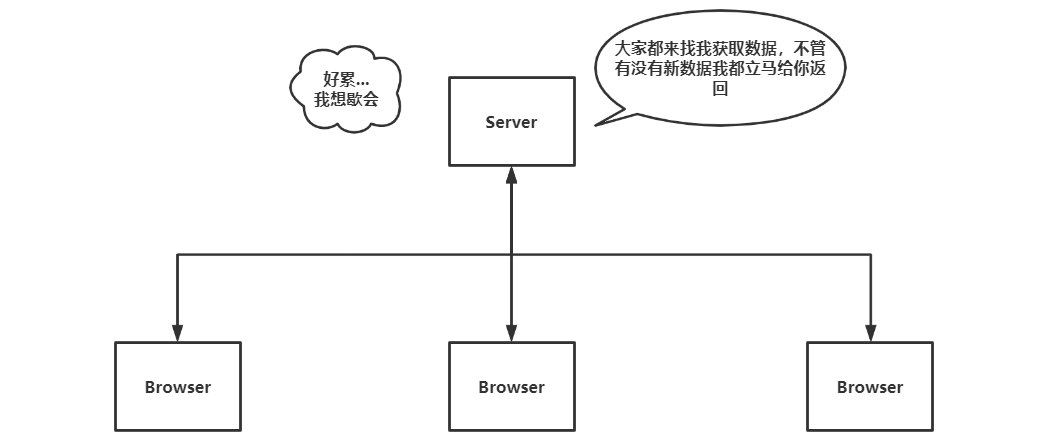
首先,对于HTTP请求来说,Server端总是处于被动的一方,即只能由Browser发送请求,Server才能够被动回应。
也就是说,如果Browser没有发送请求,则Server就不能回应。
并且HTTP具有无状态的特点,即使有长链接(Connection请求头)的支持,但受限于Server的被动特性,要有更好的解决思路才行。
轮询
基本概念
根据上面的需求,最简单的解决方案就是不断的朝Server端发送请求,Browser获取最新的消息。
对于前端来说一般都是基于setInterval来做,但是轮询的缺点非常明显:
- Server需要不断的处理请求,压力非常大
- 前端数据刷新不及时,setInterval间隔时间越长,数据刷新越慢,setInterval间隔时间越短,Server端的压力越大
 >
>
示例演示
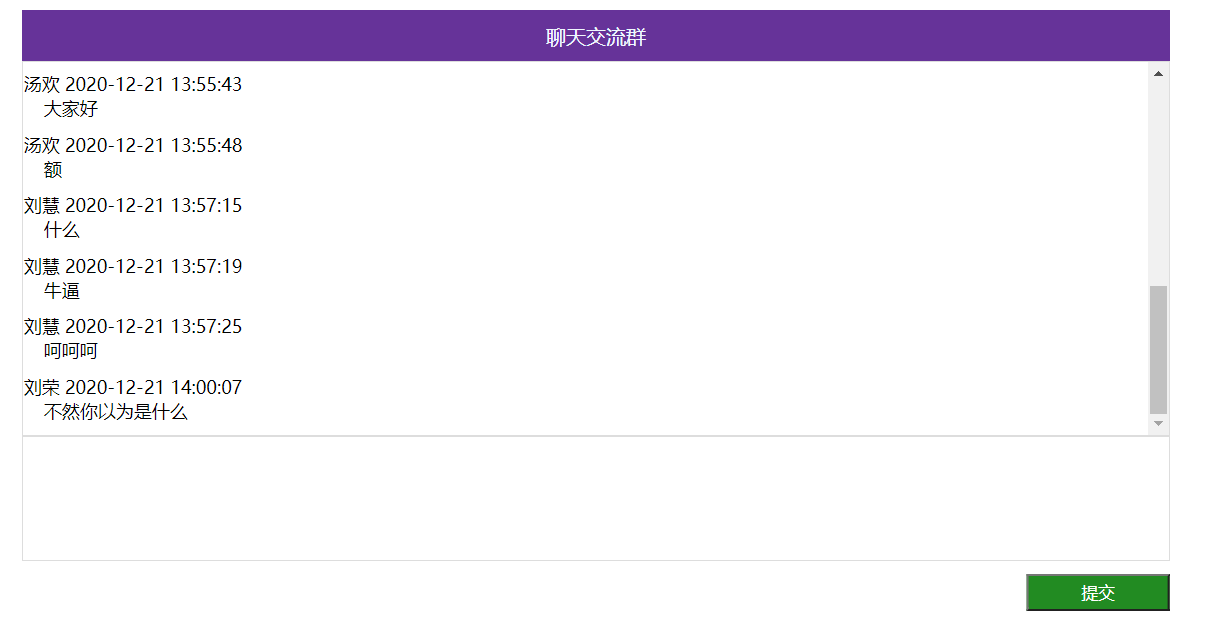
以下是用Flask和Vue做的简单实例。
每个用户打开该页面后都会生成一个随机名字,前端采用轮询的方式更新记录。
后端用一个列表存储最近的聊天记录,最多存储100条,超过一百条截取最近十条。
总体流程就是前端发送过来的消息都放进列表中,然后前端轮询时就将整个聊天记录列表获取到后在页面进行渲染。
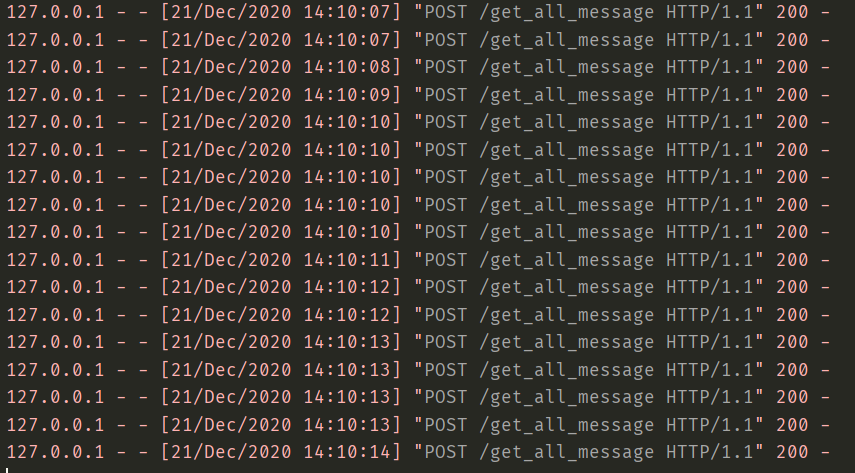
缺点非常明显,仅仅有两个用户在线时,后端的请求就非常频繁了:
后端代码:
import uuid

from faker import Faker

from flask import Flask, request, jsonify

fake = Faker(locale='zh_CN')  # 生成随机名

app = Flask(__name__)

notes = []  # 存储聊天记录,100条

@app.after_request  # 解决CORS跨域请求

def cors(response):

    response.headers['Access-Control-Allow-Origin'] = "*"

    if request.method == "OPTIONS":

        response.headers["Access-Control-Allow-Headers"] = "Origin,Content-Type,Cookie,Accept,Token,authorization"

    return response

@app.route('/get_name', methods=["POST"])

def get_name():

    """

    生成随机名

    """

    username = fake.name() + "==" + str(uuid.uuid4())

    return jsonify(username)

@app.route('/send_message', methods=["POST"])

def send_message():

    """

    发送信息

    """

    username, tag = request.json.get("username").rsplit("==", maxsplit=1)  # 取出uuid和名字

    message = request.json.get("message")

    time = request.json.get("time")

    dic = {

        "username": username,

        "message": message,

        "time": time,

        "tag": tag + time,  # 前端:key唯一标识

    }

    notes.append(dic)  # 追加聊天记录

    return jsonify({

        "status": 1,

        "error": "",

        "message": "",

    })

@app.route('/get_all_message', methods=["POST"])

def get_all_message():

    """

    获取聊天记录

    """

    global notes

    if len(notes) == 100:

        notes = notes[90:101]

    return jsonify(notes)

if __name__ == '__main__':

    app.run(threaded=True)  # 开启多线程
前端代码main.js:
import Vue from 'vue'

import App from './App.vue'

import router from './router'

import store from './store'

import axios from "axios"

import moment from 'moment'

Vue.prototype.$moment = moment

moment.locale('zh-cn')

Vue.prototype.$axios = axios;

Vue.config.productionTip = false

new Vue({

  router,

  store,

  render: h => h(App)

}).$mount('#app')
前端代码Home.vue:
<template>
<div class="index">
<div>{{ title }}</div>
<article id="context">
<ul>
<li v-for="(v,index) in all_message" :key="index">
<p>{{ v.username }} {{ v.time }}</p>
<p>{{ v.message }}</p>
</li>
</ul>
</article>
<textarea v-model.trim="message" @keyup.enter="send"></textarea>
<button type="button" @click="send">提交</button>
</div>
</template>
<script>
export default {
name: 'Home',
data() {
return {
BASE_URL: "http://127.0.0.1:5000/",
title: "聊天交流群",
username: "",
message: "",
all_message: [],
}
},
mounted() {
// 获取用户名
this.get_user_name();
// 轮询,获取信息
setInterval(this.get_all_message, 3000);
},
methods: {
// 获取用户名
get_user_name() {
this.$axios({
method: "POST",
url: this.BASE_URL + "get_name",
responseType: "json",
}).then(response => {
this.username = response.data;
})
},
// 发送消息
send() {
if (this.message) {
this.$axios({
method: "POST",
url: this.BASE_URL + "send_message",
data: {
message: this.message,
username: this.username,
time: this.$moment().format("YYYY-MM-DD HH:mm:ss"),
},
responseType: "json",
});
this.message = "";
}
},
// 轮询获取消息
get_all_message() {
this.$axios({
method: "POST",
url: this.BASE_URL + "get_all_message",
responseType: "json",
}).then(response => {
this.all_message = response.data;
// 使用宏队列任务,拉滚动条
let context = document.querySelector("#context");
setTimeout(() => {
context.scrollTop = context.scrollHeight;
},)
})
},
}
}
</script>
<style scoped>
* {
margin: 0;
padding: 0;
list-style: none;
box-sizing: border-box;
}
.index {
display: flex;
flex-flow: column;
justify-content: flex-start;
align-items: center;
}
.index div:first-child {
margin: 0 auto;
background: rebeccapurple;
padding: 10px;
display: flex;
justify-content: center;
align-items: center;
color: aliceblue;
width: 80%;
}
.index article {
margin: 0 auto;
height: 300px;
border: 1px solid #ddd;
overflow: auto;
width: 80%;
font-size: .9rem;
}
.index article ul li {
margin-bottom: 10px;
}
.index article ul li p:last-of-type {
text-indent: 1rem;
}
.index textarea {
outline: none;
resize: none;
width: 80%;
height: 100px;
border: 1px solid #ddd;
margin-bottom: 10px;
}
.index button {
width: 10%;
height: 30px;
align-self: flex-end;
transform: translate(-100%);
background: forestgreen;
color: white;
outline: none;
}
</style>
长轮询
基本概念
轮询是不断的发送请求,Server端显然受不了。
这时候就可以使用长轮询的机制,即为每一个进入聊天室的用户(与Server端建立连接的用户)创建一个队列,每个用户轮询时都去询问自己的队列,如果没有新消息就等待,如果后端一旦接收到新消息就将消息放入所有的等待队列中返回本次请求。
长轮询是在轮询基础上做的,也是不断的访问服务器,但是服务器不会即刻返回,而是等有新消息到来时再返回,或者等到超时时间到了再返回。
- Server端采用队列,为每一个请求创建一个专属队列
- Server端有新消息进来,放入每一个请求的队列中进行返回,或者等待超时时间结束捕获异常后再返回

示例演示
使用长轮询实现聊天室是最佳的解决方案。
前端页面打开后的流程依旧是生成随机名字,后端立马为这个随机名字拼接上uuid后创建一个专属的队列。
然后每次发送消息时都将消息装到每个用户的队列中,如果有队列消息大于1的说明该用户已经下线,将该队列删除即可。
获取最新消息的时候就从自己的队列中获取,获取不到就阻塞,获取到就立刻返回。
后端代码:
import queue

import uuid

from faker import Faker

from flask import Flask, request, jsonify

fake = Faker(locale='zh_CN')  # 生成随机名

app = Flask(__name__)

notes = []  # 存储聊天记录,100条

# 用户消息队列

user_queue = {

}

# 已下线用户

out_user = []

@app.after_request  # 解决CORS跨域请求

def cors(response):

    response.headers['Access-Control-Allow-Origin'] = "*"

    if request.method == "OPTIONS":

        response.headers["Access-Control-Allow-Headers"] = "Origin,Content-Type,Cookie,Accept,Token,authorization"

    return response

@app.route('/get_name', methods=["POST"])

def get_name():

    """

    生成随机名,还有管道

    """

    username = fake.name() + "==" + str(uuid.uuid4())

    q = queue.Queue()

    user_queue[username] = q  # 创建管道 {用户名+uuid:队列}

    return jsonify(username)

@app.route('/send_message', methods=["POST"])

def send_message():

    """

    发送信息

    """

    username, tag = request.json.get("username").rsplit("==", maxsplit=1)  # 取出uuid和名字

    message = request.json.get("message")

    time = request.json.get("time")

    dic = {

        "username": username,

        "message": message,

        "time": time,

    }

    for username, q in user_queue.items():

        if q.qsize() > 1:  # 用户已下线,五条阻塞信息,加入下线的用户列表中

            out_user.append(username)  # 不能循环字典的时候弹出元素

        else:

            q.put(dic)  # 将最新的消息放入管道中

    if out_user:

        for username in out_user:

            user_queue.pop(username)

            out_user.remove(username)

            print(username + "已下线,弹出消息通道")

    notes.append(dic)  # 追加聊天记录

    return jsonify({

        "status": 1,

        "error": "",

        "message": "",

    })

@app.route('/get_all_message', methods=["POST"])

def get_all_message():

    """

    获取聊天记录

    """

    global notes

    if len(notes) == 100:

        notes = notes[90:101]

    return jsonify(notes)

@app.route('/get_new_message', methods=["POST"])

def get_new_message():

    """

    获取最新的消息

    """

    username = request.json.get("username")

    q = user_queue[username]

    try:

        # 获取不到就阻塞,不立即返回

        new_message_dic = q.get(timeout=30)

    except queue.Empty:

        return jsonify({

            "status": 0,

            "error": "没有新消息",

            "message": "",

        })

    return jsonify({

        "status": 1,

        "error": "",

        "message": new_message_dic

    })

if __name__ == '__main__':

    app.run()
前端代码main.js:
import Vue from 'vue'

import App from './App.vue'

import router from './router'

import store from './store'

import axios from "axios"

import moment from 'moment'

Vue.prototype.$moment = moment

moment.locale('zh-cn')

Vue.prototype.$axios = axios;

Vue.config.productionTip = false

new Vue({

  router,

  store,

  render: h => h(App)

}).$mount('#app')
前端代码Home.vue:
<template>
<div class="index">
<div>{{ title }}</div>
<article id="context">
<ul>
<li v-for="(v,index) in all_message" :key="index">
<p>{{ v.username }} {{ v.time }}</p>
<p>{{ v.message }}</p>
</li>
</ul>
</article>
<textarea v-model.trim="message" @keyup.enter="send" :readonly="status"></textarea>
<button type="button" @click="send">提交</button>
</div>
</template>
<script>
export default {
name: 'Home',
data() {
return {
BASE_URL: "http://127.0.0.1:5000/",
title: "聊天交流群",
username: "",
message: "",
status: false,
all_message: [],
}
},
mounted() {
// 获取用户名
this.get_user_name();
// 异步队列,确认用户名已获取到
setTimeout(() => {
// 加载聊天记录
this.get_all_message();
// 长轮询
this.get_new_message();
}, 1000)
},
methods: {
// 获取用户名
get_user_name() {
this.$axios({
method: "POST",
url: this.BASE_URL + "get_name",
responseType: "json",
}).then(response => {
this.username = response.data;
})
},
// 发送消息
send() {
if (this.message) {
this.$axios({
method: "POST",
url: this.BASE_URL + "send_message",
data: {
message: this.message,
username: this.username,
time: this.$moment().format("YYYY-MM-DD HH:mm:ss"),
},
responseType: "json",
});
this.message = "";
}
},
// 页面打开后,第一次加载聊天记录
get_all_message() {
this.$axios({
method: "POST",
url: this.BASE_URL + "get_all_message",
responseType: "json",
}).then(response => {
this.all_message = response.data;
// 控制滚动条
let context = document.querySelector("#context");
setTimeout(() => {
context.scrollTop = context.scrollHeight;
},)
})
},
get_new_message() {
this.$axios({
method: "POST",
// 发送用户名
data: {"username": this.username},
url: this.BASE_URL + "get_new_message",
responseType: "json",
}).then(response => {
if (response.data.status === 1) {
// 添加新消息
this.all_message.push(response.data.message);
// 控制滚动条
let context = document.querySelector("#context");
setTimeout(() => {
context.scrollTop = context.scrollHeight;
},)
}
// 递归
this.get_new_message();
})
}
}
}
</script>
<style scoped>
* {
margin: 0;
padding: 0;
list-style: none;
box-sizing: border-box;
}
.index {
display: flex;
flex-flow: column;
justify-content: flex-start;
align-items: center;
}
.index div:first-child {
margin: 0 auto;
background: rebeccapurple;
padding: 10px;
display: flex;
justify-content: center;
align-items: center;
color: aliceblue;
width: 80%;
}
.index article {
margin: 0 auto;
height: 300px;
border: 1px solid #ddd;
overflow: auto;
width: 80%;
font-size: .9rem;
}
.index article ul li {
margin-bottom: 10px;
}
.index article ul li p:last-of-type {
text-indent: 1rem;
}
.index textarea {
outline: none;
resize: none;
width: 80%;
height: 100px;
border: 1px solid #ddd;
margin-bottom: 10px;
}
.index button {
width: 10%;
height: 30px;
align-self: flex-end;
transform: translate(-100%);
background: forestgreen;
color: white;
outline: none;
}
</style>
使用轮询&长轮询实现网页聊天室的更多相关文章
- WebSocket 网页聊天室
先给大家开一个原始的websocket的连接使用范例 <?php /* * recv是从套接口接收数据,也就是拿过来,但是不知道是什么 * read是读取拿过来的数据,就是要知道recv过来的是 ...
- Java和WebSocket开发网页聊天室
小编心语:咳咳咳,今天又是聊天室,到现在为止小编已经分享了不下两个了,这一次跟之前的又不大相同,这一次是网页聊天室,具体怎么着,还请各位看官往下看~ Java和WebSocket开发网页聊天室 一.项 ...
- JavaWeb网页聊天室(WebSocket即时通讯)
原文:http://baike.xsoftlab.net/view/656.html Git地址 http://git.oschina.net/loopcc/WebSocketChat 概要: Web ...
- 基于flask的网页聊天室(四)
基于flask的网页聊天室(四) 前言 接前天的内容,今天完成了消息的处理 具体内容 上次使用了flask_login做用户登录,但是直接访问login_requare装饰的函数会报401错误,这里可 ...
- 基于flask的网页聊天室(三)
基于flask的网页聊天室(三) 前言 继续上一次的内容,今天完成了csrf防御的添加,用户头像的存储以及用户的登录状态 具体内容 首先是添加csrf的防御,为整个app添加防御: from flas ...
- 基于flask的网页聊天室(二)
基于flask的网页聊天室(二) 前言 接上一次的内容继续完善,今天完成的内容不是很多,只是简单的用户注册登录,内容具体如下 具体内容 这次要加入与数据哭交互的操作,所以首先要建立相关表结构,这里使用 ...
- 基于flask的网页聊天室(一)
基于flask的网页聊天室(一) 基本目标 基于flask实现的web聊天室,具有基本的登录注册,多人发送消息,接受消息 扩展目标 除基本目标外添加当前在线人数,消息回复,markdown支持,历史消 ...
- WebSocket 网页聊天室的实现(服务器端:.net + windows服务,前端:Html5)
websocket是HTML5中的比较有特色一块,它使得以往在客户端软件中常用的socket在web程序中也能轻松的使用,较大的提高了效率.废话不多说,直接进入题. 网页聊天室包括2个部分,后端服务器 ...
- JAVA实现webSocket网页聊天室
一.什么是webSocket WebSocket 是一种网络通信协议,是持久化协议.RFC6455 定义了它的通信标准. WebSocket 是 HTML5 开始提供的一种在单个 TCP 连接上进行全 ...
随机推荐
- iMindMap:一款可以免费试用的思维导图软件
思维导图在我们的生活中已经越来越常见了,在市场上也有很多思维导图的软件.今天小编给大家推荐的是一款免费思维导图软件-iMindMap.它具有22种布局模式,包含组织架构图.鱼骨图.时间线.气泡图等,3 ...
- 使用Folx下载任务完成后,怎么自动完成关闭
下载工具的优点是可以通过多线程的方式,提高文件的下载速度,减少用户的下载时间.但另一方面来说,下载工具为了达到高速下载,也会占据较多的带宽资源,甚至会拖慢电脑的运行. 因此,很多用户会利用电脑的空闲时 ...
- 企业BI智能大屏,除了页面炫酷,还能带来什么?
当我们一谈到可视化大屏,超大画面.超强科技感.酷炫的呈现效果就会出现在我们的脑海中. 所谓数据可视化,就是通过图表.图形.地图等视觉元素,将数据中所蕴含的信息的趋势.异常和模式展现出来.与传统报表相比 ...
- Java基础教程——List(列表)
集合概述 Java中的集合,指一系列存储数据的接口和类,可以解决复杂的数据存储问题. 导包:import java.util.*; 简化的集合框架图如下: List·列表 ArrayList List ...
- 使用Python过程出现的细节问题:TypeError: not enough arguments for format string
今天使用字符串格式化时,遇到的一点小问题:调用这个方法解释器出错了:TypeError: not enough arguments for format string def ll(name,age) ...
- Java lambda 分组后多列求和
主要思路是reducing,可以像sql一样分组后多列求和处理成新对象等: select code,max(name)as name,sum(chengJi)as chengJi,sum(age)as ...
- Django 的缓存机制
一 缓存介绍: 在动态网站中,用户所有的请求,服务器都会去数据库中进行相应的增,删,查,改,渲染模板,执行业务逻辑,最后生成用户看到的页面. 当一个网站的用户访问量很大的时候,每一次的的后台操作,都会 ...
- Beta——代码规范与计划
这个作业属于哪个课程 软件工程 (福州大学至诚学院 - 计算机工程系) 这个作业要求在哪里 Beta 冲刺 这个作业的目标 团队进行Beta冲刺 作业正文 正文 其他参考文献 无 代码规范 此次代码规 ...
- charles功能(一)修改request请求参数
1.接口处 鼠标右击,选择breakpoints(允许本接口使用breakpionts功能) 2.开始设置断点值 3.然后修改这一条 4.然后执行 5.最终结果
- day4(JWT安装配置)
1.JWT安装配置 1.1安装JWT pip install djangorestframework-jwt==1.11.0 1.2 syl/settings.py配置jwt载荷中的有效期设 # j ...