使用angular4和asp.net core 2 web api做个练习项目(四)
第一部分: http://www.cnblogs.com/cgzl/p/7755801.html
第二部分: http://www.cnblogs.com/cgzl/p/7763397.html
第三部分: http://www.cnblogs.com/cgzl/p/7768147.html
后台代码: https://github.com/solenovex/asp.net-core-2.0-web-api-boilerplate
前台代码: https://github.com/solenovex/angular-4-client-panel-app
Auth Guard
该系统的大部分页面都应该是用户登陆以后才可以看见, 没有登陆的话直接应该跳转到登陆页面.
首先建立authguard:
ng g g guards/auth
代码:
import { Injectable } from '@angular/core';

import { CanActivate, ActivatedRouteSnapshot, RouterStateSnapshot, Router } from '@angular/router';

import { Observable } from 'rxjs/Observable';

import 'rxjs/add/operator/map';

import { User } from 'oidc-client';

import { AuthService } from '../services/auth.service';

@Injectable()

export class AuthGuard implements CanActivate {

  constructor(

    private router: Router,

    private authService: AuthService

  ) { }

  canActivate(): Observable<boolean> {

    return this.authService.loginStatusChanged.map((user: User) => {

      if (user) {

        return true;

      }

      this.authService.login();

      return false;

    });

  }

}
然后在app.module.ts里面引用并注册:
import { AuthGuard } from './guards/auth.guard';

const appRoutes: Routes = [

  { path: '', component: DashboardComponent, canActivate: [AuthGuard] },

  { path: 'login-callback', component: LoginCallbackComponent },

  { path: 'register', component: RegisterComponent },

  { path: 'add-client', component: AddClientComponent, canActivate: [AuthGuard] },

  { path: 'client/:id', component: ClientDetailsComponent, canActivate: [AuthGuard] },

  { path: 'edit-client/:id', component: EditClientComponent, canActivate: [AuthGuard] }

];

  providers: [

    ClientService,

    AuthService,

    AuthGuard

  ],
需要权限控制的路由需要加上 canActivate属性, 它的值是一个数组可以使用多个guards.
别忘了在providers里面注册一下.
然后运行.
进入首页 http://localhost:4200, 如果没登陆, 那么直接跳转到authorization server的登陆页面.

登录成功后, 会跳转到login-callback, 这里有一个地方需要改一下(可能是oidc-client的bug?):
ngOnInit() {

    this.authService.loginCallBack().subscribe(

      (user: User) => {

        if (user) {

          window.location.href = '/';

        }

      }

    );

  }
使用的是window.location.href='/', 如果使用angular的路由router.navigate跳转的话会有问题.

登陆成功后跳转到主页.
做一些清理工作:
由于用户注册是在authorization server进行的, 所以把angular项目中的相关文件以及app.module里面的调用删除...
Settings 系统设置
我们需要做一些全局的设置, 可以全局控制某些参数, 例如我们的余额是否可以输入.
建立settings service:
ng g s services/settings
建立settings model:
ng g interface models/Settings
生成的文件名首字母是小写的, 首字母还是改成大写的吧...
Settings.ts:
export interface Settings {

  disableBalanceOnAdd?: boolean;

  disableBalanceOnEdit?: boolean;

}
settings.service.ts:
import { Injectable } from '@angular/core';

import { Settings } from '../models/Settings';

@Injectable()

export class SettingsService {

  private _settings: Settings = {

    disableBalanceOnAdd: false,

    disableBalanceOnEdit: false

  };

  constructor() { }

  get settings() {

    return this._settings;

  }

}
然后再app.module.ts里面注册:
import { SettingsService } from './services/settings.service';

providers: [

    ClientService,

    AuthService,

    SettingsService,

    AuthGuard

  ]
然后我们使用settings service.
在add-client.component.ts里面:
import { SettingsService } from '../../services/settings.service';

public disableBalanceOnAdd = false;

  constructor(

    public flashMessagesService: FlashMessagesService,

    public router: Router,

    public clientService: ClientService,

    public settingsService: SettingsService

  ) { }

  ngOnInit() {

    this.disableBalanceOnAdd = this.settingsService.settings.disableBalanceOnAdd;

  }
然后运行一下:

发现点击添加按钮不起作用!!!!, 点击明细也不起作用!!!!
后来发现, 是auth service和auth guard里面写错了, 先修改auth service:
  tryGetUser() {

    return Observable.fromPromise(this.manager.getUser());

  }
把这个方法改成public的.
然后修改: auth guard:
  canActivate(): Observable<boolean> {

    return this.authService.tryGetUser().map((user: User) => {

      if (user) {

        return true;

      }

      this.authService.login();

      return false;

    });

  }
这次再试试, 就没有问题了. 进入添加客户页面.
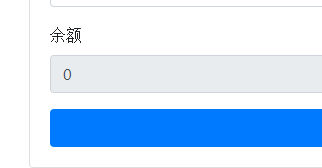
这个栏位的状态会根据settings里面的设置而变化.
同样在edit-client里面修改一下:
import { SettingsService } from '../../services/settings.service';

disableBalanceOnEdit = false;

  constructor(

    public clientService: ClientService,

    public router: Router,

    public route: ActivatedRoute,

    public flashMessagesService: FlashMessagesService,

    public settingsService: SettingsService

  ) { }

  ngOnInit() {

    this.disableBalanceOnEdit = this.settingsService.settings.disableBalanceOnEdit;

    // 获取ID

    this.id = this.route.snapshot.params['id'];

    // 获取Client

    this.clientService.getOne(+this.id).subscribe(

      client => {

        this.client = client;

      }

    );

  }
运行一下, 应该好用!
最后, 做一下Settings页面
需要改一下setting.serviec, 将使用localstorage来存储settings:
import { Injectable } from '@angular/core';

import { Settings } from '../models/Settings';

@Injectable()

export class SettingsService {

  private _settings: Settings = {

    disableBalanceOnAdd: true,

    disableBalanceOnEdit: false

  };

  constructor() {

    if (localStorage.getItem('settings')) {

      this._settings = JSON.parse(localStorage.getItem('settings'));

    }

  }

  get settings() {

    return this._settings;

  }

  set settings(value: Settings) {

    this._settings = value;

    localStorage.setItem('settings', JSON.stringify(this._settings));

  }

}
然后打开settings.component.ts:
import { Component, OnInit } from '@angular/core';

import { SettingsService } from '../../services/settings.service';

import { Router } from '@angular/router';

import { FlashMessagesService } from 'angular2-flash-messages';

import { Settings } from '../../models/Settings';

@Component({

  selector: 'app-settings',

  templateUrl: './settings.component.html',

  styleUrls: ['./settings.component.css']

})

export class SettingsComponent implements OnInit {

  settings: Settings;

  constructor(

    private settingsService: SettingsService,

    private flashMessagesService: FlashMessagesService,

    private router: Router

  ) { }

  ngOnInit() {

    this.settings = this.settingsService.settings;

  }

  onSubmit() {

    this.settingsService.settings = this.settings;

    this.flashMessagesService.show('Settings 保存了', { cssClass: 'alert-success', timeout: 4000 });

  }

}
这个很简单.
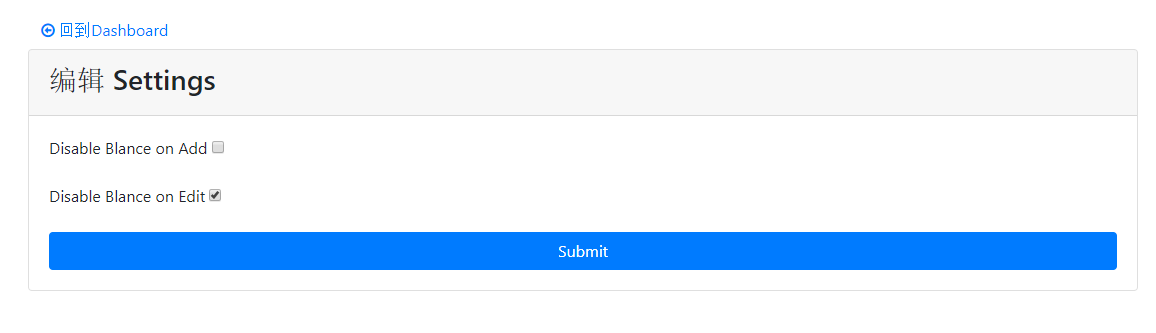
然后是html:
<div class="row">

  <div class="col-md-6">

    <a routerLink="/" class="btn btn-link">

      <i class="fa fa-arrow-circle-o-left"></i> 回到Dashboard</a>

  </div>

  <div class="col-md-6">

  </div>

</div>

<div class="card">

  <div class="card-header">

    <h3>编辑 Settings</h3>

  </div>

  <div class="card-body">

    <form (submit)="onSubmit()">

      <div class="form-group">

        <label for="disableBalanceOnAdd">Disable Blance on Add</label>

        <input type="checkbox" id="disableBalanceOnAdd" name="disableBalanceOnAdd" [(ngModel)]="settings.disableBalanceOnAdd">

      </div>

      <div class="form-group">

        <label for="disableBalanceOnEdit">Disable Blance on Edit</label>

        <input type="checkbox" id="disableBalanceOnEdit" name="disableBalanceOnEdit" [(ngModel)]="settings.disableBalanceOnEdit">

      </div>

      <input type="submit" class="btn btn-primary btn-block" value="Submit">

    </form>

  </div>

</div>
别忘了在app.module里面添加路由:
const appRoutes: Routes = [

  { path: '', component: DashboardComponent, canActivate: [AuthGuard] },

  { path: 'login-callback', component: LoginCallbackComponent },

  { path: 'add-client', component: AddClientComponent, canActivate: [AuthGuard] },

  { path: 'client/:id', component: ClientDetailsComponent, canActivate: [AuthGuard] },

  { path: 'edit-client/:id', component: EditClientComponent, canActivate: [AuthGuard] },

  { path: 'settings', component: SettingsComponent, canActivate: [AuthGuard] },

  { path: '**', component: PageNotFoundComponent }

];
顺便把page Not found的路由也加上, 使用 ** wildcard.
最后在navbar.html 添加上链接按钮:
        <li *ngIf="isLoggedIn" class="nav-item">

          <a class="nav-link" href="#" routerLink="/settings">Settings </a>

        </li>
运行一下试试:
刷新, 查看添加和编辑页面,再刷新, 应该好用.
这个联系项目就到这了.
然后我要用asp.net core 2.0 web api 和 identity server 4 以及 angular 5 做一个项目了(angular 5正式版刚刚出来), 大约 300个页面......
也许之前还要做一个练习..请各位指教...
使用angular4和asp.net core 2 web api做个练习项目(四)的更多相关文章
- 使用angular4和asp.net core 2 web api做个练习项目(一)
这是一篇学习笔记. angular 5 正式版都快出了, 不过主要是性能升级. 我认为angular 4还是很适合企业的, 就像.net一样. 我用的是windows 10 安装工具: git for ...
- 使用angular4和asp.net core 2 web api做个练习项目(二), 这部分都是angular
上一篇: http://www.cnblogs.com/cgzl/p/7755801.html 完成client.service.ts: import { Injectable } from '@an ...
- 使用angular4和asp.net core 2 web api做个练习项目(三)
第一部分: http://www.cnblogs.com/cgzl/p/7755801.html 第二部分: http://www.cnblogs.com/cgzl/p/7763397.html 后台 ...
- angular4和asp.net core 2 web api
angular4和asp.net core 2 web api 这是一篇学习笔记. angular 5 正式版都快出了, 不过主要是性能升级. 我认为angular 4还是很适合企业的, 就像.net ...
- 温故知新,使用ASP.NET Core创建Web API,永远第一次
ASP.NET Core简介 ASP.NET Core是一个跨平台的高性能开源框架,用于生成启用云且连接Internet的新式应用. 使用ASP.NET Core,您可以: 生成Web应用和服务.物联 ...
- 基于ASP.NET Core 创建 Web API
使用 Visual Studio 创建项目. 文件->新建->项目,选择创建 ASP.NET Core Web 应用程序. 基于 ASP.NET Core 2.0 ,选择API,身份验证选 ...
- ASP.NET Core Restful Web API 相关资源索引
GraphQL 使用ASP.NET Core开发GraphQL服务器 -- 预备知识(上) 使用ASP.NET Core开发GraphQL服务器 -- 预备知识(下) [视频] 使用ASP.NET C ...
- 使用 ASP.NET Core 创建 Web API及链接sqlserver数据库
创建 Web API https://docs.microsoft.com/zh-cn/aspnet/core/tutorials/first-web-api?view=aspnetcore-3.0& ...
- ASP.NET Core 中基于 API Key 对私有 Web API 进行保护
这两天遇到一个应用场景,需要对内网调用的部分 web api 进行安全保护,只允许请求头账户包含指定 key 的客户端进行调用.在网上找到一篇英文博文 ASP.NET Core - Protect y ...
随机推荐
- mysql水平分表和垂直分表的优缺点
表分割有两种方式: 1.水平分割:根据一列或多列数据的值把数据行放到两个独立的表中. 水平分割通常在下面的情况下使用. •表很大,分割后可以降低在查询时需要读的数据和索引的页数,同时也降低了索引的层数 ...
- 通用技术 : 异步调用 - Ajax技术
Ajax技术概述
- eclipse导入源码
1.window-----preferences 2.java---installed jres(点击不用展开)---选中使用的jar包-----editor 3.选中rt.jar ------sou ...
- 第4章 同步控制 Synchronization ----死锁(DeadLock)
Jeffrey Richter 在他所主持的 Win32 Q&A 专栏(Microsoft Systems Journal,1996/07)中曾经提到过,Windows NT 和 Window ...
- Win7 32位系统下Sublime text 3的安装以及配置C/C++、java、python的开发环境方法
本人初学者,此文仅是对这几天鼓捣subime text 3一点微不足道的经验总结,如有明显错误,欢迎指正! 好了,废话少说,进入正题,之前编程java一直用的是eclipse,java的主流IDE,后 ...
- Windows下Apache添加SSL模块
参考资料:http://www.yuansir-web.com/2011/05/12/hello-world/测试环境:windows2003 32位 + Apache2.4 + PHP5.4 一.准 ...
- Nginx 1.10.1 版本nginx.conf优化配置及详细注释
Nginx 1.10.1 的nginx.conf文件,是调优后的,可以拿来用,有一些设置无效,我备注上了,不知道是不是版本的问题,回头查一下再更正. #普通配置 #==性能配置 #运行用户 user ...
- FPGA与PCI-E
从并行到串行: PCI Express(又称PCIe)是一种高性能.高带宽串行通讯互连标准,取代了基于总线的通信架构,如:PCI.PCI Extended (PCI-X) 以及加速图形端口(AGP). ...
- Linux下安装jdk8的详细步骤
一.登录Linux,切换到root用户 sudo su 二.在usr目录下建立java安装目录 cd /usr mkdir java 三.下载jdk 登录网址:http://www.oracle.co ...
- 替代PhotoShop:GIMP图形编辑器的使用
GIMP最早是linux环境下用于图形编辑的一款开源软件,目前的功能很已经很丰富,如果使用得当,在很多的图形编辑操作上完全可以替代收费的Photoshop(PS).目前GIMP已经发展成了多平台的开源 ...