13.2SolrCloud集群使用手册之CoreAdmin API
转载请出自出处:http://www.cnblogs.com/hd3013779515/
CoreAdminHandler是用来管理Solr cores的,用来管理一个Solr instance中所有的cores。
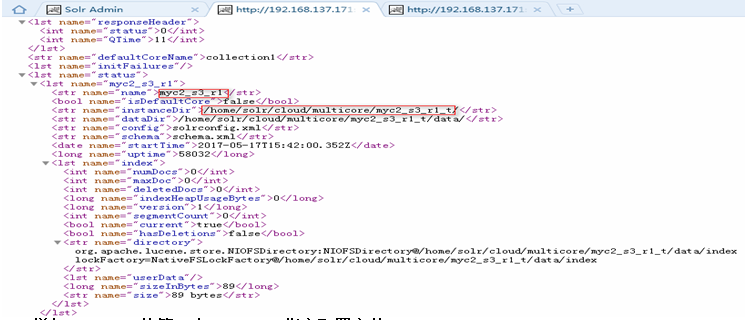
1. 查看状态STATUS
http://192.168.137.171:8080/solr-cloud/admin/cores?action=STATUS


2.创建Core
|
name |
The name of the new core. Same as "name" on the <core> element. |
|
instanceDir |
The directory where files for this SolrCore should be stored. Same as instanceDir on the <core> element. |
|
config |
(Optional) Name of the config file (solrconfig.xml) relative to instanceDir. |
|
schema |
(Optional) Name of the schema file (schema.xml) relative to instanceDir. |
|
datadir |
(Optional) Name of the data directory relative to instanceDir. |
|
configSet |
(Optional) Name of the configset to use for this core (see Config Sets) |
|
collection |
(Optional) The name of the collection to which this core belongs. The default is the name of the core. collection.<param>=<value> causes a property of <param>=<value> to be set if a new collection is being created. Use collection.configName=<configname> to point to the configuration for a new collection. |
|
shard |
(Optional) The shard id this core represents. Normally you want to be auto-assigned a shard id. |
|
property.name=value |
(Optional) Sets the core property name to value. See core.properties file contents. |
|
async |
(Optional) Request ID to track this action which will be processed asynchronously |
(1)增加shard3的第一个replica(指定core名字和目录)
http://192.168.137.171:8080/solr-cloud/admin/cores?action=CREATE&name=myc2_s3_r1&instanceDir=myc2_s3_r1_t&collection=myc2&shard=shard3


(2)增加shard3的第二个replica(指定配置文件)
http://192.168.137.172:8080/solr-cloud/admin/cores?action=CREATE&name=myc2_s3_r2&instanceDir=myc2_s3_r2&collection=myc2&shard=shard3&config=solrconfig2.xml&schema=schema2.xml


(3)新建collection(增加shard1的第一个replica)
http://192.168.137.171:8080/solr-cloud/admin/cores?action=CREATE&name=myc3_s1_r1&instanceDir=myc3_s1_r1&collection=myc3&shard=shard1&configSet=myconf&collection.configName=myconf2

3.刷新core
当core的配置文件有变化时,可以reload一下。采用的是无缝连接方式。
http://192.168.137.171:8080/solr-cloud/admin/cores?action=RELOAD&core=myc3_s1_r1
4.重命名core
http://192.168.137.171:8080/solr-cloud/admin/cores?action=RENAME&core=myc3_s1_r1&other=coreother
5.交换core
交换core的名字,可以把待机core升格为livecore,同时保持可以恢复livecore。
官方示例:http://localhost:8983/solr/admin/cores?action=SWAP&core=core1&other=core0
6.下线core
官方示例:http://localhost:8983/solr/admin/cores?action=UNLOAD&core=core0
7.合并索引
官方示例:
方式1:http://localhost:8983/solr/admin/cores?action=MERGEINDEXES&core=core0&indexDir=/opt/solr/core1/data/index&indexDir=/opt/solr/core2/data/index
方式2:http://localhost:8983/solr/admin/cores?action=mergeindexes&core=core0&srcCore=core1&srcCore=core2
8.切分
官方示例:http://localhost:8983/solr/admin/cores?action=SPLIT&core=core0&targetCore=core1&targetCore=core2
可选参数:
|
Parameter |
Description |
Multi-valued |
|
core |
The name of the core to be split. |
false |
|
path |
The directory path in which a piece of the index will be written. |
true |
|
targetCore |
The target Solr core to which a piece of the index will be merged |
true |
|
ranges |
A comma-separated list of hash ranges in hexadecimal format |
false |
|
split.key |
The key to be used for splitting the index |
false |
|
async |
(Optional) Request ID to track this action which will be processed asynchronously |
false |
9.查看请求状态
官方示例:http://localhost:8983/solr/admin/cores?action=REQUESTSTATUS&requestid=1
13.2SolrCloud集群使用手册之CoreAdmin API的更多相关文章
- 13.1SolrCloud集群使用手册之Collections API
转载请出自出处:http://www.cnblogs.com/hd3013779515/ 1.创建collection name:指明collection名字 router.name:指定路由策略,默 ...
- 13.4SolrCloud集群使用手册之CRUD
转载请出自出处:http://www.cnblogs.com/hd3013779515/ Student.java package cn.ljh.ssm.test; import org.apache ...
- 13.3SolrCloud集群使用手册之Zookeeper指令
转载请出自出处:http://www.cnblogs.com/hd3013779515/ 1.upconfig java -classpath .:/home/solr/cloud/lib/* org ...
- Ubuntu_10.04下Hadoop-0.20.2集群配置手册
Ubuntu_10.04下Hadoop-0.20.2集群配置手册 一.软硬件环境的准备 下面的文章来自hadoopor.com,我先交待一下我自己的环境: 两台机器,每台机器上面两个虚机(vmware ...
- Nginx+Tomcat+MemCached 集群配置手册
系统实施文档 Nginx+Tomcat+MemCached 集群配置手册 目 录 第1章 概述 1.1 目标 互联网的快速发展带来了互联网系统的高负载和高可用性, 这要求我们在设计系统架 ...
- 实现CI/CDk8s高可用集群搭建总结以及部署API到k8s
实现CI/CD(Centos7.2)系列二:k8s高可用集群搭建总结以及部署API到k8s 前言:本系列博客又更新了,是博主研究很长时间,亲自动手实践过后的心得,k8s集群是购买了5台阿里云服务器部署 ...
- Greenplum(4.3.73)集群安装手册
1. 概述 本文档仅限于指导Greenplum 4.3.7.3(对应安装包greenplum-db-4.3.7.3-build-2-RHEL5-x86_64.bin)版本在CentOS6.5 系统进行 ...
- OEMCC 13.2 集群版本安装部署
之前测试部署过OEMCC 13.2单机,具体可参考之前随笔: OEMCC 13.2 安装部署 当时环境:两台主机,系统RHEL 6.5,分别部署OMS和OMR: OMS,也就是OEMCC的服务端 IP ...
- kubeadm安装kubernetes 1.13.1集群完整部署记录
k8s是什么 Kubernetes简称为k8s,它是 Google 开源的容器集群管理系统.在 Docker 技术的基础上,为容器化的应用提供部署运行.资源调度.服务发现和动态伸缩等一系列完整功能,提 ...
随机推荐
- VC++窗口创建过程,图形绘制,时钟程序
创建窗口步骤: (1)注册窗口类(RegisterClassEx) (2)创建窗口(CreateWindowEx) (3)在桌面显示窗口(ShowWindow) (4)更新窗口客户区(UpdateWi ...
- thinkphp 百度编辑器和layer简单用法
百度编辑器1.4.3.3和layer插件简单案例 :后台单页面管理 增删改查操作 此处为默认图片保存路径,如果要修改保存路径,需要修改config文件. 添加页. <extend name=&q ...
- 【Java并发编程】1、ConcurrentHashMap原理分析
集合是编程中最常用的数据结构.而谈到并发,几乎总是离不开集合这类高级数据结构的支持.比如两个线程需要同时访问一个中间临界区(Queue),比如常会用缓存作为外部文件的副本(HashMap).这篇文章主 ...
- Java虚拟机 - Javac编译与JIT编译
[深入Java虚拟机]之七:Javac编译与JIT编译 编译过程 不论是物理机还是虚拟机,大部分的程序代码从开始编译到最终转化成物理机的目标代码或虚拟机能执行的指令集之前,都会按照如下图所示的各个步骤 ...
- SqlSession对象之ResultSetHandler
ResultSetHandler是Mybatis中的另一重要接口,它的代码如下所示: public interface ResultSetHandler { <E> List<E&g ...
- js点击获取标签元素
14.数组去重 方法一:利用冒泡 function elementName(evt){ evt = evt|| window.event; // IE: window.event // IE用src ...
- PHP中NOTICE错误常见解决方法
对于初学者,肯定会遇到不同的错误提示,比如:警告,致命,等等,其中NOTICE错误等级最低,页面中,好多类似 Notice: Use of undefined constant title - ass ...
- js-ES6学习笔记-Class(2)
1.与函数一样,类也可以使用表达式的形式定义. const MyClass = class Me { getClassName() { return Me.name; } }; 这个类的名字是MyCl ...
- linux下安装jenkins实现自动化部署
安装 开始 1.安装之前,必须先安装JDK 可以参考 http://www.cnblogs.com/ericli-ericli/p/7070874.html 2.使用相关命令: wget -q -O ...
- ActiveReports 报表控件V12新特性 -- 可定制的安装设置
ActiveReports是一款专注于 .NET 平台的报表控件,全面满足 HTML5 / WinForms / ASP.NET / ASP.NET MVC / WPF 等平台下报表设计和开发工作需求 ...
