C# 开源仪表盘库—Agauge App
1、简介
有个叫A.J.Bauer 的大神在System.Windows.Forms.Control类的基础上建立了一个显示各种仪表盘的类。
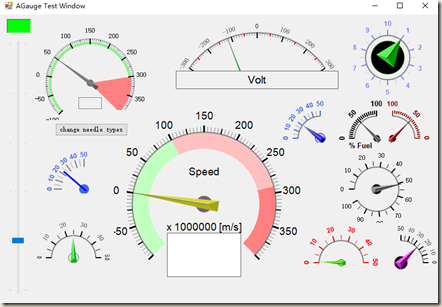
英文版简介:C# Tutorial, A gauge control with all source code, .net 2.0 http://ucancode.net/CSharp_Tutorial_GDI+_Gauge_Source_Code.htm
Github地址:Code-Artist/AGauge: C# Gauge Control https://github.com/Code-Artist/AGauge
安装包地址:NuGet Gallery | CodeArtEng.Controls 2.2.0 https://www.nuget.org/packages/CodeArtEng.Controls/
2、下载及安装
(1)使用VS自带的NuGet来安装
不清楚NuGet的童鞋可以参考这篇:真心好用的VS扩展--NuGet - 阿里云 https://www.aliyun.com/jiaocheng/624805.html
接下来,开始安装,打开安装包地址 https://www.nuget.org/packages/CodeArtEng.Controls/
可以看到支持package Manager 安装,只需输入下面指令:
Install-Package CodeArtEng.Controls -Version 2.2.0

先打开VS,进入Tools即工具选项卡,找到NuGet,打开其控制台
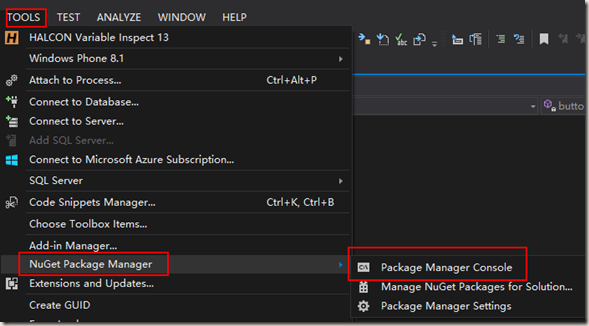
然后在控制台输入上面的指令:
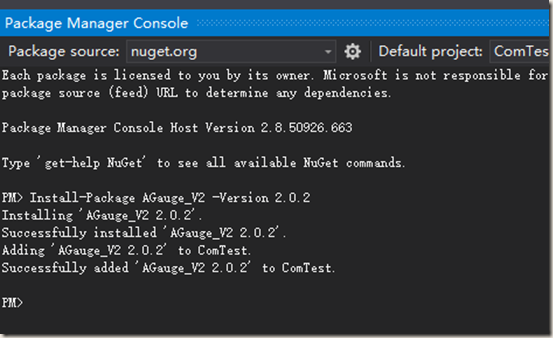
成功安装后,就可以愉快的引用了。
(2)手动下载软件包并导入
在网站右侧有下载按钮,直接下载的包名称为 agauge_v2.2.0.2.nupkg

接下来添加本地的nuget包,可参考一下文章:
NuGet添加本地包(Package) - Hejin.Wong - 博客园 https://www.cnblogs.com/egger/archive/2013/03/19/2970138.html
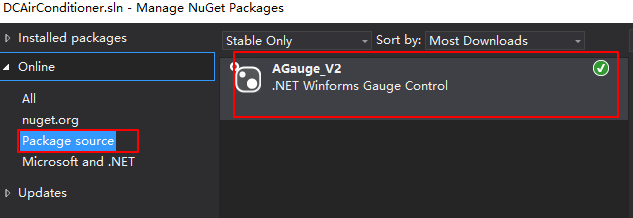
进入工具(Tools),最下面一行选项(Options),找到NugetPackageManager,在包来源处添加本地包所在的目录。
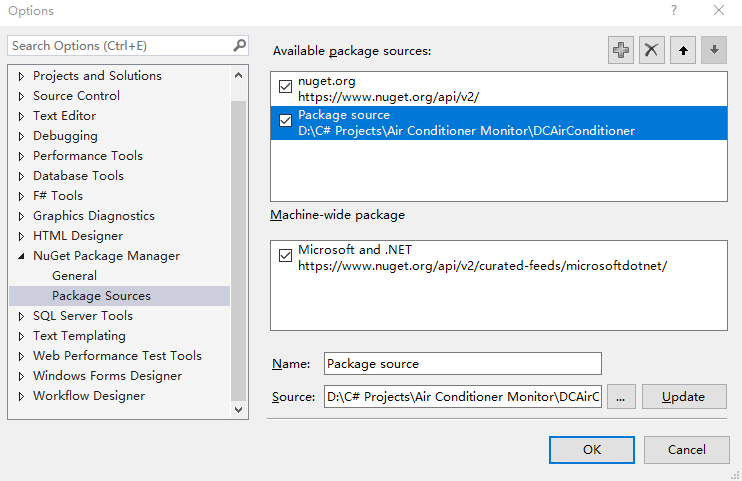
之后再进入Tools->NuGet,从设定好的package source 目录中选择我们的本地库进行导入。
3、新建winForm工程并添加Agauge
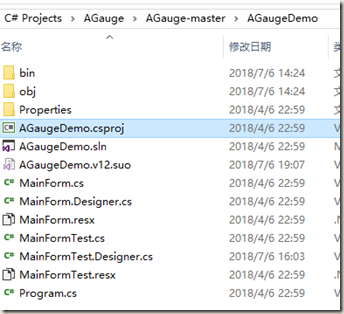
首先从github下载了Agauge的作者写的demo,里面是没有.sln文件的,打开csproj文件即可。
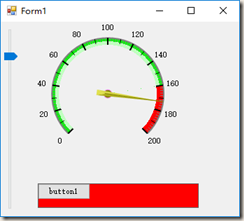
这个项目用vs2013打开之后是直接可以运行的,界面是一个仪表盘和一个滑动条,拖动滑动条可以改变仪表盘的指针。
为了快速编写自己的例子,我新建了一个C#的winForm工程,仪表盘的代码直接从demo
拷贝过来。我新建的工程放在了 https://github.com/sheep12345679/C-Agauge-Test.git
注意新建项目一定要使用Nuget导入agauge的package。
主要修改了MainForm.Designer.cs和MainForm.cs里的代码:
MainForm.Designer.cs中定义了使用的控件,同时在InitializeComponent()函数中对控件做了初始化。
private void InitializeComponent()

        {

            System.Windows.Forms.AGaugeLabel aGaugeLabel1 = new System.Windows.Forms.AGaugeLabel();

            System.Windows.Forms.AGaugeRange aGaugeRange1 = new System.Windows.Forms.AGaugeRange();

            System.Windows.Forms.AGaugeRange aGaugeRange2 = new System.Windows.Forms.AGaugeRange();

            System.Windows.Forms.AGaugeRange aGaugeRange3 = new System.Windows.Forms.AGaugeRange();

            this.trackBar1 = new System.Windows.Forms.TrackBar();

            this.panel1 = new System.Windows.Forms.Panel();

            this.button1 = new System.Windows.Forms.Button();

            this.tableLayoutPanel1 = new System.Windows.Forms.TableLayoutPanel();

            this.aGauge1 = new System.Windows.Forms.AGauge();

            this.button2 = new System.Windows.Forms.Button();

            ((System.ComponentModel.ISupportInitialize)(this.trackBar1)).BeginInit();

            this.panel1.SuspendLayout();

            this.tableLayoutPanel1.SuspendLayout();

            this.SuspendLayout();

            //

            // trackBar1

            //

            this.trackBar1.Dock = System.Windows.Forms.DockStyle.Fill;

            this.trackBar1.LargeChange = ;

            this.trackBar1.Location = new System.Drawing.Point(, );

            this.trackBar1.Maximum = ;

            this.trackBar1.Name = "trackBar1";

            this.trackBar1.Orientation = System.Windows.Forms.Orientation.Vertical;

            this.tableLayoutPanel1.SetRowSpan(this.trackBar1, );

            this.trackBar1.Size = new System.Drawing.Size(, );

            this.trackBar1.TabIndex = ;

            this.trackBar1.TickStyle = System.Windows.Forms.TickStyle.None;

            this.trackBar1.ValueChanged += new System.EventHandler(this.trackBar1_ValueChanged);

            //

            // panel1

            //

            this.panel1.BorderStyle = System.Windows.Forms.BorderStyle.FixedSingle;

            this.panel1.Controls.Add(this.button1);

            this.panel1.Location = new System.Drawing.Point(, );

            this.panel1.Name = "panel1";

            this.panel1.Size = new System.Drawing.Size(, );

            this.panel1.TabIndex = ;

            //

            // button1

            //

            this.button1.Location = new System.Drawing.Point(-, -);

            this.button1.Name = "button1";

            this.button1.Size = new System.Drawing.Size(, );

            this.button1.TabIndex = ;

            this.button1.Text = "button1";

            this.button1.UseVisualStyleBackColor = true;

            this.button1.Click += new System.EventHandler(this.button1_Click);

            //

            // tableLayoutPanel1

            //

            this.tableLayoutPanel1.ColumnCount = ;

            this.tableLayoutPanel1.ColumnStyles.Add(new System.Windows.Forms.ColumnStyle(System.Windows.Forms.SizeType.Absolute, 50F));

            this.tableLayoutPanel1.ColumnStyles.Add(new System.Windows.Forms.ColumnStyle(System.Windows.Forms.SizeType.Percent, 100F));

            this.tableLayoutPanel1.Controls.Add(this.aGauge1, , );

            this.tableLayoutPanel1.Controls.Add(this.trackBar1, , );

            this.tableLayoutPanel1.Controls.Add(this.panel1, , );

            this.tableLayoutPanel1.Dock = System.Windows.Forms.DockStyle.Fill;

            this.tableLayoutPanel1.Location = new System.Drawing.Point(, );

            this.tableLayoutPanel1.Name = "tableLayoutPanel1";

            this.tableLayoutPanel1.RowCount = ;

            this.tableLayoutPanel1.RowStyles.Add(new System.Windows.Forms.RowStyle(System.Windows.Forms.SizeType.Percent, 100F));

            this.tableLayoutPanel1.RowStyles.Add(new System.Windows.Forms.RowStyle(System.Windows.Forms.SizeType.Absolute, 50F));

            this.tableLayoutPanel1.Size = new System.Drawing.Size(, );

            this.tableLayoutPanel1.TabIndex = ;

            //

            // aGauge1

            //

            this.aGauge1.BackColor = System.Drawing.SystemColors.Control;

            this.aGauge1.BaseArcColor = System.Drawing.Color.Gray;

            this.aGauge1.BaseArcRadius = ;

            this.aGauge1.BaseArcStart = ;

            this.aGauge1.BaseArcSweep = ;

            this.aGauge1.BaseArcWidth = ;

            this.aGauge1.Center = new System.Drawing.Point(, );

            this.aGauge1.Dock = System.Windows.Forms.DockStyle.Fill;

            aGaugeLabel1.Color = System.Drawing.SystemColors.WindowText;

            aGaugeLabel1.Font = new System.Drawing.Font("Verdana", 9.75F, ((System.Drawing.FontStyle)((System.Drawing.FontStyle.Bold | System.Drawing.FontStyle.Italic))), System.Drawing.GraphicsUnit.Point, ((byte)()));

            aGaugeLabel1.Name = "GaugeLabel1";

            aGaugeLabel1.Position = new System.Drawing.Point(, );

            aGaugeLabel1.Text = "";

            this.aGauge1.GaugeLabels.Add(aGaugeLabel1);

            aGaugeRange1.Color = System.Drawing.Color.Red;

            aGaugeRange1.EndValue = 200F;

            aGaugeRange1.InnerRadius = ;

            aGaugeRange1.InRange = false;

            aGaugeRange1.Name = "AlertRange";

            aGaugeRange1.OuterRadius = ;

            aGaugeRange1.StartValue = 160F;

            aGaugeRange2.Color = System.Drawing.Color.FromArgb(((int)(((byte)()))), ((int)(((byte)()))), ((int)(((byte)()))));

            aGaugeRange2.EndValue = 160F;

            aGaugeRange2.InnerRadius = ;

            aGaugeRange2.InRange = false;

            aGaugeRange2.Name = "GaugeRange3";

            aGaugeRange2.OuterRadius = ;

            aGaugeRange2.StartValue = 0F;

            aGaugeRange3.Color = System.Drawing.Color.Lime;

            aGaugeRange3.EndValue = 160F;

            aGaugeRange3.InnerRadius = ;

            aGaugeRange3.InRange = false;

            aGaugeRange3.Name = "GaugeRange2";

            aGaugeRange3.OuterRadius = ;

            aGaugeRange3.StartValue = 0F;

            this.aGauge1.GaugeRanges.Add(aGaugeRange1);

            this.aGauge1.GaugeRanges.Add(aGaugeRange2);

            this.aGauge1.GaugeRanges.Add(aGaugeRange3);

            this.aGauge1.Location = new System.Drawing.Point(, );

            this.aGauge1.MaxValue = 200F;

            this.aGauge1.MinValue = 0F;

            this.aGauge1.Name = "aGauge1";

            this.aGauge1.NeedleColor1 = System.Windows.Forms.AGaugeNeedleColor.Yellow;

            this.aGauge1.NeedleColor2 = System.Drawing.Color.Olive;

            this.aGauge1.NeedleRadius = ;

            this.aGauge1.NeedleType = System.Windows.Forms.NeedleType.Advance;

            this.aGauge1.NeedleWidth = ;

            this.aGauge1.ScaleLinesInterColor = System.Drawing.Color.Black;

            this.aGauge1.ScaleLinesInterInnerRadius = ;

            this.aGauge1.ScaleLinesInterOuterRadius = ;

            this.aGauge1.ScaleLinesInterWidth = ;

            this.aGauge1.ScaleLinesMajorColor = System.Drawing.Color.Black;

            this.aGauge1.ScaleLinesMajorInnerRadius = ;

            this.aGauge1.ScaleLinesMajorOuterRadius = ;

            this.aGauge1.ScaleLinesMajorStepValue = 20F;

            this.aGauge1.ScaleLinesMajorWidth = ;

            this.aGauge1.ScaleLinesMinorColor = System.Drawing.Color.Gray;

            this.aGauge1.ScaleLinesMinorInnerRadius = ;

            this.aGauge1.ScaleLinesMinorOuterRadius = ;

            this.aGauge1.ScaleLinesMinorTicks = ;

            this.aGauge1.ScaleLinesMinorWidth = ;

            this.aGauge1.ScaleNumbersColor = System.Drawing.Color.Black;

            this.aGauge1.ScaleNumbersFormat = null;

            this.aGauge1.ScaleNumbersRadius = ;

            this.aGauge1.ScaleNumbersRotation = ;

            this.aGauge1.ScaleNumbersStartScaleLine = ;

            this.aGauge1.ScaleNumbersStepScaleLines = ;

            this.aGauge1.Size = new System.Drawing.Size(, );

            this.aGauge1.TabIndex = ;

            this.aGauge1.Text = "aGauge1";

            this.aGauge1.Value = 0F;

            this.aGauge1.ValueChanged += new System.EventHandler(this.aGauge1_ValueChanged);

            this.aGauge1.ValueInRangeChanged += new System.EventHandler<System.Windows.Forms.ValueInRangeChangedEventArgs>(this.aGauge1_ValueInRangeChanged);

            //

            // button2

            //

            this.button2.Location = new System.Drawing.Point(, );

            this.button2.Name = "button2";

            this.button2.Size = new System.Drawing.Size(, );

            this.button2.TabIndex = ;

            this.button2.Text = "button2";

            this.button2.UseVisualStyleBackColor = true;

            //

            // MainForm

            //

            this.AutoScaleDimensions = new System.Drawing.SizeF(6F, 12F);

            this.AutoScaleMode = System.Windows.Forms.AutoScaleMode.Font;

            this.ClientSize = new System.Drawing.Size(, );

            //this.Controls.Add(this.aGauge1);

            //this.Controls.Add(this.panel1);

            //this.Controls.Add(trackBar1);

            //this.Controls.Add(this.button1);

            this.Controls.Add(tableLayoutPanel1);

            //this.Controls.Add(this.button2);

            this.Name = "MainForm";

            this.Text = "Form1";

            ((System.ComponentModel.ISupportInitialize)(this.trackBar1)).EndInit();

            this.panel1.ResumeLayout(false);

            this.tableLayoutPanel1.ResumeLayout(false);

            this.tableLayoutPanel1.PerformLayout();

            this.ResumeLayout(false);

        }
需要注意的是,在设置完控件的参数之后,不要忘了this.Controls.Add(tableLayoutPanel1); 这句话,否则控件无法显示在窗口上。
        private System.Windows.Forms.AGauge aGauge1;

        private System.Windows.Forms.TrackBar trackBar1;

        private System.Windows.Forms.Panel panel1;

        private System.Windows.Forms.TableLayoutPanel tableLayoutPanel1;

        private System.Windows.Forms.Button button1;

        private System.Windows.Forms.Button button2;
之后对MainForm.cs进行修改,定义操作控件的函数
//MainForm.cs
public partial class MainForm : Form

    {

        private System.Windows.Forms.AGaugeLabel label;

        private System.Windows.Forms.AGaugeRange alert;

        public MainForm()

        {

            InitializeComponent();

            label = aGauge1.GaugeLabels.FindByName("GaugeLabel1");

            alert = aGauge1.GaugeRanges.FindByName("AlertRange");

            aGauge1.ValueInRangeChanged += AGauge1_ValueInRangeChanged;

        }

        private void AGauge1_ValueInRangeChanged(object sender, ValueInRangeChangedEventArgs e)

        {

        }

        private void trackBar1_ValueChanged(object sender, EventArgs e)

        {

            aGauge1.Value = trackBar1.Value;

        }

        private void aGauge1_ValueChanged(object sender, EventArgs e)

        {

            label.Text = aGauge1.Value.ToString();

        }

        private void aGauge1_ValueInRangeChanged(object sender, System.Windows.Forms.ValueInRangeChangedEventArgs e)

        {

            System.Diagnostics.Debug.WriteLine("InRange Event.");

            if (e.Range == alert)

            {

                panel1.BackColor = e.InRange ? Color.Red : Color.FromKnownColor(KnownColor.Control);

            }

        }

        private void button1_Click(object sender, EventArgs e)

        {

            //aGauge1.GaugeRanges.RemoveAt(0);

            //aGauge1.GaugeRanges.Add(new AGaugeRange(Color.Blue, 40, 60, , ));

        }

    }
C# 开源仪表盘库—Agauge App的更多相关文章
- 几款开源的hybird移动app框架分析
几款开源的Hybrid移动app框架分析 Ionic Onsen UI 与 ionic 相比 jQuery Mobile Mobile Angular UI 结论 很多移动开发者喜欢使用原生代码开发, ...
- 开源整理:Android App新手指引开源控件
开源整理:Android App新手指引开源控件 一个App第一次与用户接触或者发生大版本更新时,常常会用户进行新手引导,而一个好的新手指引,往往能够方便新用户快速了解操作你的应用功能.新手指引的重要 ...
- 转载: 开源整理:Android App新手指引开源控件
http://blog.coderclock.com/2017/05/22/android/open-source-android-app-guide-view-library/ 开源整理:Andro ...
- 【android】开源一个企业通讯录app
软件背景:该app不是替代手机通讯录,而是对其一种补充.项目只是通讯录客户端,数据源是访问本地.还是访问远程服务器,由你来实现 开源地址:http://git.oschina.net/yso/Smar ...
- 滴滴 App 的质量优化框架 Booster,开源了!
一. 序 当 App 达到一定体量的时候,肯定是要考虑质量优化.有些小问题,看似只有 0.01% 触发率,但是如果发生在 DAU 过千万的产品中,就很严重了. 滴滴这个独角兽的 DAU 早已过千万,自 ...
- App Store上的开源应用汇总
以下是互联网上主要的开源iOS应用的列表,在学习的时候,多看看完成的功能代码可以给我们带来很多经验,但是除了Apple官方提供的Sample Code之外,我们很难找到优质的开源项目代码,所以我搜集了 ...
- 9个完整android开源app项目
一.photoup 介绍: photoup 是一款开源的相册类app,主要功能是将本地图片提交到facebook上去,虽然他的功能和facebook的远程服务相关,但是本身是可以被当作一款 相册应用的 ...
- Android 开源项目
StickerCamera 一个完整的开源项目.贴纸标签相机(类似nice,in),拍照,裁剪,贴贴纸打标签功能. MD-BiliBili 基于 Material Design 的 BiliBili ...
- iOS完整App资源收集
前言 iOS开发学习者都希望得到实战训练,但是很多资料都是只有一小部分代码,并不能形成完成的App,笔者在此处收集了很多开源的完整的App,都有源代码哦! 本篇文章持续更新中,请持续关注.本篇所收集的 ...
随机推荐
- Spring ApplicationContext(十)finishRefresh
ApplicationContext(十)finishRefresh Spring 系列目录(https://www.cnblogs.com/binarylei/p/10198698.html) 经过 ...
- spring.boot mybaits集成
https://www.cnblogs.com/pejsidney/p/9272562.html (insertBatch批量插入) 第一篇博客循环部分有错误,参照下面的例子去更改 List<S ...
- Activiti5 添加/查询审批批注(审批意见)
Activiti5 添加/查询审批批注 Activiti 工作流开发,23张表中,act_hi_commit 中,用于保存流程审核的批注信息: 调用: taskServer.addComment ...
- centos6.5虚拟机每次都要ifup eth0的解决办法
修改文件/etc/sysconfig/network-scripts/ifcfg-eth0把ONBOOT=no改ONBOOT=yes
- 转--O2O刷单“黑市”折射下的泡沫#神作#
“XX打车和XX用车这样的公司,太不真诚.从前补贴的是现金,现在补贴的都是各种券,还有各种使用上的规则,为什么要设置这么多的限制?反正都要花一样的钱,为什么不能痛快点?让用户体验好一点?” 说这个话的 ...
- php中如何配置项目虚拟路径
php虚拟目录的设置在apache目录下打开conf->httpd.conf文件,找到<IfModule dir_module>,在</IfModule>后面添加如下代码 ...
- 虚拟机 与 主机 Ping 中的设置
这段时间是学习华清远见的Linux A8 关于Linux移植,遇到虚拟机与主机Ping不通.经查阅后总结出以下 VM中设置. “虚拟机设置-->硬件--> 网络适配器--> 桥接模式 ...
- Codeforces Round #517 (Div. 2) C. Cram Time(思维+贪心)
https://codeforces.com/contest/1065 题意 给你a,b,让你找尽量多的自然数,使得他们的和<=a,<=b,用在a和b的自然数不能重复 思路 假如只有一个数 ...
- es6 字符串方法
1.字符串的新方法 includes() 包含属性 startsWith() 头部开始是否包含 endWith() 字符串是否在尾部 ========三个返回值都为布尔值 第二参数为数字 e ...
- vue中的路由嵌套
1定义组件 const Index = { template:` <div>首页</div> ` } const Order = { template:` <div> ...
