Spring Boot 创建hello world项目
Spring Boot 创建hello world项目
1.创建项目
最近在学习Spring Boot,这里记录使用IDEA创建Spring Boot的的过程

在1出勾选,选择2,点击Next

这里填写相应的信息,然后Next
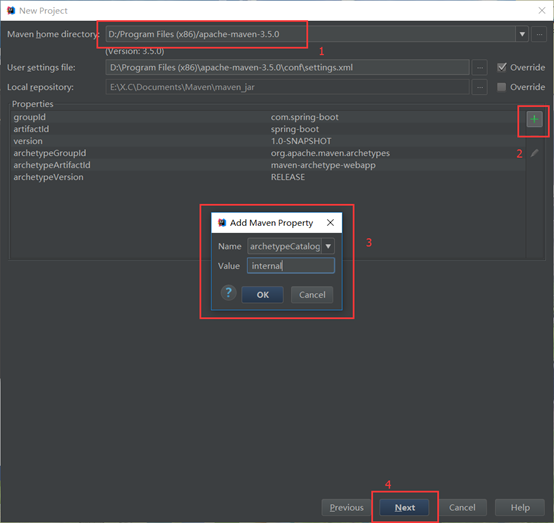
这里1是你自己中Maven的路径,这里在之前应该已经在idea中配置好了,这里直接就带过来了,然后为了解决Maven项目速度慢问题,这里点击2处,添加maven property: archetypeCatalog=internal
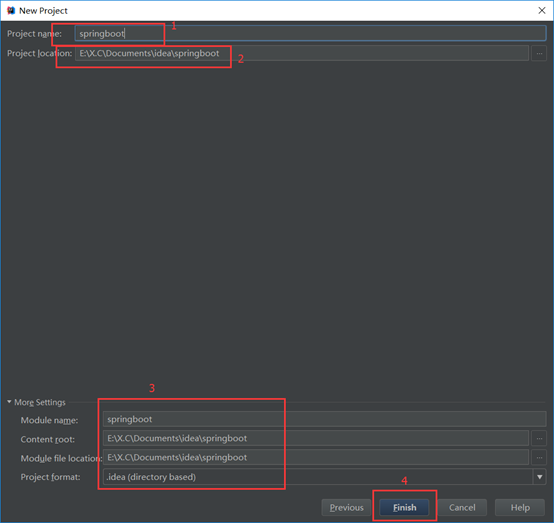
这里1是项目的名字,2是项目路径,3这里不用管他当然也可以根据自己的需要修改,然后点击Finish,idea就会自动的帮我们创建好简单的Maven项目结构,这里我们看一下,它是这个样子的.

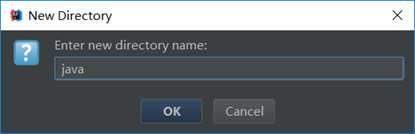
观察项目结构发现里面在main文件夹下面没有java文件夹这里我们手工的创建java文件夹,具体操作步骤如下:

创建好java文件夹后,我们需要将java文件夹设置成Sources Folder:

此时一个简单的Maven Web的目录结构已经成型了,此时我们需要向里面添加Spring Boot的内容
2.添加Spring Boot依赖
首先完善pom.xml文件
这里先设置全局编码和设定java版本:
<properties>

    <!--设置统一编码 -->

    <project.build.sourceEncoding>UTF-8</project.build.sourceEncoding>

    <project.reporting.outputEncoding>UTF-8</project.reporting.outputEncoding>

    <!-- 设置java版本-->

    <java.version>1.8</java.version>

</properties>
然后添加Spring Boot的核心依赖,这里我使用的是1.5.6RELEASE这个版本:
<parent>

    <groupId>org.springframework.boot</groupId>

    <artifactId>spring-boot-starter-parent</artifactId>

    <version>1.5.6.RELEASE</version>

</parent>
使用spring-boot-starter-parent后我们就可以无需添加一堆相应的依赖,实现依赖配置最小化
<dependency>

    <groupId>org.springframework.boot</groupId>

    <artifactId>spring-boot-starter-web</artifactId>

</dependency>
这是添加spring-boot-starter-web提供对web的支持
最后我们添加Spring Boot的maven插件,并设置好热部署,这样我们就不需要每次修改后再执行一遍项目
 <plugin>

     <groupId>org.springframework.boot</groupId>

     <artifactId>spring-boot-maven-plugin</artifactId>

     <dependencies>

         <!-- spring热部署-->

         <dependency>

			 <groupId>org.springframework</groupId>

			 <artifactId>springloaded</artifactId>

			 <version>1.2.6.RELEASE</version>

		 </dependency>

	 </dependencies>

</plugin>
这里之后直接使用mvn spring-boot: run 运行项目
3.创建Spring Boot入口
这里首先制定类文件的文件结构:
+---com.example.demo

    +--Application

+---com.example.demo.controller

    +--TestController
接着创建资源文件,这里资源文件在resources目录下创建:application.yml
# Server settings

server:

    port: 80

    address: 127.0.0.1

# SPRING PROFILES

spring:

    # HTTP ENCODING

    http:

        encoding.charset: UTF-8

        encoding.enable: true

        encoding.force: true
这里是配置服务器的端口,ip地址和编码
创建Application类并创建main方法
@SpringBootApplication

public class Application {

    public static void main(String[] args) {

        SpringApplication.run(Application.class, args);

    }

}
这里Application要使用注解@SpringBootApplication
接着我们创建Controller类:TestController
@RestController

public class TestController {

    @RequestMapping("/")

    public String test() {

        return "Test Hello World!";

    }

}
这里TestController使用的注解是@RestController , test()方法使用 @RequestMapping 来设置请求地址
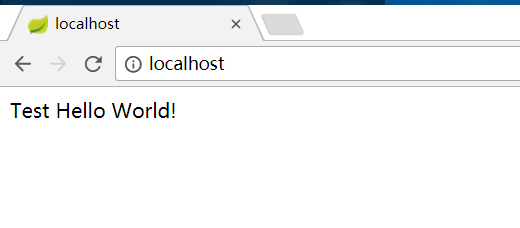
此时执行该Spring Boot项目可以,后在浏览器中输入请求路径,就完成了一个简单的hello world程序:
4.使用Thymeleaf模板
首先在pom.xml中添加依赖:
<!--添加thymeleaf模板引擎-->

<dependency>

    <groupId>org.springframework.boot</groupId>

    <artifactId>spring-boot-starter-thymeleaf</artifactId>

</dependency>
在application.yml添加配置:
spring:

    thymeleaf:

        cache: false #Thymeleaf缓存在开发过程中关闭

        encoding: utf-8

        mode: HTML5

        prefix: classpath:/templates/

        suffix: .html
在resources创建templates文件夹,这里用来存放模板,模板的静态文件在resources文件夹下创建static存放
这里在templates问价夹下创建模板:
<!DOCTYPE html>

<html xmlns="http://www.w3.org/1999/xhtml" xmlns:th="http://www.thymeleaf.org"

      xmlns:sec="http://www.thymeleaf.org/thymeleaf-extras-springsecurity3">

<head>

    <title>Hello World!</title>

</head>

<body>

    <h1 th:inline="text">Hello Thymeleaf</h1>

    <p th:text="${hello}"></p>

</body>

</html>
创建Controller类:
@Controller

@RequestMapping("/test")

public class TempController {

    @RequestMapping("/temp")

    public String toTemp(HttpServletRequest request) {

        request.setAttribute("hello", "hello world!!");

        return "tempTest";

    }

}
运行一下,在浏览器地址栏输入:http://localhost/test/temp 查看效果:

5.集成JSP
这里我们将有关Thymeleaf模板的依赖和配置先注释掉,这里在pom.xml中添加相关依赖:
<dependency>

	<groupId>org.springframework.boot</groupId>

	<artifactId>spring-boot-starter-tomcat</artifactId>

</dependency>

<dependency>

	<groupId>org.apache.tomcat.embed</groupId>

	<artifactId>tomcat-embed-jasper</artifactId>

	<version>8.5.16</version>

</dependency>
在application.yml添加配置:
spring:

     mvc:

        view.prefix: /WEB-INF/jsp/

        view.suffix: .jsp
创建Controller类:
@Controller

@RequestMapping("/demo")

public class DemoController {

    @RequestMapping("/model")

    public String toModel(Map<String, Object> model) {

        model.put("model", "Hello Model!!");

        return "model";

    }

}
最后我们根据yml配置文件中的配置,在WEB-INF文件夹下创建jsp文件夹,在其中创建model.jsp:
<%@ page contentType="text/html;charset=UTF-8" language="java" %>

<html>

<head>

    <title>ModelTest</title>

</head>

<body>

    ${model}

</body>

</html>
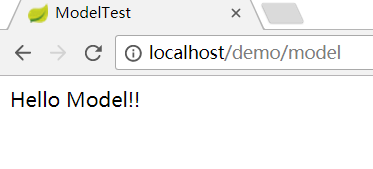
运行项目,在地址栏输入:http://localhost/demo/model
运行结果:
注意
这里要注意,该示例中不能同时支持Thymeleaf和jsp,在使用其中一个时,需将另外一个相关依赖和yml中的配置注释掉,否则会报错500或者404错误
最后附上示例地址:
https://github.com/674803226/spring-boot-demo
Spring Boot 创建hello world项目的更多相关文章
- Spring Boot创建一个HelloWorld项目
目录 Spring Boot 简介 微服务框架 以前使用spring开发web的方式 Spring Boot 启动器介绍 如何创建一个helloword的SpringBoot项目 Spring Boo ...
- 【spring boot】5.spring boot 创建web项目并使用jsp作前台页面
贼烦的是,使用spring boot 创建web项目,然后我再idea下创建的,but 仅仅启动spring boot的启动类,就算整个项目都是好着的,就算是能够进入controller中,也不能成功 ...
- 【spring】1.2、Spring Boot创建项目
Spring Boot创建项目 在1.1中,我们通过"Spring Starter Project"来创建了一个项目,实际上是使用了Pivotal团队提供的全新框架Spring B ...
- Spring Kafka整合Spring Boot创建生产者客户端案例
每天学习一点点 编程PDF电子书.视频教程免费下载:http://www.shitanlife.com/code 创建一个kafka-producer-master的maven工程.整个项目结构如下: ...
- spting Boot 创建一个springBoot项目
spting Boot 创建一个springBoot项目 1)学习springBoot使用软件:IDEA软件(前面的文章有安装idea的过程). 也可以使用另一种方法在https://start.sp ...
- Spring Boot构建的Web项目如何在服务端校验表单输入
本文首发于个人网站:Spring Boot构建的Web项目如何在服务端校验表单输入 这个例子用于演示在Spring Boot应用中如何验证Web 应用的输入,我们将会建立一个简单的Spring MVC ...
- Spring框架学习笔记(5)——Spring Boot创建与使用
Spring Boot可以更为方便地搭建一个Web系统,之后服务器上部署也较为方便 创建Spring boot项目 1. 使用IDEA创建项目 2. 修改groupid和artifact 3. 一路n ...
- Spring框架学习笔记(8)——spring boot+mybatis plus+mysql项目环境搭建
之前写的那篇Spring框架学习笔记(5)--Spring Boot创建与使用,发现有多小细节没有提及,,正好现在又学习了mybatis plus这款框架,打算重新整理一遍,并将细节说清楚 1.通过I ...
- Spring Boot 创建 Docker 镜像
随着越来越多的组织转向容器和虚拟服务器,Docker正成为软件开发工作流程中一个更重要的部分.为此,Spring Boot 2.3中最新的功能之中,提供了为Spring Boot应用程序创建 Dock ...
随机推荐
- LeetCode145 Binary Tree Postorder Traversal Java题解(递归 迭代)
题目: Given a binary tree, return the postorder traversal of its nodes' values. For example: Given bin ...
- ZOJ Design the city LCA转RMQ
Design the city Time Limit: 1 Second Memory Limit: 32768 KB Cerror is the mayor of city HangZho ...
- commons-fileupload 组件实现文件上传
index.jsp 核心代码: //创建文件项工厂 DiskFileItemFactory factory = new DiskFileItemFactory(); //创建解析请求 数据的Servl ...
- python-----删除同一文件夹下相似的图片
最近整理图片发现,好多图片都非常相似,于是写如下代码去删除,有两种方法: 注:第一种方法只对于连续图片(例一个视频里截下的图片)准确率也较高,其效率高:第二种方法准确率高,但效率低 方法一:相邻两个文 ...
- Vue Router过渡动效
<router-view> 是基本的动态组件,所以我们可以用 <transition> 组件给它添加一些过渡效果: <transition> <router- ...
- E20170609-ts
algorithm n.算法 layout n. 布局,安排,设计; 布置图,规划图; resource n. 资源; 物力,财力; 办法; 智谋; partial adj. 部分的; 偏爱的; ...
- bzoj 1026: [SCOI2009]windy数【数位dp】
忘记limit不能记WA了一发-- 典型数位dp,变成work(r)-work(l-1),然后dfs的时候记录w当前位置,la上一个数选的什么,lm当前位是否有上限,ok当前位是否可以不考虑差大于等于 ...
- 赋予option元素点击事件后,点击select时却触发了option事件。如何解决?
将select的优先级提到option之前就可以了. 方法:为select元素添加position:relative: <select class="adt" name=&q ...
- mybatis编写mapper操作
mybatis编写mapper resultType和resultMap resultType可以直接指定返回类型,例如自定义的bean <!--通过账号查询用户:一个参数用parameter ...
- NET 编程题
1.C#编写创建一个线程的代码 using System; using System.IO; using System.Threading ; class MyThread{ public int c ...