Hibernate 零配置之Annotation注解
JPA规范推荐使用Annotation来管理实体类与数据表之间的映射关系,从而避免同时维护两份文件(Java 实体类 和 XML 映射文件),将映射信息(写在Annotation中)与实体类集中在一起。
以下我将使用eclipse来构建一个简单使用注解取代*.hbm.xml的查询小例子。(p.s 建议不要使用Myeclipse,他很方便但是对于初学者来说没有eclipse学得牢靠)
1.在数据库中构建一张表

2.生成相应的hibernate.cfg.xml文件
- <?xml version="1.0" encoding="UTF-8"?>
- <!DOCTYPE hibernate-configuration PUBLIC
- "-//Hibernate/Hibernate Configuration DTD 3.0//EN"
- "http://www.hibernate.org/dtd/hibernate-configuration-3.0.dtd">
- <hibernate-configuration>
- <session-factory>
- <property name="hibernate.dialect">org.hibernate.dialect.MySQLDialect</property>
- <property name="hibernate.connection.driver_class">com.mysql.jdbc.Driver</property>
- <property name="hibernate.connection.password">root</property>
- <property name="hibernate.connection.url">jdbc:mysql://localhost:3306/zzh</property>
- <property name="hibernate.connection.username">root</property>
- <property name="show_sql">true</property>
- <property name="hbm2ddl.auto">update</property>
- </session-factory>
- </hibernate-configuration>
注意,在生成cfg.xml文件时,要create Hibernate Console Configuration


3.生成hibernate.reveng.xml逆向工程
- <?xml version="1.0" encoding="UTF-8"?>
- <!DOCTYPE hibernate-reverse-engineering PUBLIC "-//Hibernate/Hibernate Reverse Engineering DTD 3.0//EN" "http://hibernate.sourceforge.net/hibernate-reverse-engineering-3.0.dtd" >
- <hibernate-reverse-engineering>
- <table-filter match-catalog="zzh" match-name="commodity"/>
- </hibernate-reverse-engineering>
在Eclipse界面工具栏,择Hibernate code generation Configuration,new 一个新的配置。

4.选择Exporters的选项,接下来是重点!!!

选择勾选的两项,不再选.hbm.xml.
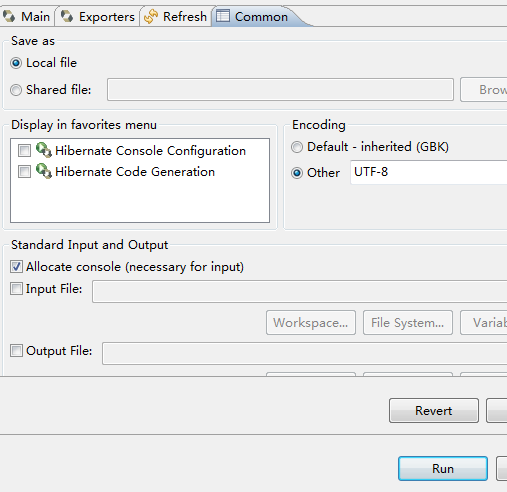
点击Run。
5.只生成了与数据表对应的实体类Commodity.java,而没有生成与该实体类对应的映射文件Commodity.hbm.xml,打开实体类
- package com.zzh;
- // Generated 2016-8-28 9:42:01 by Hibernate Tools 4.3.1.Final
- import javax.persistence.Column;
- import javax.persistence.Entity;
- import javax.persistence.GeneratedValue;
- import static javax.persistence.GenerationType.IDENTITY;
- import javax.persistence.Id;
- import javax.persistence.Table;
- /**
- * Commodity generated by hbm2java
- */
- @Entity
- @Table(name = "commodity", catalog = "zzh")
- public class Commodity implements java.io.Serializable {
- private Integer id;
- private String name;
- private Double price;
- private String unit;
- private String category;
- private String description;
- private Integer seller;
- public Commodity() {
- }
- public Commodity(String name, Double price, String unit, String category, String description, Integer seller) {
- this.name = name;
- this.price = price;
- this.unit = unit;
- this.category = category;
- this.description = description;
- this.seller = seller;
- }
- @Id
- @GeneratedValue(strategy = IDENTITY)
- @Column(name = "Id", unique = true, nullable = false)
- public Integer getId() {
- return this.id;
- }
- public void setId(Integer id) {
- this.id = id;
- }
- @Column(name = "name", length = 100)
- public String getName() {
- return this.name;
- }
- public void setName(String name) {
- this.name = name;
- }
- @Column(name = "price", precision = 11)
- public Double getPrice() {
- return this.price;
- }
- public void setPrice(Double price) {
- this.price = price;
- }
- @Column(name = "unit", length = 50)
- public String getUnit() {
- return this.unit;
- }
- public void setUnit(String unit) {
- this.unit = unit;
- }
- @Column(name = "category", length = 100)
- public String getCategory() {
- return this.category;
- }
- public void setCategory(String category) {
- this.category = category;
- }
- @Column(name = "description", length = 1000)
- public String getDescription() {
- return this.description;
- }
- public void setDescription(String description) {
- this.description = description;
- }
- @Column(name = "seller")
- public Integer getSeller() {
- return this.seller;
- }
- public void setSeller(Integer seller) {
- this.seller = seller;
- }
- }
使用@Entity注解,表示当前类为实体Bean,需要进行持久化,使用@Table注解实现数据表 commodity 与持久化类Commodity之间的映射,@Id注解指定当前持久化类的ID属性,使用@GeneratedValue注解指定ID表示生成器,使用@Column注解指定当前属性所对应的数据表中的字段,name指定字段名;unique指定是否为唯一,nullable指定是否可为null。
6.在hibernate.cfg.xml中配置映射信息
<mapping class="com.zzh.Commodity"/>
一定要注意mapping后面是class,如果是配置*.hbm.xml就是resource。
7.添加会话工厂类HibernateUtil以获取Session
- package com.zzh.utl;
- import org.hibernate.Session;
- import org.hibernate.SessionFactory;
- import org.hibernate.boot.registry.StandardServiceRegistry;
- import org.hibernate.boot.registry.StandardServiceRegistryBuilder;
- import org.hibernate.cfg.Configuration;
- public class HibernateUtil {
- private static SessionFactory sessionFactory;
- private static Session session;
- static {
- // 创建Configuration对象,读取hibernate.cfg.xml文件,完成初始化
- Configuration config = new Configuration().configure();
- StandardServiceRegistryBuilder ssrb = new StandardServiceRegistryBuilder()
- .applySettings(config.getProperties());
- StandardServiceRegistry ssr=ssrb.build();
- sessionFactory=config.buildSessionFactory(ssr);
- }
- //获取SessionFactory
- public static SessionFactory getSessionFactory(){
- return sessionFactory;
- }
- //获取Session
- public static Session getSession(){
- session=sessionFactory.openSession();
- return session;
- }
- //关闭Session
- public static void closeSession(Session session){
- if(session!=null){
- session.close();
- }
- }
- }
8.用JUnit创建一个类ZhuShi.java用于测试
- package anno;
- import static org.junit.Assert.*;
- import java.util.List;
- import org.hibernate.Query;
- import org.hibernate.Session;
- import org.junit.After;
- import org.junit.Before;
- import org.junit.Test;
- import org.hibernate.annotations.*;
- import com.zzh.Commodity;
- import com.zzh.utl.HibernateUtil;
- public class ZhuShi {
- Session session = null;
- @Before
- public void setUp() throws Exception {
- session = HibernateUtil.getSession();
- }
- @After
- public void tearDown() throws Exception {
- session.close();
- }
- @Test
- public void test() {
- String hql = " from Commodity ";
- Query query = session.createQuery(hql);
- List<Commodity> c = query.list();
- for (Commodity commodity : c) {
- System.out.println("name"+commodity.getName());
- }
- }
- }
9.整个文件已经形成

运行测试,得到结果

10.总结
原来大量的*.hbm.xml文件不再需要了,所有的配置都通过Annotation注解直接在持久化类中配置完成。
11.个人想法
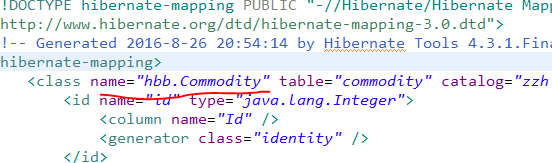
之前我有过不用注解后来因为路径调试半天的经历,那时自己也是笨,我就跟大家讲讲;我当时也是用反向工程生成实体类,还有*.hbm.xml文件,当时的hbm.xml文件如下所示:(注意看我红笔画出的部分)

由于是工具帮我生成的我也没在意,然后高高兴兴去配置cfg.xml文件去了(如下所示):

全部文件如下所示:

以为一切顺利,便用JUnit进行测试:

实体类无法找到,坑爹呀,我都是按工具一步一步来的呀,为什么会这样,后来才发现*.hbm.xml中class便签中name出错了,必须加上包名才行:
再进行测试:

总算成功了,这不代表*.hbm.xml不好,其实主要还是怪自己经验不足,乱用工具,初学者还是多用*.hbm.xml文件要好,毕竟能更好掌握其中的元素和映射信息与方式,不过就以后熟练后,还是用注释更为简洁和方便管理。
如果你觉得还不错,请继续关注我或帮我点赞,谢谢观看!
---参考资料《Struts2+Spring3+Hibernate框架技术精讲与整合案例》
Hibernate 零配置之Annotation注解的更多相关文章
- spring与hibernate整合配置基于Annotation注解方式管理实务
1.配置数据源 数据库连接基本信息存放到properties文件中,因此先加载properties文件 <!-- jdbc连接信息 --> <context:property-pla ...
- struts2 Convention插件零配置,使用注解开发
从struts21开始,struts2不再推荐使用codebehind作为零配置插件,而是改用Convention插件来支持零配置.与以前相比较,Convention插件更彻底. 使用Conventi ...
- Spring MVC零配置(全注解)(版本5.0.7)
// 核心配置类 package spittr.config; import org.springframework.web.servlet.support.AbstractAnnotationCon ...
- struts 文件下载 annotation 注解版
[本文简介] 本文将简单介绍使用 struts2 ,通过零配置和 annotation 实现文件下载功能. [文件夹结构] [web.xml有关struts的配置] <filter> &l ...
- struts 多文件上传 annotation注解(零配置)+ ajaxfileupload + 异步 版本
[本文简介] struts 多文件上传.基于”零配置“+"ajaxfileupload" 的一个简单例子. [导入依赖jar包] jquery-1.7.2.js : http:// ...
- spring+hibernate+struts2零配置整合
说句实话,很久都没使用SSH开发项目了,但是出于各种原因,再次记录一下整合方式,纯注解零配置. 一.前期准备工作 gradle配置文件: group 'com.bdqn.lyrk.ssh.study' ...
- Hibernate的Annotation注解
当项目变得比较大的时候,如何还使用hbm.xml文件来配置Hibernate实体就会变得比较复杂.这里Hibernate提供了Annotation注解方式,使得Hibernate的映射文件变得很方便管 ...
- hibernate annotation注解方式来处理映射关系
在hibernate中,通常配置对象关系映射关系有两种,一种是基于xml的方式,另一种是基于annotation的注解方式,熟话说,萝卜青菜,可有所爱,每个人都有自己喜欢的配置方式,我在试了这两种方式 ...
- Spring 基于注解零配置开发
本文是转载文章,感觉比较好,如有侵权,请联系本人,我将及时删除. 原文网址:< Spring 基于注解零配置开发 > 一:搜索Bean 再也不用在XML文件里写什么配置信息了. Sprin ...
随机推荐
- ehcache配置:使用Spring+SpringMVC+Mybatis或者有shiro
SSM框架的搭建就不在叙述了 本文主要是讲解在SSM基础上再加上ehcache 1:首先:pom.xml需要的jar <dependency> <groupId>org.myb ...
- WebStorm live edit 浏览器实现同步实现步骤
1.打开WebStore的设置对话框,找到live edit选项,选中Enable live editing. 2.打开Chrome浏览器,进入Chrome网上商店,搜索JetBrains IDE S ...
- MySql 日期函数比较
查询当天数据 select * from tab where FROM_UNIXTIME(fabutime, '%Y%m%d') = 20121217; mysql TO_DAYS(date) 函 ...
- webkit内核的浏览器为什么removeAttribute('style')会失效?
做了一些研究,应该算是理清了问题. 首先,我们在这里常说的「属性」(attributes)其实分为两种:内容属性(content attributes)以及 IDL 属性(IDL attributes ...
- python的with用法(参考)
一.With语句是什么? 有一些任务,可能事先需要设置,事后做清理工作.对于这种场景,Python的with语句提供了一种非常方便的处理方式.一个很好的例子是文件处理,你需要获取一个文件句柄,从文件中 ...
- Memcpy, blockcopy的进一步理解
using System; using System.Runtime.InteropServices; using System.IO; namespace tx { struct ST { publ ...
- 迷你MVVM框架 avalonjs 1.1发布
本版本添加了许多有用的功能,得益于用户量的增大,一些隐性BUG也暴露出来Fix掉了.强烈建议升级! 优化扫描流程: ms-skip(0) --> ms-important(1) --> m ...
- 33-wxpython多个frame之间的信息共享
https://blog.csdn.net/xyisv/article/details/78576932 https://blog.csdn.net/tianmaxingkong_/article/d ...
- QByteArray to QString
QByteArray => QString void BarEngine::ByteArrayToString(QByteArray &ba, QString &str) { i ...
- golang之指针
先上代码 package main import "fmt" type myInt int //匿名函数 //值的接收 //指针的接收 //*myint表示myInt的指针类型 / ...