Mysql高可用集群-解决MMM单点故障
preface:
MMM架构相比于MHA来说各方面都逊色不少,写这篇案例也算是整理下思路吧.
一.理论概述
MMM(Master-Master replication Manager for MySQL)
是一套支持双主日常管理的脚本程序,使用Perl语言开发,主要用来监控和管理MySQL双主库复制,同一时刻只允许一个主库进行写入
方便的是,mmm不但可以为写库配置VIP,而且实现读库VIP,也可以节省一些构建读负载均衡及高可用的资源
实现的功能简单来说就是实现了主库的故障切换功能,同时也可以实现多个slave读操作的负载均衡
不适用的场景:对数据一致性要求很高不适用
组件介绍
- mmm-mond程序:监控进程,负责所有的监控工作,在管理服务器上运行
- mmm_agentd:运行在每个集群mysql节点上的,完成监控的探针工作和执行简单的远端服务设置
- mmm_control:一个简单的管理脚本,用来查看和管理集群运行状态,同时管理mmm_mond进程。
二.环境
- 架构拓扑,本案例只针对于数据库集群示范
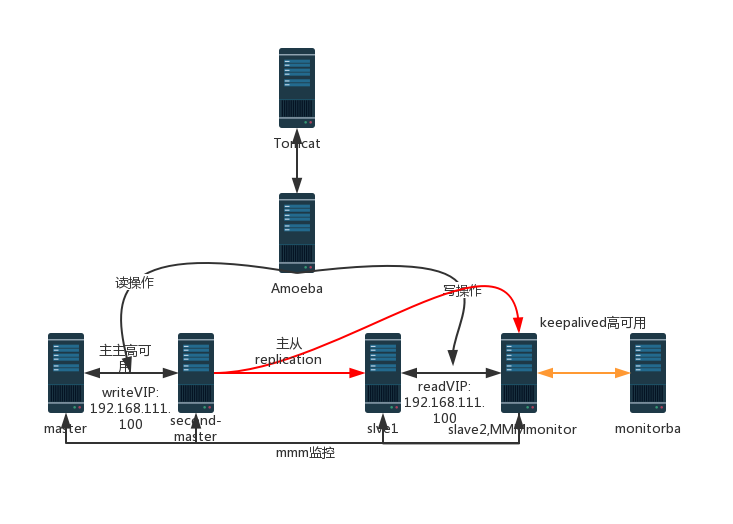
| 主机名称 | IP地址 | 角色 |
|---|---|---|
| master | 192.168.111.3 | 主库,负责写 |
| masterba | 192.168.111.4 | 备用主库,主主同步 |
| slave1 | 192.168.111.5 | 从库,读操作 |
| slave2 | 192.168.111.6 | 从库,读操作;mmm-monitor |
| monitorba | 192.168.111.7 | monitor高可用 |
| writeVIP | 192.168.111.100 | |
| readVIP | 192.168.111.200 | |
| monitorVIP | 192.168.111.222 |
实现思路:先部署主主高可用,安装mmm相关组件
三.部署
- 所有主机安装epel源
下载地址

https://mirrors.tuna.tsinghua.edu.cn/epel//

然后选择相应的版本下载并安装

yum clean all && yum makecache
- 基本环境
[root@localhost ~]# vim /etc/hosts

192.168.111.3   master

192.168.111.4   masterba

192.168.111.5   slave1

192.168.111.6   slave2

[root@localhost ~]# hostname master

[root@localhost ~]# bash

[root@master ~]# bash

[root@master ~]# uname -n

master

#全部修改为对应的
- 部署二进制包mysql5.7.24
yum -y install libaio

wget http://mirrors.sohu.com/mysql/MySQL-5.7/mysql-5.7.24-linux-glibc2.12-x86_64.tar.gz

useradd -M -s /sbin/nologin mysql

tar zxf mysql-5.7.24-linux-glibc2.12-x86_64.tar.gz

mv mysql-5.7.24-linux-glibc2.12-x86_64 /usr/local/mysql

chown -R mysql:mysql /usr/local/mysql

ln -s /usr/local/mysql/bin/* /usr/local/bin/

cp /usr/local/mysql/support-files/mysql.server /etc/init.d/mysqld

mysqld --user=mysql --basedir=/usr/local/mysql --datadir=/usr/local/mysql/data --initialize

#记住生成的随机密码待会启动服务之后修改

vim /etc/my.cnf

--------------------111.3--------------------------

[mysqld]

datadir=/usr/local/mysql/data

socket=/tmp/mysql.sock

symbolic-links=0

server-id=1

log-bin=mysql-bin

log_slave_updates=1

#将另一台备主同步数据给自身时,写入到binarylog

auto-increment-increment=2

auto-increment-offset=1

#auto_increment_increment:自增值

#auto_increment_offset:漂移值,也就是步长

[mysqld_safe]

log-error=/usr/local/mysql/data/mysql.log

pid-file=/usr/local/mysql/data/mysql.pid

!includedir /etc/my.cnf.d

--------------------111.4--------------------------

[mysqld]

datadir=/usr/local/mysql/data

socket=/tmp/mysql.sock

symbolic-links=0

server-id=2

log-bin=mysql-bin

log_slave_updates=1

#将另一台备主同步数据给自身时,写入到binarylog

auto-increment-increment=2

auto-increment-offset=2

#auto_increment_increment:自增值

#auto_increment_offset:漂移值,也就是步长

[mysqld_safe]

log-error=/usr/local/mysql/data/mysql.log

pid-file=/usr/local/mysql/data/mysql.pid

!includedir /etc/my.cnf.d

--------------------111.5--------------------------

[mysqld]

datadir=/usr/local/mysql/data

socket=/tmp/mysql.sock

symbolic-links=0

server-id=3

log-bin=mysql-bin

log_slave_updates=1

[mysqld_safe]

log-error=/usr/local/mysql/data/mysql.log

pid-file=/usr/local/mysql/data/mysql.pid

!includedir /etc/my.cnf.d

--------------------111.6--------------------------

[mysqld]

datadir=/usr/local/mysql/data

socket=/tmp/mysql.sock

symbolic-links=0

server-id=4

log_slave_updates=1

log-bin=mysql-bin

[mysqld_safe]

log-error=/usr/local/mysql/data/mysql.log

pid-file=/usr/local/mysql/data/mysql.pid

!includedir /etc/my.cnf.d

[root@masterba ~]# /etc/init.d/mysqld start

[root@master ~]# mysqladmin -u root -p'BZn9B++V06qg' password '123456'

mysqladmin: [Warning] Using a password on the command line interface can be insecure.

Warning: Since password will be sent to server in plain text, use ssl connection to ensure password safety.

#修改默认密码
- 部署主主同步
--master:

[root@master ~]# mysql -u root -p123456

mysql> grant replication slave on *.* to 'myslave'@'192.168.111.%' identified by'123456';

Query OK, 0 rows affected, 1 warning (0.00 sec)

mysql> flush privileges;

Query OK, 0 rows affected (0.00 sec)

mysql> show master status;

+------------------+----------+--------------+------------------+-------------------+

| File             | Position | Binlog_Do_DB | Binlog_Ignore_DB | Executed_Gtid_Set |

+------------------+----------+--------------+------------------+-------------------+

| mysql-bin.000002 |      879 |              |                  |                   |

+------------------+----------+--------------+------------------+-------------------+

1 row in set (0.00 sec)

--masterba:

[root@masterba ~]# mysql -uroot -p123456

mysql> grant replication slave on *.* to 'myslave'@'192.168.111.%' identified by'123456';

Query OK, 0 rows affected, 1 warning (0.00 sec)

mysql> flush privileges;

Query OK, 0 rows affected (0.01 sec)

mysql> show master status;

+------------------+----------+--------------+------------------+-------------------+

| File             | Position | Binlog_Do_DB | Binlog_Ignore_DB | Executed_Gtid_Set |

+------------------+----------+--------------+------------------+-------------------+

| mysql-bin.000002 |      879 |              |                  |                   |

+------------------+----------+--------------+------------------+-------------------+

1 row in set (0.00 sec)

--master:

mysql> change master to master_host='192.168.111.4',master_user='myslave',master_password='123456',master_log_file='mysql-bin.000002',master_log_pos=879;

Query OK, 0 rows affected, 2 warnings (0.11 sec)

mysql> start slave;

Query OK, 0 rows affected (0.00 sec)

mysql> show slave status\G;

*************************** 1. row ***************************

               Slave_IO_State: Waiting for master to send event

                  Master_Host: 192.168.111.4

                  Master_User: myslave

                  Master_Port: 3306

                Connect_Retry: 60

              Master_Log_File: mysql-bin.000002

          Read_Master_Log_Pos: 879

               Relay_Log_File: master-relay-bin.000002

                Relay_Log_Pos: 320

        Relay_Master_Log_File: mysql-bin.000002

             Slave_IO_Running: Yes

            Slave_SQL_Running: Yes

              Replicate_Do_DB:

          Replicate_Ignore_DB:

           Replicate_Do_Table:

       Replicate_Ignore_Table:

      Replicate_Wild_Do_Table:

  Replicate_Wild_Ignore_Table:

                   Last_Errno: 0

                   Last_Error:

                 Skip_Counter: 0

          Exec_Master_Log_Pos: 879

              Relay_Log_Space: 528

              Until_Condition: None

               Until_Log_File:

                Until_Log_Pos: 0

           Master_SSL_Allowed: No

           Master_SSL_CA_File:

           Master_SSL_CA_Path:

              Master_SSL_Cert:

            Master_SSL_Cipher:

               Master_SSL_Key:

        Seconds_Behind_Master: 0

Master_SSL_Verify_Server_Cert: No

                Last_IO_Errno: 0

                Last_IO_Error:

               Last_SQL_Errno: 0

               Last_SQL_Error:

  Replicate_Ignore_Server_Ids:

             Master_Server_Id: 2

                  Master_UUID: 01008194-68b1-11e9-bf0b-000c294b0234

             Master_Info_File: /usr/local/mysql/data/master.info

                    SQL_Delay: 0

          SQL_Remaining_Delay: NULL

      Slave_SQL_Running_State: Slave has read all relay log; waiting for more updates

           Master_Retry_Count: 86400

                  Master_Bind:

      Last_IO_Error_Timestamp:

     Last_SQL_Error_Timestamp:

               Master_SSL_Crl:

           Master_SSL_Crlpath:

           Retrieved_Gtid_Set:

            Executed_Gtid_Set:

                Auto_Position: 0

         Replicate_Rewrite_DB:

                 Channel_Name:

           Master_TLS_Version:

1 row in set (0.00 sec)

--masterba:

mysql> change master to master_host='192.168.111.3',master_user='myslave',master_password='123456',master_log_file='mysql-bin.000002',master_log_pos=879;

Query OK, 0 rows affected, 2 warnings (0.01 sec)

mysql> start slave;

Query OK, 0 rows affected (0.00 sec)

mysql> show slave status\G;

*************************** 1. row ***************************

               Slave_IO_State: Waiting for master to send event

                  Master_Host: 192.168.111.3

                  Master_User: myslave

                  Master_Port: 3306

                Connect_Retry: 60

              Master_Log_File: mysql-bin.000002

          Read_Master_Log_Pos: 1036

               Relay_Log_File: masterba-relay-bin.000002

                Relay_Log_Pos: 477

        Relay_Master_Log_File: mysql-bin.000002

             Slave_IO_Running: Yes

            Slave_SQL_Running: Yes

              Replicate_Do_DB:

          Replicate_Ignore_DB:

           Replicate_Do_Table:

       Replicate_Ignore_Table:

      Replicate_Wild_Do_Table:

  Replicate_Wild_Ignore_Table:

                   Last_Errno: 0

                   Last_Error:

                 Skip_Counter: 0

          Exec_Master_Log_Pos: 1036

              Relay_Log_Space: 687

              Until_Condition: None

               Until_Log_File:

                Until_Log_Pos: 0

           Master_SSL_Allowed: No

           Master_SSL_CA_File:

           Master_SSL_CA_Path:

              Master_SSL_Cert:

            Master_SSL_Cipher:

               Master_SSL_Key:

        Seconds_Behind_Master: 0

Master_SSL_Verify_Server_Cert: No

                Last_IO_Errno: 0

                Last_IO_Error:

               Last_SQL_Errno: 0

               Last_SQL_Error:

  Replicate_Ignore_Server_Ids:

             Master_Server_Id: 1

                  Master_UUID: e13f8b12-7bda-11e9-b71b-000c2935c4a6

             Master_Info_File: /usr/local/mysql/data/master.info

                    SQL_Delay: 0

          SQL_Remaining_Delay: NULL

      Slave_SQL_Running_State: Slave has read all relay log; waiting for more updates

           Master_Retry_Count: 86400

                  Master_Bind:

      Last_IO_Error_Timestamp:

     Last_SQL_Error_Timestamp:

               Master_SSL_Crl:

           Master_SSL_Crlpath:

           Retrieved_Gtid_Set:

            Executed_Gtid_Set:

                Auto_Position: 0

         Replicate_Rewrite_DB:

                 Channel_Name:

           Master_TLS_Version:

1 row in set (0.00 sec)

slave1:

mysql> change master to master_host='192.168.111.4',master_user='myslave',master_password='123456',master_log_file='mysql-bin.000002',master_log_pos=879;

Query OK, 0 rows affected, 2 warnings (0.02 sec)

mysql> start slave;

Query OK, 0 rows affected (0.00 sec)

#slave2一样操作,一同指向masterba
- 部署mmm
我们在主库上做授权,由于现在是同步状态,所以授权信息其它数据库也会存在

mysql> grant replication client on *.* to 'mmm_monitor'@'192.168.111.%' identified by '123456';

Query OK, 0 rows affected, 1 warning (0.11 sec)

#监控用户

mysql> grant super,replication client,process on *.* to 'mmm_agent'@'192.168.111.%' identified by '123456';

Query OK, 0 rows affected, 1 warning (0.01 sec)

#agent用户

mysql> grant replication slave on *.* to 'myslave'@'192.168.111.%' identified by '123456';

Query OK, 0 rows affected, 1 warning (0.00 sec)

#复制用户

mysql> flush privileges;

Query OK, 0 rows affected (0.00 sec)

[root@master ~]# yum -y install mysql-mmm-agent

#四个mysql节点都要安装

[root@slave2 ~]# yum -y install mysql-mmm mysql-mmm-agent mysql-mmm-tools mysql-mmm-monitor keepalived

#manager节点我这里充当slave2,承担了一部分读操作

[root@monitorba ~]# yum -y install mysql-mmm mysql-mmm-tools mysql-mmm-monitor

[root@slave2 ~]# vim /etc/mysql-mmm/mmm_common.conf

#该文件所有节点配置都相同

active_master_role      writer

<host default>

    cluster_interface       ens32

    pid_path                /run/mysql-mmm-agent.pid

    bin_path                /usr/libexec/mysql-mmm/

    replication_user        myslave

    replication_password    123456

    agent_user              mmm_agent

    agent_password          123456

    #刚才所授权用户的账号及密码

</host>

<host db1>

    ip      192.168.111.3

    mode    master

    peer    db2

</host>

<host db2>

    ip      192.168.111.4

    mode    master

    peer    db1

</host>

<host db3>

    ip      192.168.111.5

    mode    slave

</host>

<host db4>

    ip      192.168.111.6

    mode    slave

</host>

#每个host是一个节点,按照文件格式配置

<role writer>

    hosts   db1, db2

    ips     192.168.111.100

    #写操作服务器的VIP

    mode    exclusive

    #模式:同意时间只有一个节点可以使用资源

</role>

<role reader>

    hosts   db3, db4

    ips     192.168.111.200

    #读操作服务器的VIP,可以有多个,逗号分隔

    mode    balanced

    #负载均衡模式

</role>

[root@slave2 ~]# scp /etc/mysql-mmm/mmm_common.conf root@master:/etc/mysql-mmm/

[root@slave2 ~]# scp /etc/mysql-mmm/mmm_common.conf root@masterba:/etc/mysql-mmm/

[root@slave2 ~]# scp /etc/mysql-mmm/mmm_common.conf root@slave1:/etc/mysql-mmm/

[root@slave1 ~]# scp /etc/mysql-mmm/mmm_common.conf root@192.168.111.7:/etc/mysql-mmm/

在db1-4上修改mmm_agent.conf,只需要修改db1这里,是哪台就改成哪台,这里只给出db1的

[root@master ~]# vim /etc/mysql-mmm/mmm_agent.conf

include mmm_common.conf

# The 'this' variable refers to this server.  Proper operation requires

# that 'this' server (db1 by default), as well as all other servers, have the

# proper IP addresses set in mmm_common.conf.

this db1

配置监控工作的服务器

[root@slave2 ~]# vim /etc/mysql-mmm/mmm_mon.conf

  8     ping_ips            192.168.111.2

  #测试网络可用性的IP地址,一般指定网关

  9     auto_set_online     60

  #是否设置自动上线,如果该值大于0,抖动的主机在抖动的时间范围过后,则设置自动上线

 20     monitor_user        mmm_monitor

 21     monitor_password    123456

  #监控的用户和密码

全部节点启动agent

[root@master ~]# systemctl start mysql-mmm-agent.service

[root@master ~]# systemctl status mysql-mmm-agent.service

监控机器启动monitor

[root@slave2 ~]# systemctl start mysql-mmm-monitor.service

[root@slave2 ~]# systemctl status mysql-mmm-monitor.service

#检查集群状态,要全部是ONLINE才正确

[root@slave2 ~]# mmm_control show

  db1(192.168.111.3) master/ONLINE. Roles: writer(192.168.111.100)

  db2(192.168.111.4) master/ONLINE. Roles:

  db3(192.168.111.5) slave/ONLINE. Roles: reader(192.168.111.200)

  db4(192.168.111.6) slave/ONLINE. Roles:
- 部署monitor高可用
[root@slave2 ~]#  vim /opt/monitor.sh

#!/bin/bash

while true

	sleep 2

do

	sum=`netstat -lnpt | grep 9988 | wc -l`

	if [ $sum -eq 0 ]; then

	  systemctl stop keepalived.service

	fi

done

#脚本另一台机器一样

[root@slave2 ~]# cat /etc/keepalived/keepalived.conf

! Configuration File for keepalived

global_defs {

   notification_email {

     acassen@firewall.loc

     failover@firewall.loc

     sysadmin@firewall.loc

   }

   script_user root

   #需要制定脚本运行用户

   notification_email_from Alexandre.Cassen@firewall.loc

   smtp_server 192.168.200.1

   smtp_connect_timeout 30

   router_id LVS_DEVEL

   vrrp_skip_check_adv_addr

   vrrp_garp_interval 0

   vrrp_gna_interval 0

}

vrrp_script check_m {

	script "/opt/monitor.sh"

	interval 2

	weight 20

}

vrrp_instance VI_1 {

    state MASTER

    interface ens32

    virtual_router_id 51

    priority 100

    advert_int 1

    authentication {

        auth_type PASS

        auth_pass 1111

    }

    virtual_ipaddress {

        192.168.111.222/32 dev ens32 label ens32:2

    }

    track_script {

	check_m

    }

    #这个配置要包括到"vrrp_instance"中去

}

monitorba:

[root@monitorba ~]# cat /etc/keepalived/keepalived.conf

! Configuration File for keepalived

global_defs {

   notification_email {

     acassen@firewall.loc

     failover@firewall.loc

     sysadmin@firewall.loc

   }

   script_user root

   notification_email_from Alexandre.Cassen@firewall.loc

   smtp_server 192.168.200.1

   smtp_connect_timeout 30

   router_id LVS_DEVEL1

   vrrp_skip_check_adv_addr

   vrrp_garp_interval 0

   vrrp_gna_interval 0

}

vrrp_script check_monitor {

  script "/opt/monitor.sh"

  interval 2

  weight 20

}

vrrp_instance VI_1 {

    state BACKUP

    interface ens32

    virtual_router_id 51

    priority 90

    advert_int 1

    authentication {

        auth_type PASS

        auth_pass 1111

    }

    virtual_ipaddress {

 192.168.111.222/32 dev ens32 label ens32:2

    }

track_script {

  check_monitor

}

}

[root@slave2 ~]# systemctl start keepalived

#keepalived需要修改优先级和标识和主被状态

[root@slave2 ~]# ip a| grep ens32

2: ens32: <BROADCAST,MULTICAST,UP,LOWER_UP> mtu 1500 qdisc pfifo_fast state UP group default qlen 1000

    inet 192.168.111.6/24 brd 192.168.111.255 scope global noprefixroute ens32

    inet 192.168.111.200/32 scope global ens32

    inet 192.168.111.222/32 scope global ens32

[root@monitorba ~]# mmm_control show

  db1(192.168.111.3) master/ONLINE. Roles: writer(192.168.111.100)

  db2(192.168.111.4) master/HARD_OFFLINE. Roles:

  db3(192.168.111.5) slave/HARD_OFFLINE. Roles:

  db4(192.168.111.6) slave/ONLINE. Roles: reader(192.168.111.200)
四.测试
- 查看VIP是否正确分配
写:

[root@master ~]# ip a| grep ens32

2: ens32: <BROADCAST,MULTICAST,UP,LOWER_UP> mtu 1500 qdisc pfifo_fast state UP group default qlen 1000

    inet 192.168.111.3/24 brd 192.168.111.255 scope global noprefixroute ens32

    inet 192.168.111.100/32 scope global ens32

读:

[root@slave1 ~]# ip a| grep ens32

2: ens32: <BROADCAST,MULTICAST,UP,LOWER_UP> mtu 1500 qdisc pfifo_fast state UP group default qlen 1000

    inet 192.168.111.5/24 brd 192.168.111.255 scope global noprefixroute ens32

    inet 192.168.111.200/32 scope global ens32
- 测试VIP转移
[root@master ~]# /etc/init.d/mysqld stop

Shutting down MySQL............ SUCCESS!

[root@master ~]# ip a| grep ens32

-----写-----

2: ens32: <BROADCAST,MULTICAST,UP,LOWER_UP> mtu 1500 qdisc pfifo_fast state UP group default qlen 1000

    inet 192.168.111.3/24 brd 192.168.111.255 scope global noprefixroute ens32

[root@masterba ~]# ip a| grep ens32

2: ens32: <BROADCAST,MULTICAST,UP,LOWER_UP> mtu 1500 qdisc pfifo_fast state UP group default qlen 1000

    inet 192.168.111.4/24 brd 192.168.111.255 scope global noprefixroute ens32

    inet 192.168.111.100/32 scope global ens32

-----读-----

[root@slave1 ~]# /etc/init.d/mysqld stop

Shutting down MySQL.... SUCCESS!

[root@slave1 ~]# ip a| grep ens32

2: ens32: <BROADCAST,MULTICAST,UP,LOWER_UP> mtu 1500 qdisc pfifo_fast state UP group default qlen 1000

    inet 192.168.111.5/24 brd 192.168.111.255 scope global noprefixroute ens32

    inet 192.168.111.200/32 scope global ens32

[root@slave1 ~]# ip a| grep ens32

2: ens32: <BROADCAST,MULTICAST,UP,LOWER_UP> mtu 1500 qdisc pfifo_fast state UP group default qlen 1000

    inet 192.168.111.5/24 brd 192.168.111.255 scope global noprefixroute ens32

    inet 192.168.111.200/32 scope global ens32

[root@slave1 ~]# ip a| grep ens32

2: ens32: <BROADCAST,MULTICAST,UP,LOWER_UP> mtu 1500 qdisc pfifo_fast state UP group default qlen 1000

    inet 192.168.111.5/24 brd 192.168.111.255 scope global noprefixroute ens32

    inet 192.168.111.200/32 scope global ens32

[root@slave1 ~]# ip a| grep ens32

2: ens32: <BROADCAST,MULTICAST,UP,LOWER_UP> mtu 1500 qdisc pfifo_fast state UP group default qlen 1000

    inet 192.168.111.5/24 brd 192.168.111.255 scope global noprefixroute ens32

[root@slave2 ~]# ip a| grep ens32

2: ens32: <BROADCAST,MULTICAST,UP,LOWER_UP> mtu 1500 qdisc pfifo_fast state UP group default qlen 1000

    inet 192.168.111.6/24 brd 192.168.111.255 scope global noprefixroute ens32

    inet 192.168.111.200/32 scope global ens32

#切换的慢

[root@slave2 ~]# mmm_control show

  db1(192.168.111.3) master/HARD_OFFLINE. Roles:

  db2(192.168.111.4) master/ONLINE. Roles: writer(192.168.111.100)

  db3(192.168.111.5) slave/HARD_OFFLINE. Roles:

  db4(192.168.111.6) slave/ONLINE. Roles: reader(192.168.111.200)

#离线的已经指明了
- 修复好的数据库服务器重新加入集群的方法
[root@master ~]# /etc/init.d/mysqld start

#比较慢,在monitor上查看状态

[root@slave2 ~]# mmm_control show

  db1(192.168.111.3) master/ONLINE. Roles:

  db2(192.168.111.4) master/ONLINE. Roles: writer(192.168.111.100)

  db3(192.168.111.5) slave/HARD_OFFLINE. Roles:

  db4(192.168.111.6) slave/ONLINE. Roles: reader(192.168.111.200)
- 连接数据库VIP测试
mysql> grant all privileges on *.* to root@'192.168.111.%' identified by '123456';

Query OK, 0 rows affected, 1 warning (0.01 sec)

mysql> flush privileges;

Query OK, 0 rows affected (0.10 sec)

#主库上做下授权,从库也会同步授权信息

[root@slave2 ~]# mysql -uroot -p123456 -h'192.168.111.100'

mysql: [Warning] Using a password on the command line interface can be insecure.

Welcome to the MySQL monitor.  Commands end with ; or \g.

Your MySQL connection id is 415

Server version: 5.7.24-log MySQL Community Server (GPL)

Copyright (c) 2000, 2018, Oracle and/or its affiliates. All rights reserved.

Oracle is a registered trademark of Oracle Corporation and/or its

affiliates. Other names may be trademarks of their respective

owners.

Type 'help;' or '\h' for help. Type '\c' to clear the current input statement.

mysql>

[root@slave2 ~]# mysql -uroot -p123456 -h'192.168.111.200'

mysql: [Warning] Using a password on the command line interface can be insecure.

Welcome to the MySQL monitor.  Commands end with ; or \g.

Your MySQL connection id is 1043

Server version: 5.7.24-log MySQL Community Server (GPL)

Copyright (c) 2000, 2018, Oracle and/or its affiliates. All rights reserved.

Oracle is a registered trademark of Oracle Corporation and/or its

affiliates. Other names may be trademarks of their respective

owners.

Type 'help;' or '\h' for help. Type '\c' to clear the current input statement.

mysql>

#输入的必须都是VIP进行连接
- 测试monitorVIP
[root@slave2 ~]# systemctl stop mysql-mmm-monitor.service

[root@slave2 ~]# ip a | grep ens32

2: ens32: <BROADCAST,MULTICAST,UP,LOWER_UP> mtu 1500 qdisc pfifo_fast state UP group default qlen 1000

    inet 192.168.111.6/24 brd 192.168.111.255 scope global noprefixroute ens32

    inet 192.168.111.200/32 scope global ens32

[root@monitorba ~]# ip a| grep ens32

2: ens32: <BROADCAST,MULTICAST,UP,LOWER_UP> mtu 1500 qdisc pfifo_fast state UP group default qlen 1000

    inet 192.168.111.7/24 brd 192.168.111.255 scope global noprefixroute ens32

    inet 192.168.111.222/32 scope global ens32:2

[root@monitorba ~]# mmm_control show

  db1(192.168.111.3) master/ONLINE. Roles: writer(192.168.111.100)

  db2(192.168.111.4) master/HARD_OFFLINE. Roles:

  db3(192.168.111.5) slave/HARD_OFFLINE. Roles:

  db4(192.168.111.6) slave/ONLINE. Roles: reader(192.168.111.200)
五.总结
- 明显的切换速度太慢,案例环境还是没有多少数据的,以及系统环境也不是很复杂,生产环境慎用吧
- 可以做写的高可用,也可以用来负载均衡读的服务器
- keepalivedVIP时,纠结了几个小时,原因已经注释好了
- 持之以恒
Mysql高可用集群-解决MMM单点故障的更多相关文章
- Mysql高可用集群环境介绍
MySQL高可用集群环境搭建 01.MySQL高可用环境方案 02.MySQL主从复制原理 03.MySQL主从复制作用 04.在Linux环境上安装MySQL 05.在MySQL集群环境上配置主从复 ...
- Mysql 高可用集群PXC
PXC是percona公司的percona xtraDB cluster,简称PXC.它是基于Galera协议的高可用集群方案.可以实现多个节点间的数据同步复制以及读写,并且可保障数据库的服务高可 ...
- MySQL高可用集群方案
一.Mysql高可用解决方案 方案一:共享存储 一般共享存储采用比较多的是 SAN/NAS 方案. 方案二:操作系统实时数据块复制 这个方案的典型场景是 DRBD,DRBD架构(MySQL+DRBD+ ...
- MySQL高可用集群MHA方案
MySQL高可用集群MHA方案 爱奇艺在用的数据库高可用方案 MHA 是目前比较成熟及流行的 MySQL 高可用解决方案,很多互联网公司正是直接使用或者基于 MHA 的架构进行改造实现 MySQL 的 ...
- 部署MYSQL高可用集群
mysql-day08 部署MYSQL高可用集群 u 集群架构 ...
- keepalived+MySQL高可用集群
基于keepalived搭建MySQL的高可用集群 MySQL的高可用方案一般有如下几种: keepalived+双主,MHA,MMM,Heartbeat+DRBD,PXC,Galera Clus ...
- corosync+pacemaker and drbd实现mysql高可用集群
DRBD:Distributed Replicated Block Device 分布式复制块设备,原理图如下 DRBD 有主双架构和双主架构的,当处于主从架构时,这个设备一定只有一个节点是可以读写的 ...
- heatbeat-gui实现基于nfs的mysql高可用集群
一.简述HA高可用集群 高可用集群就是当集群中的一个节点发生各种软硬件及人为故障时,集群中的其他节点能够自动接管故障节点的资源并向外提供服务.以实现减少业务中断时间,为用户提供更可靠,更高效的服务. ...
- 构建MHA实现MySQL高可用集群架构
一.MHA简介 MHA(Master HighAvailability)目前在MySQL高可用方面是一个相对成熟的解决方案,它由日本DeNA公司youshimaton(现就职于Facebook公司)开 ...
随机推荐
- .rpt 文件怎麽打開?Crystal Reports 打開.rpt失敗 ?
.rpt 是SAP Crystal Reports 製作出來的檔案的後綴名, 可以通過 SAP Crystal Reports Viewer 打開,也可以直接用記事本(notepad / Note ...
- 案例一:利于Python调用JSON对象来实现对XENA流量测试仪的灵活发包测试,能够适应Pair,Rotate,1-to-Many等多种拓扑模型
硬件:XENA Valkyrie 或 Vantage主机,测试板卡不限,本方法适用于其100M~400G所有速率端口 环境配置:Python 3 实现功能: 1.控制流量仪进行流量测试,预定配置的流量 ...
- SSRF——漏洞利用(二)
0x01 概述 上篇讲述了SSRF的一般用法,用http协议来进行内网探测,攻击内网redis,接下来讨论的是SSRF的拓展用法,通过,file,gopher,dict协议对SSRF漏洞进行利用. 0 ...
- windows下进程与线程
windows下进程与线程 Windows是一个单用户多任务的操作系统,同一时间可有多个进程在执行.进程是应用程序的运行实例,可以理解为应用程序的一次动态执行:而线程是CPU调度的单位,是进程的一个执 ...
- Memcached内存调优及建议
一.Memcached调优 目标: 提高内存命中率 减少内存浪费 增加内存重复利用率 问题: 存不满Chunk 内存数据大量堆积 slab不能被page整除 page不能被Chunk整除 方向: 调整 ...
- UIPath工具取得某个路径下的文件夹的名称
UIPath工具取得某个路径下的文件夹的名称 处理的流程如下图 [Edit Code]按钮押下之后写入代码如下 Dim dir As New DirectoryInfo("C:\Users\ ...
- PHP去除html的宽高属性的正则表达式
PHP去除html的宽高属性的正则表达式 <pre><?php/** * 清除宽高样式 * @param String $content 内容 * @return String */ ...
- Django项目-简易博客系统(附源码) --Python Web
Django入门级项目: 链接:https://pan.baidu.com/s/13Z7v-gky6Xgka-Gom8-HQQ 提取码:uagu
- 乐字节Java反射之三:方法、数组、类加载器和类的生命周期
本文承接上一篇:乐字节Java发射之二:实例化对象.接口与父类.修饰符和属性 继续讲述Java反射之三:方法.数组.类加载器 一.方法 获取所有方法(包括父类或接口),使用Method即可. publ ...
- JRE和JDK的作用和区别
JVM(Java Virtual Machine)是一个虚拟的用于执行bytecode字节码的“虚拟计算机”JRE(Java Runtime Environment):Java 虚拟机.库函数 ...