关闭 OSX 10.11 SIP (System Integrity Protection) 功能
关闭 OSX 10.11 SIP (System Integrity Protection) 功能
Apple 从 10.9 开始导入kext需要签名认证后,在10.10全面启用此功能,每项置入/System/Library/Extersions/中的kext必需要经过签名认证系统才会启用此功能,然而在10.11时另外追加了System Integrity Protection (SIP)功能来保护系统档案及kext驱动避免被修改,即使是root权限也无法更改已经被系统设定的项目。
要了解被锁定的项目可以查询:
- cat /System/Library/Sandbox/rootless.conf
10.10只有少许的项目:
- /System
- * /System/Library/Caches
- booter /System/Library/CoreServices
- * /System/Library/Extensions
- /System/Library/Extensions/*
- UpdateSettings /System/Library/LaunchDaemons/com.apple.UpdateSettings.plist
- * /System/Library/User Template
- /bin
- /sbin
- /usr
- * /usr/local
- # symlinks
- /etc
- /tmp
- /var
10.11已经加入更多root无法修改的项目:
- /Applications/App Store.app
- /Applications/Automator.app
- /Applications/Calculator.app
- /Applications/Calendar.app
- /Applications/Chess.app
- /Applications/Contacts.app
- /Applications/Dashboard.app
- /Applications/Dictionary.app
- /Applications/DVD Player.app
- /Applications/FaceTime.app
- /Applications/Font Book.app
- /Applications/Game Center.app
- /Applications/Image Capture.app
- /Applications/Launchpad.app
- /Applications/Mail.app
- /Applications/Maps.app
- /Applications/Messages.app
- /Applications/Mission Control.app
- /Applications/Notes.app
- /Applications/Photo Booth.app
- /Applications/Photos.app
- /Applications/Preview.app
- /Applications/QuickTime Player.app
- /Applications/Reminders.app
- /Applications/Safari.app
- /Applications/Stickies.app
- /Applications/System Preferences.app
- /Applications/TextEdit.app
- /Applications/Time Machine.app
- /Applications/Utilities/Activity Monitor.app
- /Applications/Utilities/AirPort Utility.app
- /Applications/Utilities/Audio MIDI Setup.app
- /Applications/Utilities/Bluetooth File Exchange.app
- /Applications/Utilities/Boot Camp Assistant.app
- /Applications/Utilities/ColorSync Utility.app
- /Applications/Utilities/Console.app
- /Applications/Utilities/Digital Color Meter.app
- /Applications/Utilities/Disk Utility.app
- /Applications/Utilities/Feedback Assistant.app
- /Applications/Utilities/Grab.app
- /Applications/Utilities/Grapher.app
- /Applications/Utilities/Keychain Access.app
- /Applications/Utilities/Migration Assistant.app
- /Applications/Utilities/Script Editor.app
- /Applications/Utilities/System Information.app
- /Applications/Utilities/Terminal.app
- /Applications/Utilities/VoiceOver Utility.app
- /Library/Preferences/SystemConfiguration/com.apple.Boot.plist
- /System
- * /System/Library/Caches
- booter /System/Library/CoreServices
- * /System/Library/CoreServices/Photo Library Migration Utility.app
- /System/Library/CoreServices/RawCamera.bundle
- * /System/Library/Extensions
- /System/Library/Extensions/*
- UpdateSettings /System/Library/LaunchDaemons/com.apple.UpdateSettings.plist
- * /System/Library/Speech
- * /System/Library/User Template
- /bin
- dyld /private/var/db/dyld
- /sbin
- /usr
- * /usr/libexec/cups
- * /usr/local
- * /usr/share/man
- # symlinks
- /etc
- /tmp
- /var
因为启动SIP功能,rootless.conf在未关闭时是无法进行修改的。
RecoveryHD
在进行之前必需要确认你能进入Recovery OS,所以将你的系统重开机后按下Option(alt)键后进入选择启动磁碟:
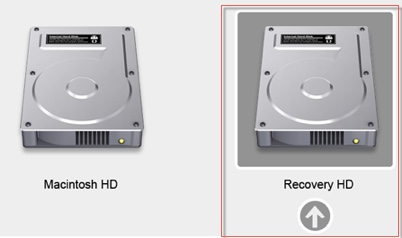
看到你的启动磁碟名称有Recovery HD代表你具有Recovery OS,如果你未包含此OS,在开机时按下Option(alt) + R进入网路开机连线至Apple伺服器进行Recovery OS的安装,详细说明传送门
csrutil
要进行SIP保护的变更需要透过csrutil工具程式进行修改,必需要经过Recovery OS开机后进入工具程式之终端机执行此命令才有权限进行修改。
此工具程式会将更变的值写入nvarm之csr-active-config中,键入csrutil会出现使用说明:
- usage: csrutil <command>
- Modify the System Integrity Protection configuration. All configuration changes apply to the entire machine.
- Available commands:
- clear
- Clear the existing configuration. Only available in Recovery OS.
- disable
- Disable the protection on the machine. Only available in Recovery OS.
- enable
- Enable the protection on the machine. Only available in Recovery OS.
- status
- Display the current configuration.
- netboot
- add <address>
- Insert a new IPv4 address in the list of allowed NetBoot sources.
- list
- Print the list of allowed NetBoot sources.
- remove <address>
- Remove an IPv4 address from the list of allowed NetBoot sources.
查看状态执行csutil status:
- System Integrity Protection status: enabled (Custom Configuration).
单单关闭SIP执行sudo csrutil enable --no-internal:
- Successfully enabled System Integrity Protection. Please restart the machine for the changes to take effect.
如果你出现:
- csrutil: failed to modify system integrity configuration. This tool needs to be executed from the Recovery OS.
代表你使用的并非Recovery OS开机,请确定从Recovery OS开机再执行。
csrutil 进阶指令
如果你只是要细部的关闭某个SIP功能例如关闭kext需要签章功能执行sudo csrutil enable --without kext:
- csrutil: requesting an unsupported configuration. This is likely to break in the future and leave your machine in an unknown state.
- Successfully enabled System Integrity Protection. Please restart the machine for the changes to take effect.
讯息告知已经将参数写入nvram中,必需要重新开机参数才会发生作用。
以上例子之外,还有其他设定都是经过enable与without功能来将功能启动与关闭,使用命令语法如下:
- csrutil enable [--without kext|fs|debug|dtrace|nvram] [--no-internal]
举个例子:
sudo csrutil enable –without fs:Filesystem Protections disable
sudo csrutil enable –without kext:Kext Signing disable
sudo csrutil enable –without debug:Debugging Restrictions disable
sudo csrutil enable –without nvram:NVRAM Protections disable
sudo csrutil enable –without dtrace:DTrace Restrictions disable
当然也可以多组合:
- sudo csrutil enable –without kext –without fs:Filesystem Protections and Kext Signing are disabled
个人心得:
csrutil设定的结果会存入nvram中的键值csr-active-config,设定值内容为1byte的值,利用1byt=8bit的关系,将每个bit解释成每个功能的设值值:
| bit | function |
|---|---|
| B0 | kext |
| B1 | fs |
| B2 | debug |
| B3 | n/a |
| B4 | internal |
| B5 | dtrace |
| B6 | nvram |
| B7 | n/a |
其中n/a值不管设定多少都不会作用,所以有把握的勇者可以直接利用nvram命令去变更csr-active-config值就可以,像:
- nvram csr-active-config=0x13
等同:
- sudo csrutil enable --without kext --without fs
参考资料
SIP/Rootless Internal in El Capitan
================ End
关闭 OSX 10.11 SIP (System Integrity Protection) 功能的更多相关文章
- 如何关闭OSX 10.11 SIP (System Integrity Protection)
http://www.jianshu.com/p/0572336a0771 注意:SIP功能是Apple在OSX上推出的系统完整性保护功能,对于普通MAC用户来说是一项安全保护功能,如果不了解他的作用 ...
- mac 关闭系统完整性保护 SIP(System Integrity Protection)的方法
在 OS X El Capitan 中有一个跟安全相关的模式叫 SIP(System Integrity Protection ) ,它禁止让软件以 root 身份来在 mac 上运行,并且对于目录 ...
- Mac OS X El Capitan系统完整性保护System Integrity Protection (SIP)
http://blog.csdn.net/yulimin/article/details/49992031 引言:前段时间经历了XCode编译器代码被注入的事件后,这次 Mac OS X El Cap ...
- class-dump在osx 10.11以后安装方法
当Mac升级了OSX 10.11后,配置class-dump的时候,会发现逆向书上推荐的class-dump存放目录/usr/bin,class-dump存放不进去,尝试过用sudo 还是不被允许 ...
- How to Disable System Integrity Protection (rootless) in OS X El Capitan
mac在10.11之后增加了一个功能,号称"System Integrity Protection, often called rootless",有了这个功能,以下目录的东西都不 ...
- MacOS changed System Integrity Protection status
禁止 System Integrity Protection 按住 command + R 重启系统 进入单用户模式 启动bash工具: 输入: csrutil disable 输入:reboot 启 ...
- Windows环境下使用Clover四叶草引导双硬盘安装OSX 10.11.5原版镜像
作为一个穷逼大学生,想搞iOS开发 买不起Mac只能鼓捣鼓捣黑苹果啦........ 之前我的电脑通过变色龙引导的方式装了个OSX10.10和win8.1双系统,因为自学的是Swift语言之前装的OS ...
- osx 10.11.5 El Capitan U盘制作安装
osx 10.11.5 El Capitan U盘制作安装 1. 下载osx10.11.5 从mac的 appstore下载(官方原版) 2. U盘8G起(注意备份重要资料) 3. 下载完成之后在Fi ...
- Setup Tensorflow with GPU on Mac OSX 10.11
Setup Tensorflow with GPU on OSX 10.11 环境描述 电脑:MacBook Pro 15.6 CPU: 2.7GHz 显卡: GT 650m 系统:OSX 10.11 ...
随机推荐
- win10 自带计算器删除了怎么办
win+S后输入Powershell,以管理员身份运行后,使用下面的命令:重要的说三遍:以管理员身份运行!以管理员身份运行!以管理员身份运行!Get-AppxPackage *calculator* ...
- process.env.NODE_ENV理解
1.理解NODE_ENV 在node中,有全局变量process表示的是当前的node进程.process.env包含着关于系统环境的信息.但是process.env中并不存在NODE_ENV这个东西 ...
- 刷题记录:[CISCN2019 总决赛 Day1 Web4]Laravel1
目录 刷题记录:[CISCN2019 总决赛 Day1 Web4]Laravel1 解题过程 刷题记录:[CISCN2019 总决赛 Day1 Web4]Laravel1 题目复现链接:https:/ ...
- mysql性能测试-------重要!!!
我们在做性能测试的目的是什么,就是要测出一个系统的瓶颈在哪里,到底是哪里影响了我们系统的性能,找到问题,然后解决它.当然一个系统由很多东西一起组合到一起,应用程序.数据库.服务器.中中间件等等很多东西 ...
- understand-show-slave-status-g
https://dba.stackexchange.com/questions/22623/mysql-exec-master-log-pos-value-greater-than-read-mast ...
- 数据分析入门——pandas之数据合并
主要分为:级联:pd.concat.pd.append 合并:pd.merge 一.numpy级联的回顾 详细参考numpy章节 https://www.cnblogs.com/jiangbei/p/ ...
- node 报错 env: node\r: No such file or directory
最近在编写一个命令行工具.使用 npm link 时可以正常运行.但是 ctrl+s 保存后, 再运行则报错 env: node\r: No such file or directory ,需要再 n ...
- 安卓 android studio 报错 The specified Android SDK Build Tools version (27.0.3) is ignored, as it is below the minimum supported version (28.0.3) for Android Gradle
今天将项目迁移到另一台笔记本,进行build出现以下问题,导致build失败 报错截图: 大致意思,目前使用的build工具版本27.0.3不合适.因为当前使用Gradle插件版本是3.2.1,这个版 ...
- [LeetCode] 220. Contains Duplicate III 包含重复元素 III
Given an array of integers, find out whether there are two distinct indices i and j in the array suc ...
- consul删除无效实例
consul删除无效实例删除无效服务删除无效节点删除无效服务http://127.0.0.1:8500/v1/agent/service/deregister/test-9c14fa595ddfb8f ...