openresty开发系列38--通过Lua+Redis 实现动态封禁IP
openresty开发系列38--通过Lua+Redis 实现动态封禁IP

一)需求背景
为了封禁某些爬虫或者恶意用户对服务器的请求,我们需要建立一个动态的 IP 黑名单。
对于黑名单之内的 IP ,拒绝提供服务。

二)设计方案
实现 IP 黑名单的功能有很多途径:
1、在操作系统层面,配置 iptables,拒绝指定 IP 的网络请求;
2、在 Web Server 层面,通过 Nginx 自身的 deny 选项 或者 lua 插件 配置 IP 黑名单;
3、在应用层面,在请求服务之前检查一遍客户端 IP 是否在黑名单。

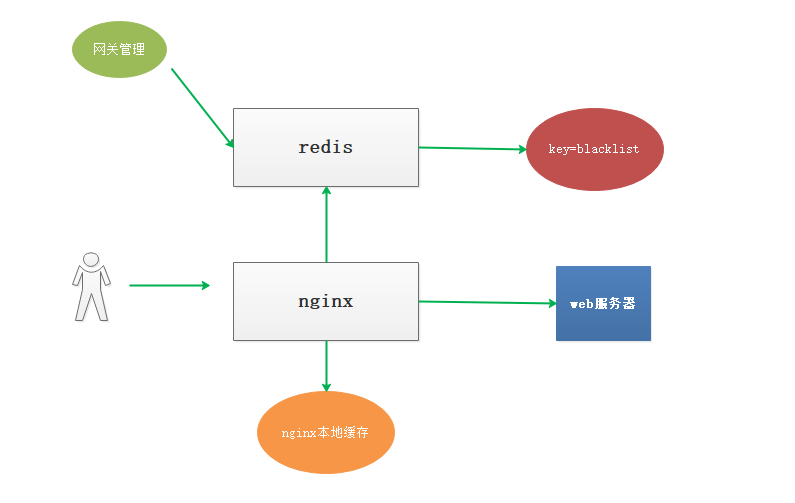
为了方便管理和共享,我们通过 Nginx+Lua+Redis 的架构实现 IP 黑名单的功能

如图

配置nginx.conf
在http部分,配置本地缓存,来缓存redis中的数据,避免每次都请求redis

lua_shared_dict shared_ip_blacklist 8m; #定义ip_blacklist 本地缓存变量

location /ipblacklist {
    access_by_lua_file /usr/local/lua/access_by_limit_ip.lua;
    echo "ipblacklist";
}
# 编辑 /usr/local/lua/access_by_limit_ip.lua

local function close_redis(red)

    if not red then

        return

    end

    --释放连接(连接池实现)

    local pool_max_idle_time =  --毫秒

    local pool_size =  --连接池大小

    local ok, err = red:set_keepalive(pool_max_idle_time, pool_size)

    if not ok then

        ngx.say("set keepalive error : ", err)

    end

end

local function errlog(...)

    ngx.log(ngx.ERR, "redis: ", ...)

end

local function duglog(...)

    ngx.log(ngx.DEBUG, "redis: ", ...)

end

local function getIp()

    local myIP = ngx.req.get_headers()["X-Real-IP"]

    if myIP == nil then

        myIP = ngx.req.get_headers()["x_forwarded_for"]

    end

    if myIP == nil then

        myIP = ngx.var.remote_addr

    end

    return myIP;

end

local key = "limit:ip:blacklist"

local ip = getIp();

local shared_ip_blacklist = ngx.shared.shared_ip_blacklist

--获得本地缓存的最新刷新时间

local last_update_time = shared_ip_blacklist:get("last_update_time");

if last_update_time ~= nil then

    local dif_time = ngx.now() - last_update_time

    if dif_time <  then --缓存1分钟,没有过期

        if shared_ip_blacklist:get(ip) then

            return ngx.exit(ngx.HTTP_FORBIDDEN) --直接返回403

        end

        return

    end

end

local redis = require "resty.redis"  --引入redis模块

local red = redis:new()  --创建一个对象,注意是用冒号调用的

--设置超时(毫秒)

red:set_timeout()

--建立连接

local ip = "10.11.0.215"

local port =

local ok, err = red:connect(ip, port)

if not ok then

    close_redis(red)

    errlog("limit ip cannot connect redis");

else

    local ip_blacklist, err = red:smembers(key);

    if err then

        errlog("limit ip smembers");

    else

        --刷新本地缓存,重新设置

        shared_ip_blacklist:flush_all();

        --同步redis黑名单 到 本地缓存

        for i,bip in ipairs(ip_blacklist) do

            --本地缓存redis中的黑名单

            shared_ip_blacklist:set(bip,true);

        end

        --设置本地缓存的最新更新时间

        shared_ip_blacklist:set("last_update_time",ngx.now());

    end

end

if shared_ip_blacklist:get(ip) then

    return ngx.exit(ngx.HTTP_FORBIDDEN) --直接返回403

end
当redis设置了密码时代码如下:
[root@node5 lua]# cat /usr/local/lua/access_by_limit_ip.lua
local function close_reis(red)

    if not red then

        return

    end

    local pool_max_idle_time =

    local pool_size =

    local ok, err = red:set_keepalive(pool_max_idle_time, pool_size)

    if not ok then

        ngx.say("set keepalive error :", err)

    end

end

local function errlog(...)

    ngx.log(ngx.ERR, "redis: ", ...)

end

local function duglog(...)

    ngx.log(ngx.DEBUG, "redis: ",...)

end

local function getIp()

    local myip = ngx.req.get_headers()["X-Real-IP"]

    if myip == nil then

        myip = ngx.req.get_headers()["x_forwarded_for"]

    end

    if myip == nil then

        myip = ngx.var.remote_addr

    end

    return myip

end

local key = "limit:ip:blacklist"

local ip = getIp();

local shared_ip_blacklist = ngx.shared.shared_ip_blacklist

local last_update_time = shared_ip_blacklist:get("last_update_time");

if last_update_time ~= nil then

    local dif_time = ngx.now() - last_update_time

    if dif_time <  then

        if shared_ip_blacklist:get(ip) then

            return ngx.exit(ngx.HTTP_FORBIDDEN)

        end

        return

    end

end

local redis = require "resty.redis"

local red = redis:new()

red:set_timeout()

local ip = "10.11.0.215"

local port =

local ok, err = red:connect(ip,port)

local count, err = red:get_reused_times()

if  == count then ----新建连接,需要认证密码

    ok, err = red:auth("redis123")

    if not ok then

        ngx.say("failed to auth: ", err)

        return

    end

elseif err then  ----从连接池中获取连接,无需再次认证密码

    ngx.say("failed to get reused times: ", err)

    return

end

if not ok then

    close_redis(red)

    errlog("limit ip cannot connect redis");

else

    local ip_blacklist, err = red:smembers(key)

    if err then

        errlog("limit ip smembers")

    else

        shared_ip_blacklist:flush_all();

        for i,bip in ipairs(ip_blacklist) do

            shared_ip_blacklist:set(bip, true);

        end

        shared_ip_blacklist:set("last_update_time", ngx.now());

    end

end

if shared_ip_blacklist:get(ip) then

    return ngx.exit(ngx.HTTP_FORBIDDEN)

end
用户redis客户端设置:
添加黑名单IP:
sadd limit:ip:blacklist 10.11.0.148
获取黑名单IP:
smembers limit:ip:blacklist
10.11.0.215:6379> sadd limit:ip:blacklist 10.11.0.148
10.11.0.215:6379> sadd limit:ip:blacklist 10.11.0.215
10.11.0.215:6379> smembers limit:ip:blacklist
1) "10.11.0.215"
2) "10.11.0.148"
10.11.0.215:6379> smembers limit:ip:blacklist
1) "10.11.0.215"
2) "10.11.0.148"
此方法目前只能实现手动添加黑名单IP进行IP封禁,在某些场景如:半夜如果有人恶意爬取网站服务器可能导致服务器资源耗尽崩溃或者影响业务
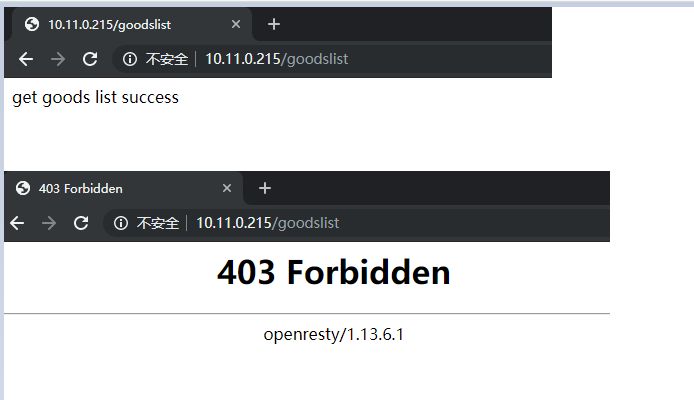
下面是改进后的代码,可以实现自动将访问频次过高的IP地址加入黑名单封禁一段时间
nginx.conf配置部分:
location /goodslist {
set $business "USER";
access_by_lua_file /usr/local/lua/access_count_limit.lua;
echo "get goods list success";
}
lua代码:
[root@node5 lua]# cat /usr/local/luaaccess_count_limit.lua
local function close_redis(red)

    if not red then

        return

    end

    local pool_max_idle_time =

    local pool_size =

    local ok, err = red:set_keepalive(pool_max_idle_tme, pool_size)

    if not ok then

        ngx.say("set keepalive err : ", err)

    end

end

local ip_block_time= --封禁IP时间(秒)

local ip_time_out=    --指定ip访问频率时间段(秒)

local ip_max_count= --指定ip访问频率计数最大值(秒)

local BUSINESS = ngx.var.business --nginx的location中定义的业务标识符

--连接redis

local redis = require "resty.redis"

local conn = redis:new()

ok, err = conn:connect("10.11.0.215", )

conn:set_timeout() --超时时间2秒

--如果连接失败,跳转到脚本结尾

if not ok then

    --goto FLAG

   close_redis(conn)

end

local count, err = conn:get_reused_times()

if  == count then ----新建连接,需要认证密码

    ok, err = conn:auth("redis123")

    if not ok then

        ngx.say("failed to auth: ", err)

        return

    end

elseif err then  ----从连接池中获取连接,无需再次认证密码

    ngx.say("failed to get reused times: ", err)

    return

end

--查询ip是否被禁止访问,如果存在则返回403错误代码

is_block, err = conn:get(BUSINESS.."-BLOCK-"..ngx.var.remote_addr)

if is_block == '' then

    ngx.exit()

    close_redis(conn)

end

--查询redis中保存的ip的计数器

ip_count, err = conn:get(BUSINESS.."-COUNT-"..ngx.var.remote_addr)

if ip_count == ngx.null then --如果不存在,则将该IP存入redis,并将计数器设置为1、该KEY的超时时间为ip_time_out

    res, err = conn:set(BUSINESS.."-COUNT-"..ngx.var.remote_addr, )

    res, err = conn:expire(BUSINESS.."-COUNT-"..ngx.var.remote_addr, ip_time_out)

else

    ip_count = ip_count +  --存在则将单位时间内的访问次数加1

    if ip_count >= ip_max_count then --如果超过单位时间限制的访问次数,则添加限制访问标识,限制时间为ip_block_time

        res, err = conn:set(BUSINESS.."-BLOCK-"..ngx.var.remote_addr, )

        res, err = conn:expire(BUSINESS.."-BLOCK-"..ngx.var.remote_addr, ip_block_time)

    else

        res, err = conn:set(BUSINESS.."-COUNT-"..ngx.var.remote_addr,ip_count)

        res, err = conn:expire(BUSINESS.."-COUNT-"..ngx.var.remote_addr, ip_time_out)

    end

end

-- 结束标记

local ok, err = conn:close()
# redis的数据
10.11.0.215:6379> get USER-COUNT-10.11.0.148
"16"
10.11.0.215:6379> get USER-BLOCK-10.11.0.148
(nil)
四、总结

以上,便是 Nginx+Lua+Redis 实现的 IP 黑名单功能,具有如下优点:

1、配置简单、轻量,几乎对服务器性能不产生影响;

2、多台服务器可以通过Redis实例共享黑名单;

3、动态配置,可以手工或者通过某种自动化的方式设置 Redis 中的黑名单。
openresty开发系列38--通过Lua+Redis 实现动态封禁IP的更多相关文章
- Nginx 通过 Lua + Redis 实现动态封禁 IP
一.背景 为了封禁某些爬虫或者恶意用户对服务器的请求,我们需要建立一个动态的 IP 黑名单.对于黑名单之内的 IP ,拒绝提供服务. 二.架构 实现 IP 黑名单的功能有很多途径: 1.在操作系统层面 ...
- openresty开发系列27--openresty中封装redis操作
openresty开发系列27--openresty中封装redis操作 在关于web+lua+openresty开发中,项目中会大量操作redis, 重复创建连接-->数据操作-->关闭 ...
- openresty开发系列26--openresty中使用redis模块
openresty开发系列26--openresty中使用redis模块 在一些高并发的场景中,我们常常会用到缓存技术,现在我们常用的分布式缓存redis是最知名的, 操作redis,我们需要引入re ...
- openresty开发系列24--openresty中lua的引入及使用
openresty开发系列24--openresty中lua的引入及使用 openresty 引入 lua 一)openresty中nginx引入lua方式 1)xxx_by_lua ---> ...
- openresty开发系列40--nginx+lua实现获取客户端ip所在的国家信息
openresty开发系列40--nginx+lua实现获取客户端ip所在的国家信息 为了实现业务系统针对不同地区IP访问,展示包含不同地区信息的业务交互界面.很多情况下系统需要根据用户访问的IP信息 ...
- openresty开发系列37--nginx-lua-redis实现访问频率控制
openresty开发系列37--nginx-lua-redis实现访问频率控制 一)需求背景 在高并发场景下为了防止某个访问ip访问的频率过高,有时候会需要控制用户的访问频次在openresty中, ...
- openresty开发系列28--openresty中操作mysql
openresty开发系列28--openresty中操作mysql Mysql客户端 应用中最常使用的就是数据库了,尤其mysql数据库,那openresty lua如何操作mysql呢? ...
- openresty开发系列10--openresty的简单介绍及安装
openresty开发系列10--openresty的简单介绍及安装 一.Nginx优点 十几年前,互联网没有这么火,软件外包开发,信息化建设,帮助企业做无纸化办公,收银系统,工厂erp,c/s架构偏 ...
- openresty开发系列36--openresty执行流程之6日志模块处理阶段
openresty开发系列36--openresty执行流程之6日志模块处理阶段 一)header_filter_by_lua 语法:header_filter_by_lua <lua-scri ...
随机推荐
- MyBatis日记(四):MyBatis——insert、update、delete、select
MyBatis简单增删改查操作,此处所做操作,皆是在之前创建的MyBatis的Hello world的工程基础上所做操作. 首先在接口文件(personMapper.java)中,添加操作方法: pa ...
- Eclipse经常出现未响应问题
修改eclipse.ini文件 -startupplugins/org.eclipse.equinox.launcher_1.5.0.v20180512-1130.jar--launcher.libr ...
- mutable用于修改const成员函数中的成员变量
http://no001.blog.51cto.com/1142339/389840/ mutalbe的中文意思是“可变的,易变的”,跟constant(既C++中的const)是反义词. 在C++中 ...
- 团队项目-Beta冲刺
请大家在每次作业开头添加格式描述: 这个作业属于哪个课程 <课程的链接> 这个作业要求在哪里 <作业要求的链接> 团队名称 <写上团队名称>(附上团队博客链接) 这 ...
- Codeforces G. Nick and Array(贪心)
题目描述: Nick had received an awesome array of integers a=[a1,a2,…,an] as a gift for his 5 birthday fro ...
- 2018年第十届ACMICPC四川省大学程序设计竞赛
..拿金了 没给学校丢脸 A ....SB题啊 比赛的时候都没看 裸的一个bitset前缀和 先开一个1e4*1e4的二维bitset数组 初始第i个数组的值为1 << i (即B[i]= ...
- spring Security的自定义用户认证
首先我需要在xml文件中声明.我要进行自定义用户的认证类,也就是我要自己从数据库中进行查询 <http pattern="/*.html" security="no ...
- spark中的scalaAPI之RDDAPI常用操作
package com.XXX import org.apache.spark.storage.StorageLevel import org.apache.spark.{SparkConf, Spa ...
- Convert.ToString(null) => null
{ string str0 = Convert.ToString(null); Console.WriteLine("0,{0}", str0); if (str0==" ...
- 2019牛客国庆集训派对day1 K题 双向链表练习题 splay区间翻转
题目链接: 解法: 先建n颗平衡树,合并的时候将a中最右的结点翻转到根节点,b中最左的结点翻转到根节点,对合并后的根节点进行标记. #include <bits/stdc++.h> usi ...


