LVS负载均衡(2)-- NAT模型搭建实例
1. LVS NAT模型搭建
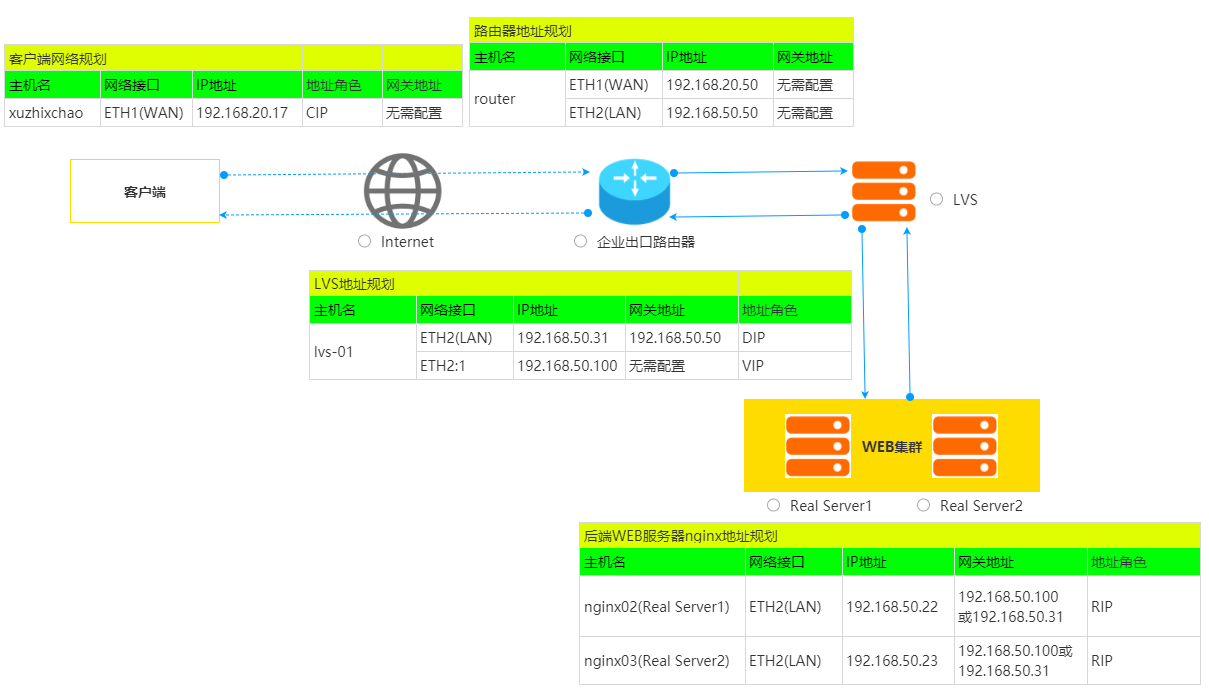
1.1 NAT模型网络规划

规划要点:
- 在生产环境中,客户端与企业互联网出口设备不会时同一网段地址,此处我们规划为同一网段地址,但是没有在客户端上配置网关,因此我们需要在企业出口设备上把LVS的VIP地址192.168.50.100做地址映射或端口映射,映射到企业出口防火墙的外网地址192.168.20.31。
- LVS设备在LAN网络中设置了两个IP,其中192.168.50.31为实际地址DIP,192.168.50.100为虚IP,为后面的高可用规划地址。
- 后端nginx服务器RS设备与LVS在同一网段,需要把网关指向LVS的DIP或VIP上,考虑到后期使用两台LVS做高可用,建议把网关配置为LVS的VIP地址。
- 所有的客户端都是与后端的RS主机进行TCP三次握手,而不是LVS设备。
1.2 NAT模型访问流程
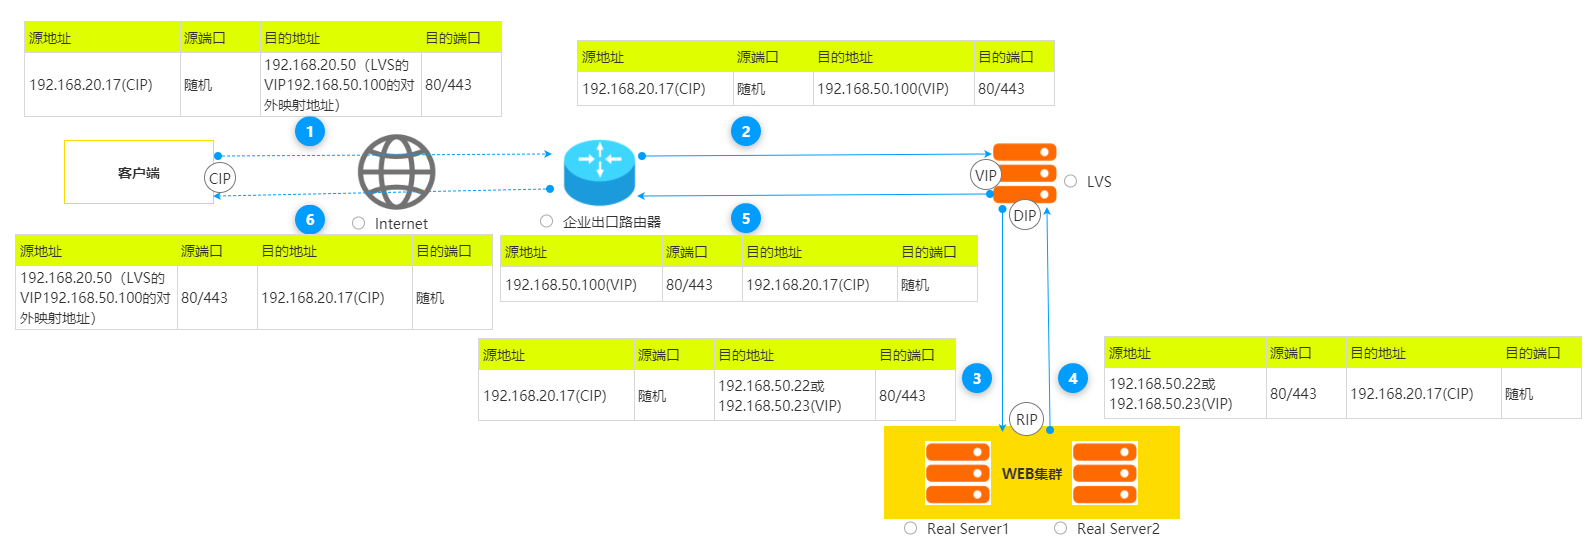
NAT模型流程图如下:

NAT的访问流程如下:
- 1、当用户请求到达 Director Server ,此时请求的数据报文会先到内核空间的 PREROUTING 链。 此时报文的源IP为CIP , 目标IP为VIP;
- 2、 PREROUTING 检查发现数据包的目标 IP 是本机,将数据包送至 INPUT 链;
- 3、 IPVS 比对数据包请求的服务是否为集群服务,若是,通过调度算法挑选一台后端 RS 服务器,并修改数据包的 目标IP为RS的IP ,然后将数据包发至POSTROUTING 链。 此时报文的 源IP为CIP , 目标IP为RIP ;
- 4、 POSTROUTING 链通过选路,将数据包通过 Director Server 的 DIP 发送给 RS ;
- 5、 RS 发现目标为自己的 IP ,则交给应用程序处理,然后构建响应报文发回给Director Server 。 此时报文的 源IP为RIP , 目标IP为CIP ;
- 6、 Director Server 在响应客户端前,会将源 IP 地址修改为 VIP 地址,然后响应给客户端。此时报文的 源IP为VIP , 目标IP为CIP;
1.3 NAT模型配置步骤
1.3.1 ROUTER设备配置
ROUTER设备的IP地址和路由信息如下:
[root@router ~]# ip add

3: eth1: <BROADCAST,MULTICAST,UP,LOWER_UP> mtu 1500 qdisc pfifo_fast state UP group default qlen 1000

    link/ether 00:0c:29:4f:a9:ca brd ff:ff:ff:ff:ff:ff

    inet 192.168.20.50/24 brd 192.168.20.255 scope global noprefixroute eth1

       valid_lft forever preferred_lft forever

4: eth2: <BROADCAST,MULTICAST,UP,LOWER_UP> mtu 1500 qdisc pfifo_fast state UP group default qlen 1000

    link/ether 00:0c:29:4f:a9:d4 brd ff:ff:ff:ff:ff:ff

    inet 192.168.50.50/24 brd 192.168.50.255 scope global noprefixroute eth2

       valid_lft forever preferred_lft forever

#此场景中无需配置路由

[root@router ~]# route -n

Kernel IP routing table

Destination     Gateway         Genmask         Flags Metric Ref    Use Iface

192.168.20.0    0.0.0.0         255.255.255.0   U     101    0        0 eth1

192.168.50.0    0.0.0.0         255.255.255.0   U     104    0        0 eth2
打开router设备的ip_forward功能:
[root@router ~]# echo "net.ipv4.ip_forward = 1" >> /etc/sysctl.conf

[root@router ~]# sysctl -p

net.ipv4.ip_forward = 1
把LVS的虚IP地址的80和443端口映射到路由器外网地址的80和443端口,也可以使用地址映射:
#端口映射:

[root@router ~]# iptables -t nat -A PREROUTING -d 192.168.20.50 -p tcp --dport 80 -j DNAT --to 192.168.50.100:80

[root@router ~]# iptables -t nat -A PREROUTING -d 192.168.20.50 -p tcp --dport 443 -j DNAT --to 192.168.50.100:443

#地址映射:

[root@router ~]# iptables -t nat -A PREROUTING -d 192.168.20.50 -j DNAT --to 192.168.50.100

#源NAT,让内部主机上网使用

[root@router ~]# iptables -t nat -A POSTROUTING -s 192.168.50.0/24 -j SNAT --to 192.168.20.50

#查看NAT配置:

[root@router ~]# iptables -t nat -vnL

Chain PREROUTING (policy ACCEPT 0 packets, 0 bytes)

 pkts bytes target     prot opt in     out     source               destination

    0     0 DNAT       tcp  --  *      *       0.0.0.0/0            192.168.20.50        tcp dpt:80 to:192.168.50.100:80

    0     0 DNAT       tcp  --  *      *       0.0.0.0/0            192.168.20.50        tcp dpt:443 to:192.168.50.100:443

Chain INPUT (policy ACCEPT 0 packets, 0 bytes)

 pkts bytes target     prot opt in     out     source               destination

Chain OUTPUT (policy ACCEPT 0 packets, 0 bytes)

 pkts bytes target     prot opt in     out     source               destination

Chain POSTROUTING (policy ACCEPT 0 packets, 0 bytes)

 pkts bytes target     prot opt in     out     source               destination

    0     0 SNAT       all  --  *      *       192.168.50.0/24      0.0.0.0/0            to:192.168.20.50
1.3.2 后端nginx服务器配置
nginx02主机的网络配置如下:
[root@nginx02 ~]# ip add

4: eth2: <BROADCAST,MULTICAST,UP,LOWER_UP> mtu 1500 qdisc pfifo_fast state UP group default qlen 1000

    link/ether 00:0c:29:d9:f9:7d brd ff:ff:ff:ff:ff:ff

    inet 192.168.50.22/24 brd 192.168.50.255 scope global noprefixroute eth2

       valid_lft forever preferred_lft forever

#路由配置:网关指向LVS的VIP地址192.168.50.100

[root@nginx02 ~]# ip route add default via 192.168.50.100

#本实验场景中存在ETH1口地址为192.168.20.0/24网段,因此需要配置指向客户端的主机路由,生产中不需要

[root@nginx02 ~]# ip route add 192.168.20.17/32 via 192.168.50.100

[root@nginx02 ~]# route -n

Kernel IP routing table

Destination     Gateway         Genmask         Flags Metric Ref    Use Iface

0.0.0.0         192.168.50.100  0.0.0.0         UG    0      0        0 eth2

192.168.20.0    0.0.0.0         255.255.255.0   U     101    0        0 eth1

192.168.20.17   192.168.50.100  255.255.255.255 UGH   0      0        0 eth2

192.168.50.0    0.0.0.0         255.255.255.0   U     103    0        0 eth2
nginx03主机的网络配置如下:
[root@nginx03 ~]# ip add

4: eth2: <BROADCAST,MULTICAST,UP,LOWER_UP> mtu 1500 qdisc pfifo_fast state UP group default qlen 1000

    link/ether 00:0c:29:0a:bf:63 brd ff:ff:ff:ff:ff:ff

    inet 192.168.50.23/24 brd 192.168.50.255 scope global noprefixroute eth2

       valid_lft forever preferred_lft forever

#路由配置:网关指向LVS的VIP地址192.168.50.100

[root@nginx03 ~]# ip route add default via 192.168.50.100

#本实验场景中存在ETH1口地址为192.168.20.0/24网段,因此需要配置指向客户端的主机路由,生产中不需要

[root@nginx03 ~]# ip route add 192.168.20.17/32 via 192.168.50.100

[root@nginx03 ~]# route -n

Kernel IP routing table

Destination     Gateway         Genmask         Flags Metric Ref    Use Iface

0.0.0.0         192.168.50.100  0.0.0.0         UG    0      0        0 eth2

192.168.20.0    0.0.0.0         255.255.255.0   U     101    0        0 eth1

192.168.20.17   192.168.50.100  255.255.255.255 UGH   0      0        0 eth2

192.168.50.0    0.0.0.0         255.255.255.0   U     103    0        0 eth2
nginx配置文件两台WEB服务器保持一致:
[root@nginx03 ~]# cat /etc/nginx/conf.d/xuzhichao.conf

server {

	listen 80 default_server;

	listen 443 ssl;

	server_name www.xuzhichao.com;

	access_log /var/log/nginx/access_xuzhichao.log access_json;

	charset utf-8,gbk;

	#SSL配置

	ssl_certificate_key /apps/nginx/certs/www.xuzhichao.com.key;

	ssl_certificate /apps/nginx/certs/www.xuzhichao.com.crt;

	ssl_session_cache shared:ssl_cache:20m;

	ssl_session_timeout 10m;

	ssl_protocols TLSv1 TLSv1.1 TLSv1.2;

	keepalive_timeout 65;

	#防盗链

	valid_referers none blocked server_names *.b.com  b.*  ~\.baidu\.  ~\.google\.;

	if ( $invalid_referer ) {

		return 403;

	}

	client_max_body_size 10m;

	#浏览器图标

	location = /favicon.ico {

		root /data/nginx/xuzhichao;

	}

	location / {

		root /data/nginx/xuzhichao;

		index index.html index.php;

		#http自动跳转https

		if ($scheme = http) {

			rewrite ^/(.*)$ https://www.xuzhichao.com/$1;

		}

	}

}

#重启nginx服务:

[root@nginx03 ~]# nginx -t

nginx: the configuration file /etc/nginx/nginx.conf syntax is ok

nginx: configuration file /etc/nginx/nginx.conf test is successful

[root@nginx03 ~]# systemctl reload nginx.service
nginx02主机的主页文件如下:
[root@nginx02 certs]# cat /data/nginx/xuzhichao/index.html

node1.xuzhichao.com page
nginx03主机的主页文件如下:
[root@nginx03 ~]# cat /data/nginx/xuzhichao/index.html

node2.xuzhichao.com page
测试访问:
[root@lvs-01 ~]# curl -Hhost:www.xuzhichao.com  -k https://192.168.50.23

node2.xuzhichao.com page

[root@lvs-01 ~]# curl -Hhost:www.xuzhichao.com  -k https://192.168.50.22

node1.xuzhichao.com page
1.3.3 LVS设备配置
LVS设备的网络配置如下:
#1.配置虚地址192.168.50.100

#临时配置:

[root@lvs-01 ~]# ifconfig eth2:1 192.168.50.100/24 up

#永久配置,使用配置文件:

[root@lvs-01 ~]# cat /etc/sysconfig/network-scripts/ifcfg-eth2:1

TYPE=Ethernet

BOOTPROTO=none

IPADDR=192.168.50.100

PREFIX=24

DEVICE=eth2:1

NAME=eth2:1

DEFROUTE=yes

ONBOOT=yes

#重启网卡:

[root@lvs-01 ~]# ifdown eth2 && ifup eth2

[root@lvs-01 ~]# ifdown eth2:1 && ifup eth2:1

#2.LVS地址配置:

[root@lvs-01 ~]# ip add

4: eth2: <BROADCAST,MULTICAST,UP,LOWER_UP> mtu 1500 qdisc pfifo_fast state UP group default qlen 1000

    link/ether 00:0c:29:21:84:9d brd ff:ff:ff:ff:ff:ff

    inet 192.168.50.31/24 brd 192.168.50.255 scope global noprefixroute eth2

       valid_lft forever preferred_lft forever

    inet 192.168.50.100/24 brd 192.168.50.255 scope global secondary eth2:1

       valid_lft forever preferred_lft forever

#3.LVS配置默认路由指向出口路由器192.168.50.50

[root@lvs-01 ~]# ip route add default via 192.168.50.50

#本实验场景中存在ETH1口地址为192.168.20.0/24网段,因此需要配置指向客户端的主机路由,生产中不需要

[root@lvs-01 ~]# ip route add 192.168.20.17/32 via 192.168.50.50

[root@lvs-01 ~]# route -n

Kernel IP routing table

Destination     Gateway         Genmask         Flags Metric Ref    Use Iface

0.0.0.0         192.168.50.50   0.0.0.0         UG    0      0        0 eth2

192.168.20.0    0.0.0.0         255.255.255.0   U     101    0        0 eth1

192.168.20.17   192.168.50.50   255.255.255.255 UGH   0      0        0 eth2

192.168.50.0    0.0.0.0         255.255.255.0   U     102    0        0 eth2
打开lvs设备的ip_forward功能:
[root@router ~]# echo "net.ipv4.ip_forward = 1" >> /etc/sysctl.conf

[root@router ~]# sysctl -p

net.ipv4.ip_forward = 1
配置IPVS的规则:
#创建80和443两个集群,并添加后端主机:

[root@lvs-01 ~]# ipvsadm -A -t 192.168.50.100:80 -s rr

[root@lvs-01 ~]# ipvsadm -A -t 192.168.50.100:443 -s rr

[root@lvs-01 ~]# ipvsadm -a -t 192.168.50.100:80 -r 192.168.50.22:80 -m

[root@lvs-01 ~]# ipvsadm -a -t 192.168.50.100:80 -r 192.168.50.23:80 -m

[root@lvs-01 ~]# ipvsadm -a -t 192.168.50.100:443 -r 192.168.50.22:443 -m

[root@lvs-01 ~]# ipvsadm -a -t 192.168.50.100:443 -r 192.168.50.23:443 -m

[root@lvs-01 ~]# ipvsadm -Ln

IP Virtual Server version 1.2.1 (size=4096)

Prot LocalAddress:Port Scheduler Flags

  -> RemoteAddress:Port           Forward Weight ActiveConn InActConn

TCP  192.168.50.100:80 rr

  -> 192.168.50.22:80             Masq    1      0          0

  -> 192.168.50.23:80             Masq    1      0          0

TCP  192.168.50.100:443 rr

  -> 192.168.50.22:443            Masq    1      0          0

  -> 192.168.50.23:443            Masq    1      0          0
1.3.4 客户端访问测试
客户端网络配置如下:
[root@xuzhichao ~]# ip add

3: eth1: <BROADCAST,MULTICAST,UP,LOWER_UP> mtu 1500 qdisc pfifo_fast state UP group default qlen 1000

    link/ether 00:0c:29:2f:d0:da brd ff:ff:ff:ff:ff:ff

    inet 192.168.20.17/24 brd 192.168.20.255 scope global noprefixroute eth1

       valid_lft forever preferred_lft forever

[root@xuzhichao ~]# route -n

Kernel IP routing table

Destination     Gateway         Genmask         Flags Metric Ref    Use Iface

192.168.20.0    0.0.0.0         255.255.255.0   U     101    0        0 eth1
测试访问:
#1.测试使用http方式访问,重定向到https

[root@xuzhichao ~]# for i in {1..10} ;do curl -k -L -Hhost:www,xuzhichao.com http://192.168.20.50; done

node2.xuzhichao.com page

node1.xuzhichao.com page

node2.xuzhichao.com page

node1.xuzhichao.com page

node2.xuzhichao.com page

node1.xuzhichao.com page

node2.xuzhichao.com page

node1.xuzhichao.com page

node2.xuzhichao.com page

node1.xuzhichao.com page

#2.测试直接使用https方式访问

[root@xuzhichao ~]# for i in {1..10} ;do curl -k -Hhost:www,xuzhichao.com https://192.168.20.50; done

node2.xuzhichao.com page

node1.xuzhichao.com page

node2.xuzhichao.com page

node1.xuzhichao.com page

node2.xuzhichao.com page

node1.xuzhichao.com page

node2.xuzhichao.com page

node1.xuzhichao.com page

node2.xuzhichao.com page

node1.xuzhichao.com page
查看LVS的状态信息:
[root@lvs-01 ~]# ipvsadm -Ln --stats

IP Virtual Server version 1.2.1 (size=4096)

Prot LocalAddress:Port               Conns   InPkts  OutPkts  InBytes OutBytes

  -> RemoteAddress:Port

TCP  192.168.50.100:80                  21      122       71     7976     9278

  -> 192.168.50.22:80                   10       62       39     4056     4902

  -> 192.168.50.23:80                   11       60       32     3920     4376

TCP  192.168.50.100:443                 22      198      132    20454    60570

  -> 192.168.50.22:443                  11       99       66    10227    30285

  -> 192.168.50.23:443                  11       99       66    10227    30285

[root@lvs-01 ~]# ipvsadm -Ln --rate

IP Virtual Server version 1.2.1 (size=4096)

Prot LocalAddress:Port                 CPS    InPPS   OutPPS    InBPS   OutBPS

  -> RemoteAddress:Port

TCP  192.168.50.100:80                   0        1        1       89      122

  -> 192.168.50.22:80                    0        1        0       44       61

  -> 192.168.50.23:80                    0        1        0       44       61

TCP  192.168.50.100:443                  0        2        1      210      614

  -> 192.168.50.22:443                   0        1        1      105      307

  -> 192.168.50.23:443                   0        1        1      105      307

[root@lvs-01 ~]# ipvsadm -Lnc

IPVS connection entries

pro expire state       source             virtual            destination

TCP 00:31  TIME_WAIT   192.168.20.17:52494 192.168.50.100:80  192.168.50.22:80

TCP 00:21  TIME_WAIT   192.168.20.17:43218 192.168.50.100:443 192.168.50.23:443

TCP 00:32  TIME_WAIT   192.168.20.17:52530 192.168.50.100:80  192.168.50.23:80

TCP 01:21  TIME_WAIT   192.168.20.17:52554 192.168.50.100:80  192.168.50.23:80

TCP 00:32  TIME_WAIT   192.168.20.17:43260 192.168.50.100:443 192.168.50.23:443

TCP 00:31  TIME_WAIT   192.168.20.17:43240 192.168.50.100:443 192.168.50.22:443

TCP 01:22  TIME_WAIT   192.168.20.17:52570 192.168.50.100:80  192.168.50.23:80

TCP 00:31  TIME_WAIT   192.168.20.17:52506 192.168.50.100:80  192.168.50.23:80

TCP 01:21  TIME_WAIT   192.168.20.17:43280 192.168.50.100:443 192.168.50.22:443

TCP 01:21  TIME_WAIT   192.168.20.17:43304 192.168.50.100:443 192.168.50.22:443

TCP 00:31  TIME_WAIT   192.168.20.17:52502 192.168.50.100:80  192.168.50.22:80

TCP 00:21  TIME_WAIT   192.168.20.17:43220 192.168.50.100:443 192.168.50.22:443

TCP 01:40  TIME_WAIT   192.168.20.17:43330 192.168.50.100:443 192.168.50.23:443

TCP 00:31  TIME_WAIT   192.168.20.17:52510 192.168.50.100:80  192.168.50.22:80

TCP 00:32  TIME_WAIT   192.168.20.17:43268 192.168.50.100:443 192.168.50.23:443

TCP 01:21  TIME_WAIT   192.168.20.17:52542 192.168.50.100:80  192.168.50.22:80

TCP 01:40  TIME_WAIT   192.168.20.17:43328 192.168.50.100:443 192.168.50.22:443

TCP 00:22  TIME_WAIT   192.168.20.17:43232 192.168.50.100:443 192.168.50.22:443

TCP 02:00  TIME_WAIT   192.168.20.17:43342 192.168.50.100:443 192.168.50.23:443

TCP 02:00  TIME_WAIT   192.168.20.17:43338 192.168.50.100:443 192.168.50.23:443

TCP 00:11  TIME_WAIT   192.168.20.17:43212 192.168.50.100:443 192.168.50.22:443

TCP 00:32  TIME_WAIT   192.168.20.17:43272 192.168.50.100:443 192.168.50.22:443

TCP 00:31  TIME_WAIT   192.168.20.17:43248 192.168.50.100:443 192.168.50.22:443

TCP 01:40  TIME_WAIT   192.168.20.17:43314 192.168.50.100:443 192.168.50.23:443

TCP 00:07  TIME_WAIT   192.168.20.17:52466 192.168.50.100:80  192.168.50.22:80

TCP 15:00  ESTABLISHED 192.168.20.17:43344 192.168.50.100:443 192.168.50.22:443

TCP 01:40  TIME_WAIT   192.168.20.17:43318 192.168.50.100:443 192.168.50.23:443

TCP 02:00  TIME_WAIT   192.168.20.17:43334 192.168.50.100:443 192.168.50.23:443

TCP 01:40  TIME_WAIT   192.168.20.17:43320 192.168.50.100:443 192.168.50.22:443

TCP 01:21  TIME_WAIT   192.168.20.17:43284 192.168.50.100:443 192.168.50.23:443

TCP 02:00  TIME_WAIT   192.168.20.17:43340 192.168.50.100:443 192.168.50.22:443

TCP 00:32  TIME_WAIT   192.168.20.17:52518 192.168.50.100:80  192.168.50.22:80

TCP 01:21  TIME_WAIT   192.168.20.17:43308 192.168.50.100:443 192.168.50.23:443

TCP 00:31  TIME_WAIT   192.168.20.17:43236 192.168.50.100:443 192.168.50.23:443

TCP 01:21  TIME_WAIT   192.168.20.17:52566 192.168.50.100:80  192.168.50.22:80

TCP 00:22  TIME_WAIT   192.168.20.17:43222 192.168.50.100:443 192.168.50.23:443

TCP 01:21  TIME_WAIT   192.168.20.17:52534 192.168.50.100:80  192.168.50.22:80

TCP 00:22  TIME_WAIT   192.168.20.17:43230 192.168.50.100:443 192.168.50.23:443

TCP 00:21  TIME_WAIT   192.168.20.17:43214 192.168.50.100:443 192.168.50.23:443

TCP 00:32  TIME_WAIT   192.168.20.17:43264 192.168.50.100:443 192.168.50.22:443

TCP 00:32  TIME_WAIT   192.168.20.17:43256 192.168.50.100:443 192.168.50.22:443

TCP 01:40  TIME_WAIT   192.168.20.17:43332 192.168.50.100:443 192.168.50.22:443

TCP 00:31  TIME_WAIT   192.168.20.17:43252 192.168.50.100:443 192.168.50.23:443

TCP 00:31  TIME_WAIT   192.168.20.17:52498 192.168.50.100:80  192.168.50.23:80

TCP 00:21  TIME_WAIT   192.168.20.17:43216 192.168.50.100:443 192.168.50.22:443

TCP 01:40  TIME_WAIT   192.168.20.17:43322 192.168.50.100:443 192.168.50.23:443

TCP 00:22  TIME_WAIT   192.168.20.17:43226 192.168.50.100:443 192.168.50.23:443

TCP 01:21  TIME_WAIT   192.168.20.17:43292 192.168.50.100:443 192.168.50.23:443

TCP 00:22  TIME_WAIT   192.168.20.17:43224 192.168.50.100:443 192.168.50.22:443

TCP 00:32  TIME_WAIT   192.168.20.17:52522 192.168.50.100:80  192.168.50.23:80

TCP 01:21  TIME_WAIT   192.168.20.17:52546 192.168.50.100:80  192.168.50.23:80

TCP 01:21  TIME_WAIT   192.168.20.17:52562 192.168.50.100:80  192.168.50.23:80

TCP 01:21  TIME_WAIT   192.168.20.17:43300 192.168.50.100:443 192.168.50.23:443

TCP 01:40  TIME_WAIT   192.168.20.17:43324 192.168.50.100:443 192.168.50.22:443

TCP 01:21  TIME_WAIT   192.168.20.17:52538 192.168.50.100:80  192.168.50.23:80

TCP 01:40  TIME_WAIT   192.168.20.17:43326 192.168.50.100:443 192.168.50.23:443

TCP 01:21  TIME_WAIT   192.168.20.17:52550 192.168.50.100:80  192.168.50.22:80

TCP 00:31  TIME_WAIT   192.168.20.17:43244 192.168.50.100:443 192.168.50.23:443

TCP 01:21  TIME_WAIT   192.168.20.17:43288 192.168.50.100:443 192.168.50.22:443

TCP 02:00  TIME_WAIT   192.168.20.17:43336 192.168.50.100:443 192.168.50.22:443

TCP 00:32  TIME_WAIT   192.168.20.17:52526 192.168.50.100:80  192.168.50.22:80

TCP 01:21  TIME_WAIT   192.168.20.17:43276 192.168.50.100:443 192.168.50.23:443

TCP 00:22  TIME_WAIT   192.168.20.17:43228 192.168.50.100:443 192.168.50.22:443

TCP 01:21  TIME_WAIT   192.168.20.17:52558 192.168.50.100:80  192.168.50.22:80

TCP 01:22  TIME_WAIT   192.168.20.17:43312 192.168.50.100:443 192.168.50.22:443

TCP 01:21  TIME_WAIT   192.168.20.17:43296 192.168.50.100:443 192.168.50.22:443

TCP 00:07  TIME_WAIT   192.168.20.17:43208 192.168.50.100:443 192.168.50.23:443

TCP 01:40  TIME_WAIT   192.168.20.17:43316 192.168.50.100:443 192.168.50.22:443

TCP 00:32  TIME_WAIT   192.168.20.17:52514 192.168.50.100:80  192.168.50.23:80

TCP 00:11  TIME_WAIT   192.168.20.17:52470 192.168.50.100:80  192.168.50.23:80
LVS负载均衡(2)-- NAT模型搭建实例的更多相关文章
- 20.LVS负载均衡群集—NAT模式实例
LVS负载均衡群集-NAT模式实例 目录 LVS负载均衡群集-NAT模式实例 群集引用概述 群集的含义 问题 解决方法 企业群集分类 群集的三种类型 负载均衡群集(Load Balance Clust ...
- LVS负载均衡之NAT模式部署
1.LVS的NAT模式介绍 参考自官网:http://www.linuxvirtualserver.org/zh/lvs3.html 由于IPv4中IP地址空间的日益紧张和安全方面的原因,很多网络使用 ...
- LVS负载均衡集群服务搭建详解(二)
lvs-nat模型构建 1.lvs-nat模型示意图 本次构建的lvs-nat模型的示意图如下,其中所有的服务器和测试客户端均使用VMware虚拟机模拟,所使用的CentOS 7 VS内核都支持ipv ...
- LVS负载均衡集群服务搭建详解(一)
LVS概述 1.LVS:Linux Virtual Server 四层交换(路由):根据请求报文的目标IP和目标PORT将其转发至后端主机集群中的某台服务器(根据调度算法): 不能够实现应用层的负载均 ...
- LVS负载均衡群集(NAT)
----构建NAT模式的LVS群集----------client---------------LVS----------------WEB1-----------WEB2------------NF ...
- LVS负载均衡NAT模式实现
LVS负载均衡之NAT模式配置 NAT 模式架构图: 操作步骤 实验环境准备:(centos7平台) 所有服务器上配置 # systemctl stop firewalld //关闭防火墙 # sed ...
- CentOS7Linux中服务器LVS负载均衡、高可用集群搭建(NAT、DR);
目录 集群 声明 集群概念 集群特性 Web服务器并发相应瓶颈 集群的分类 LB实现方法: LVS集群 负载调度器 服务器池 共享存储 LVS负载均衡的三种模式 负载均衡 集群 声明 文档不断更新中. ...
- Linux中keepalived+LVS负载均衡的搭建测试
1.1 LVS简介 LVS(Linux Virtual Server),也就是Linux虚拟服务器, 是一个自由软件项目.使用LVS技术要达到的目标是:通过LVS提供的负载均衡技术和Lin ...
- lvs负载均衡的搭建
lvs负载均衡的搭建 作者:尹正杰 版权声明:原创作品,谢绝转载!否则将追究法律责任. 在部署环境前,我们需要了解一下一些协议 一.什么是arp 地址解析协议,即ARP(Addr ...
- LVS负载均衡常用的工作模式有NAT、DR、和TUN三种,其中DR模式性能最为优越,使用最为广泛。
一.安装LVS LVS的编译安装参考本站文章:http://www.linuxe.cn/post-192.html,对于LVS这种功能性软件,在生产中用yum安装也是没有问题的. 1 yum inst ...
随机推荐
- 关于JDK21控制台字符集编码问题
关于JDK21控制台字符集编码问题 前言: 某日尝试JDK21,idea控制台字符集编码一直乱码,后将idea所有能配置UTF-8的配置都配了一遍,无果,后搜索JDK21字符集编码相关后解决 1.配置 ...
- Spring boot中拦截器的简单使用
1.创建自定义拦截器类:首先,你需要创建一个自定义的拦截器类,该类需要实现HandlerInterceptor接口.例如,你可以创建一个名为CustomInterceptor的类. import or ...
- win10/11 暂停更新
1. win+R 输入regeidt 进入注册表编辑器 2.在"计算机\HKEY_LOCAL_MACHINE\SOFTWARE\Microsoft\WindowsUpdate\UX\Sett ...
- #二分图,并查集#洛谷 6185 [NOI Online #1 提高组] 序列
题目 分析 考虑2操作可以在保证总和不变的情况下任意修改, 如果将2操作所在的连通块用并查集缩点,那么再考虑1操作, 按照1操作建边,如果存在奇环,那么只要这个环的点权和为偶数一定能使 \(a,b\) ...
- C++ 编译器和链接器的完全指南
C++是一种强类型语言,它的编译和链接是程序开发过程中不可或缺的两个环节.编译器和链接器是两个非常重要的概念.本文将详细介绍C++中的编译器和链接器以及它们的工作原理和使用方法. 编译器 编译器是将源 ...
- 了解 Spring MVC 架构、Dispatcher Servlet 和 JSP 文件的关键作用
Spring MVC 是 Spring 框架的一部分,是一个 Web 应用程序框架.它旨在使用 Model-View-Controller(MVC) 设计模式轻松构建Web应用程序. Spring M ...
- 使用IDEA直接连接数据库报错:Server returns invalid timezone. Go to 'Advanced' tab and set 'serverTimezone' property manually.
错误详情:使用IDEA直接连接数据库报错:Server returns invalid timezone. Go to 'Advanced' tab and set 'serverTimezone' ...
- HMS Core手语服务荣获2022中国互联网大会“特别推荐案例”:助力建设数字社会
11月15日,HMS Core手语服务在2022(第二十一届)中国互联网大会 "互联网助力经济社会数字化转型"案例评选活动中,荣获"特别推荐案例". 经过一年多 ...
- Redis和elasticsearch
redis -----------NOSQL的对比和劣和应用场景参考好文http://www.redis.cn/articles/20181020003.html --------- -------- ...
- sql 语句系列(记录时间差)[八百章之第十八章]
计算当前记录和下一条记录之间的日期差 关键点在于如何获得下一条日期. mysql 和 sql server select x.*,DATEDIFF(day,x.HIREDATE,x.next_hd) ...
