antd/fusion表格增加圈选复制功能
背景介绍
我们存在着大量在PC页面通过表格看数据业务场景,表格又分为两种,一种是 antd / fusion 这种基于 dom 元素的表格,另一种是通过 canvas 绘制的类似 excel 的表格。
基于 dom 的表格功能丰富较为美观,能实现多表头、合并单元格和各种自定义渲染(如表格中渲染图形 / 按钮 / 进度条 / 单选框 / 输入框),以展示为主,不提供圈选、整列复制等功能。
canvas 绘制的类 excel 外表朴素更为实用,大量数据渲染不卡顿,操作类似 excel,能行/列选中,圈选、复制等功能。

两者使用场景有所差异,各有利弊,但业务方不希望一套系统中出现两种类型的交互,期望能将两种表格的优缺点进行融合,在美观的dom表格中增加圈选、复制的功能。
圈选效果
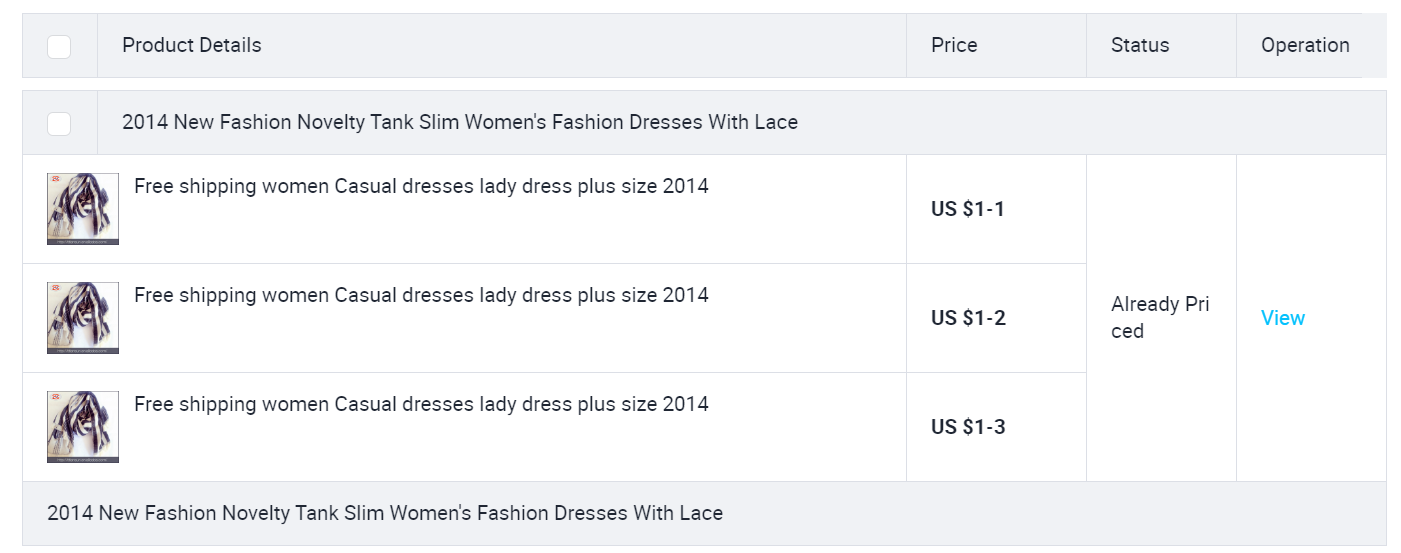
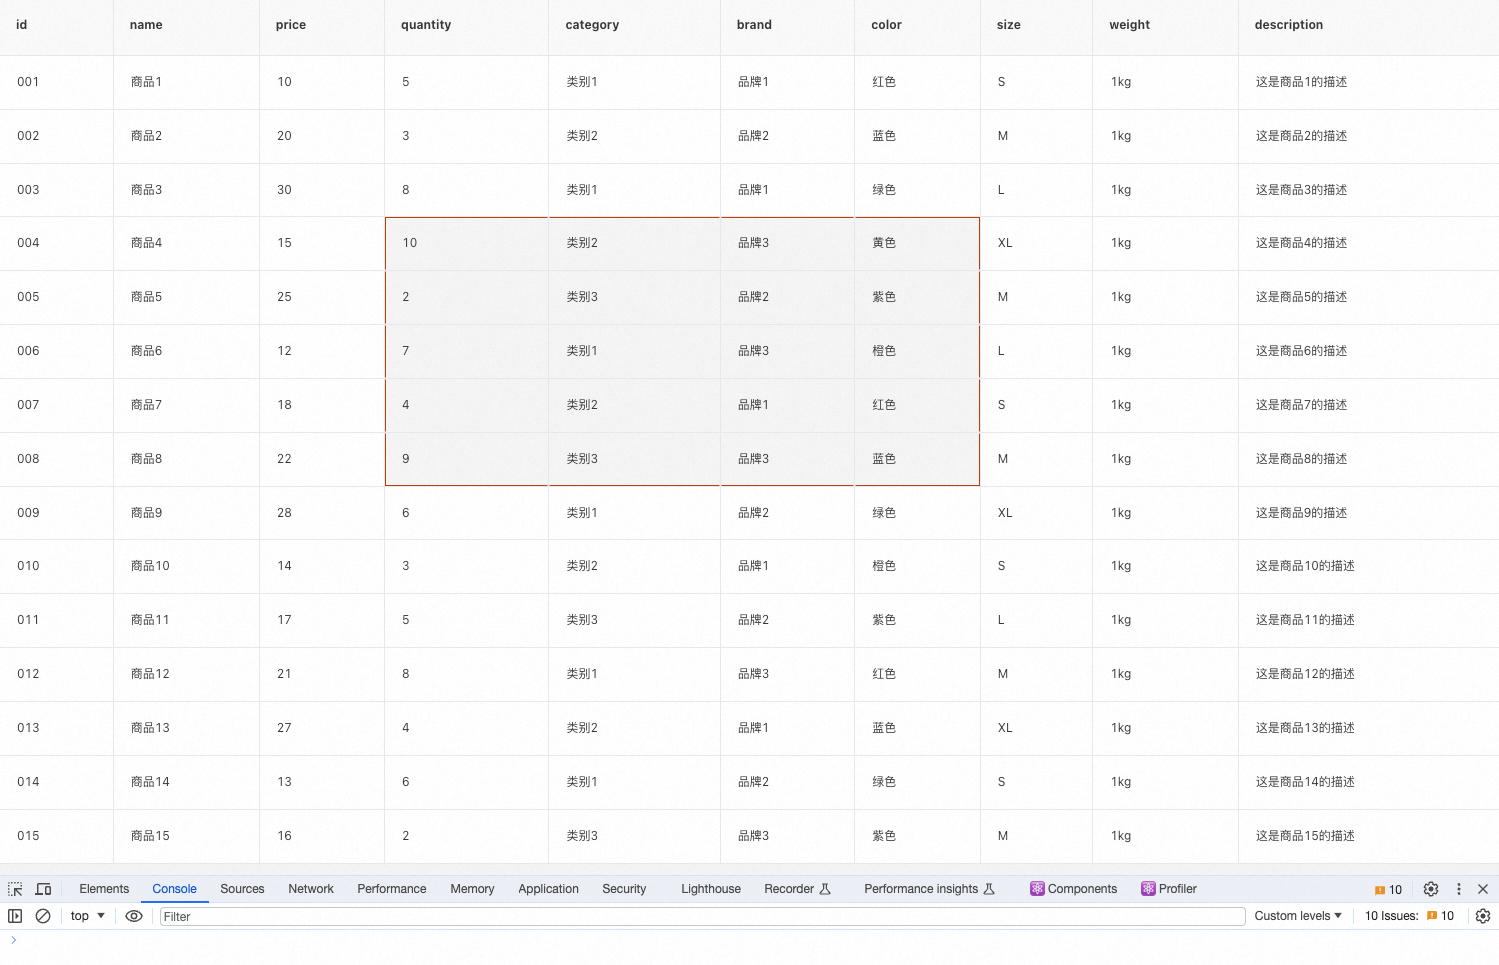
业务方所期望的圈选效果和excel类似,鼠标按下即选中元素,然后滑动鼠标,鼠标所经过形成的四边形就是选中区域,此时鼠标右键点击复制按钮,或者键盘按下 ctrl + c 复制文本。
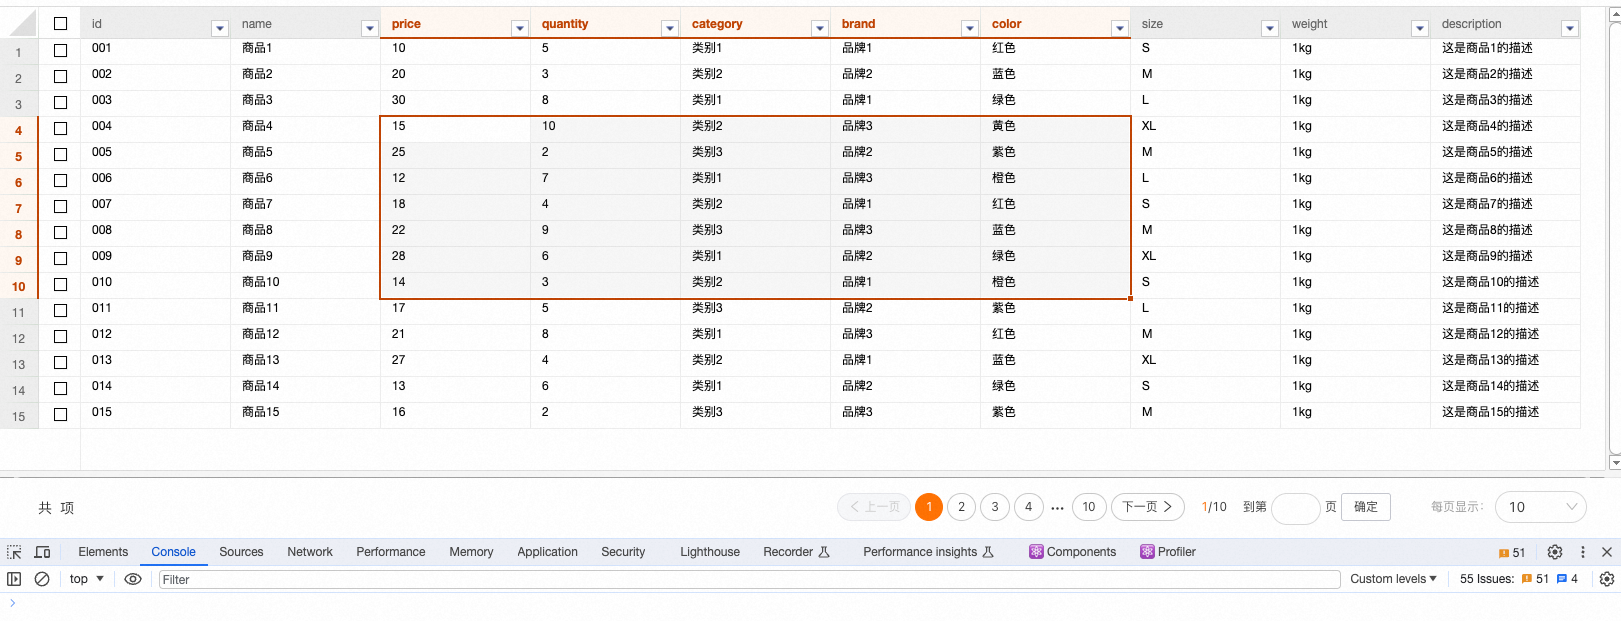
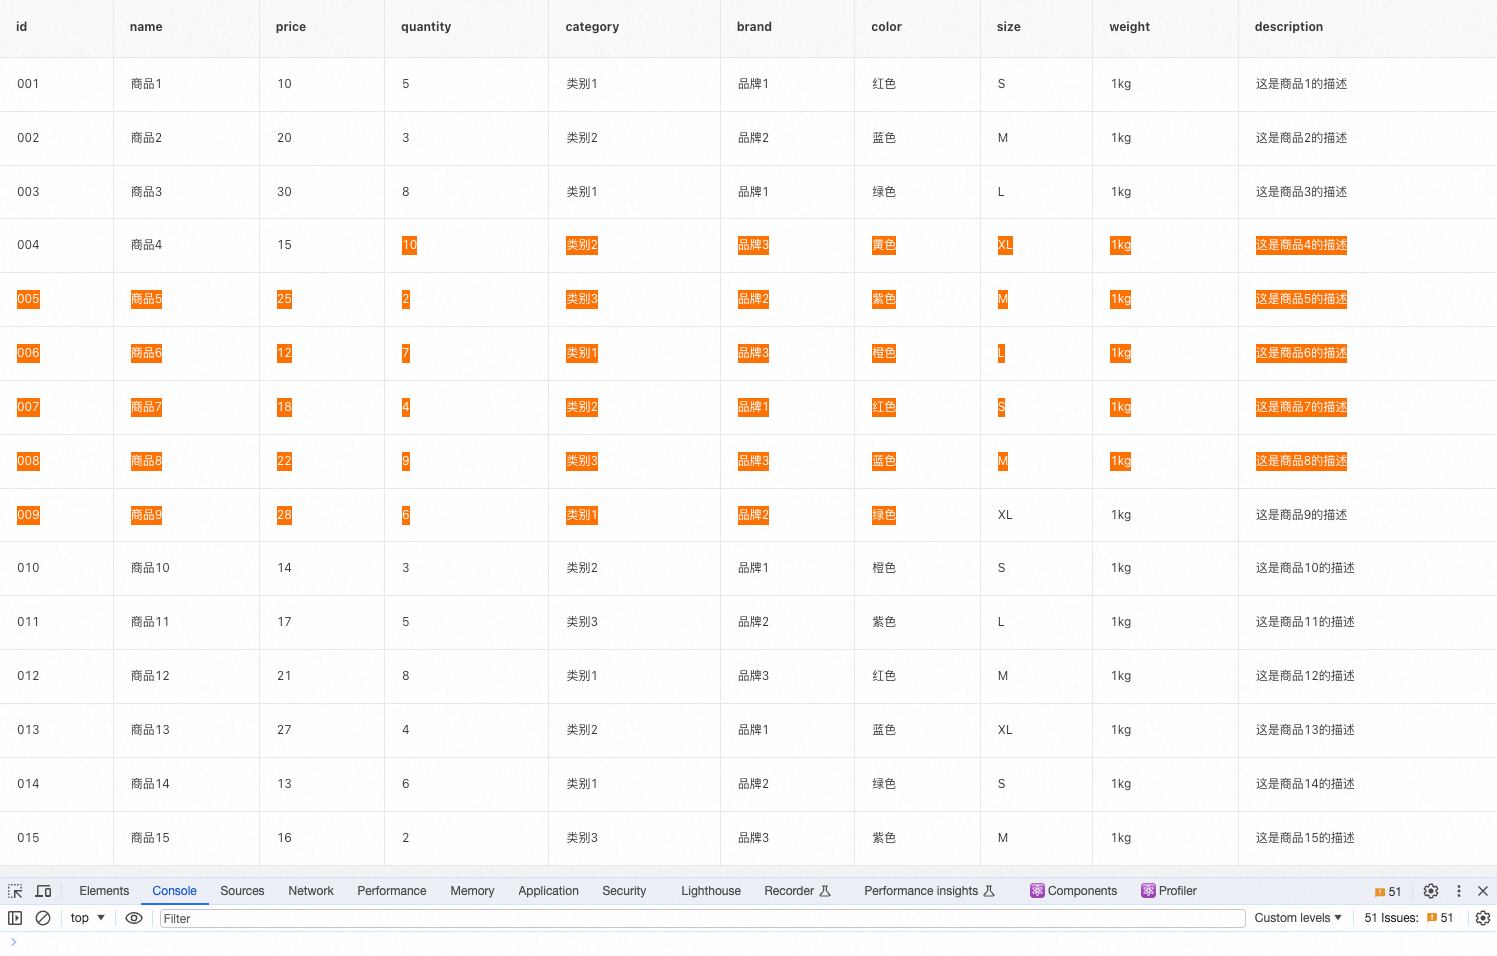
而dom表格经过如上操作,会把一整行数据都选上,不符合业务同学的使用预期。
实现过程
去除默认样式
我们需要自行定义鼠标事件、元素样式,需要先将无用的默认样式清除,包括上图中的 hover 和选中元素的背景色。
- 禁用表格本身的鼠标点击选择功能,设置css,userSelect: none
<Table style={{ userSelect: 'none' }} ></Table>
- 去除 hover 样式(这里使用的是 fusion 组件)
.next-table-row:hover {

  background-color: transparent !important;

}
鼠标按下,记录选中元素
为表格绑定鼠标按键时触发事件 mousedown。
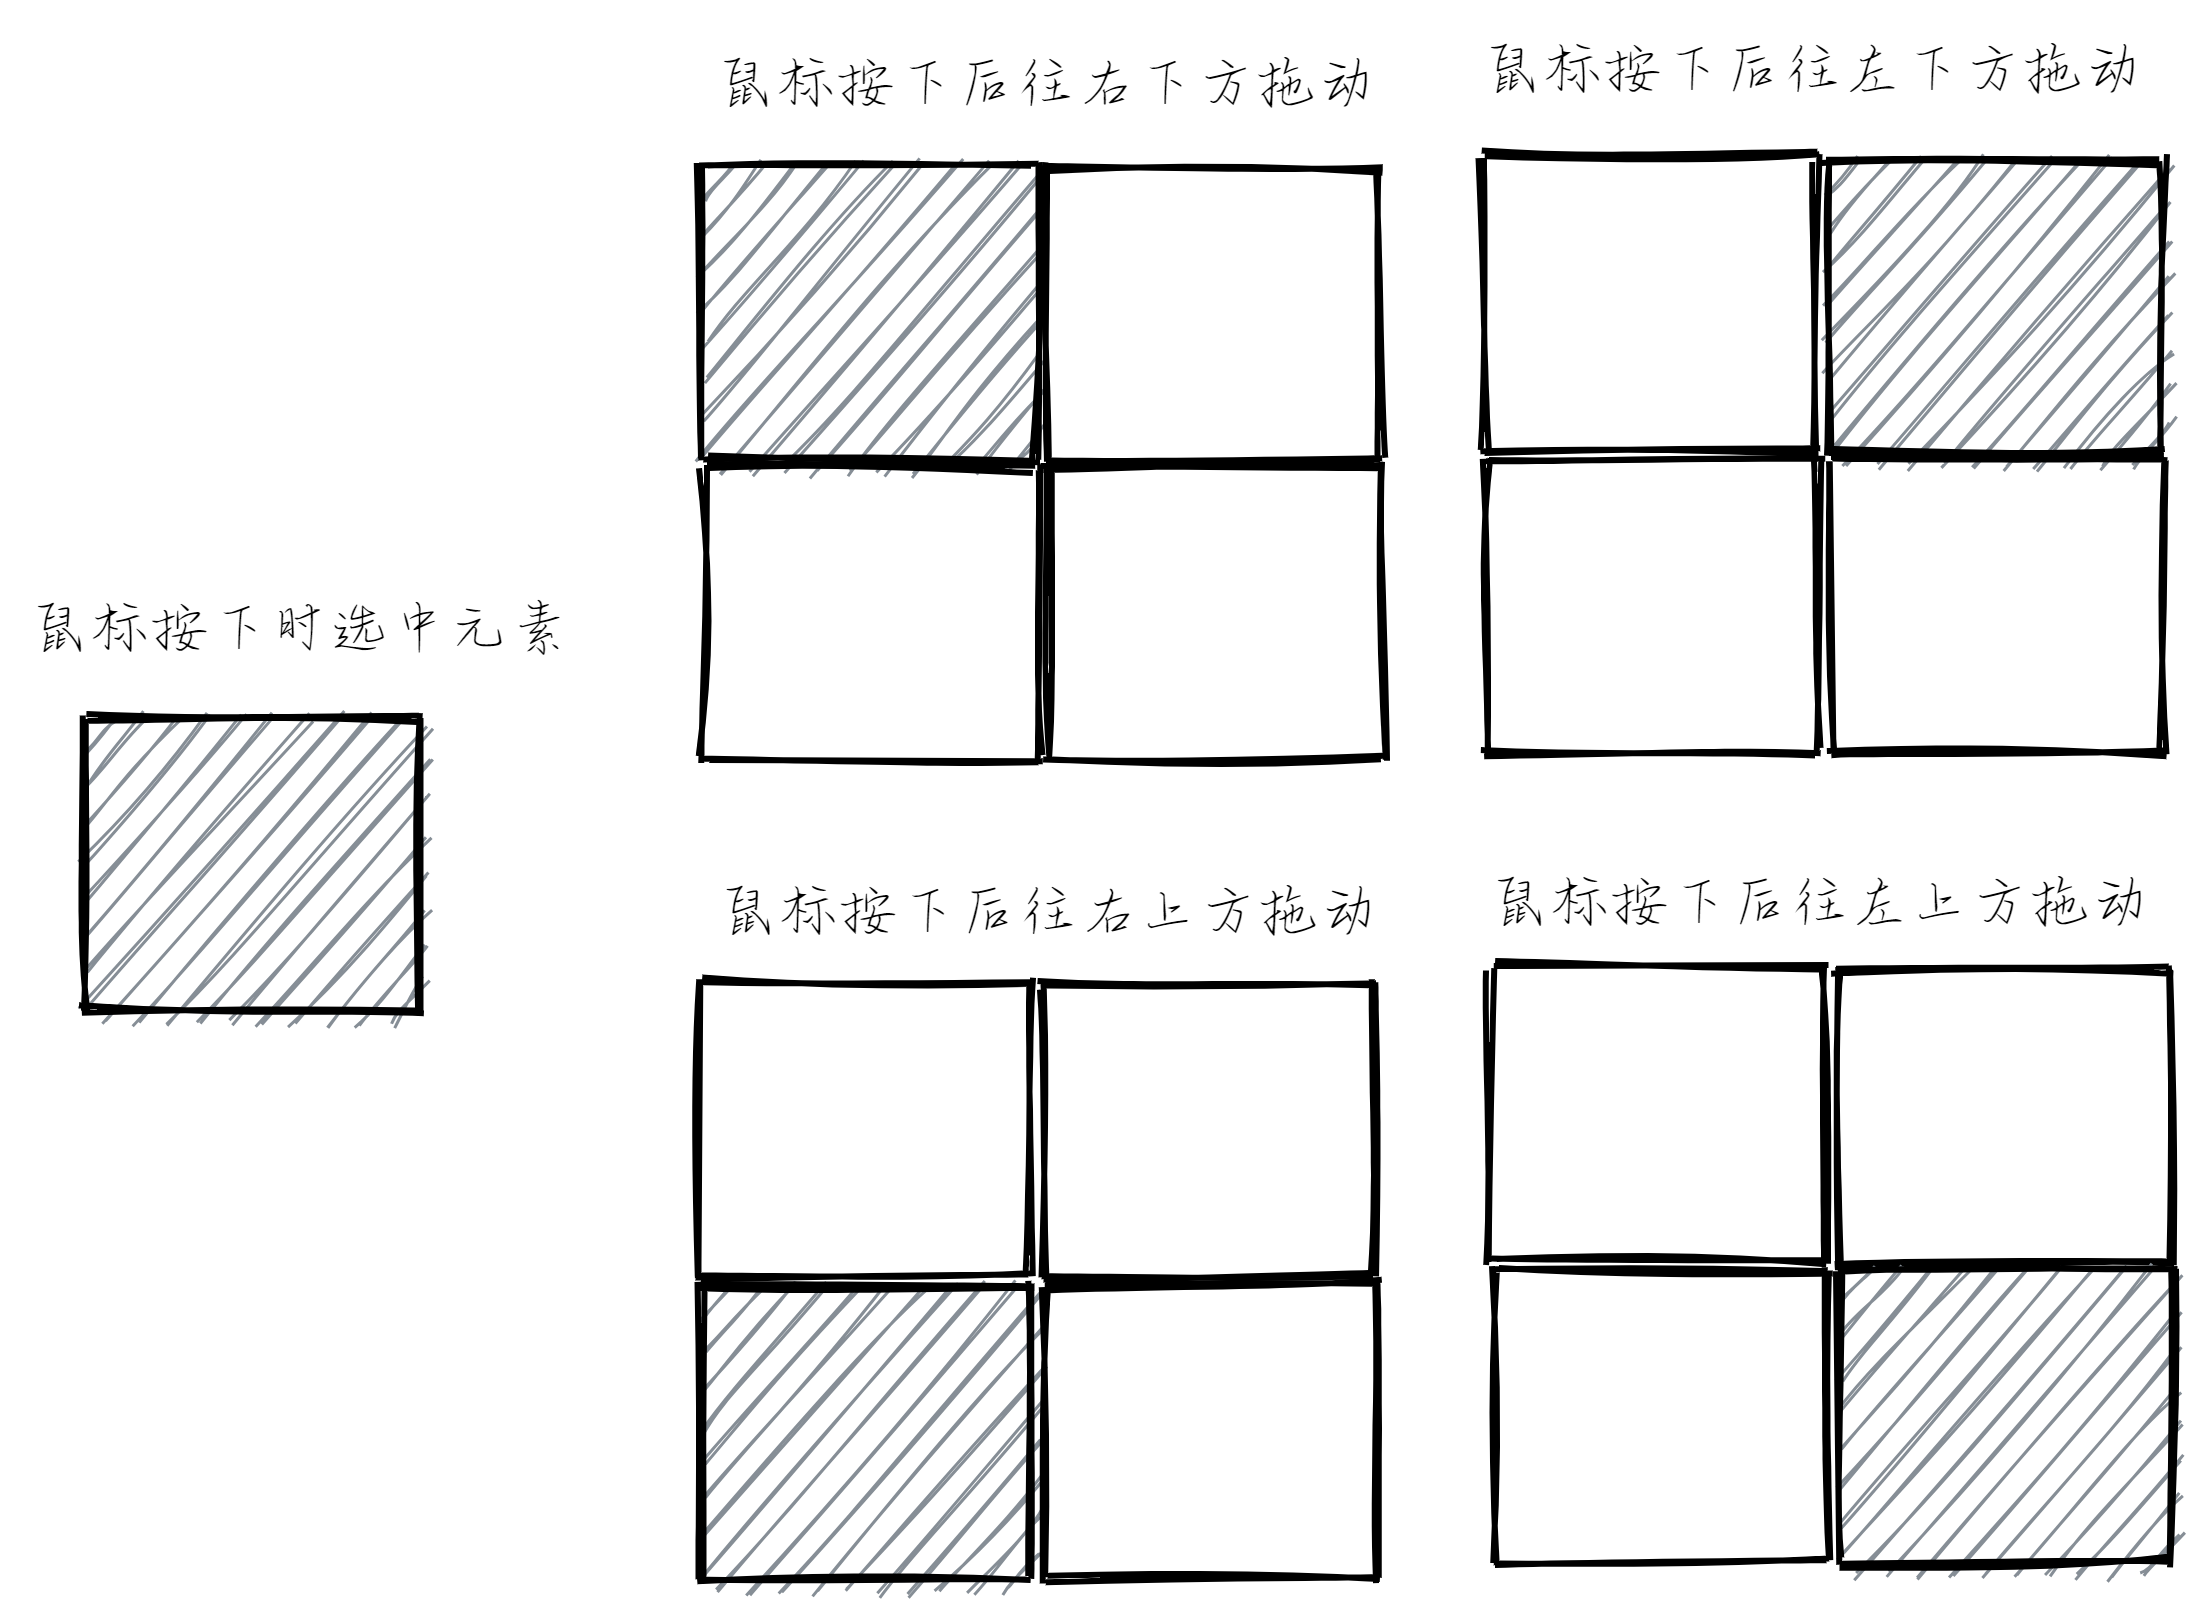
当鼠标按下时,这个元素就是中心元素,无论是向哪个方向旋转,所形成的区域一定会包含初始选中的元素。
getBoundingClientRect() 用于获得页面中某个元素的上下左右分别相对浏览器视窗的位置。
const onMouseDown = (event) => {

  const rect = event.target.getBoundingClientRect();

  // funsion 判断点击是否为表头元素,为否时才继续后面的逻辑。antd 不需要判断,因为点击表头不会触发该事件

  const isHeaderNode = event.target?.parentNode?.getAttribute('class')?.indexOf('next-table-header-node') > -1;

  if (isHeaderNode) return;

  originDir = {

    top: rect.top,

    left: rect.left,

    right: rect.right,

    bottom: rect.bottom,

  };

  // 渲染

  renderNodes(originDir);

};

<Table style={{ userSelect: 'none' }} onMouseDown={onMouseDown}></Table>
鼠标滑过
为表格绑定鼠标滑过时触发事件 mousemove。
根据滑动元素的上下左右距离与鼠标按下时的位置进行判断,圈选元素存在四个方向,以第一次选中的元素为中心位置。滑动时元素位于鼠标按下的右下、左下、右上、左上方,根据不同的情况来设置四个角的方位。
const onMouseMove = (event) => {

  if (!originDir.top) return;

  const rect = event.target.getBoundingClientRect();

  let coordinates = {};

  // 鼠标按下后往右下方拖动

  if (

    rect.top <= originDir.top &&

    rect.left <= originDir.left &&

    rect.right <= originDir.left &&

    rect.bottom <= originDir.top

  ) {

    coordinates = {

      top: rect.top,

      left: rect.left,

      right: originDir.right,

      bottom: originDir.bottom,

    };

  }

  // 鼠标按下后往左下方拖动

  if (

    rect.top >= originDir.top &&

    rect.left <= originDir.left &&

    rect.right <= originDir.right &&

    rect.bottom >= originDir.bottom

  ) {

    coordinates = {

      top: originDir.top,

      left: rect.left,

      right: originDir.right,

      bottom: rect.bottom,

    };

  }

// 鼠标按下后往右上方拖动

   if (

    rect.top <= originDir.top &&

    rect.left >= originDir.left &&

    rect.right >= originDir.right &&

    rect.bottom <= originDir.bottom

    ) {

     coordinates = {

        top: rect.top,

        left: originDir.left,

        right: rect.right,

        bottom: originDir.bottom,

    };

}

  // 鼠标按下后往左上方拖动

  if (

    rect.top >= originDir.top &&

    rect.left >= originDir.left &&

    rect.right >= originDir.right &&

    rect.bottom >= originDir.bottom

  ) {

    coordinates = {

      top: originDir.top,

      left: originDir.left,

      right: rect.right,

      bottom: rect.bottom,

    };

  }

  renderNodes(coordinates);

};

<Table

    style={{ userSelect: 'none' }}

    onMouseDown={onMouseDown}

    onMouseMove={onMouseMove}

></Table>
渲染/清除样式
遍历表格中 dom 元素,如果该元素在圈选的区域内,为其添加选中的背景色,再为四边形区域增加边框。
这里无论是直接设置 style 还是添加 classname 都不是很好。直接添加 classname 时,antd 会在 hover 操作时重置 classname,原来设置的 classname 会被覆盖。直接设置 style 可能存在和其他设置冲突的情况,并且最后获取所有圈选元素时比较麻烦。
以上两种方法都尝试过,最后选择了直接往 dom 元素上面添加属性,分别用5个属性保存是否圈选,上下左右边框,这里没有进行合并是因为一个dom元素可能同时存在这五个属性。
const renderNodes = (coordinates) => {

  const nodes = document.querySelectorAll('.next-table-cell-wrapper');

  nodes.forEach((item) => {

    const target = item?.getBoundingClientRect();

    clearStyle(item);

    if (

      target?.top >= coordinates.top &&

      target?.right <= coordinates.right &&

      target?.left >= coordinates.left &&

      target?.bottom <= coordinates.bottom

    ) {

      item.setAttribute('data-brush', 'true');

      if (target.top === coordinates.top) {

        item.setAttribute('brush-border-top', 'true');

      }

      if (target.right === coordinates.right) {

        item.setAttribute('brush-border-right', 'true');

      }

      if (target.left === coordinates.left) {

        item.setAttribute('brush-border-left', 'true');

      }

      if (target.bottom === coordinates.bottom) {

        item.setAttribute('brush-border-bottom', 'true');

      }

    }

  });

};

const clearStyle = (item) => {

  item.hasAttribute('data-brush') && item.removeAttribute('data-brush');

  item.hasAttribute('brush-border-top') && item.removeAttribute('brush-border-top');

  item.hasAttribute('brush-border-right') && item.removeAttribute('brush-border-right');

  item.hasAttribute('brush-border-left') && item.removeAttribute('brush-border-left');

  item.hasAttribute('brush-border-bottom') && item.removeAttribute('brush-border-bottom');

};
使用 fusion 的 table 需要为每一个元素添加上透明的边框,不然会出现布局抖动的情况。(antd 不用)
 /* 为解决设置样式抖动而设置 */

 .next-table td .next-table-cell-wrapper {

  border: 1px solid transparent;

 }

[brush-border-top="true"] {

  border-top: 1px solid #b93d06 !important;

}

[brush-border-right="true"] {

  border-right: 1px solid #b93d06 !important;

}

[brush-border-left="true"] {

  border-left: 1px solid #b93d06 !important;

}

[brush-border-bottom="true"] {

  border-bottom: 1px solid #b93d06 !important;

}

[data-brush="true"] {

  background-color: #f5f5f5 !important;

}

.next-table-row:hover {

  background-color: transparent !important;

}
鼠标松开
为表格绑定鼠标松开时触发事件 mouseup。
从鼠标按下,到滑动,最后松开,是一整个圈选流程,在鼠标按下时保存了初始的方位,滑动时判断是否存在方位再进行计算,松开时将初始方位置空。
const onMouseUp = () => {

  originDir = {};

};

 <Table

    style={{ userSelect: 'none' }}

    onMouseDown={onMouseDown}

    onMouseMove={onMouseMove}

    onMouseUp={onMouseUp}

    ></Table>
到这一步,就已经实现了鼠标圈选功能。
复制功能
表格圈选的交互效果其实是为复制功能做准备。
鼠标右键复制
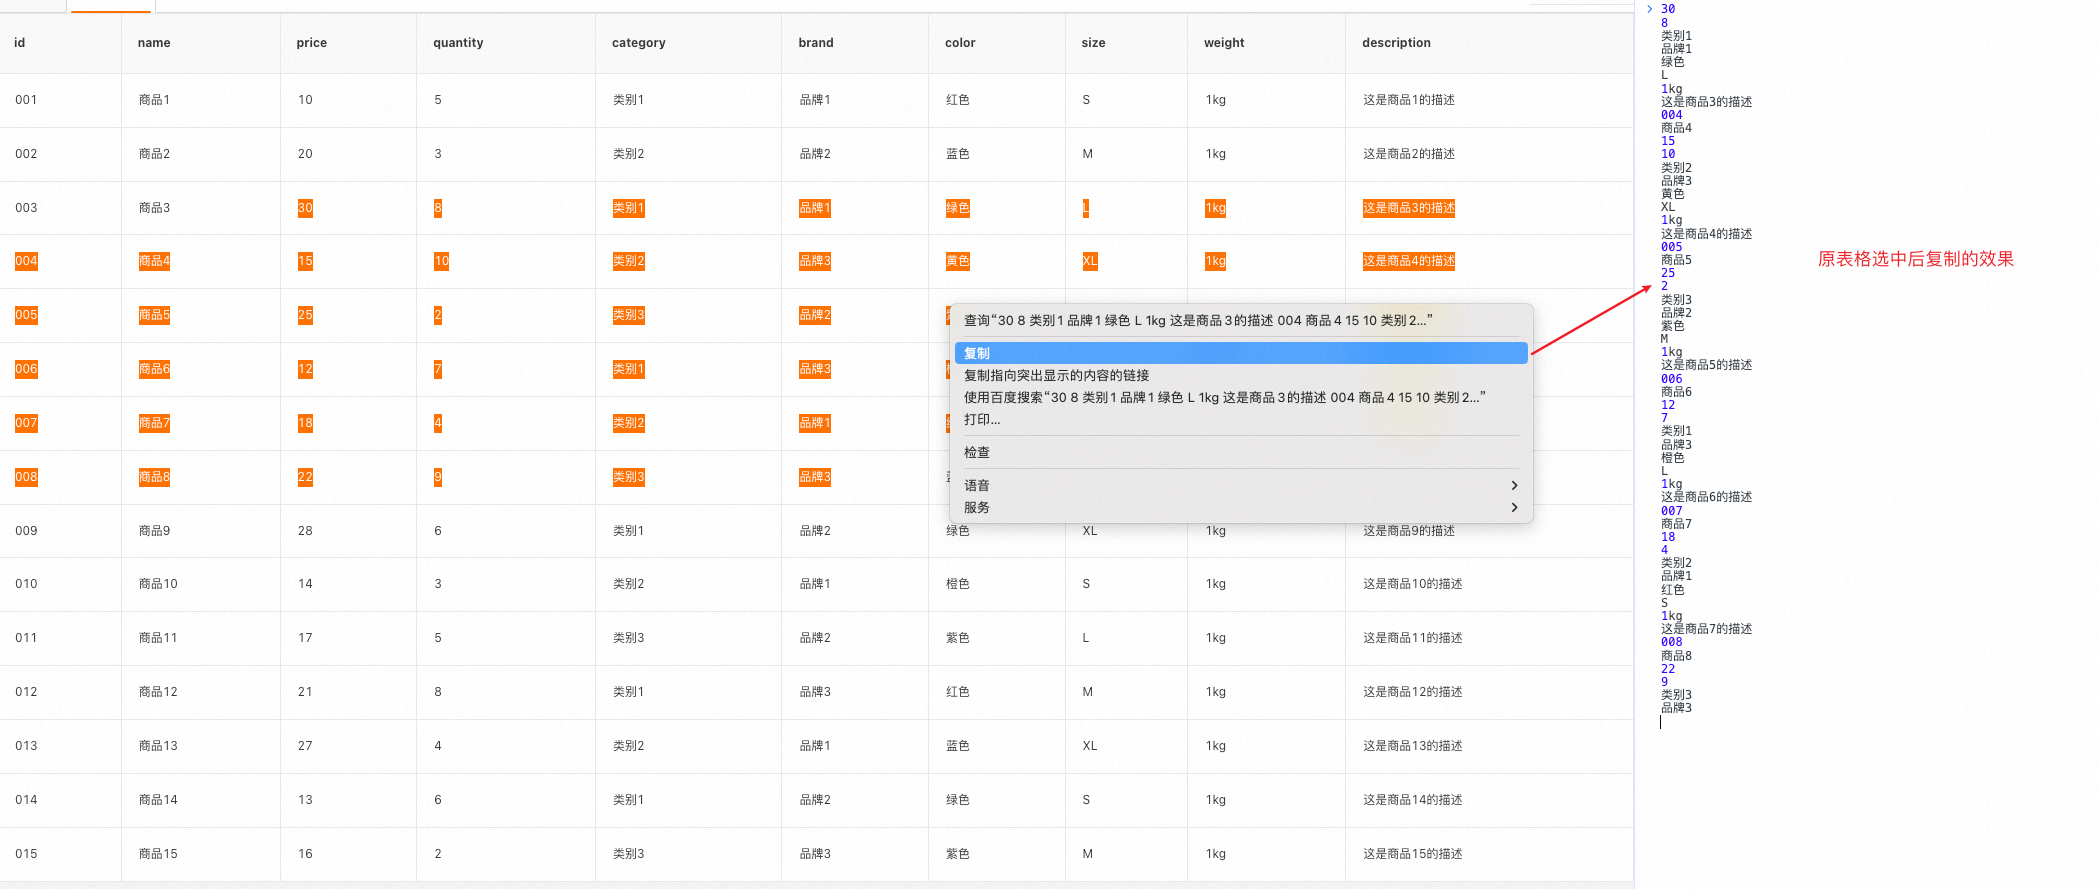
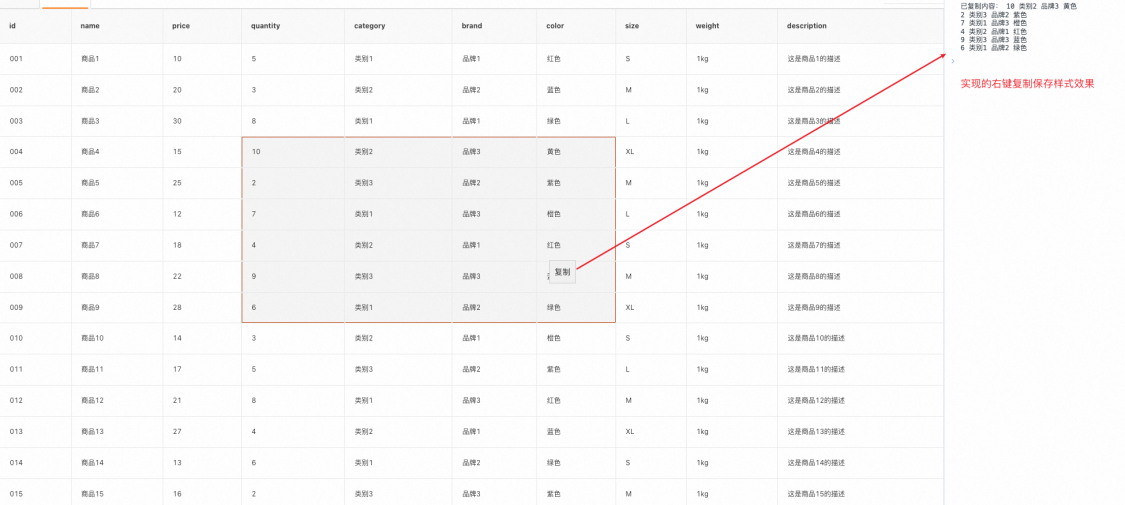
原表格在选中元素时鼠标右键会出现【复制】按钮,点击后复制的效果是图中圈选到的元素每一个都换行展示,圈选行为不能满足使用需求,复制的内容也无法按照页面中展示的行列格式。
而当我们实现圈选功能之后,因为使用 css 属性 "user-select: none" 禁止用户选择文本,此时鼠标右键已经不会出现复制按钮。
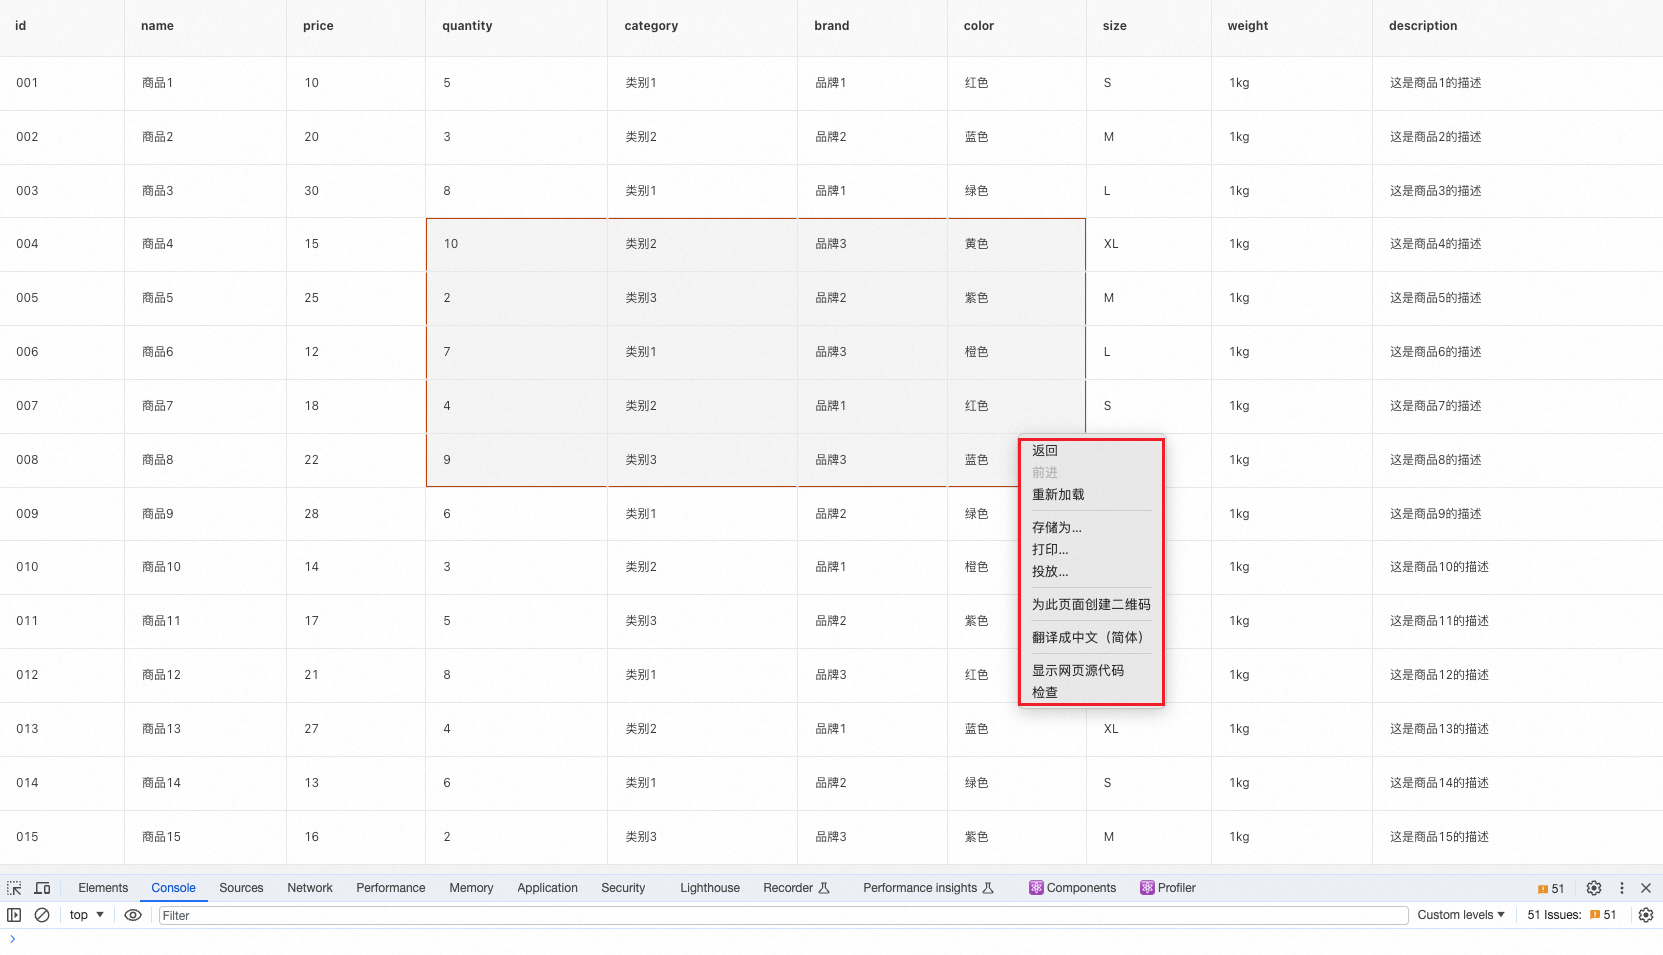
为了实现鼠标右键出现复制按钮,我们需要覆盖原鼠标右键事件,自定义复制功能。
1、为表格绑定鼠标右键事件 contextMenu
<Table

    style={{ userSelect: 'none' }}

    onMouseDown={onMouseDown}

    onMouseMove={onMouseMove}

    onMouseUp={onMouseUp}

    onContextMenu={onContextMenu}

></Table>
2、创建一个包含复制按钮的自定义上下文菜单
<div id="contextMenu" className="context-menu" style={{ cursor: 'pointer' }}>

<div onClick={onClickCopy}>复制</div>

</div>
3、阻止默认的右键菜单弹出,将自定义上下文菜单添加到页面中,并定位在鼠标右键点击的位置。
const onContextMenu = (event) => {

  event.preventDefault(); // 阻止默认右键菜单弹出

  const contextMenu = document.getElementById('contextMenu');

  // 定位上下文菜单的位置

  contextMenu.style.left = `${event.clientX}px`;

  contextMenu.style.top = `${event.clientY}px`;

  // 显示上下文菜单

  contextMenu.style.display = 'block';

};
这里复制按钮没有调整样式,可根据自己项目情况进行一些美化。
4、点击复制按钮时,保存当前行列格式执行复制操作。
复制仍然保留表格的样式,这里想了很久,一直在想通过保存dom元素的样式来实现,这种方案存在两个问题,一是保存html样式的api,document.execCommand('copy') 不被浏览器支持,二是表格元素都是行内元素,即使复制了样式,也和页面上看到的布局不一样。
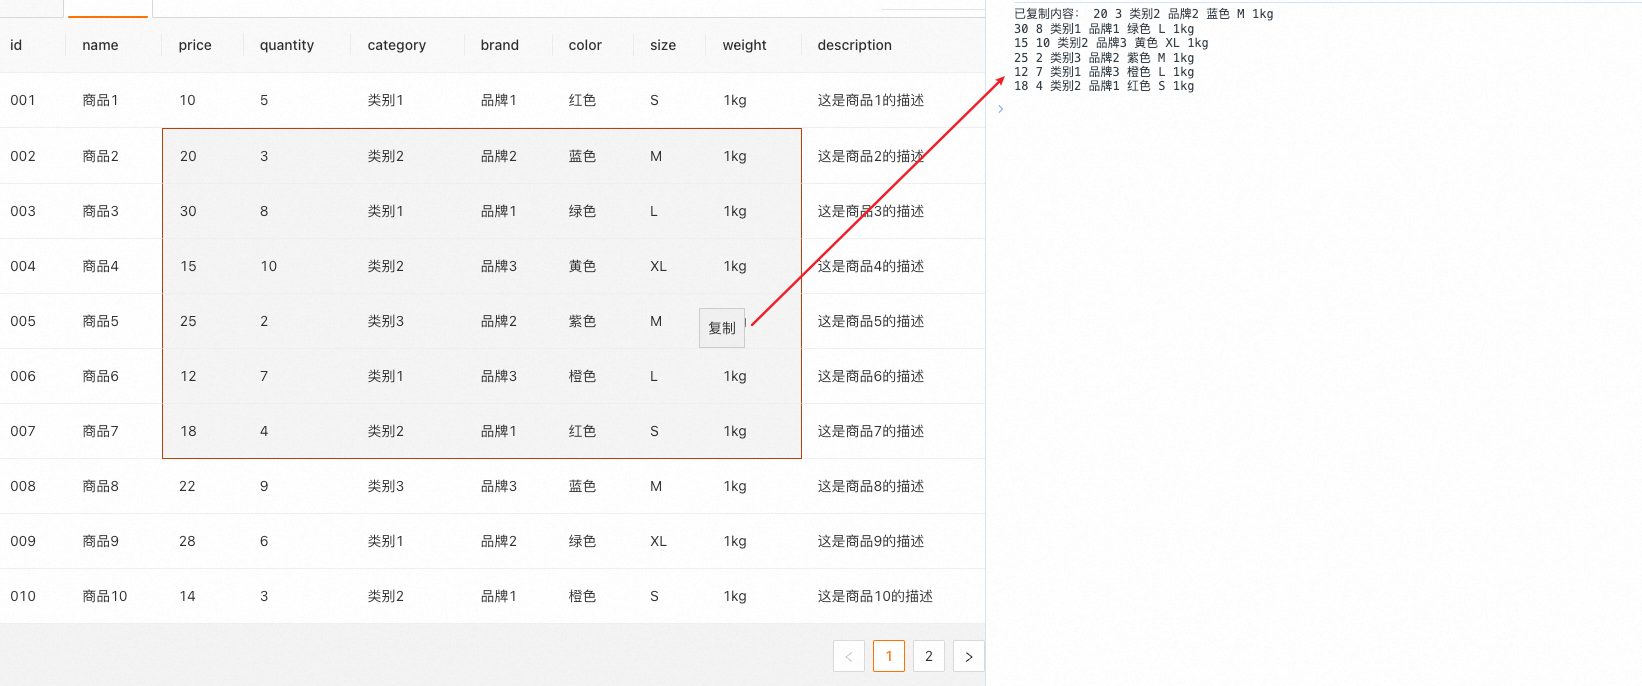
最后采取的方案还是自己对是否换行进行处理,遍历元素时判断当前元素的 top 属性和下一个点距离,如果相同则添加空字符串,不同则添加换行符 \n 。
const onClickCopy = () => {

    const contextMenu = document.getElementById('contextMenu');

    const copyableElements = document.querySelectorAll('[data-brush=true]');

    // 遍历保存文本

    let copiedContent = '';

    copyableElements.forEach((element, index) => {

       let separator = ' ';

       if (index < copyableElements.length - 1) {

          const next = copyableElements?.[index + 1];

          if (next?.getBoundingClientRect().top !== element.getBoundingClientRect().top) {

              separator = '\n';

           }

        }

        copiedContent += `${element.innerHTML}${separator}`;

    });

    // 执行复制操作

    navigator.clipboard.writeText(copiedContent).then(() => {

       console.log('已复制内容:', copiedContent);

    }) .catch((error) => {

        console.error('复制失败:', error);

    });

    // 隐藏上下文菜单

    contextMenu.style.display = 'none';

};
5、对鼠标按下事件 onMouseDown 的处理
- 鼠标点击右键也会触发 onMouseDown ,这时会造成选中区域错乱,需要通过 event.button 判断当前事件触发的鼠标位置。
- 鼠标右键后如果没有点击复制按钮而是滑走或者使用鼠标左键选中,这时候相当于执行取消复制操作,复制按钮的上下文需要清除。
const onMouseDown = (event) => {

  //  0:表示鼠标左键。2:表示鼠标右键。1:表示鼠标中键或滚轮按钮

  if (event.button !== 0) return;

  // 隐藏复制按钮

  const contextMenu = document.getElementById('contextMenu');

  contextMenu.style.display = 'none';

};
到这里,就已经实现了圈选鼠标右键复制的功能。
ctrl+s / command+s 复制
使用 event.ctrlKey 来检查 Ctrl 键是否按下,使用 event.metaKey 来检查 Command 键是否按下,并使用 event.key 来检查按下的键是否是 c 键。
useEffect(() => {

    const clickSave = (event) => {

      if ((event.ctrlKey || event.metaKey) && event.key === 'c') {

        onClickCopy();

        event.preventDefault(); // 阻止默认的保存操作

      }

    };

    document.addEventListener('keydown', clickSave);

    return () => {

      document.removeEventListener('keydown', clickSave);

    };

}, []);
antd 也可以使用
以上功能是在 fusion design 中实现的,在 antd 中也可以使用,语法稍有不同。
表格中鼠标事件需要绑定在 onRow 函数中
 <Table

  style={{ userSelect: 'none' }}

  onRow={() => {

    return {

      onContextMenu,

      onMouseDown,

      onMouseMove,

      onMouseUp,

    };

  }}

>
获取所有表格 dom 元素的类名替换一下
const nodes = document.querySelectorAll('.ant-table-cell');
覆盖表格 hover 时样式
 .ant-table-cell-row-hover {

    background: transparent;

  }

  .ant-table-wrapper .ant-table .ant-table-tbody > tr.ant-table-row:hover > td,

  .ant-table-wrapper .ant-table .ant-table-tbody > tr > td.ant-table-cell-row-hover {

    background: transparent;

  }
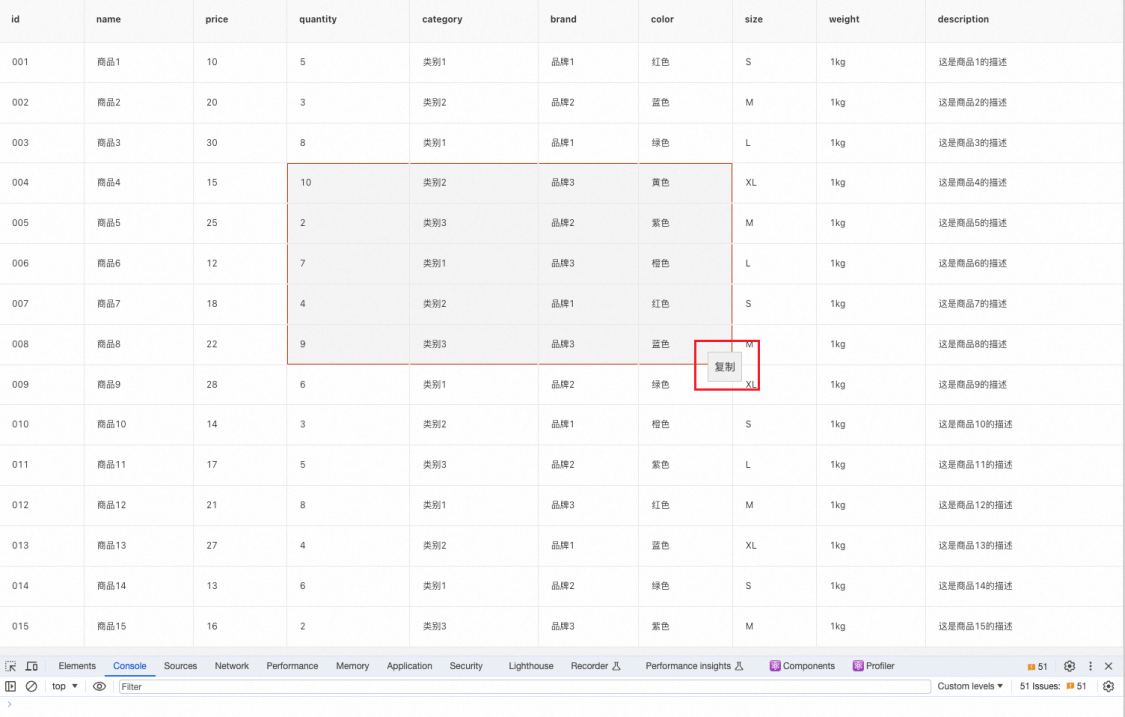
实现效果是这样的
完整代码
完整代码在这里 table-brush-copy,包括 fusion design 和 ant design 两个版本。
总结
表格圈选复制功能的实现主要是以下五步
- mousedown 按下鼠标,记录初始坐标
- mousemove 滑动鼠标,计算所形成的四边形区域
- mouseup 松开鼠标,清空初始坐标
- contextmenu 自定义鼠标右键事件,定位上下文事件
- keydown 监听键盘按下位置,判断是否为复制操作
集合了较多的鼠标、键盘事件,以及 javascript 获取属性、元素。
antd/fusion表格增加圈选复制功能的更多相关文章
- React使用antd Table生成层级多选组件
一.需求 用户对不同的应用需要有不同的权限,用户一般和角色关联在一起,新建角色的时候会选择该角色对应的应用,然后对应用分配权限.于是写了一种实现的方式.首先应用是一个二级树,一级表示的是应用分组,二级 ...
- C# asp Aspose.Cells 教程,包含增加勾选框,单元格,字体设置
1,引用Aspose.Cells dll 2,using Aspose.Cells; 3, Workbook excel = new Workbook(); string strFilePath = ...
- Silverlight RadChart :创建十字定位&圈选
//图像加载 void Chart_Loaded(object sender, RoutedEventArgs e) { var plotAreaPanel = this.radChart.Defau ...
- JS中表格的全选和删除要注意的问题
在项目开发中,由于刚刚开始做项目,我对js还不是很精通,所以在用js对表格的全选和删除中遇到了不少问题,后来通过查找资料解决了,之后总结了一下关于js表格的全选和删除出现的一些问题,希望能帮助到大家. ...
- 基于jQuery表格增加删除代码示例
<!doctype html> <html lang="en"> <head> <meta charset="UTF-8&quo ...
- angular实现表格的全选、单选、部分删除以及全部删除
昨天自己写了一小段js,在全选的时候有点儿小坑,然后,整理了一下.今天把它贴出来,希望以后还记得. 大家也可以去github上查看或下载:https://github.com/dreamITGirl/ ...
- Redis总结(五)缓存雪崩和缓存穿透等问题 Web API系列(三)统一异常处理 C#总结(一)AutoResetEvent的使用介绍(用AutoResetEvent实现同步) C#总结(二)事件Event 介绍总结 C#总结(三)DataGridView增加全选列 Web API系列(二)接口安全和参数校验 RabbitMQ学习系列(六): RabbitMQ 高可用集群
Redis总结(五)缓存雪崩和缓存穿透等问题 前面讲过一些redis 缓存的使用和数据持久化.感兴趣的朋友可以看看之前的文章,http://www.cnblogs.com/zhangweizhon ...
- react中antd的表格自定义展开
antd的表格官方案例中给出的都是固定的图表展开,在做需求的时候,需要使用点击最后一列,然后出现展开内容,实现效果图如下 在最开始设置一个全局变量 const keys = [];在设置列参数的函数中 ...
- 向DataGrid数据表格增加查询搜索框
向DataGrid数据表格增加查询搜索框 效果如下: js代码: $(function(){ var dg = $('#dg').datagrid({ url:"${pageContext. ...
- EasyUi datagrid列表增加复选框
本文为博主原创,未经允许不得转载 1.增加复选框列 { field: 'oid', title: '<input type=\"checkbox\" name ...
随机推荐
- day09-SpringCloud Sleuth+Zipkin-链路追踪
SpringCloud Sleuth+Zipkin-链路追踪 官网:spring-cloud/spring-cloud-sleuth: Distributed tracing for spring c ...
- 南洋才女,德艺双馨,孙燕姿本尊回应AI孙燕姿(基于Sadtalker/Python3.10)
孙燕姿果然不愧是孙燕姿,不愧为南洋理工大学的高材生,近日她在个人官方媒体博客上写了一篇英文版的长文,正式回应现在满城风雨的"AI孙燕姿"现象,流行天后展示了超人一等的智识水平,行文 ...
- 高并发场景下,6种解决SimpleDateFormat类的线程安全问题方法
摘要:解决SimpleDateFormat类在高并发场景下的线程安全问题可以有多种方式,这里,就列举几个常用的方式供参考. 本文分享自华为云社区<[高并发]更正SimpleDateFormat类 ...
- Java版人脸跟踪三部曲之一:极速体验
欢迎访问我的GitHub 这里分类和汇总了欣宸的全部原创(含配套源码):https://github.com/zq2599/blog_demos 关于<Java版人脸跟踪三部曲>系列 -& ...
- Send files or execute commands over SSH
1. 配置 SSH Server ----公钥和私钥的配置---- 假设有两台服务器,A是Jenkins构建服务器,B是应用服务器,A构建好应用之后,将包传到B进行发布. 在A上面执行 ssh-key ...
- 解决phpMyAdmin点击"结构"列页面失去响应的问题
最后更新时间 2017-12-05. 我的环境: phpMyAdmin:4.0.4.1 PHP:5.6.11 第一步 关闭自动更新 打开 ./libraries 目录下的 vendor_config. ...
- MIT 6.5840 Raft Implementation(2A, Leader Election)
Raft实现思路+细节 2A 任务分解 总体来说,2A中主要的任务就是选出领导人,在选出领导人的时候,我们要遵循下图. 在2A中,由于并没有出现日志复制,所以我们只需要考察两者的任期是否相等,以及接收 ...
- Centos7中Oracle占用CPU过高(解决方案)
Centos7中Oracle占用CPU过高(解决方案) 前言: 99%的问题几乎都是SQL的问题,一般SQL可能会出现以下几种情况: 相关SQL搜索条件没有加索引 索引失效 联合查询过多 数据量过大 ...
- 深度系统安装wine
step1: 输入命令: sudo dpkg --add-architecture i386 step2: 1.切换成管理员权限: sudo su 2.打开源文件 vi /etc/apt/source ...
- Android Studio Giraffe安装与gradle配置
本机环境:win10专业版,64位,16G内存. 原先用的AS2.2,是很早之前在看<第一行代码Android(第2版)>的时候,按书里的链接下载安装的,也不用怎么配置.(PS:第一行代码 ...