那就用pthon来写个跳板机吧
1、需求
命令行模式的堡垒机简单需求:
- 管理员为用户在服务器上创建账号(将公钥放置服务器,或者使用用户名密码)
- 用户登陆堡垒机,输入堡垒机用户名密码,显示当前用户管理的服务器列表
- 用户选择服务器,并自动登陆
- 执行操作并同时将用户操作记录
2、程序设计
程序一:
1、后台管理
- 堡垒机上创建用户和密码(堡垒机root封装的类,UserProfile表)
- .bashrc
/usr/bin/python3 /data/bastion.py
exit
2、后台管理
- 服务器上创建用户和密码 或 公钥上传
- 服务器账号 -> 人 关联
程序二:
3、用户登录
说明:用户使用xsehll登陆的时候,触发登陆脚本例如:
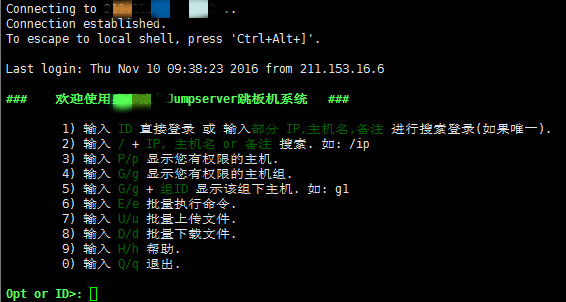
- ssh 堡垒机用户名@堡垒机IP
- 获取当前用户 os.environ['USER']
- 获取当前用户的主机列表
- 获取选中的主机下的所有用户
- 选择任何一个用户
3、实现思路
堡垒机执行流程:
- 管理员为用户在服务器上创建账号(将公钥放置服务器,或者使用用户名密码)
- 用户登陆堡垒机,输入堡垒机用户名密码,现实当前用户管理的服务器列表
- 用户选择服务器,并自动登陆
- 执行操作并同时将用户操作记录
注:配置.brashrc实现ssh登陆后自动执行脚本,如:/usr/bin/python /home/wupeiqi/menu.py
那么需要用到的点:
- 1、使用 ORM/Schema Type/SQL Expression Language/Engine/ConnectionPooling/Dialect 所有组件对数据进行操作。根据类创建对象,对象转换成SQL,执行SQL。
- 2、paramiko模块,基于SSH用于连接远程服务器并执行相关操作。
具体实现流程:
- 设计表机构
- 创建表结构
- 利用paramiko模块去实现跳板机底层的ssh连接并执行相关操作
- 将底层的连接封装成跳板机用户对指定主机组和用户的操作并记录日志
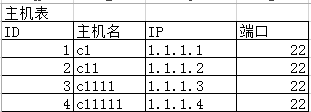
4、表结构设计
1、主机表
记录服务器主机名、IP、端口。
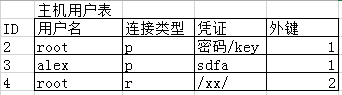
2、主机用户表
记录唯一ID号主机对于的用户名、连接方式、连接凭证。这里需要用外键关联一下主机表的ID。
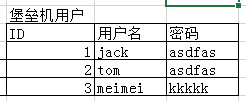
3、跳板机用户表
记录跳板机的用户名/密码。
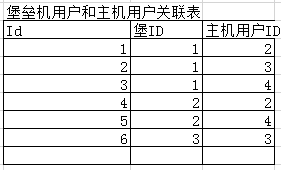
4、跳板机用户和主机用户关联表
记录跳板机用户和服务主机用户的对应关系。
5、日志记录表
记录跳板机用户的命令操作日志。

 #!/usr/bin/env python

 # -*- coding:utf-8 -*-

 from sqlalchemy import create_engine, and_, or_, func, Table

 from sqlalchemy.ext.declarative import declarative_base

 from sqlalchemy import Column, Integer, String, ForeignKey, UniqueConstraint, DateTime

 from sqlalchemy.orm import sessionmaker, relationship

 Base = declarative_base()  # 生成一个SqlORM 基类

 class Host(Base):

     __tablename__ = 'host'

     id = Column(Integer, primary_key=True, autoincrement=True)

     hostname = Column(String(64), unique=True, nullable=False)

     ip_addr = Column(String(128), unique=True, nullable=False)

     port = Column(Integer, default=22)

 class HostUser(Base):

     __tablename__ = 'host_user'

     id = Column(Integer, primary_key=True, autoincrement=True)

     username = Column(String(64), unique=True, nullable=False)

     AuthTypes = [

         ('p', 'SSH/Password'),

         ('r', 'SSH/KEY'),

     ]

     auth_type = Column(String(16))

     cert = Column(String(255))

     host_id = Column(Integer, ForeignKey('host.id'))

     __table_args__ = (

         UniqueConstraint('host_id', 'username', name='_host_username_uc'),

     )

 class Group(Base):

     __tablename__ = 'group'

     id = Column(Integer, primary_key=True, autoincrement=True)

     name = Column(String(64), unique=True, nullable=False)

 class UserProfile(Base):

     __tablename__ = 'user_profile'

     id = Column(Integer, primary_key=True, autoincrement=True)

     username = Column(String(64), unique=True, nullable=False)

     password = Column(String(255), nullable=False)

 class Group2UserProfile(Base):

     __tablename__ = 'group_2_user_profile'

     id = Column(Integer, primary_key=True, autoincrement=True)

     user_profile_id = Column(Integer, ForeignKey('user_profile.id'))

     group_id = Column(Integer, ForeignKey('group.id'))

     __table_args__ = (

         UniqueConstraint('user_profile_id', 'group_id', name='ux_user_group'),

     )

 class Group2HostUser(Base):

     __tablename__ = 'group_2_host_user'

     id = Column(Integer, primary_key=True, autoincrement=True)

     host_user_id = Column(Integer, ForeignKey('host_user.id'))

     group_id = Column(Integer, ForeignKey('group.id'))

     __table_args__ = (

         UniqueConstraint('group_id', 'host_user_id', name='ux_group_host_user'),

     )

 class UserProfile2HostUser(Base):

     __tablename__ = 'user_profile_2_host_user'

     id = Column(Integer, primary_key=True, autoincrement=True)

     host_user_id = Column(Integer, ForeignKey('host_user.id'))

     user_profile_id = Column(Integer, ForeignKey('user_profile.id'))

     __table_args__ = (

         UniqueConstraint('user_profile_id', 'host_user_id', name='ux_user_host_user'),

     )

 class AuditLog(Base):

     __tablename__ = 'audit_log'

     id = Column(Integer, primary_key=True, autoincrement=True)

     action_choices2 = [

         (u'cmd', u'CMD'),

         (u'login', u'Login'),

         (u'logout', u'Logout'),

     ]

     action_type = Column(String(16))

     cmd = Column(String(255))

     date = Column(DateTime)

     user_profile_id = Column(Integer, ForeignKey('user_profile.id'))

     host_user_id = Column(Integer, ForeignKey('host_user.id'))

 表结构示例
表结构设计code
5、利用paramiko模块实现ssh连接
5.1、paramiko实现ssh连接基础:
http://www.cnblogs.com/yangliheng/p/6344528.html
5.2、SshClient 封装 Transport:
基于用户名密码连接:
 import paramiko

 transport = paramiko.Transport(('hostname', 22))

 transport.connect(username='wupeiqi', password='')

 ssh = paramiko.SSHClient()

 ssh._transport = transport

 stdin, stdout, stderr = ssh.exec_command('df')

 print stdout.read()

 transport.close()
基于公钥密钥连接:
 import paramiko

 private_key = paramiko.RSAKey.from_private_key_file('/home/auto/.ssh/id_rsa')

 transport = paramiko.Transport(('hostname', 22))

 transport.connect(username='wupeiqi', pkey=private_key)

 ssh = paramiko.SSHClient()

 ssh._transport = transport

 stdin, stdout, stderr = ssh.exec_command('df')

 transport.close()
 import paramiko

 from io import StringIO

 key_str = """-----BEGIN RSA PRIVATE KEY-----

 MIIEpQIBAAKCAQEAq7gLsqYArAFco02/55IgNg0r7NXOtEM3qXpb/dabJ5Uyky/8

 NEHhFiQ7deHIRIuTW5Zb0kD6h6EBbVlUMBmwJrC2oSzySLU1w+ZNfH0PE6W6fans

 H80whhuc/YgP+fjiO+VR/gFcqib8Rll5UfYzf5H8uuOnDeIXGCVgyHQSmt8if1+e

 7hn1MVO1Lrm9Fco8ABI7dyv8/ZEwoSfh2C9rGYgA58LT1FkBRkOePbHD43xNfAYC

 tfLvz6LErMnwdOW4sNMEWWAWv1fsTB35PAm5CazfKzmam9n5IQXhmUNcNvmaZtvP

 c4f4g59mdsaWNtNaY96UjOfx83Om86gmdkKcnwIDAQABAoIBAQCnDBGFJuv8aA7A

 ZkBLe+GN815JtOyye7lIS1n2I7En3oImoUWNaJEYwwJ8+LmjxMwDCtAkR0XwbvY+

 c+nsKPEtkjb3sAu6I148RmwWsGncSRqUaJrljOypaW9dS+GO4Ujjz3/lw1lrxSUh

 IqVc0E7kyRW8kP3QCaNBwArYteHreZFFp6XmtKMtXaEA3saJYILxaaXlYkoRi4k8

 S2/K8aw3ZMR4tDCOfB4o47JaeiA/e185RK3A+mLn9xTDhTdZqTQpv17/YRPcgmwz

 zu30fhVXQT/SuI0sO+bzCO4YGoEwoBX718AWhdLJFoFq1B7k2ZEzXTAtjEXQEWm6

 01ndU/jhAasdfasdasdfasdfa3eraszxqwefasdfadasdffsFIfAsjQb4HdkmHuC

 OeJrJOd+CYvdEeqJJNnF6AbHyYHIECkj0Qq1kEfLOEsqzd5nDbtkKBte6M1trbjl

 HtJ2Yb8w6o/q/6Sbj7wf/cW3LIYEdeVCjScozVcQ9R83ea05J+QOAr4nAoGBAMaq

 UzLJfLNWZ5Qosmir2oHStFlZpxspax/ln7DlWLW4wPB4YJalSVovF2Buo8hr8X65

 lnPiE41M+G0Z7icEXiFyDBFDCtzx0x/RmaBokLathrFtI81UCx4gQPLaSVNMlvQA

 539GsubSrO4LpHRNGg/weZ6EqQOXvHvkUkm2bDDJAoGATytFNxen6GtC0ZT3SRQM

 WYfasdf3xbtuykmnluiofasd2sfmjnljkt7khghmghdasSDFGQfgaFoKfaawoYeH

 C2XasVUsVviBn8kPSLSVBPX4JUfQmA6h8HsajeVahxN1U9e0nYJ0sYDQFUMTS2t8

 RT57+WK/0ONwTWHdu+KnaJECgYEAid/ta8LQC3p82iNAZkpWlGDSD2yb/8rH8NQg

 9tjEryFwrbMtfX9qn+8srx06B796U3OjifstjJQNmVI0qNlsJpQK8fPwVxRxbJS/

 pMbNICrf3sUa4sZgDOFfkeuSlgACh4cVIozDXlR59Z8Y3CoiW0uObEgvMDIfenAj

 98pl3ZkCgYEAj/UCSni0dwX4pnKNPm6LUgiS7QvIgM3H9piyt8aipQuzBi5LUKWw

 DlQC4Zb73nHgdREtQYYXTu7p27Bl0Gizz1sW2eSgxFU8eTh+ucfVwOXKAXKU5SeI

 +MbuBfUYQ4if2N/BXn47+/ecf3A4KgB37Le5SbLDddwCNxGlBzbpBa0=

 -----END RSA PRIVATE KEY-----"""

 private_key = paramiko.RSAKey(file_obj=StringIO(key_str))

 transport = paramiko.Transport(('10.0.1.40', 22))

 transport.connect(username='wupeiqi', pkey=private_key)

 ssh = paramiko.SSHClient()

 ssh._transport = transport

 stdin, stdout, stderr = ssh.exec_command('df')

 result = stdout.read()

 transport.close()

 print(result)
基于私钥字符串进行连接
5.3、Ssh连接demo:
 #!/usr/bin/env python

 # -*- coding:utf-8 -*-

 import paramiko

 import uuid

 class Haproxy(object):

     def __init__(self):

         self.host = '172.0.2.19'

         self.port = 21345

         self.username = 'ylh'

         self.pwd = ''

         self.__k = None

     def create_file(self):

         file_name = str(uuid.uuid4())

         with open(file_name,'w') as f:

             f.write('sb')

         return file_name

     def run(self):

         self.connect()

         self.upload()

         self.rename()

         self.close()

     def connect(self):

         transport = paramiko.Transport((self.host,self.port))

         transport.connect(username=self.username,password=self.pwd)

         self.__transport = transport

     def close(self):

         self.__transport.close()

     def upload(self):

         # 连接,上传

         file_name = self.create_file()

         sftp = paramiko.SFTPClient.from_transport(self.__transport)

         # 将location.py 上传至服务器 /tmp/test.py

         sftp.put(file_name, '/home/wupeiqi/tttttttttttt.py')

     def rename(self):

         ssh = paramiko.SSHClient()

         ssh._transport = self.__transport

         # 执行命令

         stdin, stdout, stderr = ssh.exec_command('mv /home/wupeiqi/tttttttttttt.py /home/wupeiqi/ooooooooo.py')

         # 获取命令结果

         result = stdout.read()

 ha = Haproxy()

 ha.run()
demo
6、Python操作Mysql数据库
Python 操作 Mysql 模块的安装
Python 操作 Mysql 模块的安装
|
1
2
3
4
5
|
linux: yum install MySQL-pythonwindow: http://files.cnblogs.com/files/wupeiqi/py-mysql-win.zip |
SQL基本使用
http://www.cnblogs.com/yangliheng/p/6270392.html
Python Mysql Api
1、插入数据
2、删除数据
3、修改数据
4、查数据
7、跳板机代码目录
Go_Jump/
|-- bin/
| |-- manager.py
| |-- manager.py
|-- foo/
| |-- tests/
| | |-- __init__.py
| | |-- test_main.py
| |
| |-- __init__.py
| |-- main.py
|
|-- docs/
| |-- conf.py
| |-- abc.rst
|
|-- setting.py
|-- requirements.txt
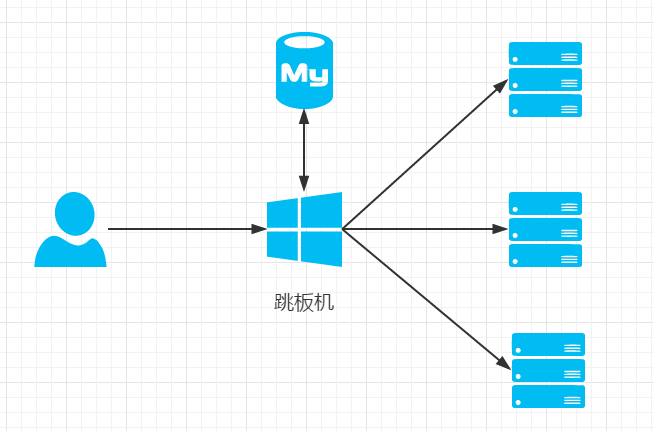
|-- README8、跳板机简单流程图
9、完整代码git地址
https://github.com/yangliheng
那就用pthon来写个跳板机吧的更多相关文章
- 用pthon来写个跳板机
用pthon来写个跳板机 1.需求 程序一:1.后台管理- 堡垒机上创建用户和密码(堡垒机root封装的类,UserProfile表)- .bashrc /usr/bin/python3 /dat ...
- Shell跳板机sshstack
笔者Q:972581034 交流群:605799367.有任何疑问可与笔者或加群交流 源码地址: https://github.com/sshstack/sshstack 为什么要写shell跳板机? ...
- shell开源跳板机sshstack
笔者Q:972581034 交流群:605799367.有任何疑问可与笔者或加群交流 源码地址: https://github.com/sshstack/sshstack 为什么要写shell跳板机? ...
- linux跳板机开发之trap信号机应用
场景1:公司新招聘了一个配置管理员,他的工作是负责将公司开发人员写的新代码依次分发到办公室测试环境.IDC测试环境和正式线上环境.因此公司需要开发一个程序,当配置管理员登录服务器,只能进入分发的管理界 ...
- Shell实现跳板机,为什么用跳板机
整理自:http://blog.chinaunix.net/uid-22101889-id-3167454.html 注意:请谨慎使用,到现在为止,使用了,我还没找到改回去的方法. 1. 问题 ...
- jmeter连接配置带跳板机(SSH)的mysql服务器
jmeter连接配置mysql服务器时,如果数据库服务器没有通过ssh连接,则只需要配置相应的jdbc参数就可以了,即请求域名或ip地址:3306,如果数据库服务器是通过SSH连接的,那需要通过中间远 ...
- 用meterpreter实现跳板机
meterpreter跳板机 背景:渗透测试者A拿到了B主机的控制权,但没有拿到ssh密码(不能打ssh隧道).现需横向移动渗透内网主机C,为了避免动作过大不便直接在B上对C进行渗透,其中C不能出 ...
- CentOS 7 搭建Jumpserver跳板机(堡垒机)
跳板机概述: 跳板机就是一台服务器,开发或运维人员在维护过程中首先要统一登录到这台服务器,然后再登录到目标设备进行维护和操作 跳板机缺点:没有实现对运维人员操作行为的控制和审计,使用跳板机的过程中还是 ...
- Jumpserver跳板机的搭建和部署
1.需要搭云yum仓库wget -O /etc/yum.repos.d/CentOS-Base.repo http://mirrors.aliyun.com/repo/Centos-6.repo 2. ...
随机推荐
- Linux运维常用的命令详解
1. 查看系统内核版本 [root@funsion geekxa]# cat /etc/issue CentOS release 6.5 (Final) Kernel \r on an \m 显示了系 ...
- DIV撑开
引用自:http://radzhang.iteye.com/blog/1678734 在CSS排版中,如果一个层中的层使用了float浮动的话,那么就有可能会出现外层没有被内层撑开的情况,如以下代码所 ...
- CentOS下自动登陆root帐户
1 vi /etc/pam.d/gdm 把 auth required …… root quiet这行注释掉 2 vi /etc/pam.d/gdm-passwd 同上 3 vi /etc/gdm/c ...
- Ubuntu下安装Hudson
因为hudson需要依赖java等,手动安装比较费劲 官方给出了一种很简单的解决方案:http://wiki.eclipse.org/Hudson-ci/Installing_Hudson_DEB 1 ...
- UVA 10304 Optimal Binary Search Tree
简单区间DP. #include<cstdio> #include<cstring> #include<cmath> #include<vector> ...
- 解决adb command not found以及sdk环境配置
解决adb command not found以及sdk环境配置 分类: mark 2013-10-02 09:41 2975人阅读 评论(0) 收藏 举报 原文地址:http://www.cnblo ...
- GPU
GPU主要是进行计算机图形这种大运算量的图形处理器,包括顶点设置.光影.像素操作.对CPU发出的数据和指令,进行着色,材质填充,渲染. 在没有GPU的系统中,3D游戏中物体移动时的坐标转换与光源处理, ...
- 对STM32的NVIC_PriorityGroupConfig使用及优先级分组方式理解(转)
源:http://blog.chinaunix.net/uid-22670933-id-3443085.html STM32有43个channel的settable的中断源:AIRC(Applicat ...
- PAT 天梯赛 L2-005 集合相似度
set的应用 题目链接 题解 有点像集合的交并操作,直接利用set进行处理,因为set有去重的功能,而且set是利用红黑树实现的,查找速度快O(logN). 代码如下: #include<cst ...
- openstack controller ha测试环境搭建记录(一)——操作系统准备
为了初步了解openstack controller ha的工作原理,搭建测试环境进行学习. 在学习该方面知识时,当前采用的操作系统版本是centos 7.1 x64.首先在ESXi中建立2台用于测试 ...