(Concurrent)HashMap的存储过程及原理。
1.前言
看完咕泡Jack前辈的有关hashMap的视频(非宣传,jack自带1.5倍嘴速,高效),收益良多,所以记录一下学习到的东西。
2.基础用法
源码的注释首先就介绍了哈希表是基于Map接口,所以它的用法和其他集合的用法差不多。
/**

 * Hash table based implementation of the <tt>Map</tt> interface.  This             * 哈希表的实现基于<tt>Map</ tt>接口。

 * implementation provides all of the optional map operations, and permits          * 此实现提供所有可选的映射操作,

 * <tt>null</tt> values and the <tt>null</tt> key.  (The <tt>HashMap</tt>           * 并允许<tt> null </ tt>值和<tt> null </ tt>键。

 * class is roughly equivalent to <tt>Hashtable</tt>, except that it is             * (<tt> HashMap </ tt>类与<tt> Hashtable </ tt>大致等效,

 * unsynchronized and permits nulls.)  This class makes no guarantees as to         * 除了它是不同步的,并且允许为null。) , 此类不保证映射的顺序。

 * the order of the map; in particular, it does not guarantee that the order        * 特别是不能保证订单将随着时间的推移保持不变。

 * will remain constant over time.
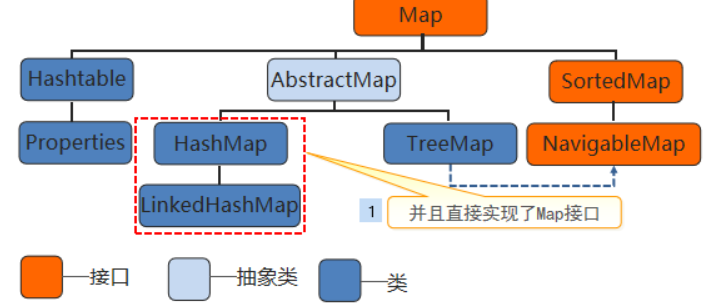
对应的源码,如图所示,它继承了抽象Map类,实现了Map接口:
public class HashMap<K,V> extends AbstractMap<K,V> implements Map<K,V>, Cloneable, Serializable { ... }
至于具体咋用,不多介绍,推一个链接,HashMap的基础用法:https://blog.csdn.net/lzx_cherry/article/details/98947819
3.存储方式
下面就是介绍一个HashMap完成put(key, value)操作之后的存储流程。
(1)HashMap key、value被put后的存储方式:
在JDK1.7及其之前都是用的 数组+链表 的方式,JDK1.8之后存储方式优化成了 数组+链表+红黑树 的方式。
(JDK1.8后,如果单链表存储的长度大于8则转换为红黑树存储,采用这样的改善有利于解决hash冲突中链表过长引发的性能下降问题)
(2)图解HashMap的主要数据结构:
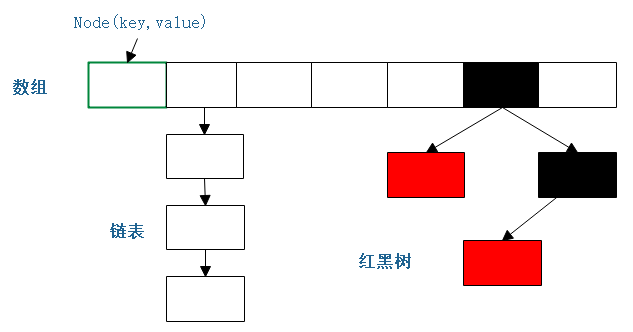
<1>存储单元 Node
图中的每一个格子代表每一个Node对象。Node的信息主要包含它的存储位置,key,value,如果在链表中则会有下一个Node的信息,如果存储在红黑树中则包含红黑树的相关信息。
由上面我们可以写出Node数据结构的伪代码:
Node[] table; 数组
class Node{ Node next; } 链表
TreeNode(left, right, parent, boolean flag = red| black) 红黑树
而HashMap源码中Node的代码和上面伪代码的一致:
    /**

     * Basic hash bin node, used for most entries.  (See below for

     * TreeNode subclass, and in LinkedHashMap for its Entry subclass.)

     */

    static class Node<K,V> implements Map.Entry<K,V> {

        //通过hash算法得出的存储位置

        final int hash;

        //key

        final K key;

        //value

        V value;

        //链表的下个Node

        Node<K,V> next;
     ...
  }
HashMap源码中TreeMap的代码(建议之前先了解红黑树的原理):
    static final class TreeNode<K,V> extends LinkedHashMap.Entry<K,V> {

        TreeNode<K,V> parent;  // red-black tree links

        TreeNode<K,V> left;

        TreeNode<K,V> right;

        TreeNode<K,V> prev;    // needed to unlink next upon deletion

        boolean red;
    ... }
<2>存储过程
根据HashMap的数据结构,可以大致推断出它的存储过程。
a.先创建一个数组
b.计算出存储key value的Node的位置
c.如果hash冲突了,判断冲突数目的长度决定使用链表还是红黑树结构
d.数组不够需要进行扩容
下面对存储过程进行细致的分析。
1.计算出存储key value的Node的位置
先分析这个有助于其他的理解,这也是理解存储过程一个比较基础重要的内容。
计算出Node的位置,就是需要得到Node在数组中的整型数下标,但是前提是不超出数组的大小。HashMap数组的大小可以采用默认值,也可以自行规定,这边我们采用默认的值16进行分析。
首先,要保证是个整型数,最好还是和key value有关联的,所以最好的方式就是通过key.hashCode()。其次,我们需要保证Node的index大小在0~15之间。所以我们可以先进行一个取余判断,判断: 整型数%16 = [ 0 , 15 ]。
分析取余:
例如一个数字1,hashCode的值为49,那么取余的操作就为 49 % 16 = 1。但是这样的取模方式还可以进行优化,49的10进制整型数转化为32位二进制:
0000 0000 0000 0000 0000 0000 0011 0001 % 16 = 1
对16进行取余,其实效果就相当于对(16-1)进行与操作:0000 0000 0000 0000 0000 0000 0011 0001 & 0111,因为与操作时候与的时候,最后四位的范围是[0,15],如果大于15的话,就进位了,这样可以更有效控制整形数的范围。
0000 0000 0000 0000 0000 0000 0011 0001
0 1111 &操作 (数组大小 - 1)
————————————————————————————————————————————————
0001(结果)
最终返回的结果就是Node在数组中的位置index了。index如果相同的话就会产生位置冲突,这时候就需要链表和红黑树数据结构,但这样会使得我们去获取key value变得更加耗时。所以我们需要尽量保证index就是Node的位置不要太容易就出现重复的情况。
从上的与过程中我们可以看出,能决定Node位置取决在两个相与的数(暂称为key1和key2),这两个数的后4位决定了Node的位置,如果要保证hash不冲突的话,就要先分析他们。与操作,一方为0就结果为0,key2的最后四位值如果一个为0的话,无论key1对应的是什么,结果都是0,这样极其容易导致冲突,所以我们要尽量保证key2除了最高为0外。其他位置都1。例如:01111(15)、011111(31)、0111111(63),不难看出key2的值,其实就是2的n次幂-1。所以我们需要尽量保证数组的大小为2的n次幂。但是即便保证了后四位都为1的话,毕竟只有4位,4位进行与操作,还是很容易出现一个重复情况,对于这种情况,HashMap采用了异或(xor)操作( a⊕b = (¬a ∧ b) ∨ (a ∧¬b) )。
具体操作,将32位的二进制数字一分为二,左边16位的高16位为一份,右边的低16位为另一份。两者进行异或运算,降低重复的可能性。
如:
高16位 低16位
0101 0101 0010 1001 | 0001 0001 0001 0110
其实这就是HashMap中的hash算法,源码:
    static final int hash(Object key) {

        int h;
        //如果key为null则返回0,如果不为null则返回key的hashCode高低16位异或运算的结果

        return (key == null) ? 0 : (h = key.hashCode()) ^ (h >>> 16);

    }
如果再重复就只能形成链表和红黑树了。
2.创建数组以及数组的扩容
如果采用默认的大小的话,默认的数组大小为16。源码:
    /**
     * The default initial capacity - MUST be a power of two.
   * 默认初始容量为16,必须为2的幂
   * 表示1,左移4位,变成10000,也就是16

     */

    static final int DEFAULT_INITIAL_CAPACITY = 1 << 4; // aka 16
至于为什么不采用int DEFAULT_INITIAL_CAPACITY = 16;,一方面是省略了中间一些复杂的转换过程,直接以二进制形式去运行运算,另一方面也是配合2次幂的约束条件。
当然我们知道,HashMap数组的大小也是可以自己定义的。自己定义和默认有啥区别,如果你使用了阿里的checkstyle,初始化HashMap使用了默认的大小,这时候规约就会提示你需要自己定义
HashMap的大小。我们可以看一下阿里巴巴的规约:
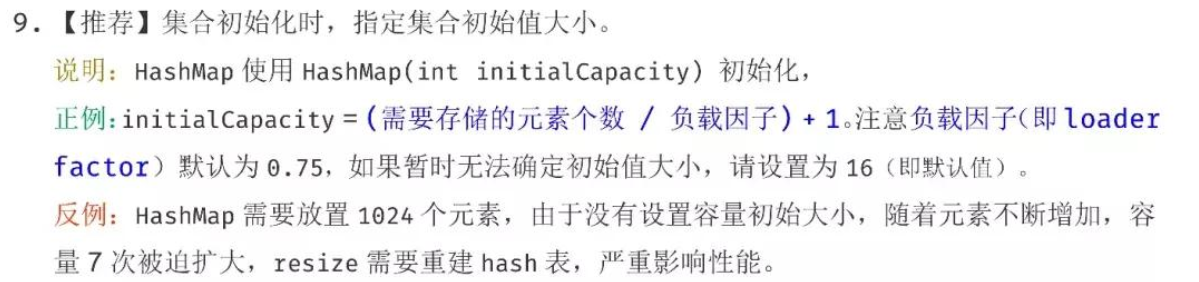
上面说的很清楚了,如果不指定初始化的大小,容易引起多次的扩容操作,影响性能。并给出了推荐的初始化值 = (需要存储的元素个数 / 负载因子) + 1;
负载因子决定了数组扩容的阔值,如果一个数组大小为20,负载因子为0.75,那么数组长度到达15的时候,数组就会进行扩容操作。15也就是数组扩容的阔值,0.75就称为负载因子,附上源码:
源码中的load factor也就是负载因子,规定的大小为0.75,也就是3/4。
    /**

     * The load factor used when none specified in constructor.

     */

    static final float DEFAULT_LOAD_FACTOR = 0.75f;
如果自己进行初始化数组的值,那么是不是就可以随意设置值了呢?看一下源码就知道了:
初始化大小必须大于等于0,且是有最大值的。
    /**

     * Constructs an empty <tt>HashMap</tt> with the specified initial

     * capacity and load factor.

     *

     * @param  initialCapacity the initial capacity      初始化大小

     * @param  loadFactor      the load factor       负载因子

     * @throws IllegalArgumentException if the initial capacity is negative

     *         or the load factor is nonpositive

     */

    public HashMap(int initialCapacity, float loadFactor) {

        //如果初始化大小小于0,抛出异常

        if (initialCapacity < 0)

            throw new IllegalArgumentException("Illegal initial capacity: " +

                                               initialCapacity);

        //如果初始化大小大于最大值,则将初始化值设为最大值

        if (initialCapacity > MAXIMUM_CAPACITY)

            initialCapacity = MAXIMUM_CAPACITY;

        if (loadFactor <= 0 || Float.isNaN(loadFactor))

            throw new IllegalArgumentException("Illegal load factor: " +

                                               loadFactor);

        this.loadFactor = loadFactor;

        //阔值,该方法保证了数组初始化大小为2的次幂

        this.threshold = tableSizeFor(initialCapacity);

    }
最大值:(1073741824)
static final int MAXIMUM_CAPACITY = 1 << 30;
如果你初始化数组大小时候,没有按照前面的要求将数组的大小设为n的二次幂,也就是key2不是0111111这样子的形式,是不是会增加到hash冲突的概率呢。其实,HashMap源码里面针对这种情况进行了
调整,保证了每一个数组大小为2的次幂,具体源码看下面“
    /**

     * Returns a power of two size for the given target capacity.

     */

    static final int tableSizeFor(int cap) {

        int n = cap - 1;

        //位或操作,一步一步保证最后几位都1

        n |= n >>> 1;

        n |= n >>> 2;

        n |= n >>> 4;

        n |= n >>> 8;

        n |= n >>> 16;

        //如果n小于0返回1,不然返回小于最大值的n+1值

        return (n < 0) ? 1 : (n >= MAXIMUM_CAPACITY) ? MAXIMUM_CAPACITY : n + 1;

    }
上面就是哈希中数组初始化的内容,接下来说一下数组扩容的方式。
1.需要先知道的是,扩容是把原始的数组扩成多大的容量。
从源码中的must be power of two,就是必须是2的n次幂就可以推断出扩容的方式是double,也就是将数组的大小翻倍。
2.新数组如何创建,以及如何重新散列。(重新散列:把老数组中的Node移到到新的数组。)
新数组的大小我们已经可以确定为旧数组大小的2倍,现在主要的问题就是重新散列,也就是把旧的数组中Node转移到新的数组中去。普遍的做法就是遍历旧的数组,将非空的Node依次赋值给新的数组。
如果Node节点下面是链表就遍历链表,再赋值给新数组的Node节点。如果是红黑树,也是一样先打散再重排。这样的做法理解起来很简单,让我们一起看一下源码(较长):
    /**

     *

     *初始化或增加表大小。 如果为null,则分配

     *符合在现场阈值中保持的初始容量目标。

     *否则,因为我们使用的是二次幂扩展,所以

     *每个bin中的元素必须保持相同的索引或移动

     *在新表中具有两个偏移量的幂。

     *

     * Initializes or doubles table size.  If null, allocates in

     * accord with initial capacity target held in field threshold.

     * Otherwise, because we are using power-of-two expansion, the

     * elements from each bin must either stay at same index, or move

     * with a power of two offset in the new table.

     *

     * @return the table

     */

    final Node<K,V>[] resize() {

        //旧的Node数组

        Node<K,V>[] oldTab = table;

        //获取旧的数组长度,如果为null则返回0

        int oldCap = (oldTab == null) ? 0 : oldTab.length;

        //旧数组的阔值

        //threshold :The next size value at which to resize (capacity * load factor).

        //下一个要调整大小的大小值(容量*负载系数)。

        int oldThr = threshold;

        //新的数组和新的阔值

        int newCap, newThr = 0;

        //如果旧数组长度大于0

        if (oldCap > 0) {

            //限制最大值

            if (oldCap >= MAXIMUM_CAPACITY) {

                threshold = Integer.MAX_VALUE;

                return oldTab;

            }

            //限制新的阔值大小

            else if ((newCap = oldCap << 1) < MAXIMUM_CAPACITY &&

                     oldCap >= DEFAULT_INITIAL_CAPACITY)

                //这边就是对新的数组阔值进行翻倍

                newThr = oldThr << 1; // double threshold

        }

        //初始化新数组的值

        else if (oldThr > 0) // initial capacity was placed in threshold

            newCap = oldThr;

        else {               // zero initial threshold signifies using defaults

            //如果之前的阔值小于0,新的数组大小设置为16,阔值设置为 16 * 0.75f

            newCap = DEFAULT_INITIAL_CAPACITY;

            newThr = (int)(DEFAULT_LOAD_FACTOR * DEFAULT_INITIAL_CAPACITY);

        }

        if (newThr == 0) {

            //如果之前的阔值=0,赋值给新的阔值

            float ft = (float)newCap * loadFactor;

            newThr = (newCap < MAXIMUM_CAPACITY && ft < (float)MAXIMUM_CAPACITY ?

                      (int)ft : Integer.MAX_VALUE);

        }

        //全局变量的阔值变化

        threshold = newThr;

        @SuppressWarnings({"rawtypes","unchecked"})

            Node<K,V>[] newTab = (Node<K,V>[])new Node[newCap];

        //新的哈希表

        table = newTab;

        if (oldTab != null) {

            //不为空的情况下遍历

            for (int j = 0; j < oldCap; ++j) {

                Node<K,V> e;

                //如果Node节点不为null

                if ((e = oldTab[j]) != null) {

                    //之前的值删除(就是设置为null)

                    oldTab[j] = null;

                    //如果不为链表和红黑树

                    if (e.next == null)

                        //直接赋值给新的哈希表

                        newTab[e.hash & (newCap - 1)] = e;

                    //如果Node是红黑树数据结构,打散重排

                    else if (e instanceof TreeNode)

                        ((TreeNode<K,V>)e).split(this, newTab, j, oldCap);

                    else { // preserve order

                        //不然就是链表,对链表进行遍历 赋值到新的的哈希表

                        Node<K,V> loHead = null, loTail = null;

                        Node<K,V> hiHead = null, hiTail = null;

                        Node<K,V> next;

                        do {

                            next = e.next;

                            if ((e.hash & oldCap) == 0) {

                                if (loTail == null)

                                    loHead = e;

                                else

                                    loTail.next = e;

                                loTail = e;

                            }

                            else {

                                if (hiTail == null)

                                    hiHead = e;

                                else

                                    hiTail.next = e;

                                hiTail = e;

                            }

                        } while ((e = next) != null);

                        if (loTail != null) {

                            loTail.next = null;

                            newTab[j] = loHead;

                        }

                        if (hiTail != null) {

                            hiTail.next = null;

                            newTab[j + oldCap] = hiHead;

                        }

                    }

                }

            }

        }

        return newTab;

    }
但是在赋值的过程中,需要注意所有的位置都进行了新的一轮hash运算,在 【1.计算出存储key value的Node的位置 】中可以知道key2的值形式要保持是01111……11的形式。
之前的操作是这样的:
0000 0000 0000 0000 0000 0000 0011 0001
0 1111 &操作 (数组大小 - 1)
————————————————————————————————————————————————
0001(结果) --- 1
但是我们现在对key2的值进行了翻倍,那么随之与操作的结果也会变化,也就是在新的数组中Node的位置以及发生了变化,具体看下面:
0000 0000 0000 0000 0000 0000 0010 0001 key1的值 第一种情况
0000 0000 0000 0000 0000 0000 001 0001 key1的值 第二种情况
01 1111 &操作 (新数组大小 = 旧数组大小 * 2,比之前左边多了一位1)
————————————————————————————————————————————————
00 0001(第一种结果) ---1
第一种情况,key1的值和之前的值一样,也就是重新散列的位置不变
01 0001(第二种结果) ---17
第二种情况,key1的值比之前的值大16(数组的长度),也就是重新散列的位置发生了变化
所以,哈希resize后,之前旧数组的Node在新数组中的位置有两种情况:1.保持和旧数组一样 2.旧数组的位置+旧数组的大小
在注释部分,就交代了“刷新”操作是会重建内部数据结构的。
 * <p>An instance of <tt>HashMap</tt> has two parameters that affect its            * <p> <tt> HashMap </ tt>的实例有两个参数会影响其性能:<i>初始容量</ i>和<i>负载系数</ i>。

 * performance: <i>initial capacity</i> and <i>load factor</i>.  The                * 容量只是创建哈希表时的容量。

 * <i>capacity</i> is the number of buckets in the hash table, and the initial        * <i>负载因子</ i>是衡量哈希表允许填充的程度的度量在容量自动增加之前获取 。

 * capacity is simply the capacity at the time the hash table is created.  The        * 当哈希表中的条目超过了负载系数和当前容量,

 * <i>load factor</i> is a measure of how full the hash table is allowed to           * 哈希表被<i>刷新</ i>(即内部数据结构已重建),

 * get before its capacity is automatically increased.  When the number of            * 因此哈希表的大小大约是原来容量的2倍。

 * entries in the hash table exceeds the product of the load factor and the

 * current capacity, the hash table is <i>rehashed</i> (that is, internal data

 * structures are rebuilt) so that the hash table has approximately twice the

 * number of buckets.

 *
3.key和value的put经历
上面说的都是关于Node的位置问题,如果Node位置确定了,那么剩下的就只剩putNode里面的key和value了。首先,一个数组里面put一个Node,我们需要思考这个位置是否是NULL,如果为NULL的话,就在该位置new一个新的Node ;如果不为NULL,那么就需要判断put的内容是覆盖原来的value还是新增一个Node,新增又分为链表新增和红黑树的新增。具体的源码如下:
   /**

     * Implements Map.put and related methods 实现Map.put及相关方法

     *

     * @param hash hash for key hash算法算出的Node位置

     * @param key the key 键

     * @param value the value to put 放置的值

     * @param onlyIfAbsent if true, don't change existing value onlyIfAbsent如果为true,请不要更改现有值

     * @param evict if false, the table is in creation mode. 退出,如果为false,则表处于创建模式。

     * @return previous value, or null if none  上一个值,如果没有则返回null

     */

    final V putVal(int hash, K key, V value, boolean onlyIfAbsent,

                   boolean evict) {

        Node<K,V>[] tab; Node<K,V> p; int n, i;

        //初始化哈希表

        if ((tab = table) == null || (n = tab.length) == 0)

            n = (tab = resize()).length;

        //获取在哈希表中的位置,并且判断该位置是否为null,如果是null 直接就创建新的Node

        if ((p = tab[i = (n - 1) & hash]) == null)

            tab[i] = newNode(hash, key, value, null);

        else {

            //如果该位置不为null,则可能为链表或者红黑树

            Node<K,V> e; K k;

            //如果key值相同,hash也相同,则替换value的值

            if (p.hash == hash &&

                ((k = p.key) == key || (key != null && key.equals(k))))

                e = p;

            //红黑树存储

            else if (p instanceof TreeNode)

                e = ((TreeNode<K,V>)p).putTreeVal(this, tab, hash, key, value);

            //链表存储

            else {

                //遍历链表

                for (int binCount = 0; ; ++binCount) {

                    if ((e = p.next) == null) {

                        //尾部插入

                        p.next = newNode(hash, key, value, null);

                        //如果长度大于8 (TREEIFY_THRESHOLD = 8)

                        if (binCount >= TREEIFY_THRESHOLD - 1) // -1 for 1st

                            //链表转换为红黑树

                            treeifyBin(tab, hash);

                        break;

                    }

                    if (e.hash == hash &&

                        ((k = e.key) == key || (key != null && key.equals(k))))

                        break;

                    p = e;

                }

            }

            if (e != null) { // existing mapping for key

                V oldValue = e.value;

                if (!onlyIfAbsent || oldValue == null)

                    e.value = value;

                afterNodeAccess(e);

                return oldValue;

            }

        }

        ++modCount;

        //数组长度大于阔值

        if (++size > threshold)
       //扩容

            resize();

        afterNodeInsertion(evict);

        return null;

    }
getNode的源码和上面的如出一辙,也很好理解,根据hash先找到Node的头节点,如果头节点的hash和key都相同,就直接返回第一个数组的值,否在判断该Node是否是链表或者红黑树结构,再根据key获取值,贴一下:
    /**

     * Implements Map.get and related methods

     *

     * @param hash hash for key

     * @param key the key

     * @return the node, or null if none

     */

    final Node<K,V> getNode(int hash, Object key) {

        Node<K,V>[] tab; Node<K,V> first, e; int n; K k;

        if ((tab = table) != null && (n = tab.length) > 0 &&

            (first = tab[(n - 1) & hash]) != null) {

            if (first.hash == hash && // always check first node

                ((k = first.key) == key || (key != null && key.equals(k))))

                return first;

            if ((e = first.next) != null) {

                if (first instanceof TreeNode)

                    return ((TreeNode<K,V>)first).getTreeNode(hash, key);

                do {

                    if (e.hash == hash &&

                        ((k = e.key) == key || (key != null && key.equals(k))))

                        return e;

                } while ((e = e.next) != null);

            }

        }

        return null;

    }
4.ConcurrentHashMap以及线程安全
先看一下同样是线程安全的HashTable是如何保证线程安全的:
    public synchronized V put(K key, V value) {

        // Make sure the value is not null

        if (value == null) {

            throw new NullPointerException();

        }
由上面的源码可以看出synchronized关键字直接约束了整个put方法,这样线程虽然是安全的,但是效率过于低下。对比之下ConcurrentHashMap的锁设计就更为精确化,因为对于一个put方法,后者把它大致分为几个步骤,通过对每个步骤进行线程安全约束来提升效率。(index:这边当作数组下标)
大致的put步骤:map.put(K,V)—> new Node[]创建数组 —> index == null(数组位置值为null,直接创建) —> index!=null(加入链表,红黑树) —> resize()扩容
1.保证初始化哈希表线程安全
在创建数组的时候,通过乐观锁机制(CAS)保证只有一个线程去初始化数组;
初始化的源码:
//putVal 方法中
if (tab == null || (n = tab.length) == 0)
          //初始化

           tab = initTable();
    /**

     * Initializes table, using the size recorded in sizeCtl.

     */

    private final Node<K,V>[] initTable() {

        Node<K,V>[] tab; int sc;

        while ((tab = table) == null || tab.length == 0) {

            //如果SIZECTL<0,就代表已经有一个线程在执行初始化了,进行线程让步

            if ((sc = sizeCtl) < 0)

                Thread.yield(); // lost initialization race; just spin

            //CAS 乐观锁机制保证数组初始化线程安全,如果当前对象的值==SIZECTL,则认为线程安全,返回-1

            else if (U.compareAndSwapInt(this, SIZECTL, sc, -1)) {

                try {

                    if ((tab = table) == null || tab.length == 0) {

                        int n = (sc > 0) ? sc : DEFAULT_CAPACITY;

                        @SuppressWarnings("unchecked")

                        Node<K,V>[] nt = (Node<K,V>[])new Node<?,?>[n];

                        table = tab = nt;

                        sc = n - (n >>> 2);

                    }

                } finally {

                    sizeCtl = sc;

                }

                break;

            }

        }

        return tab;

    }
2.数组下标index为null时候
如果数组下标的值为null,也是通过乐观锁机制保证线程安全,源码:
    /** Implementation for put and putIfAbsent */

    final V putVal(K key, V value, boolean onlyIfAbsent) {

        if (key == null || value == null) throw new NullPointerException();

        int hash = spread(key.hashCode());

        int binCount = 0;

        for (Node<K,V>[] tab = table;;) {

            Node<K,V> f; int n, i, fh;

            if (tab == null || (n = tab.length) == 0)

                tab = initTable();

            //如果数组下标的值为null,也是通过乐观锁机制保证线程安全

            else if ((f = tabAt(tab, i = (n - 1) & hash)) == null) {

                if (casTabAt(tab, i, null,

                             new Node<K,V>(hash, key, value, null)))

                    break;                   // no lock when adding to empty bin

            }
3.数组下标不为null
数组下标不为null的话,那么就是链表和红黑树结构,如果再用CAS去保证线程安全就需要对链表和红黑树中的元素依次去进行compareAndSwapInt,很麻烦。所以在这边,我们可以将链表或者红黑树的头节点锁住,就可以保证一整个链表红黑树的线程安全,这样影响的范围就会缩小。
源码:
通过对头节点(数组下标)的锁,保证一整个链表和红黑树的线程安全。
 //如果数组下标的值为null,也是通过乐观锁机制保证线程安全

            else if ((f = tabAt(tab, i = (n - 1) & hash)) == null) {

                if (casTabAt(tab, i, null,

                             new Node<K,V>(hash, key, value, null)))

                    break;                   // no lock when adding to empty bin

            }

            else if ((fh = f.hash) == MOVED)

                tab = helpTransfer(tab, f);

            else {

                V oldVal = null;

                //如果下标不为null,那么就是链表和红黑树结构,如果再用CAS去保证线程安全就需要对链表和红黑树中的元素依次去进行compareAndSwapInt,

                //所以在这边,我们可以将链表或者红黑树的头节点锁住,就可以保证一整个链表红黑树的线程安全

                synchronized (f) {

                    if (tabAt(tab, i) == f) {

                        if (fh >= 0) {

                            binCount = 1;

                            for (Node<K,V> e = f;; ++binCount) {

                                K ek;

                                if (e.hash == hash &&

                                    ((ek = e.key) == key ||

                                     (ek != null && key.equals(ek)))) {

                                    oldVal = e.val;

                                    if (!onlyIfAbsent)

                                        e.val = value;

                                    break;

                                }
完整的putVal源码:
   /** Implementation for put and putIfAbsent */

    final V putVal(K key, V value, boolean onlyIfAbsent) {

        if (key == null || value == null) throw new NullPointerException();

        int hash = spread(key.hashCode());

        int binCount = 0;

        for (Node<K,V>[] tab = table;;) {

            Node<K,V> f; int n, i, fh;

            if (tab == null || (n = tab.length) == 0)

                tab = initTable();

            //如果数组下标的值为null,也是通过乐观锁机制保证线程安全

            else if ((f = tabAt(tab, i = (n - 1) & hash)) == null) {

                if (casTabAt(tab, i, null,

                             new Node<K,V>(hash, key, value, null)))

                    break;                   // no lock when adding to empty bin

            }

            //如果不是初始化数组的线程的话,就去帮忙重新散列

       //MOVED 的值为-1

            else if ((fh = f.hash) == MOVED)

                tab = helpTransfer(tab, f);

            else {

                V oldVal = null;

                //如果下标不为null,那么就是链表和红黑树结构,如果再用CAS去保证线程安全就需要对链表和红黑树中的元素依次去进行compareAndSwapInt,

                //所以在这边,我们可以将链表或者红黑树的头节点锁住,就可以保证一整个链表红黑树的线程安全

                synchronized (f) {

                    if (tabAt(tab, i) == f) {

                        if (fh >= 0) {

                            binCount = 1;

                            for (Node<K,V> e = f;; ++binCount) {

                                K ek;

                                if (e.hash == hash &&

                                    ((ek = e.key) == key ||

                                     (ek != null && key.equals(ek)))) {

                                    oldVal = e.val;

                                    if (!onlyIfAbsent)

                                        e.val = value;

                                    break;

                                }

                                Node<K,V> pred = e;

                                if ((e = e.next) == null) {

                                    pred.next = new Node<K,V>(hash, key,

                                                              value, null);

                                    break;

                                }

                            }

                        }

                        else if (f instanceof TreeBin) {

                            Node<K,V> p;

                            binCount = 2;

                            if ((p = ((TreeBin<K,V>)f).putTreeVal(hash, key,

                                                           value)) != null) {

                                oldVal = p.val;

                                if (!onlyIfAbsent)

                                    p.val = value;

                            }

                        }

                    }

                }

                if (binCount != 0) {

                    if (binCount >= TREEIFY_THRESHOLD)

                        treeifyBin(tab, i);

                    if (oldVal != null)

                        return oldVal;

                    break;

                }

            }

        }

    //每次put都会统计数组的大小,以确定是否扩容

        addCount(1L, binCount);

        return null;

    }
4.扩容的线程安全
一个线程去扩容的时候,其他的线程进行扩容或进行put操作都会引起线程安全问题,所以在一个线程在扩容的时候,其他的线程需要进入等待状态。这样等待状态的线程占据着CPU但是却不做事情,所以源码对此进行了优化。首先,保证只有一个线程能去初始化。其次,剩下等待的线程共同帮助完成重新散列。
比如一个数组tab[]大小16,一个线程去负责扩容成大小32的新数组。剩下的等待线程就会去帮着重新散列,如:等待线程a就会去从数组末尾开始向前领取一个区间的Node进行重新散列,例如区间(tab[13]~tab[15] ),a线程去负责对区间的Node进行重新散列。如果在a完成了,还没有其他的扩容(或者put)线程进入变成等待线程的话,a就会继续领取一个区间的任务继续进行重新散列,如果有一个线程b要进行扩容,因为扩容操作已经有线程在做了,b随之进入等待状态,这时候b线程就会去帮着a线程去完成剩下区间的散列任务。以此反复,其中的每一个线程帮着完成重新散列任务都是会提交自己的进度的,所以不要担心会重复或少工作这么一个情况。
上面的过程,侧重点就2个,第一个保证一个线程初始化数组,第二保证剩下的线程去帮助扩容。
源码实现:
统计源码,决定什么时候能扩容:
 /**

     * Adds to count, and if table is too small and not already

     * resizing, initiates transfer. If already resizing, helps

     * perform transfer if work is available.  Rechecks occupancy

     * after a transfer to see if another resize is already needed

     * because resizings are lagging additions.

     *

     * @param x the count to add

     * @param check if <0, don't check resize, if <= 1 only check if uncontended

     */

    private final void addCount(long x, int check) {

        CounterCell[] as; long b, s;

        if ((as = counterCells) != null ||

            !U.compareAndSwapLong(this, BASECOUNT, b = baseCount, s = b + x)) {

            CounterCell a; long v; int m;

            boolean uncontended = true;

            if (as == null || (m = as.length - 1) < 0 ||

                (a = as[ThreadLocalRandom.getProbe() & m]) == null ||

                !(uncontended =

                  U.compareAndSwapLong(a, CELLVALUE, v = a.value, v + x))) {

                fullAddCount(x, uncontended);

                return;

            }

            if (check <= 1)

                return;

            //统计的结果s

            s = sumCount();

        }

        if (check >= 0) {

            Node<K,V>[] tab, nt; int n, sc;

            //如果s大于阔值,则需要进行扩容

            while (s >= (long)(sc = sizeCtl) && (tab = table) != null &&

                   (n = tab.length) < MAXIMUM_CAPACITY) {

                int rs = resizeStamp(n);

                //sc = 阔值

                if (sc < 0) {

                    if ((sc >>> RESIZE_STAMP_SHIFT) != rs || sc == rs + 1 ||

                        sc == rs + MAX_RESIZERS || (nt = nextTable) == null ||

                        transferIndex <= 0)

                        break;

                    if (U.compareAndSwapInt(this, SIZECTL, sc, sc + 1))

                        transfer(tab, nt);

                }

                //阔值大于0 进行初始化 乐观锁保证线程安全

                else if (U.compareAndSwapInt(this, SIZECTL, sc,

                                             (rs << RESIZE_STAMP_SHIFT) + 2))

                    transfer(tab, null);

                s = sumCount();

            }

        }

    }
任务代码:
 /**

     * Moves and/or copies the nodes in each bin to new table. See

     * above for explanation.

     */

    private final void transfer(Node<K,V>[] tab, Node<K,V>[] nextTab) {

        int n = tab.length, stride;

     //确定任务的大小=16

        if ((stride = (NCPU > 1) ? (n >>> 3) / NCPU : n) < MIN_TRANSFER_STRIDE)

            stride = MIN_TRANSFER_STRIDE; // subdivide range

     //初始化数组线程,如果入参的nextTab为null的话

        if (nextTab == null) {            // initiating

            try {

                @SuppressWarnings("unchecked")

                Node<K,V>[] nt = (Node<K,V>[])new Node<?,?>[n << 1];

                nextTab = nt;

            } catch (Throwable ex) {      // try to cope with OOME

                sizeCtl = Integer.MAX_VALUE;

                return;

            }

            nextTable = nextTab;

            transferIndex = n;

        }

     //非初始化线程,nextTab不为null

        int nextn = nextTab.length;

        ForwardingNode<K,V> fwd = new ForwardingNode<K,V>(nextTab);

     //保证true,使其不断领取任务

        boolean advance = true;

     //标记重新散列任务是否完成

        boolean finishing = false; // to ensure sweep before committing nextTab

        for (int i = 0, bound = 0;;) {

            Node<K,V> f; int fh;

       //领取散列任务

            while (advance) {

                int nextIndex, nextBound;

                if (--i >= bound || finishing)

                    advance = false;

                else if ((nextIndex = transferIndex) <= 0) {

                    i = -1;

                    advance = false;

                }

                else if (U.compareAndSwapInt

                         (this, TRANSFERINDEX, nextIndex,

                          nextBound = (nextIndex > stride ?

                                       nextIndex - stride : 0))) {

                    bound = nextBound;

                    i = nextIndex - 1;

                    advance = false;

                }

            }

       //执行散列

            if (i < 0 || i >= n || i + n >= nextn) {

                int sc;

          //完成扩容

                if (finishing) {

                    nextTable = null;

                    table = nextTab;

            //扩展改变

                    sizeCtl = (n << 1) - (n >>> 1);

                    return;

                }

          //没有完成扩容,汇报自己的完成任务

                if (U.compareAndSwapInt(this, SIZECTL, sc = sizeCtl, sc - 1)) {

                    if ((sc - 2) != resizeStamp(n) << RESIZE_STAMP_SHIFT)

                        return;

                    finishing = advance = true;

                    i = n; // recheck before commit

                }

            }

            else if ((f = tabAt(tab, i)) == null)

                advance = casTabAt(tab, i, null, fwd);

            else if ((fh = f.hash) == MOVED)

                advance = true; // already processed

            else {

          //迁移数据操作,和HashMap一致

                synchronized (f) {

                    if (tabAt(tab, i) == f) {

                        Node<K,V> ln, hn;

                        if (fh >= 0) {

                            int runBit = fh & n;

                            Node<K,V> lastRun = f;

                            for (Node<K,V> p = f.next; p != null; p = p.next) {

                                int b = p.hash & n;

                                if (b != runBit) {

                                    runBit = b;

                                    lastRun = p;

                                }

                            }

                            if (runBit == 0) {

                                ln = lastRun;

                                hn = null;

                            }

                            else {

                                hn = lastRun;

                                ln = null;

                            }

                            for (Node<K,V> p = f; p != lastRun; p = p.next) {

                                int ph = p.hash; K pk = p.key; V pv = p.val;

                                if ((ph & n) == 0)

                                    ln = new Node<K,V>(ph, pk, pv, ln);

                                else

                                    hn = new Node<K,V>(ph, pk, pv, hn);

                            }

                            setTabAt(nextTab, i, ln);

                            setTabAt(nextTab, i + n, hn);

                            setTabAt(tab, i, fwd);

                            advance = true;

                        }

                        else if (f instanceof TreeBin) {

                            TreeBin<K,V> t = (TreeBin<K,V>)f;

                            TreeNode<K,V> lo = null, loTail = null;

                            TreeNode<K,V> hi = null, hiTail = null;

                            int lc = 0, hc = 0;

                            for (Node<K,V> e = t.first; e != null; e = e.next) {

                                int h = e.hash;

                                TreeNode<K,V> p = new TreeNode<K,V>

                                    (h, e.key, e.val, null, null);

                                if ((h & n) == 0) {

                                    if ((p.prev = loTail) == null)

                                        lo = p;

                                    else

                                        loTail.next = p;

                                    loTail = p;

                                    ++lc;

                                }

                                else {

                                    if ((p.prev = hiTail) == null)

                                        hi = p;

                                    else

                                        hiTail.next = p;

                                    hiTail = p;

                                    ++hc;

                                }

                            }

                            ln = (lc <= UNTREEIFY_THRESHOLD) ? untreeify(lo) :

                                (hc != 0) ? new TreeBin<K,V>(lo) : t;

                            hn = (hc <= UNTREEIFY_THRESHOLD) ? untreeify(hi) :

                                (lc != 0) ? new TreeBin<K,V>(hi) : t;

                            setTabAt(nextTab, i, ln);

                            setTabAt(nextTab, i + n, hn);

                            setTabAt(tab, i, fwd);

                            advance = true;

                        }

                    }

                }

            }

        }

    }
再精细的就不会了。
(Concurrent)HashMap的存储过程及原理。的更多相关文章
- 详解HashMap的内部工作原理
本文将用一个简单的例子来解释下HashMap内部的工作原理.首先我们从一个例子开始,而不仅仅是从理论上,这样,有助于更好地理解,然后,我们来看下get和put到底是怎样工作的. 我们来看个非常简单的例 ...
- 走向DBA[MSSQL篇] 针对大表 设计高效的存储过程【原理篇】 附最差性能sql语句进化过程客串
原文:走向DBA[MSSQL篇] 针对大表 设计高效的存储过程[原理篇] 附最差性能sql语句进化过程客串 测试的结果在此处 本篇详解一下原理 设计背景 由于历史原因,线上库环境数据量及其庞大,很多千 ...
- 关于HashMap put元素的原理
HashMap集合put元素的原理:(1)计算key的hashCode(2)将key的hashCode作为计算因子,通过哈希算法计算HashMap的数组下标index(3)如果index下标的数组元素 ...
- HashMap的底层实现原理
HashMap的底层实现原理1,属性static final int MAX_CAPACITY = 1 << 30;//1073741824(十进制)0100000000000000000 ...
- HashMap底层实现及原理
注意:文章的内容基于JDK1.7进行分析.1.8做的改动文章末尾进行讲解. 一.先来熟悉一下我们常用的HashMap: 1.HashSet和HashMap概述 对于HashSst及其子类而 ...
- Hashtable,HashMap和ConcurrentHashMap的原理及区别
一.原理 Hashtable 底层数组+链表实现,无论key还是value都不能为null,线程安全,实现线程安全的方式是在修改数据时锁住整个HashTable,效率低,ConcurrentHashM ...
- Map实现之HashMap(结构及原理)(转)
java.util包中的集合类包含 Java 中某些最常用的类.最常用的集合类是 List 和 Map.List 的具体实现包括 ArrayList 和 Vector,它们是可变大小的列表,比较适合构 ...
- HashMap和ConcurrentHashMap实现原理及源码分析
HashMap实现原理及源码分析 哈希表(hash table)也叫散列表,是一种非常重要的数据结构,应用场景及其丰富,许多缓存技术(比如memcached)的核心其实就是在内存中维护一张大的哈希表, ...
- Java集合:HashMap底层实现和原理(源码解析)
Note:文章的内容基于JDK1.7进行分析.1.8做的改动文章末尾进行讲解. 一.先来熟悉一下我们常用的HashMap: 1.概述 HashMap基于Map接口实现,元素以键值对的方式存储,并且允许 ...
随机推荐
- windows版的mysql主从复制环境搭建
背景 最近在学习用Spring Aop来实现数据库读写分离的功能. 在编写代码之前,首先是要部署好mysql的环境,因为要实现读写分离,所以至少需要部署两个mysql实例,一主一从,并且主从实例之间能 ...
- c# 发送邮箱,企业邮箱测试成功
今天在项目中需要实现一个发送邮箱的功能,来实现用户邮箱激活功能!!! 之前采用的是个人的邮箱进行测试,一切都是很顺利的,后来换成了公司的企业邮箱,遇到了一点小问题,问题如下: 发送邮件失败,原因:命令 ...
- python--debug神器pysnooper
使用它你可以获得什么优势: (1)无需用print就可以获得变量的值: (2)以日志地形式进行保存,方便随时查看: (3)可以根据需要,设置调用函数的深度: (4)多个函数的日志,可以设置前缀进行标识 ...
- ORA-00845 startup启动不起来关于磁盘空间扩充
问题描述:今天在虚拟机下进行startup的操作,但是没有起来,系统报错:ORA-00845: MEMORY_TARGET not supported on this system 1.startup ...
- day 41 css固定位置 以及小米商城项目
.如何让一个绝对定位的盒子居中 left:%; margin-left:- 宽度的一半 .固定定位 position: fixed; ()脱标 参考点:浏览器的左上角 作用:固定导航栏 返回顶部 小广 ...
- nginx的使用,以及反向代理,负载均衡,从安装到使用,全部步骤。
先总结nginx实现负载均衡的原理,在这之前先的知道反向代理,因为nginx的负载均衡是在反向代理的基础上实现的: 1.反向代理:通过在nginx的配置文件 (vim /opt/nginx196/co ...
- 空气质量管理系统+SSM(Spring+SpringMVC+Mybatis)+前后端分离总结
作者:故事我忘了¢个人微信公众号:程序猿的月光宝盒 点我进SSM演示地址 1.目录结构: 2.需要注意的地方 2.1在WEB-INFO下新建 2.1.1 springMVC-servlet.xml & ...
- 请停止编写这么多的for循环!
在这篇文章中,我想和你一起回到基础知识,并讨论 Java 中的 for 循环.老实说,我正在为自己写这篇博客文章,因为我也会这样做.从 Java 8 开始,我们不必在 Java 中编写太多 for 循 ...
- AJAX入门介绍
在我们平时的开发过程中,经常使用到Ajax数据交互,相信有很大一部分人会使用,可能没太详细了解过Ajax的工作原理.下面我们一起看一下吧! ( 一 ) 什么是Ajax Ajax 即“Asynchron ...
- Qt的安装
由于之前用的vs2017是集成c++环境的,加之dev c++ 编码管理起来不是很方便,Mytc (win10不支持) ,所以转而向Qt 开发工具,以下是大概安装过程 下载地址 清华源:https:/ ...