Spring高级注解
目录:
1、使用限定注解;
2、自定义限定注解;
3、自定义bean的生命周期;
开发环境:IntelliJ IDEA 2019.2.2
Spring Boot版本:2.1.8
新建一个名称为demo的Spring Boot项目。
一、限定注解
当存在多个同类型的bean时,可以使用Primary注解指定优先注入的bean。如果对bean的注入选择做进一步的控制,则可以使用限定注解。
限定注解可以与特定的参数关联起来,缩小类型匹配的范围,最后选择一个符合条件的bean来注入。
1、新建类 MyBean.java
package com.example.demo;

public class MyBean {

    public MyBean(String id){

       this.id = id;

    }

    private String id;

    public String getId() {

        return id;

    }

    public void setId(String id) {

        this.id = id;

    }

}
2、新建类 MyConfig.java
package com.example.demo;

import org.springframework.context.annotation.Bean;

import org.springframework.context.annotation.Configuration;

@Configuration

public class MyConfig {

    @Bean

    public MyBean bean1(){

        return new MyBean("1");

    }

    @Bean

    public MyBean bean2(){

        return new MyBean("2");

    }

}
3、新建一个控制器 DemoController.java
package com.example.demo;

import org.springframework.beans.factory.annotation.Autowired;

import org.springframework.beans.factory.annotation.Qualifier;

import org.springframework.web.bind.annotation.RequestMapping;

import org.springframework.web.bind.annotation.RestController;

@RestController

public class DemoController {

    @Autowired

    @Qualifier("bean1")

    MyBean bean;

    @RequestMapping(value = "/")

    public String index(){

        return bean.getId();

    }

}
运行项目后,浏览器访问:http://localhost:8080/,页面显示:
1
二、自定义限定注解
如果需要根据特定的属性来指定注入的bean,则可以自定义限定注解。
1、继续使用上面例子的类 MyBean.java
2、新建一个接口 MyBeanQualifier.java
package com.example.demo;

import org.springframework.beans.factory.annotation.Qualifier;

import java.lang.annotation.ElementType;

import java.lang.annotation.Retention;

import java.lang.annotation.RetentionPolicy;

import java.lang.annotation.Target;

@Target({ElementType.FIELD, ElementType.METHOD})

@Retention(RetentionPolicy.RUNTIME)

@Qualifier

public @interface MyBeanQualifier {

    String type();

}
3、修改上面例子代码 MyConfig.java
在配置bean时,需要为相应的bean设置不同的类型。
package com.example.demo;

import org.springframework.context.annotation.Bean;

import org.springframework.context.annotation.Configuration;

@Configuration

public class MyConfig {

    @Bean

    @MyBeanQualifier(type = "bean1")

    public MyBean bean1(){

        return new MyBean("1");

    }

    @Bean

    @MyBeanQualifier(type = "bean2")

    public MyBean bean2(){

        return new MyBean("2");

    }

}
4、修改上面例子控制器代码 DemoController.java
package com.example.demo;

import org.springframework.beans.factory.annotation.Autowired;

import org.springframework.web.bind.annotation.RequestMapping;

import org.springframework.web.bind.annotation.RestController;

@RestController

public class DemoController {

    @Autowired

    @MyBeanQualifier(type = "bean2")

    MyBean bean;

    @RequestMapping(value = "/")

    public String index(){

        return bean.getId();

    }

}
运行项目后,浏览器访问:http://localhost:8080/,页面显示:
2
三、自定义bean的生命周期
Scope注解主要用于配置bean在容器中的生命周期,除了可以配置为singleton和prototype,在Web环境还可以配置为request、session等
值,表示容器会为一次请求或一个会话分配一个bean的实例。
如果对bean的生命周期有特殊需求,可以使用自定义的Scope。
例子:一个bean被使用3次后,就获取新的bean实例。
1、继续使用上面例子的类 MyBean.java
2、新建一个自定义的Scope类 MyScope.java
package com.example.demo;

import org.springframework.beans.factory.ObjectFactory;

import org.springframework.beans.factory.config.Scope;

import java.util.HashMap;

import java.util.Map;

public class MyScope implements Scope {

    //记录bean的使用次数

    private Map<String,Integer> beanCounts = new HashMap<String,Integer>();

    //保存实例

    private Map<String,Object> beans = new HashMap<String,Object>();

    @Override

    public Object get(String s, ObjectFactory<?> objectFactory) {

        if(beanCounts.get(s) == null){

            beanCounts.put(s, 0);

        }

        //第一次使用,放到实例的Map中

        Integer beanCount = beanCounts.get(s);

        if(beanCount == 0){

            Object newObject = objectFactory.getObject();

            beans.put(s, newObject);

        }

        Object bean = beans.get(s);

        //计数器加1

        Integer newBeanCount = beanCount + 1;

        if(newBeanCount >= 3){

            newBeanCount = 0;

        }

        //设置新的次数

        beanCounts.put(s, newBeanCount);

        return bean;

    }

    @Override

    public Object remove(String s) {

        return null;

    }

    @Override

    public void registerDestructionCallback(String s, Runnable runnable) {

    }

    @Override

    public Object resolveContextualObject(String s) {

        return null;

    }

    @Override

    public String getConversationId() {

        return null;

    }

}
3、修改上面例子代码 MyConfig.java
将自定义Scope注册到容器中。
package com.example.demo;

import org.springframework.beans.factory.BeanFactory;

import org.springframework.beans.factory.annotation.Autowired;

import org.springframework.beans.factory.config.ConfigurableListableBeanFactory;

import org.springframework.beans.factory.config.CustomScopeConfigurer;

import org.springframework.context.annotation.Bean;

import org.springframework.context.annotation.Configuration;

import org.springframework.context.annotation.Scope;

import javax.annotation.PostConstruct;

@Configuration

public class MyConfig {

    @Autowired

    BeanFactory factory;

    @PostConstruct

    public void customScopeConfigurer(){

        CustomScopeConfigurer config = new CustomScopeConfigurer();

        config.addScope("three", new MyScope());

        config.postProcessBeanFactory((ConfigurableListableBeanFactory)factory);

    }

    @Bean

    @Scope(scopeName = "three")

    public MyBean bean1(){

        return new MyBean("1");

    }

}
4、修改上面例子控制器代码 DemoController.java
package com.example.demo;

import org.springframework.beans.factory.annotation.Autowired;

import org.springframework.context.ApplicationContext;

import org.springframework.web.bind.annotation.RequestMapping;

import org.springframework.web.bind.annotation.RestController;

@RestController

public class DemoController {

    @Autowired

    ApplicationContext ctx;

    @RequestMapping(value = "/")

    public String index(){

        for(int i=0;i<5;i++){

            System.out.println(ctx.getBean("bean1"));

        }

        return "";

    }

}
运行项目后,浏览器访问:http://localhost:8080/,IDEA控制台输出:
com.example.demo.MyBean@61f13a02
com.example.demo.MyBean@61f13a02
com.example.demo.MyBean@61f13a02
com.example.demo.MyBean@54094334
com.example.demo.MyBean@54094334
可见前3次得到同一个bean实例。
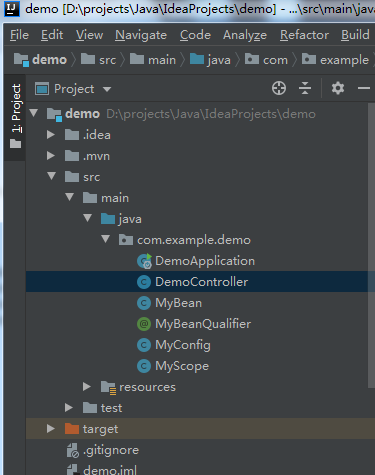
附,项目结构图

Spring高级注解的更多相关文章
- Spring高级话题-@Enable***注解的工作原理
出自:http://blog.csdn.net/qq_26525215 @EnableAspectJAutoProxy @EnableAspectJAutoProxy注解 激活Aspect自动代理 & ...
- Spring Boot实战笔记(九)-- Spring高级话题(组合注解与元注解)
一.组合注解与元注解 从Spring 2开始,为了响应JDK 1.5推出的注解功能,Spring开始大量加入注解来替代xml配置.Spring的注解主要用来配置注入Bean,切面相关配置(@Trans ...
- Spring高级装配
Spring高级装配 目录 一.Profile(根据开发环境创建对应的bean) 二.条件化的创建bean(根据条件创建bean) 三.处理自动装配歧义性(指定首选bean.限定符限制bean) 四. ...
- Spring高级装配(一) profile
Spring高级装配要学习的内容包括: Spring profile 条件化的bean声明 自动装配与歧义性 bean的作用域 Spring表达式语言 以上属于高级一点的bean装配技术,如果你没有啥 ...
- spring mvc 注解详解
1.@Controller 在SpringMVC 中,控制器Controller 负责处理由DispatcherServlet 分发的请求,它把用户请求的数据经过业务处理层处理之后封装成一个Model ...
- Spring常用注解用法总结
转自http://www.cnblogs.com/leskang/p/5445698.html 1.@Controller 在SpringMVC 中,控制器Controller 负责处理由Dispat ...
- Spring MVC注解的一些案列
1. spring MVC-annotation(注解)的配置文件ApplicationContext.xml <?xml version="1.0" encoding=& ...
- Spring系列之Spring常用注解总结
传统的Spring做法是使用.xml文件来对bean进行注入或者是配置aop.事物,这么做有两个缺点:1.如果所有的内容都配置在.xml文件中,那么.xml文件将会十分庞大:如果按需求分开.xml文件 ...
- spring @condition 注解
spring @condition注解是用来在不同条件下注入不同实现的 demo如下: package com.foreveross.service.weixin.test.condition; im ...
随机推荐
- EVERSPIN非易失性存储器具吸引力嵌入式技术
相关研究指出,如果以嵌入式MRAM取代微控制器中的eFlash和SRAM,可节省高达90%的功耗:如果采用单一晶体管MRAM取代六个晶体管SRAM,则可实现更高的位元密度和更小的芯片尺寸,这些功率与面 ...
- C++之new关键字
我们都知道new是用来在程序运行过程中为变量临时分配内存的C++关键字,那它跟C语言中的malloc有什么区别呢,相比之下又为什么推荐使用new呢 c++ throwing() void* opera ...
- Android进程管理机制研究
一.Linux中的进程管理在Linux中,进程是指处理器上执行的一个实例,可使用任意资源以便完成它的任务,具体的进程管理,是通过“进程描述符”来完成的,对应Linux内核中的task_struct数据 ...
- SpringCloud微服务实现生产者消费者+ribbon负载均衡
一.生产者springcloud_eureka_provider (1)目录展示 (2)导入依赖 <dependency> <groupId>org.springframewo ...
- 每天进步一点点----JS之比较运算符易错点
1.字符串的比较 字符串也是可以比较的,字符串比较的asc码顺序:asc有128位,由7位二进制数表示,每个数对应的是一个字符.ASC码有ASC码1,由7位二进制1数表示:ASC2码又8位二进制数表示 ...
- C# 读写倍福plc beckhoff , 使用ADS协议实现读取plc
本文将使用库技术来读写倍福PLC数据,使用的是基于以太网的ADS实现,不需要额外的组件,读取操作只要放到后台线程就不会卡死线程,本组件支持超级方便的高性能读写操作 github地址:https://g ...
- jQuery总结01_jq的基本概念+选择器
jQuery基本概念 学习目标:学会如何使用jQuery,掌握jQuery的常用api,能够使用jQuery实现常见的效果. 为什么要学习jQuery? [01-让div显示与设置内容.html] 使 ...
- GitLab基本设置-新增用户
场景 Docker Compose部署GitLab服务,搭建自己的代码托管平台(图文教程): https://blog.csdn.net/BADAO_LIUMANG_QIZHI/article/det ...
- Angular(05)- 组件知识点脑图
点击左键 => 拖拽图片 => 新标签页查看图片 => 放大拖拽查阅
- 构建Electron的常见问题(Mac)
背景 起因是产品的需求,需要更换Electron为底层平台,但因为会有不少定制化的功能要实现,必须自己实现此类内容,所以也就导致必须自己编译Electron的源代码. 整个构建过程,看Electron ...
