C# Xamarin 数据绑定入门基础
C# Xamarin 数据绑定入门基础
关于数据绑定
Xamarin 单向、双向绑定
Xaml绑定
C#代码绑定
在此之前,几段 伪代码 帮助像我一样菜的同学入门。。。
假如说,有两个控件,一个是滑动条(Slider),一个是显示文本的标签(Label)。
            Slider slider = new Slider()

            {

                Maximum = 1,

                Value = 10

            };

            Label label = new Label();

            label.Text = slider.Value.ToString();
滑动条(Slider)滑动的最小单位是 1,初始化值是 10。
我们想用标签(Label)显示滑动条的值,在代码里可以直接赋值。
label.Text = slider.Value.ToString();
但是,这样只能获取一次值,我们想滑动条每次滑动,标签动态显示滑动条的值,这时候就需要绑定。
方式1:
            Slider slider = new Slider()

            {

                Maximum = 1,

                Value = 10

            };

            Label label = new Label();

            label.Text = "666"; // 随便初始化一个值

            label.BindingContext = slider;      // 与一个对象相关联

            // 设置一个绑定

            // 将 Label 类型的 Text 与 slider 的 Value 属性绑定起来

            label.SetBinding(Label.TextProperty,"Value");
方式2:
            Slider slider = new Slider()

            {

                Maximum = 1,

                Value = 10

            };

            Label label = new Label();

            label.Text = "666"; // 随便初始化一个值

            Binding binding = new Binding()

            {

                Source = slider, // 关联数据源

                Path = "Value"   // 绑定数据源的属性

            };

            // 绑定

            label.SetBinding(Label.TextProperty, binding);
上面里,有关键字需要记住
BindingContext()、SetBinding()、Binding、Source、Path。
视图-视图绑定
视图-视图绑定,即 UI 控件间的绑定,使用 Xaml 代码即可完成,不需要 C#代码。
上一节中,使用 伪代码 来作为示范,显示了两种绑定方式,下面将以两种方式为例,编写 Xaml 代码的绑定。
首先,要建立数据源
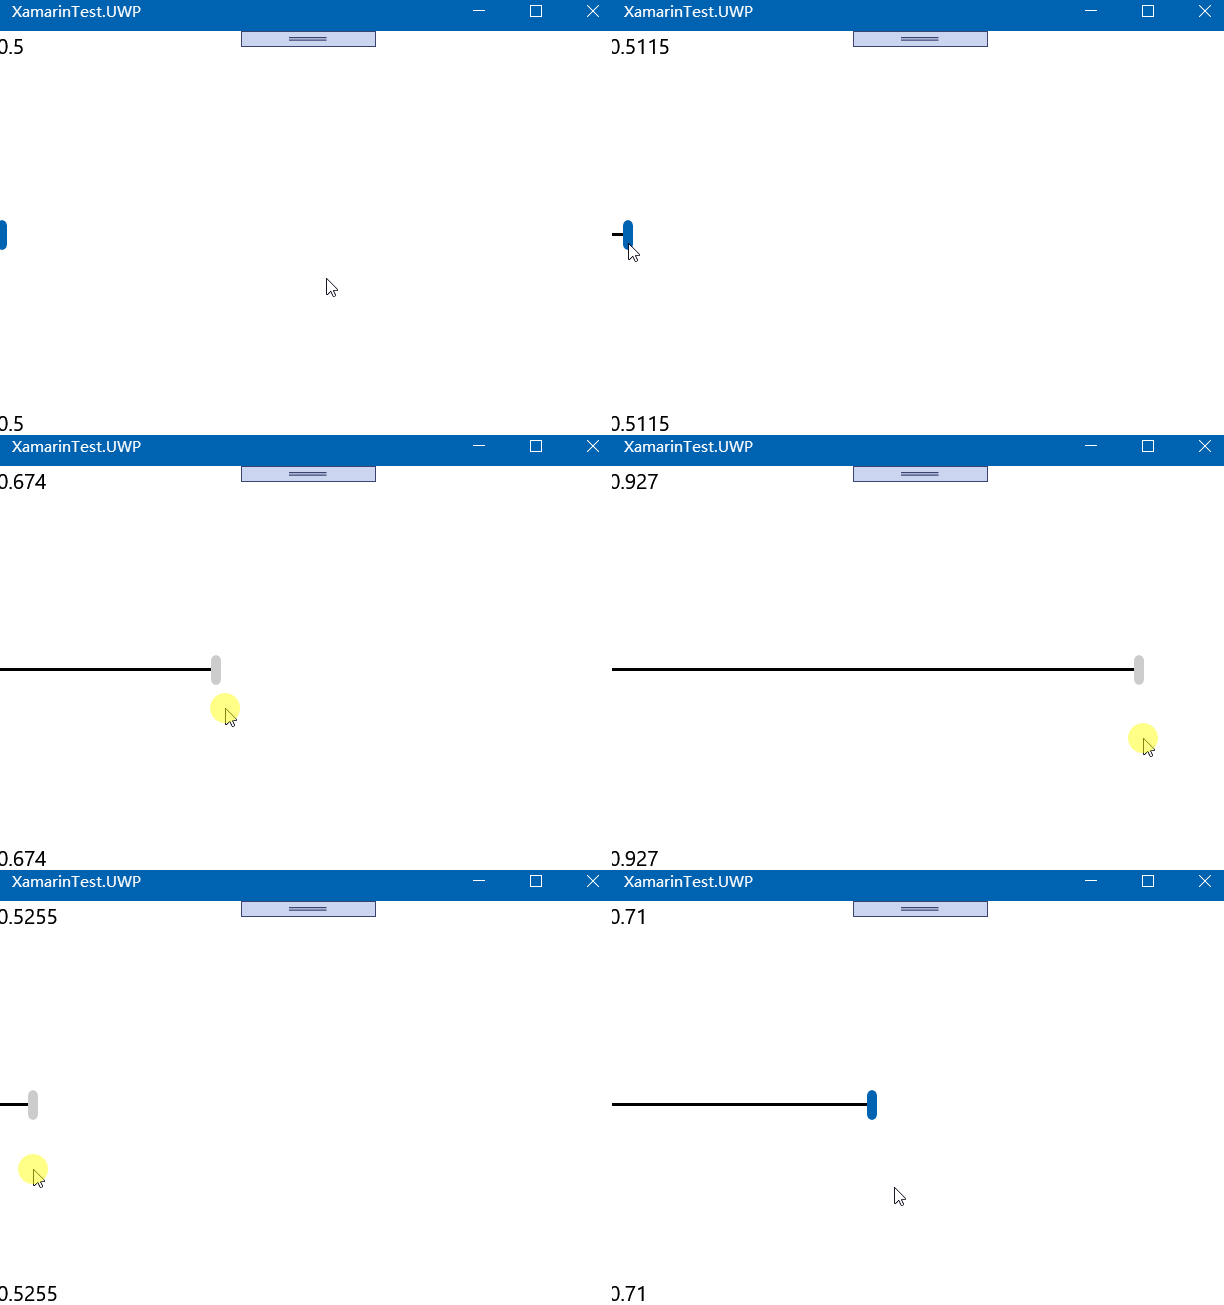
<Slider x:Name="slider" Maximum="1.0" VerticalOptions="CenterAndExpand" />
绑定数据使用 {Binding ... ...}
然后按照第一种方式就行绑定
        <Label x:Name="label"

               BindingContext="{x:Reference Name=slider}"

               Text="{Binding Path=Value}" />
x:Reference 是拓展标记,在 XAML 标记中其他地方声明的实例的引用。 指明所引用的元素的 x:Name。就是一种固定格式,主要是里面的 Name,要填写数据控件的 X:Name 属性。
{Binding Path=Value} 表明操作是 Binding ,即绑定数据,绑定的数据是 slider 的 Value 属性。
上面绑定方式,先在 BindingContext 属性中绑定数据源对象,再在 Text 属性中绑定 数据源对象 的 Value 属性。
第二种方式
<Label Text="{Binding Source={x:Reference Name=slider}, Path=Value}" />
第二种方式,直接使用 {Binding ... ... } 绑定数据,Source 设置要绑定的数据源对象,Path 绑定了这个对象的某个属性。
为了让界面好看一些,总结上面的代码,写成
    <StackLayout>

        <Label x:Name="label"

               BindingContext="{x:Reference Name=slider}"

               Text="{Binding Path=Value}" />

        <Slider x:Name="slider" Maximum="1.0" VerticalOptions="CenterAndExpand" />

        <Label Text="{Binding  Source={x:Reference Name=slider}, Path=Value}" />

    </StackLayout>

但是上面的小数点位数太多,不符合我们需要的格式,我们可以使用 StringFormat 对数据进行格式化。
Text="{Binding Path=Value,StringFormat='{0:F1}'}
绑定模式
绑定枚举
绑定类型的BindingMode枚举:
DefaultOneWay-值从源传输到目标OneWayToSource-值从目标传输到源TwoWay-值传输源和目标之间的这两种方式OneTime-数据从源到目标进行,但仅当BindingContext发生更改时
上面的的数据绑定,是一对一的,而且是单向的数据绑定,是先有 Slider 控件,再在 Label 中绑定。
而且实际场景,1对1并且数据双向影响、1对多并且多个数据源数据汇集到一个控件等。
单个控件的不同属性都可以绑定数据。 但是,每个控件只能有一个BindingContext,因此,在该视图上的多个数据绑定必须全部引用同一对象的属性。
如果你使用上小节的第一种方式的话,那么只能绑定=一个对象和使用这个对象的属性。
如果使用第二种方法,则可以绑定多个数据源。
一对多-目标绑定源数据
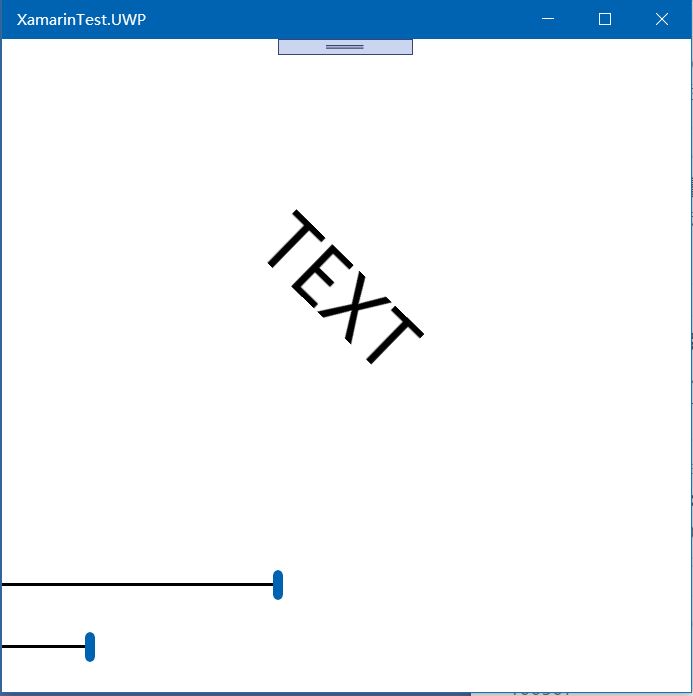
根据之前的示例,假如 Label 的多个属性,同时要绑定不同的数据,可以这样写。
    <Grid>

        <Grid.RowDefinitions>

            <RowDefinition Height="*" />

            <RowDefinition Height="Auto" />

            <RowDefinition Height="Auto" />

            <RowDefinition Height="Auto" />

            <RowDefinition Height="Auto" />

        </Grid.RowDefinitions>

        <Grid.ColumnDefinitions>

            <ColumnDefinition Width="*" />

            <ColumnDefinition Width="Auto" />

        </Grid.ColumnDefinitions>

        <!-- Scale:大小, Rotation:旋转角度 -->

        <Label x:Name="label"

               Text="TEXT"

               Scale="{Binding Source={x:Reference Name=slider1},Path=Value}"

               Rotation="{Binding Source={x:Reference Name=slider2},Path=Value}"

               HorizontalOptions="Center"

               VerticalOptions="CenterAndExpand" />

        <!-- 用来控制大小 -->

        <Slider x:Name="slider1"

                Grid.Row="1" Grid.Column="0"

                Value="5"

                Maximum="10" />

        <!--控制旋转角度 -->

        <Slider x:Name="slider2"

                Grid.Row="2" Grid.Column="0"

                Maximum="360"/>

    </Grid>

一对多-源对象绑定目标
上面的方法不太灵活,假设 Label 是公用的,要在 Label 里面配置多个属性的数据来源,要通过自身编写绑定,而且一个属性只能绑定一个数据对象。
为了降低耦合度,降低 Label 绑定数据的复杂程度,并且使得多个对象都可以修改 Label 的属性。
我们可以反过来,创建多个控件,Label 是数据源,其他控件是目标源,但是数据却是从其他控件提供给 Label 的。有的绕,没事,下面举例说明。
        <!-- Scale:大小, Rotation:旋转角度 -->

        <Label x:Name="label"

               Text="TEXT"

               HorizontalOptions="Center"

               VerticalOptions="CenterAndExpand" />

        <!-- 用来控制大小 -->

        <Slider x:Name="scaleSlider"

                BindingContext="{x:Reference label}"

                Grid.Row="1" Grid.Column="0"

                Maximum="10"

                Value="{Binding Scale, Mode=TwoWay}" />

        <!--控制旋转角度 -->

        <Slider x:Name="rotationSlider"

                BindingContext="{x:Reference label}"

                Grid.Row="2" Grid.Column="0"

                Maximum="360"

                Value="{Binding Rotation, Mode=OneWayToSource}" />
label 不作任何处理,而 scaleSlider 和 rotationSlider 把 label 作为数据源绑定,从绑定的定义来说, label 是数据源, label 的属性数据将 作为 目标控件 scaleSlider、 rotationSlider 的属性值。
咦?好像搞错了,我们是要通过别的控件,去修改 label 的属性值,怎么变成了用 label 的属性值当作 此控件 的属性值了?
原因在于使用了 Mode 。
OneWayToSource 枚举:值从目标传输到源。
从绑定的代码和定义来说,label 是数据源,滑动条是目标,但是数据是反向流通的。
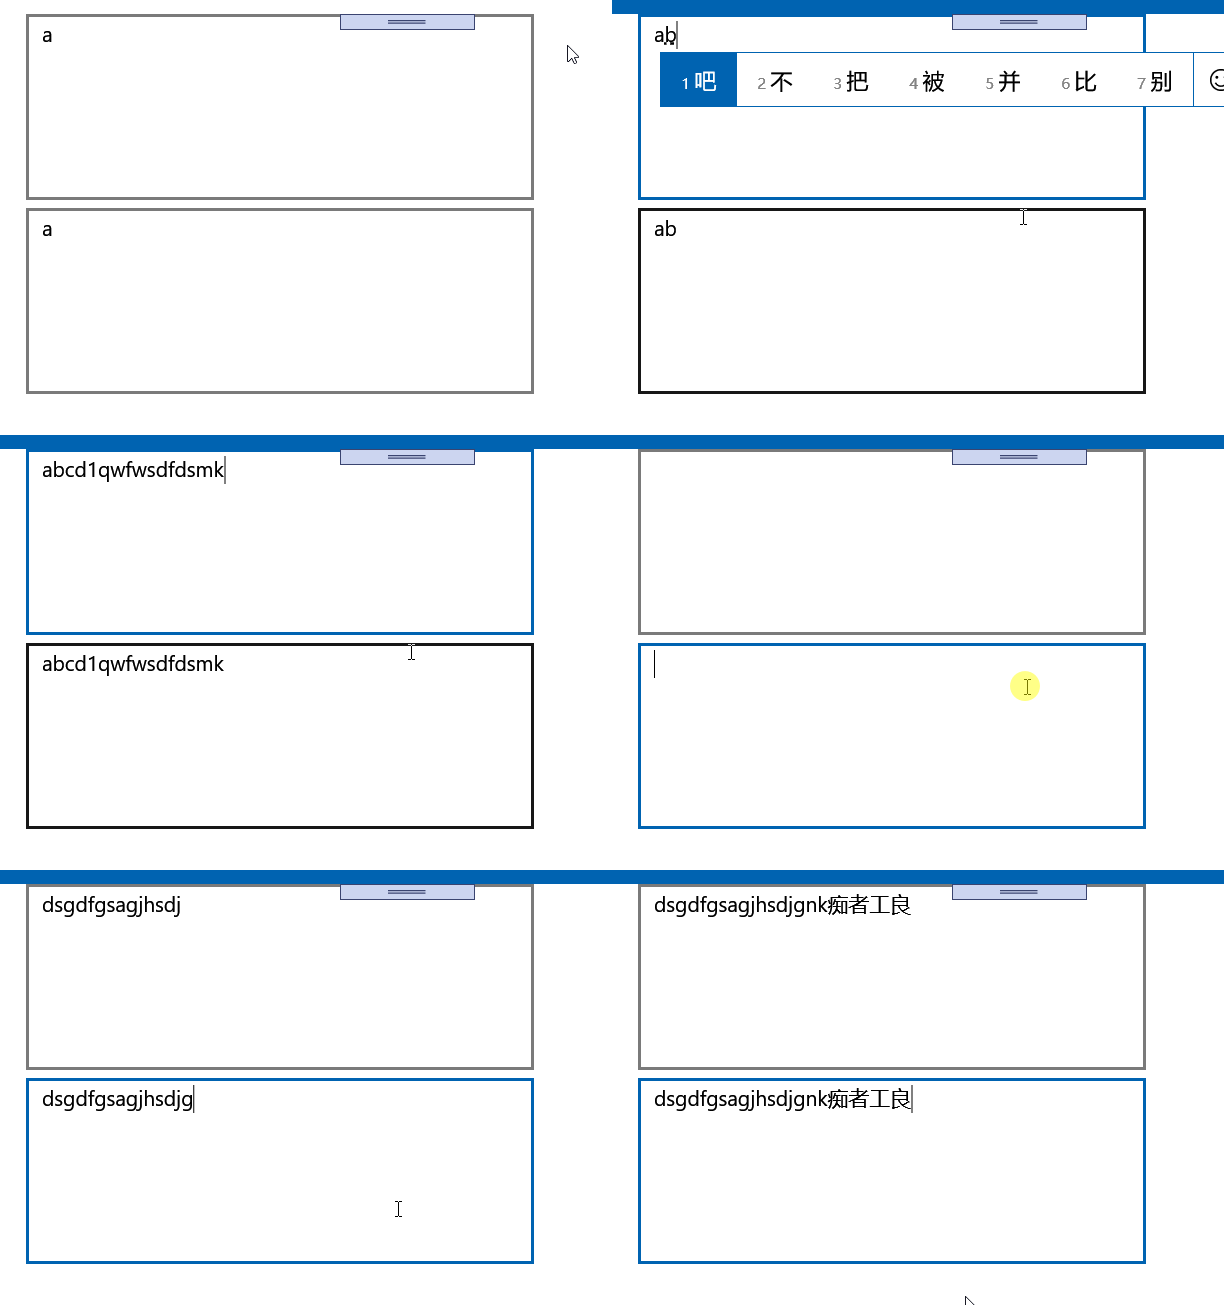
文本框双向绑定
示例代码如下
    <Grid>

        <Grid.RowDefinitions>

            <RowDefinition Height="2*" />

            <RowDefinition Height="2*" />

            <RowDefinition Height="2*" />

            <RowDefinition Height="2*" />

            <RowDefinition Height="2*" />

        </Grid.RowDefinitions>

        <Grid.ColumnDefinitions>

            <ColumnDefinition Width="2*" />

            <ColumnDefinition Width="2*" />

            <ColumnDefinition Width="2*" />

            <ColumnDefinition Width="2*" />

            <ColumnDefinition Width="2*" />

        </Grid.ColumnDefinitions>

        <Editor x:Name="edit1"

                Grid.Row="0"

                Grid.Column="1"

                Grid.ColumnSpan="2"

                Text="a"/>

        <Editor x:Name="edit2"

                Grid.Row="1"

                Grid.Column="1"

                Grid.ColumnSpan="2"

                Text="{Binding Source={x:Reference edit1},Path=Text,Mode=TwoWay}"/>

    </Grid>

官方示例
微软官方文档有一个示例代码量比较多,有兴趣可以参考一下
<ContentPage xmlns="http://xamarin.com/schemas/2014/forms"

             xmlns:x="http://schemas.microsoft.com/winfx/2009/xaml"

             x:Class="XamlSamples.SliderTransformsPage"

             Padding="5"

             Title="Slider Transforms Page">

    <Grid>

        <Grid.RowDefinitions>

            <RowDefinition Height="*" />

            <RowDefinition Height="Auto" />

            <RowDefinition Height="Auto" />

            <RowDefinition Height="Auto" />

            <RowDefinition Height="Auto" />

        </Grid.RowDefinitions>

        <Grid.ColumnDefinitions>

            <ColumnDefinition Width="*" />

            <ColumnDefinition Width="Auto" />

        </Grid.ColumnDefinitions>

        <!-- Scaled and rotated Label -->

        <Label x:Name="label"

               Text="TEXT"

               HorizontalOptions="Center"

               VerticalOptions="CenterAndExpand" />

        <!-- Slider and identifying Label for Scale -->

        <Slider x:Name="scaleSlider"

                BindingContext="{x:Reference label}"

                Grid.Row="1" Grid.Column="0"

                Maximum="10"

                Value="{Binding Scale, Mode=TwoWay}" />

        <Label BindingContext="{x:Reference scaleSlider}"

               Text="{Binding Value, StringFormat='Scale = {0:F1}'}"

               Grid.Row="1" Grid.Column="1"

               VerticalTextAlignment="Center" />

        <!-- Slider and identifying Label for Rotation -->

        <Slider x:Name="rotationSlider"

                BindingContext="{x:Reference label}"

                Grid.Row="2" Grid.Column="0"

                Maximum="360"

                Value="{Binding Rotation, Mode=OneWayToSource}" />

        <Label BindingContext="{x:Reference rotationSlider}"

               Text="{Binding Value, StringFormat='Rotation = {0:F0}'}"

               Grid.Row="2" Grid.Column="1"

               VerticalTextAlignment="Center" />

        <!-- Slider and identifying Label for RotationX -->

        <Slider x:Name="rotationXSlider"

                BindingContext="{x:Reference label}"

                Grid.Row="3" Grid.Column="0"

                Maximum="360"

                Value="{Binding RotationX, Mode=OneWayToSource}" />

        <Label BindingContext="{x:Reference rotationXSlider}"

               Text="{Binding Value, StringFormat='RotationX = {0:F0}'}"

               Grid.Row="3" Grid.Column="1"

               VerticalTextAlignment="Center" />

        <!-- Slider and identifying Label for RotationY -->

        <Slider x:Name="rotationYSlider"

                BindingContext="{x:Reference label}"

                Grid.Row="4" Grid.Column="0"

                Maximum="360"

                Value="{Binding RotationY, Mode=OneWayToSource}" />

        <Label BindingContext="{x:Reference rotationYSlider}"

               Text="{Binding Value, StringFormat='RotationY = {0:F0}'}"

               Grid.Row="4" Grid.Column="1"

               VerticalTextAlignment="Center" />

    </Grid>

</ContentPage>
简单的集合绑定
MainPage.xaml 里添加
    <ListView x:Name="lview">

    </ListView>
MainPage.xaml.cs 里,改成
    public partial class MainPage : ContentPage

    {

        public static List<string> lists = new List<string> {"a","b","c","d","e","f" };

        public MainPage()

        {

            InitializeComponent();

            lview.ItemsSource = lists;

        }

    }
运行后,会自动出现列表。
关于 ListView ,后面的文章会更详细地介绍。
C# Xamarin 数据绑定入门基础的更多相关文章
- Angular JS从入门基础 mvc三层架构 常用指令
Angular JS从入门基础 mvc模型 常用指令 ★ 最近一直在复习AngularJS,它是一款优秀的前端JS框架,已经被用于Google的多款产品当中.AngularJS有着诸多特性,最为核心 ...
- Vue学习记录第一篇——Vue入门基础
前面的话 Vue中文文档写得很好,界面清爽,内容翔实.但文档毕竟不是教程,文档一上来出现了大量的新概念,对于新手而言,并不友好.个人还是比较喜欢类似于<JS高级程序设计>的风格,从浅入深, ...
- Vue入门基础
前面的话 Vue中文文档写得很好,界面清爽,内容翔实.但文档毕竟不是教程,文档一上来出现了大量的新概念,对于新手而言,并不友好.个人还是比较喜欢类似于<JS高级程序设计>的风格,从浅入深, ...
- C# Xamarin移动开发基础进修篇
一.课程介绍 英文原文:C# is the best language for mobile app development. Anything you can do in Objective-C, ...
- 微信小程序入门基础
微信小程序入门基础 视频教程(https://edu.csdn.net/course/detail/8456?pre_view=1) 第一章.认识小程序 1.工具的下载与安装 2.小程序代码构成 ...
- mybatis入门基础(二)----原始dao的开发和mapper代理开发
承接上一篇 mybatis入门基础(一) 看过上一篇的朋友,肯定可以看出,里面的MybatisService中存在大量的重复代码,看起来不是很清楚,但第一次那样写,是为了解mybatis的执行步骤,先 ...
- 01shell入门基础
01shell入门基础 为什么学习和使用shell编程 shell是一种脚本语言,脚本语言是相对于编译语言而言的.脚本语言不需要编译,由解释器读取程序并且执行其中的语句,而编译语言需要编译成可执行代码 ...
- Markdown入门基础
// Markdown入门基础 最近准备开始强迫自己写博文,以治疗严重的拖延症,再不治疗就“病入骨髓,司命之所属,无奈何”了啊.正所谓“工欲善其事,必先利其器”,于是乎在写博文前,博主特地研究了下博文 ...
- [深入浅出WP8.1(Runtime)]数据绑定的基础
11.1 数据绑定的基础 数据绑定是一种XAML界面和后台数据通信的方式,因为界面和后台数据的通信的场景有多种,并且数据于数据之间也存在着不一样的关联关系,所以数据绑定的实现技巧和方式也是多种多样的. ...
随机推荐
- eclipse配置svn导出项目
eclipse安装svn 菜单栏help-->eclipse marketspace-->find中搜索subclipse,安装-->ok windows-->show vie ...
- 面试 3-5年Java开发后的感受
在上周,我密集面试了若干位Java后端的候选人,工作经验在3到5年间.我的标准其实不复杂:第一能干活,第二Java基础要好,第三最好熟悉些分布式框架,我相信其它公司招初级开发时,应该也照着这个标准来面 ...
- Jenkins+GitLab+Sonarqube+Shell持续集成CI/CD
1.部署GitLab 2.部署Jenkins 3.Sonar代码审计 4.参数化构建 5.git参数化构建
- CSS 盒子模型、RestCSS、浮动、定位
盒子模型 边框:border 左边框:border-left 右边框:border-right 上边框:border-top 下边框:border-bottom 复合样式:border 边框颜色:bo ...
- 视频分享慕课网----Angular 打造企业级协作平台
慕课网是一个非常不错的视频学习网站,搭建搭建企业协作平台,导师由深到浅,讲解的特别好. 本课程主要学习 Angular 进阶知识点和技巧(Material.动画.依赖注入.表单控件.RxJS,Redu ...
- 1.Redux学习1,Redux
Redux流程图如上: Action就是一条命令 Store顾名思义就是存储数据的, Reducers是一个回调函数用于处理数据,它处理完数据会返回给Store存储起来 基本流程就是:组件中用Stor ...
- django-建表出现的错误
在执行python3 manage.py migrate时出现以下错误 ?: (mysql.W002) MySQL Strict Mode is not set for database connec ...
- gitlab如何从Github导入项目
本文简单演示如何Github上导入项目到私人搭建的Gitlab中,搭建过程参考:CentOS7 搭建gitlab服务器. Gitlab版本是gitlab-ce-12.0.2,界面可能稍有差异,但应该影 ...
- Spring Boot 处理异常返回json
spring boot 老版本处理异常 对于浏览器客户端,返回error数据 对于非浏览器返回json数据, 主要取决于你的请求head 是什么 但是当我们自定义了: 老版本无论请求什么都会返回j ...
- Python @classmethod和@staticmethod装饰器使用介绍
@classmethod和@staticmethod装饰器使用介绍 by:授客 QQ:1033553122 简介 静态方法:类中用 @staticmethod装饰的不带 self 参数的方法.类的静态 ...
