runoob-Android 基础入门教程-1
https://www.runoob.com/w3cnote/android-tutorial-interface-design.html
公司的话,大部分使用的都是Axure Rp,但是这个东西比较难用!除了这个以外还有其他很多的原型设计工具:
- Pencil
- Framer
- Shireframe
- UIDesigner
- Balsamiq Mockups
- Mockup Builder
- Mockup
- FrameBox
- iPhone Mockup
- GOOFLOW
- WireframeSketcher
- FluidIA
- Indigo Studio
- Origami
- Quartz Composer
- Justproto
- Avocado
- PaintCode
- Mockplus(摩客)
- 墨刀等....
Mockplus原型工具的使用:
有网页版以及客户端版供你选择:Mockplus官网
Step 1:注册一个你自己的账号,然后新建文件进入编辑界面!(时间关系,这里笔者直接试用) 然后弹出一个原型风格的对话框给我们选择:素描跟线条!
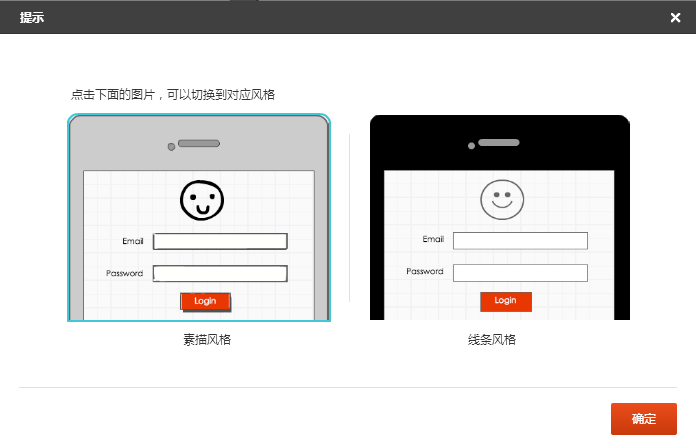
笔者选择线条:

我们要做的就是从左边的组件栏中啦控件到手机界面上,当然,我们可以双击某个控件,自定义我们 的样式,比如颜色,背景图片等!
Step 2:交互实现: 界面原型除了界面外,肯定是少不了交互的,这里我们做一个简单的新闻应用的交互例子给大家体验下: 我们在其中一个新闻类别中添加跳转链接,

接着我们可以点击右上角的播放按钮:

接下来我们就可以看具体的交互了,PS:这里可能是网页版的问题,有些图片显示不出来! 
好了,大概的用法就这些,大家可以自己摸索摸索,另外,如果生成文档是要升级为付费用户的哦!一个月6元不贵,就一个早餐钱,当然如果是自己玩玩而已就没必要开了!
Android自带DroidDraw工具设计Android界面:
其实Android也给我们提供了一个"老掉牙"的界面设计工具,跟上面这些高大上的界面原型工具相比,差几十条街,可以理解成一个分离的ADT,比ADT高级一点的功能就是自动生成代码...对于很少接触原型设计的朋友来说,花1,2分钟就可以掌握这个工具,还是比较值得!
工具界面:
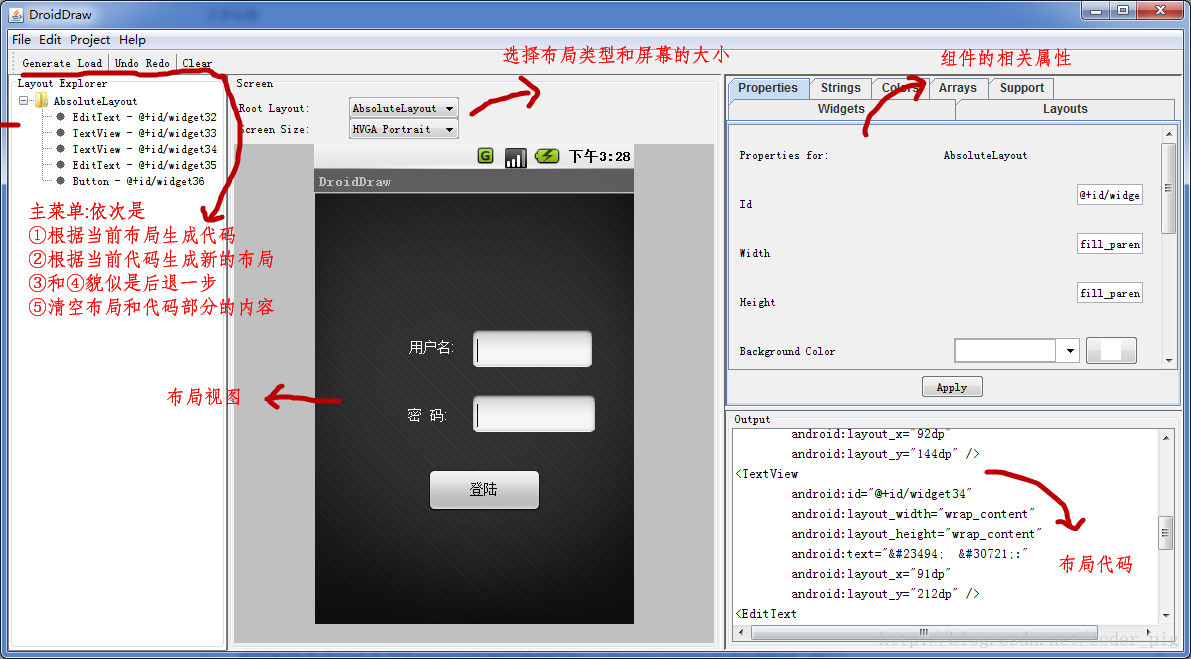
图示已经写明相关的操作了,很简单,实践是检验真理的唯一标准,自己下来试试吧!!
软件下载:droiddrawr.jar
本节小结:
本节给大家介绍了下界面原型设计的概念,轻量级Mockplus(摩客)的简单实用,以及Android自带的DroidDraw工具,内容比较简单,还需大家自行实践理解!
1.工程项目结构解析:
我们开发大部分时间都花在下面这个部分上:
接下来我们对关键部分进行讲解:
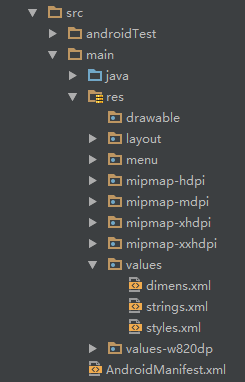
- java:我们写Java代码的地方,业务功能都在这里实现
- res:存放我们各种资源文件的地方,有图片,字符串,动画,音频等,还有各种形式的XML文件
1.res资源文件夹介绍:
PS:说到这个res目录,另外还有提下这个assets目录,虽然这里没有,但是我们可以自己创建,两者的区别在于是否前者下所有的资源文件都会在R.java文件下生成对应的资源id,而后者并不会;前者我们可以直接通过资源id访问到对应的资源;而后者则需要我们通过AssetManager以二进制流的形式来读取!对了,这个R文件可以理解为字典,res下每个资源都都会在这里生成一个唯一的id!
接着说下res这个资源目录下的相关目录:
PS:下述mipmap的目录,在Eclipse并不存在这个,Eclipse中都是drawable开头的,其实区别不大,只是使用mipmap会在图片缩放在提供一定的性能优化,分辨率不同系统会根据屏幕分辨率来选择hdpi,mdpi,xmdpi,xxhdpi下的对应图片,所以你解压别人的apk可以看到上述目录同一名称的图片,在四个文件夹下都有,只是大小和像素不一样而已!当然,这也不是绝对的,比如我们把所有的图片都丢在了drawable-hdpi下的话,即使手机 本该加载ldpi文件夹下的图片资源,但是ldpi下没有,那么加载的还会是hdpi下的图片! 另外,还有一种情况:比如是hdpi,mdpi目录下有,ldpi下没有,那么会加载mdpi中的资源! 原则是使用最接近的密度级别!另外如果你想禁止Android不跟随屏幕密度加载不同文件夹的资源,只需在AndroidManifest.xml文件中添加android:anyDensity="false"字段即可!
1.先说下图片资源:
- drawable:存放各种位图文件,(.png,.jpg,.9png,.gif等)除此之外可能是一些其他的drawable类型的XML文件
- mipmap-hdpi:高分辨率,一般我们把图片丢这里
- mipmap-mdpi:中等分辨率,很少,除非兼容的的手机很旧
- mipmap-xhdpi:超高分辨率,手机屏幕材质越来越好,以后估计会慢慢往这里过渡
- mipmap-xxhdpi:超超高分辨率,这个在高端机上有所体现
2.接着说下布局资源:
- layout:该目录下存放的就是我们的布局文件,另外在一些特定的机型上,我们做屏幕适配,比如480*320这样的手机,我们会另外创建一套布局,就行:layout-480x320这样的文件夹!
3.接下来说下菜单资源:
- menu:在以前有物理菜单按钮,即menu键的手机上,用的较多,现在用的并不多,菜单项相关的资源xml可在这里编写,不知道谷歌会不会出新的东西来替代菜单了~
4.接下来说下values目录:
- demens.xml:定义尺寸资源
- string.xml:定义字符串资源
- styles.xml:定义样式资源
- colors.xml:定义颜色资源
- arrays.xml:定义数组资源
- attrs.xml:自定义控件时用的较多,自定义控件的属性!
- theme主题文件,和styles很相似,但是会对整个应用中的Actvitiy或指定Activity起作用,一般是改变窗口外观的!可在Java代码中通过setTheme使用,或者在Androidmanifest.xml中为<application...>添加theme的属性! PS:你可能看到过这样的values目录:values-w820dp,values-v11等,前者w代表平板设备,820dp代表屏幕宽度;而v11这样代表在API(11),即android 3.0后才会用到的!
5.在接着说下这个raw目录: 用于存放各种原生资源(音频,视频,一些XML文件等),我们可以通过openRawResource(int id)来获得资源的二进制流!其实和Assets差不多,不过这里面的资源会在R文件那里生成一个资源id而已
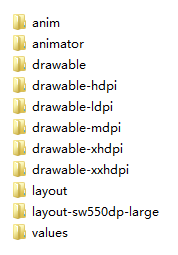
6.最后还有个动画的,动画有两种:属性动画和补间动画:
- animator:存放属性动画的XML文件
- anim:存放补间动画的XML文件
2.如何去使用这些资源
嗯,知道有什么资源,接下来就来了解该怎么用了: 前面也说了,我们所有的资源文件都会在R.java文件下生成一个资源id,我们可以通过这个资源id来完成资源的访问,使用情况有两种:Java代码中使用和XML代码中使用。
Java代码中使用:
Java 文字:
txtName.setText(getResources().getText(R.string.name));
图片:
imgIcon.setBackgroundDrawableResource(R.drawable.icon);
颜色:
txtName.setTextColor(getResouces().getColor(R.color.red));
布局:
setContentView(R.layout.main);
控件:
txtName = (TextView)findViewById(R.id.txt_name);
XML代码中使用:
通过@xxx即可得到,比如这里获取文本和图片:
<TextView android:text="@string/hello_world" android:layout_width="wrap_content" android:layout_height="wrap_content" android:background = "@drawable/img_back"/>
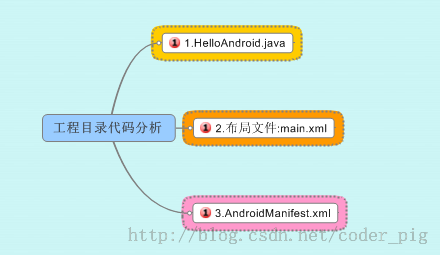
2.深入了解三个文件:
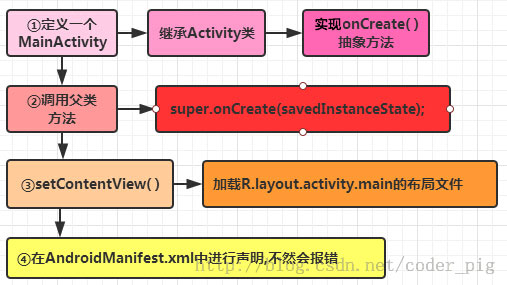
好了,接下来我们就要剖析工程里三个比较重要的文件: MainActivity.java,布局文件:activity_main和Android配置文件:AndroidManifest.xml PS:图片内容可能有点差距,没时间做图,望体谅~
MainActivity.java:
代码如下
package jay.com.example.firstapp;

import android.support.v7.app.AppCompatActivity;

import android.os.Bundle;

public class MainActivity extends AppCompatActivity {

    @Override

    protected void onCreate(Bundle savedInstanceState) {

        super.onCreate(savedInstanceState);

        setContentView(R.layout.activity_main);

    }

}
代码分析:
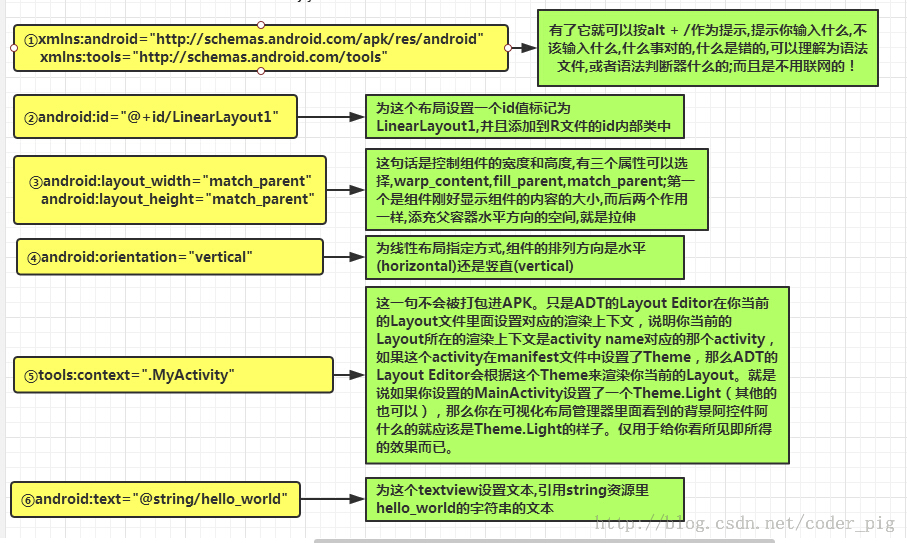
布局文件:activity_main.xml:
代码如下:
<RelativeLayout xmlns:android="http://schemas.android.com/apk/res/android"

    xmlns:tools="http://schemas.android.com/tools"

    android:layout_width="match_parent"

    android:layout_height="match_parent"

    tools:context=".MainActivity">

    <TextView

        android:layout_width="wrap_content"

        android:layout_height="wrap_content"

        android:text="@string/hello_world" />

</RelativeLayout>
代码分析:
我们定义了一个LinearLayout线性布局,在xml命名空间中定义我们所需要使用的架构,来自于①
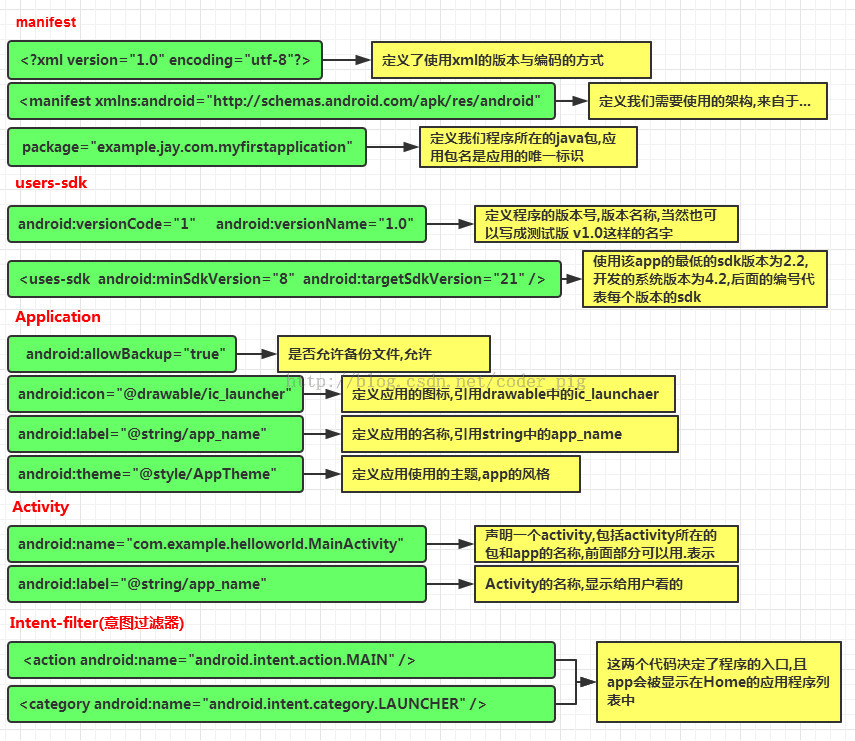
AndroidManifest.xml配置文件:
代码如下:
<?xml version="1.0" encoding="utf-8"?>

<manifest xmlns:android="http://schemas.android.com/apk/res/android"

    package="jay.com.example.firstapp" >

    <application

        android:allowBackup="true"

        android:icon="@mipmap/ic_launcher"

        android:label="@string/app_name"

        android:theme="@style/AppTheme" >

        <activity

            android:name=".MainActivity"

            android:label="@string/app_name" >

            <intent-filter>

                <action android:name="android.intent.action.MAIN" />

                <category android:name="android.intent.category.LAUNCHER" />

            </intent-filter>

        </activity>

    </application>

</manifest>
代码分析:
除了上述内容外:
①如果app包含其他组件的话,都要使用类型说明语法在该文件中进行声明 Server:元素 BroadcastReceiver元素 ContentProvider元素 IntentFilter<intent-filter>元素
②权限的声明: 在该文件中显式地声明程序需要的权限,防止app错误地使用服务, 不恰当地访问 资源,最终提高android app的健壮性 android.permission.SEND_SMS 有这句话表示app需要使用发送信息的权限,安装的时候就会提示用户, 相关权限可以在sdk参考手册查找!
1.9 Android程序签名打包
1.什么是签名,有什么用:
Android APP都需要我们用一个证书对应用进行数字签名,不然的话是无法安装到Android手机上的,平时我们调试运行时到手机上时,是AS会自动用默认的密钥和证书来进行签名;但是我们实际发布编译时,则不会自动签名,这个时候我们就需要进行手动签名了! 为我们的APK签名有以下好处:
- 1.应用程序升级:如果你希望用户无缝升级到新的版本,那么你必须用同一个证书进行签名。这是由于只有以同一个证书签名,系统才会允许安装升级的应用程序。如果你采用了不同的证书,那么系统会要求你的应用程序采用不同的包名称,在这种情况下相当于安装了一个全新的应用程序。如果想升级应用程序,签名证书要相同,包名称要相同!
- 2.应用程序模块化: Android系统可以允许同一个证书签名的多个应用程序在一个进程里运行,系统实际把他们作为一个单个的应用程序,此时就可以把我们的应用程序以模块的方式进行部署,而用户可以独立的升级其中的一个模块。
- 3.代码或者数据共享: Android提供了基于签名的权限机制,那么一个应用程序就可以为另一个以相同证书签名的应用程序公开自己的功能。以同一个证书对多个应用程序进行签名,利用基于签名的权限检查,你就可以在应用程序间以安全的方式共享代码和数据了。 不同的应用程序之间,想共享数据,或者共享代码,那么要让他们运行在同一个进程中,而且要让他们用相同的证书签名。 ————上述内容摘自:android 为什么需要签名
2.Android Studio如何打包签名:
好的,因为学习本课程的都是初学者,多渠道打包的内容以后再进行讲解!本节只讲最简单的打包签名 对了,1中说的调试时默认生成的apk在:app/build/outputs/apk目录下! 和Eclipse并不相同,Eclipse是在bin目录下生成的!

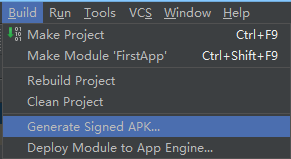
好的,打开我们的AS上的Hello World项目,点击菜单:
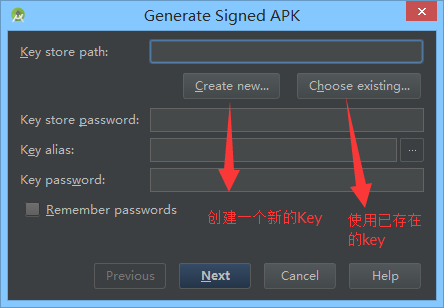
①Build -> Generate Signed APK...
②弹出窗口,如果没有key,就创建一个,有的话就选择存在的Key
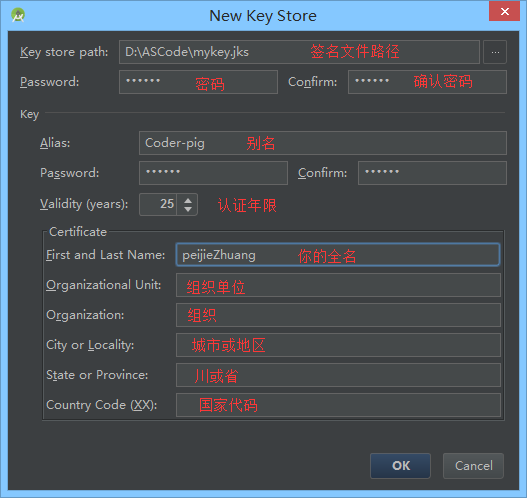
③没有,我们新建一个,可根据自己需要填写相关项:
④好的,点击OK后,可以看到我们密码的信息,可能需要我们填入密码了,填写下:
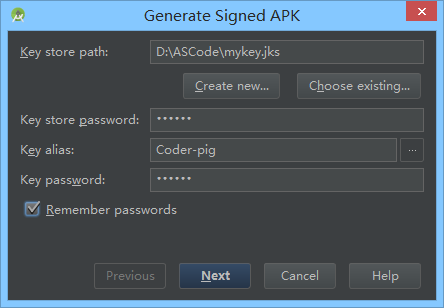
⑤点击Next:
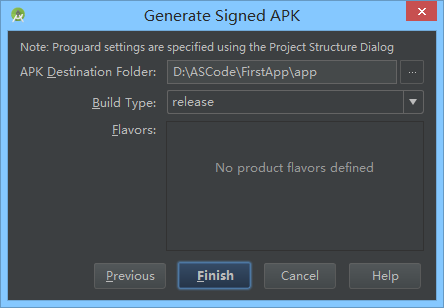
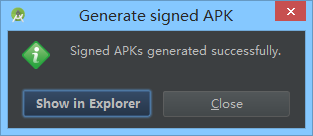
⑥点击Finish稍等一会儿会出现下述提示,说明应用已经打包签名成功了:
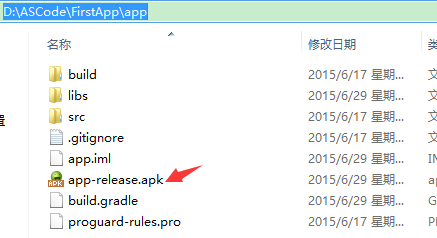
⑦可以看到打包后的APK已经安详地躺在我们的app目录下了:
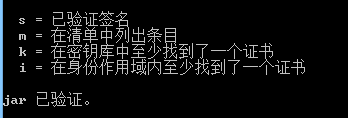
⑧到第七步就已经打包签名完成了,如果你要验证是否签名,只需要输入下述cmd指令

本节小结
打包Android APK的方法还有很多,命令行,或者Gradle,ANT,MAVEN等等,方法有很多,本节讲解最简单的通过图形化界面打包签名的方式!好了,本节就到这里,最简单的打包签名方法get了没?
1.11 反编译APK获取代码&资源
1.要准备的三个工具
- apktool:获取资源文件,提取图片文件,布局文件,还有一些XML的资源文件
- dex2jar:将APK反编译成Java源码(将classes.dex转化为jar文件)
- jd-gui:查看2中转换后的jar文件,即查看Java文件 为了方便各位读者,这里将三个打包到一起放到云盘中,又需要的可以进行下载: 反编译相关的三个工具.zip
2.使用apktool反编译APK获得图片与XML资源:
把下载好的apktool解压后,我们可以看到下述文件(忽略那两个csdn,一个是反编译的apk,一个是反编译后文件):
接下来,双击cmd.exe,来到命令行,键入: apktool.bat d csdn.apk 即可,Enter回车:
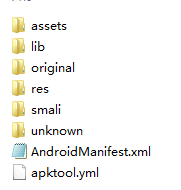
然后就可以看到生成的csdn文件夹,里面就有我们想要资源
好的,就是XML资源到手了是吧!图片素材也到手了!

3.使用dex2jar将classes.dex转换成jar文件:
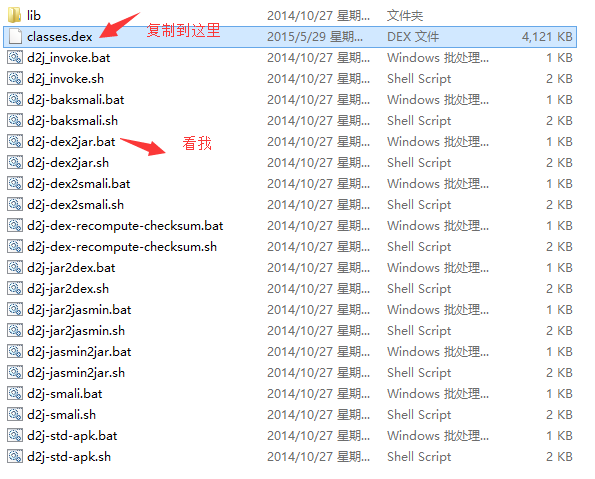
把下载好的dex2jar文件夹解压,apk解压后中的classes.dex复制到dex2jar.bat所在的目录下:
打开cmd,来到这个目录下:键入:d2j-dex2jar.bat classes.dex
接着我们可以看到,生成了一个jar包:
好的,转换完成!

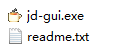
4.使用jd-gui查看jar包中的Java代码:
好的,打开jd-gui的文件夹
打开后,打开我们3中转换后的jar包,我们可以看见里面的代码:
csdn的客户端竟然不混淆代码...可能是本着开源的精神吧,给我们学习代码吧!一般的话,apk发布都会 进行混淆,然后进行一些加密,或者使用第三方的加密平台,用的比较多的"爱加密",有兴趣的也自行百度查看更加详细的介绍!
2.1 View与ViewGroup的概念
UI Overview
在Android APP中,所有的用户界面元素都是由View和ViewGroup的对象构成的。View是绘制在屏幕上的用户能与之交互的一个对象。而ViewGroup则是一个用于存放其他View(和ViewGroup)对象的布局容器! Android为我们提供了一个View和ViewGroup子类的集合,集合中提供了一些常用的输入控件(比如按钮和文本域)和各种各样的布局模式(比如线性或相对布局)
User Interface Layout
你的APP的用户界面上的每一个组件都是使用View和ViewGroup对象的层次结构来构成的,比如 图 1。每个ViewGroup都是要给看不见的用于组织子View的容器,而它的子View可能是输入控件 或者在UI上绘制了某块区域的小部件。有了层次树,你就可以根据自己的需要,设计简单或者复 杂的布局了(布局越简单性能越好)
 图 1.一个UI布局的层次结构的插图
定义你的布局,你可以在代码中实例化View对象并且开始构建你的树,但最容易和最高效的方式来定义你的布局则是使用一个XML文件,用XML来构成布局更加符合人的阅读习惯,而XML类似与HTML 使用XML元素的名称代表一个View。所以< TextView >元素会在你的界面中创建一个TextView控件,而一个< LinearLayout >则会创建一个LinearLayout的容器! 举个例子,一个简单简单的垂直布局上面有一个文本视图和一个按钮,就像下面这样:
<?xml version="1.0" encoding="utf-8"?>

<LinearLayout xmlns:android="http://schemas.android.com/apk/res/android"

              android:layout_width="fill_parent"

              android:layout_height="fill_parent"

              android:orientation="vertical" >

    <TextView android:id="@+id/text"

              android:layout_width="wrap_content"

              android:layout_height="wrap_content"

              android:text="I am a TextView" />

    <Button android:id="@+id/button"

            android:layout_width="wrap_content"

            android:layout_height="wrap_content"

            android:text="I am a Button" />

</LinearLayout>
当你的App加载上述的布局资源的时候,Android会将布局中的每个节点进行实例化成一个个对象,然后你可以为这些定义一些额外的行为,查询对象的状态,或者修改布局。 完整创建UI布局的引导,请参考XML Layouts
User Interface Components
你无需全部用View和ViewGroup对象来创建你的UI布局。Android给我们提供了一些app控件,标准的UI布局,你只需要定义内容。这些UI组件都有其属性介绍的API文档,比如操作栏,对话框和状态通知栏等。
2.2.1 LinearLayout(线性布局)
本节引言
本节开始讲Android中的布局,Android中有六大布局,分别是: LinearLayout(线性布局),RelativeLayout(相对布局),TableLayout(表格布局) FrameLayout(帧布局),AbsoluteLayout(绝对布局),GridLayout(网格布局) 而今天我们要讲解的就是第一个布局,LinearLayout(线性布局),我们屏幕适配的使用 用的比较多的就是LinearLayout的weight(权重属性),在这一节里,我们会详细地解析 LinearLayout,包括一些基本的属性,Weight属性的使用,以及比例如何计算,另外还 会说下一个用的比较少的属性:android:divider绘制下划线!
1.本节学习图

2.weight(权重)属性详解:
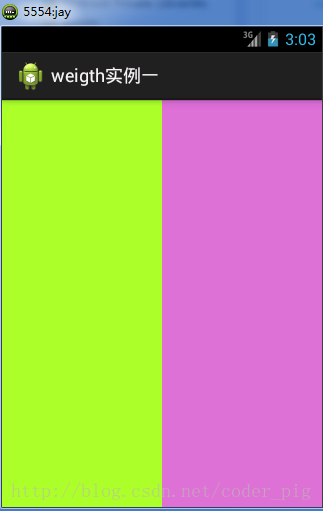
①最简单用法:
如图:
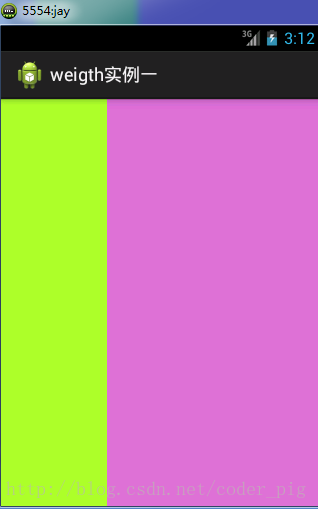
实现代码:
<LinearLayout xmlns:android="http://schemas.android.com/apk/res/android"

    xmlns:tools="http://schemas.android.com/tools"

    android:id="@+id/LinearLayout1"

    android:layout_width="match_parent"

    android:layout_height="match_parent"

    android:orientation="horizontal">

    <LinearLayout

        android:layout_width="0dp"

        android:layout_height="fill_parent"

        android:background="#ADFF2F"

        android:layout_weight="1"/>

    <LinearLayout

        android:layout_width="0dp"

        android:layout_height="fill_parent"

        android:background="#DA70D6"

        android:layout_weight="2"/>

</LinearLayout>
要实现第一个的1:1的效果,只需要分别把两个LinearLayout的weight改成1和1就可以了 用法归纳: 按比例划分水平方向:将涉及到的View的android:width属性设置为0dp,然后设置为android weight属性设置比例即可;类推,竖直方向,只需设android:height为0dp,然后设weight属性即可! 大家可以自己写个竖直方向的等比例划分的体验下简单用法!
②weight属性详解:
当然,如果我们不适用上述那种设置为0dp的方式,直接用wrap_content和match_parent的话, 则要接着解析weight属性了,分为两种情况,wrap_content与match_parent!另外还要看 LinearLayout的orientation是水平还是竖直,这个决定哪个方向等比例划分
1)wrap_content比较简单,直接就按比例的了
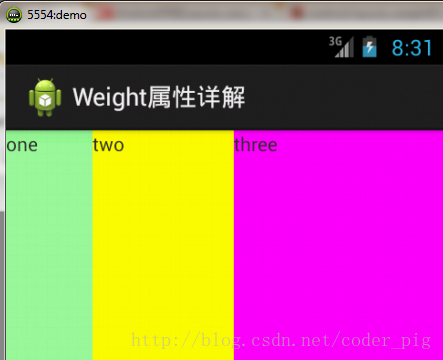
实现代码:
<LinearLayout xmlns:android="http://schemas.android.com/apk/res/android"

    xmlns:tools="http://schemas.android.com/tools"

    android:id="@+id/LinearLayout1"

    android:layout_width="match_parent"

    android:layout_height="match_parent"

    android:orientation="horizontal" >

    <TextView

        android:layout_weight="1"

        android:layout_width="wrap_content"

        android:layout_height="fill_parent"

        android:text="one"

        android:background="#98FB98"

     />

     <TextView

        android:layout_weight="2"

        android:layout_width="wrap_content"

        android:layout_height="fill_parent"

        android:text="two"

        android:background="#FFFF00"

     />

     <TextView

        android:layout_weight="3"

        android:layout_width="wrap_content"

        android:layout_height="fill_parent"

        android:text="three"

        android:background="#FF00FF"

     />

</LinearLayout>
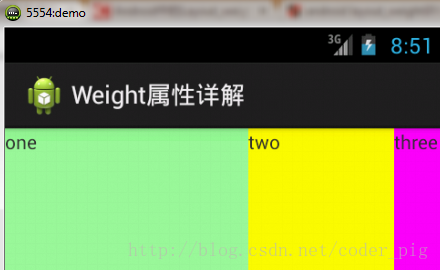
2)match_parent(fill_parent):这个则需要计算了
我们写这段简单的代码:
<LinearLayout xmlns:android="http://schemas.android.com/apk/res/android"

    xmlns:tools="http://schemas.android.com/tools"

    android:id="@+id/LinearLayout1"

    android:layout_width="match_parent"

    android:layout_height="match_parent" >

    <TextView

        android:layout_weight="1"

        android:layout_width="fill_parent"

        android:layout_height="fill_parent"

        android:text="one"

        android:background="#98FB98"

     />

     <TextView

        android:layout_weight="2"

        android:layout_width="fill_parent"

        android:layout_height="fill_parent"

        android:text="two"

        android:background="#FFFF00"

     />

     <TextView

        android:layout_weight="3"

        android:layout_width="fill_parent"

        android:layout_height="fill_parent"

        android:text="three"

        android:background="#FF00FF"

     />

</LinearLayout>
运行效果图:
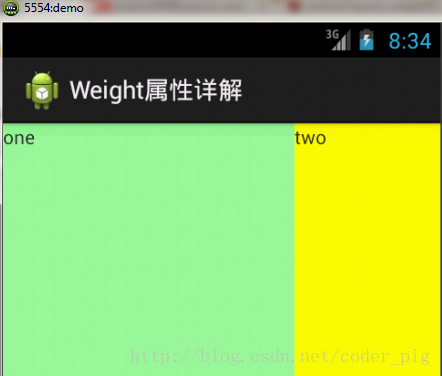
这个时候就会有疑问了,怎么会这样,这比例是2:1吧,那么three去哪了?代码里面明明有 three的啊,还设置了3的,而1和2的比例也不对耶,1:2:3却变成了2:1:0,怎么会这样呢? 答:这里其实没那么简单的,还是需要我们计算的,网上给出的算法有几种,这里就给出笔者 觉得比较容易理解的一种: step 1:个个都是fill_parent,但是屏幕只有一个啦,那么1 - 3 = - 2 fill_parent step 2:依次比例是1/6,2/6,3/6 step 3:先到先得,先分给one,计算: 1 - 2 * (1/6) = 2/3 fill_parent 接着到two,计算: 1 - 2 * (2/6) = 1/3 fill_parent 最后到three,计算 1 - 2 * (3/6) = 0 fill_parent step 4:所以最后的结果是:one占了两份,two占了一份,three什么都木有 以上就是为什么three没有出现的原因了,或许大家看完还是有点蒙,没事,我们举多几个例子试试就知道了!
比例为:1:1:1
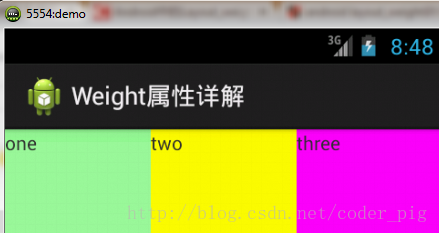
按照上面的计算方法算一次,结果是:1/3 1/3 1/3,没错
接着我们再试下:2:3:4
计算结果:5/9 3/9 1/9,对比效果图,5:3:1,也没错,所以这个计算方法你可得mark下了!
③Java代码中设置weight属性:
setLayoutParams(new LayoutParams(LayoutParams.FILL_PARENT,

        LayoutParams.WRAP_CONTENT, 1));
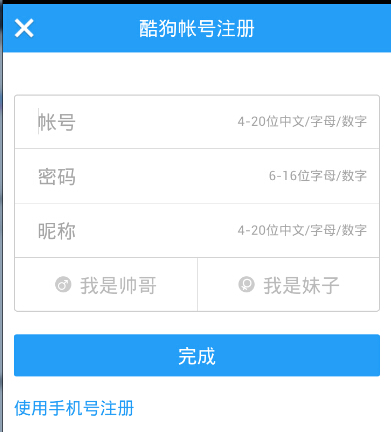
3.为LinearLayout设置分割线
很多界面开发中都会设置一些下划线,或者分割线,从而使得界面更加整洁美观,比如下面的酷狗 音乐的注册页面:
对于这种线,我们通常的做法有两种 ①直接在布局中添加一个view,这个view的作用仅仅是显示出一条线,代码也很简单:
<View

    android:layout_width="match_parent"

    android:layout_height="1px"

    android:background="#000000" />
这个是水平方向上的黑线,当然你也可以改成其他颜色,或者使用图片

②第二种则是使用LinearLayout的一个divider属性,直接为LinearLayout设置分割线 这里就需要你自己准备一张线的图片了 1)android:divider设置作为分割线的图片 2)android:showDividers设置分割线的位置,none(无),beginning(开始),end(结束),middle(每两个组件间) 3)dividerPadding设置分割线的Padding
使用示例:
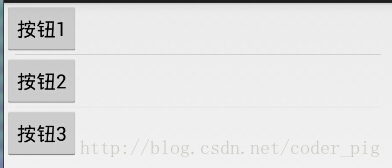
实现代码:
<LinearLayout xmlns:android="http://schemas.android.com/apk/res/android"

    xmlns:tools="http://schemas.android.com/tools"

    android:id="@+id/LinearLayout1"

    android:layout_width="match_parent"

    android:layout_height="match_parent"

    android:divider="@drawable/ktv_line_div"

    android:orientation="vertical"

    android:showDividers="middle"

    android:dividerPadding="10dp"

    tools:context="com.jay.example.linearlayoutdemo.MainActivity" >

    <Button

        android:layout_width="wrap_content"

        android:layout_height="wrap_content"

        android:text="按钮1" />

    <Button

        android:layout_width="wrap_content"

        android:layout_height="wrap_content"

        android:text="按钮2" />

    <Button

        android:layout_width="wrap_content"

        android:layout_height="wrap_content"

        android:text="按钮3" />

</LinearLayout>
4.LinearLayout的简单例子:
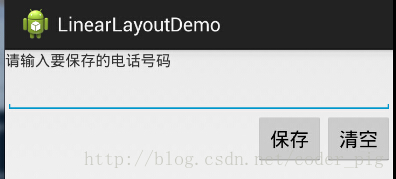
实现代码如下:
<LinearLayout xmlns:android="http://schemas.android.com/apk/res/android"

    xmlns:tools="http://schemas.android.com/tools"

    android:id="@+id/LinearLayout1"

    android:layout_width="fill_parent"

    android:layout_height="fill_parent"

    android:orientation="vertical"

    tools:context=".MainActivity" >

    <TextView

        android:layout_width="wrap_content"

        android:layout_height="wrap_content"

        android:text="请输入要保存的电话号码"/>

    <EditText

        android:layout_width="fill_parent"

        android:layout_height="wrap_content"/>

    <LinearLayout

        android:layout_width="fill_parent"

        android:layout_height="wrap_content"

        android:orientation="horizontal"

        android:gravity="right">

        <Button

            android:layout_width="wrap_content"

            android:layout_height="wrap_content"

            android:text="保存"/>

        <Button

            android:layout_width="wrap_content"

            android:layout_height="wrap_content"

            android:text="清空"/>

    </LinearLayout>

</LinearLayout>
5.注意事项:
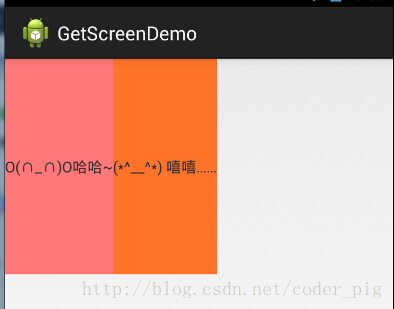
使用Layout_gravity的一个很重要的问题!!! 问题内容: 在一个LinearLayout的水平方向中布置两个TextView,想让一个左,一个右,怎么搞? 或许你会脱口而出:"gravity设置一个left,一个right就可以啦!" 真的这么简单?你试过吗?写个简单的Layout你就会发现,事与愿违了: 代码如下:
<LinearLayout xmlns:android="http://schemas.android.com/apk/res/android"

    xmlns:tools="http://schemas.android.com/tools"

    android:layout_width="match_parent"

    android:layout_height="match_parent"

    android:orientation="horizontal"

    tools:context="com.jay.example.getscreendemo.MainActivity" >

    <TextView

        android:layout_width="wrap_content"

        android:layout_height="200dp"

        android:layout_gravity="left"

        android:background="#FF7878"

        android:gravity="center"

        android:text="O(∩_∩)O哈哈~" />

    <TextView

        android:layout_width="wrap_content"

        android:layout_height="200dp"

        android:layout_gravity="right"

        android:background="#FF7428"

        android:gravity="center"

        android:text="(*^__^*) 嘻嘻……" />

</LinearLayout>
运行结果图:
看到这里你会说:哎呀,真的不行耶,要不在外层LinearLayout加个gravity=left的属性,然后设置第二个 TextView的layout_gravity为right,恩,好我们试一下:
<LinearLayout xmlns:android="http://schemas.android.com/apk/res/android"

    xmlns:tools="http://schemas.android.com/tools"

    android:layout_width="match_parent"

    android:layout_height="match_parent"

    android:orientation="horizontal"

    android:gravity="left"

    tools:context="com.jay.example.getscreendemo.MainActivity" >

    <TextView

        android:layout_width="wrap_content"

        android:layout_height="200dp"

        android:background="#FF7878"

        android:gravity="center"

        android:text="O(∩_∩)O哈哈~" />

    <TextView

        android:layout_width="wrap_content"

        android:layout_height="200dp"

        android:layout_gravity="right"

        android:background="#FF7428"

        android:gravity="center"

        android:text="(*^__^*) 嘻嘻……" />

</LinearLayout>
结果还是一样:

好吧,没辙了,怎么办好?
当 android:orientation="vertical" 时, 只有水平方向的设置才起作用,垂直方向的设置不起作用。 即:left,right,center_horizontal 是生效的。 当 android:orientation="horizontal" 时, 只有垂直方向的设置才起作用,水平方向的设置不起作用。 即:top,bottom,center_vertical 是生效的。
然而,这方法好像并没有什么卵用。比如: 如果只能竖直方向设置左右对齐的话,就会出现下面的效果:
这显然不是我们要的结果把! 综上,要么按照上述给出的规则来布局,不过对于这种情况还是使用相对布局RelativeLayout把! 网上没给出具体的原因,都是说这样改有人说这个和orientation的优先级有关 ,暂且先mark下来吧,后续如果知道原因的话再解释!前面屏幕适配也说过了,布局还是建议使用 RelativeLayout!
2.2.2 RelativeLayout(相对布局)
本节引言
在上一节中我们对LinearLayout进行了详细的解析,LinearLayout也是我们 用的比较多的一个布局,我们更多的时候更钟情于他的weight(权重)属性,等比例划分,对屏幕适配还是 帮助蛮大的;但是使用LinearLayout的时候也有一个问题,就是当界面比较复杂的时候,需要嵌套多层的 LinearLayout,这样就会降低UI Render的效率(渲染速度),而且如果是listview或者GridView上的 item,效率会更低,另外太多层LinearLayout嵌套会占用更多的系统资源,还有可能引发stackoverflow; 但是如果我们使用RelativeLayout的话,可能仅仅需要一层就可以完成了,以父容器或者兄弟组件参考+margin +padding就可以设置组件的显示位置,是比较方便的!当然,也不是绝对的,具体问题具体分析吧! 总结就是:尽量使用RelativeLayout + LinearLayout的weight属性搭配使用吧!
1.核心属性图
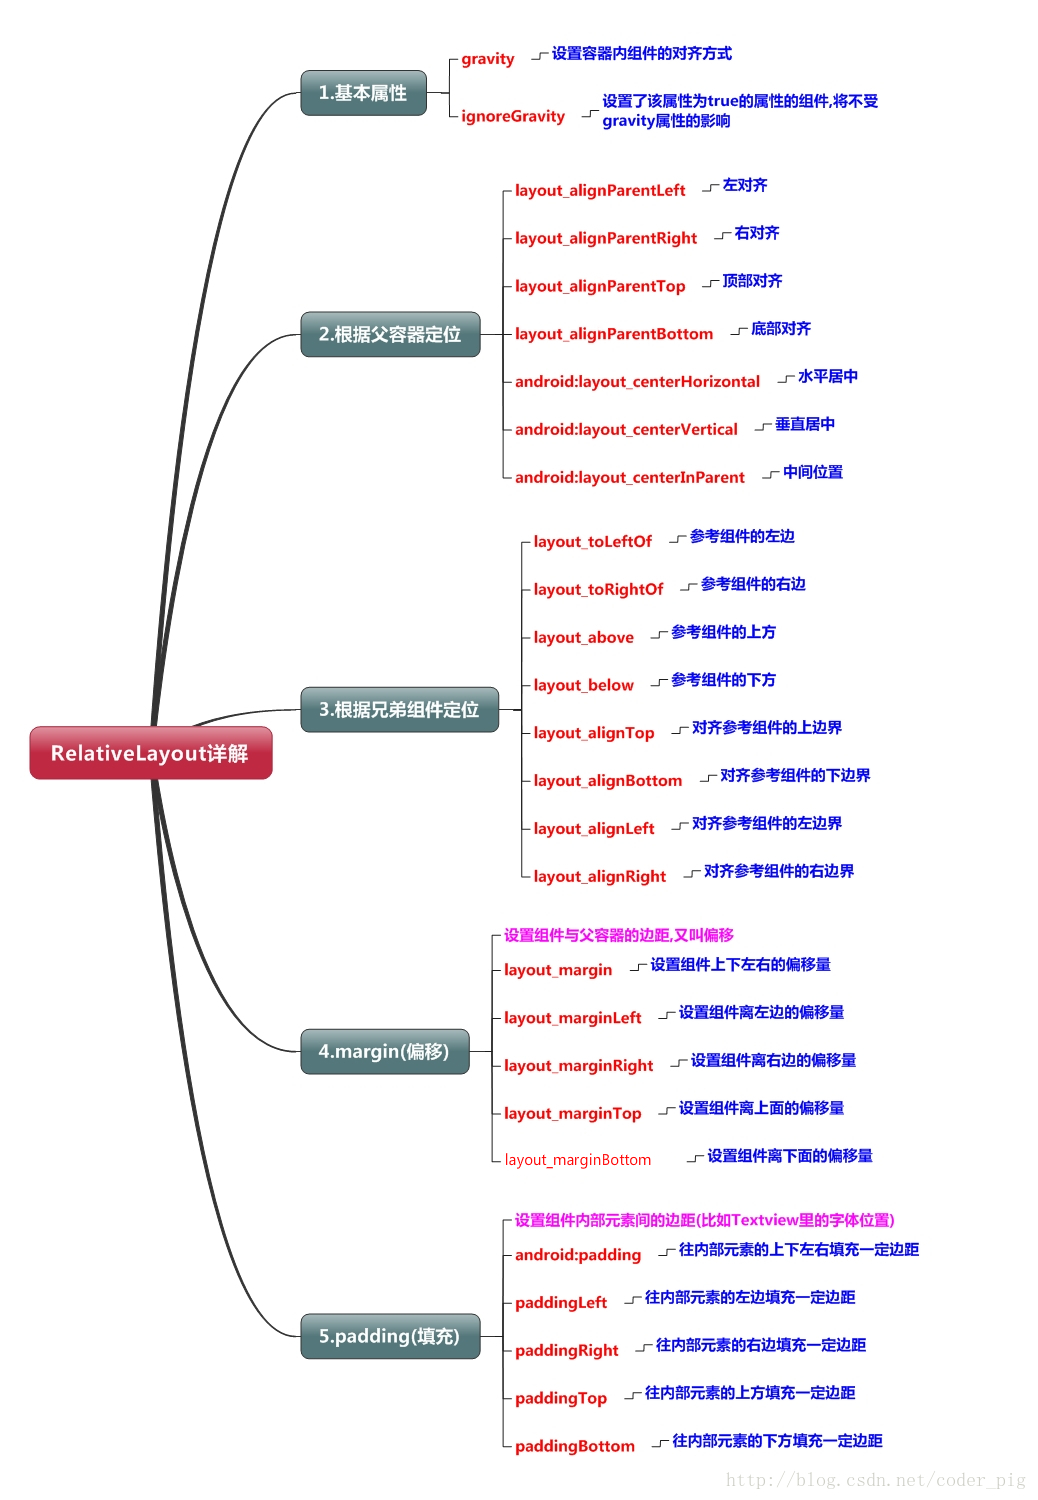
2.父容器定位属性示意图

3.根据兄弟组件定位
恩,先说下什么是兄弟组件吧,所谓的兄弟组件就是处于同一层次容器的组件,如图
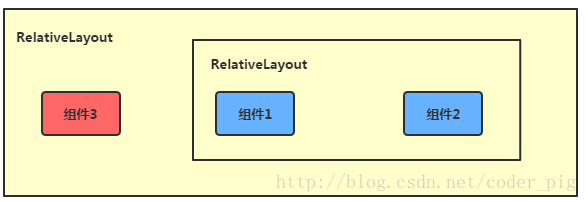
图中的组件1,2就是兄弟组件了,而组件3与组件1或组件2并不是兄弟组件,所以组件3不能通过 组件1或2来进行定位,比如layout_toleftof = "组件1"这样是会报错的!切记! 关于这个兄弟组件定位的最经典例子就是"梅花布局"了,下面代码实现下:
运行效果图:
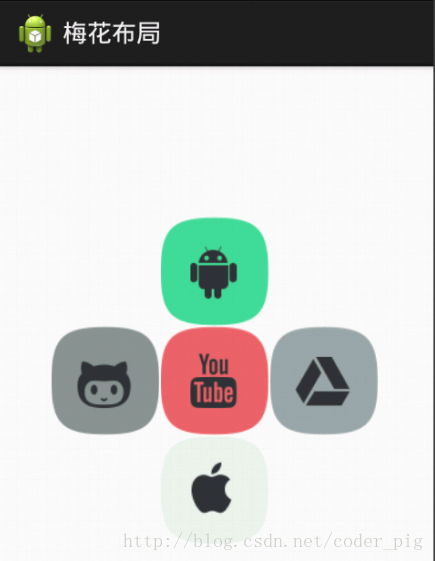
实现代码:
<RelativeLayout xmlns:android="http://schemas.android.com/apk/res/android"

    xmlns:tools="http://schemas.android.com/tools"

    android:id="@+id/RelativeLayout1"

    android:layout_width="match_parent"

    android:layout_height="match_parent" >

    <!-- 这个是在容器中央的 -->

    <ImageView

        android:id="@+id/img1"

        android:layout_width="80dp"

        android:layout_height="80dp"

        android:layout_centerInParent="true"

        android:src="@drawable/pic1"/>

    <!-- 在中间图片的左边 -->

    <ImageView

        android:id="@+id/img2"

        android:layout_width="80dp"

        android:layout_height="80dp"

        android:layout_toLeftOf="@id/img1"

        android:layout_centerVertical="true"

        android:src="@drawable/pic2"/>

    <!-- 在中间图片的右边 -->

    <ImageView

        android:id="@+id/img3"

        android:layout_width="80dp"

        android:layout_height="80dp"

        android:layout_toRightOf="@id/img1"

        android:layout_centerVertical="true"

        android:src="@drawable/pic3"/>

    <!-- 在中间图片的上面-->

    <ImageView

        android:id="@+id/img4"

        android:layout_width="80dp"

        android:layout_height="80dp"

        android:layout_above="@id/img1"

        android:layout_centerHorizontal="true"

        android:src="@drawable/pic4"/>

    <!-- 在中间图片的下面 -->

    <ImageView

        android:id="@+id/img5"

        android:layout_width="80dp"

        android:layout_height="80dp"

        android:layout_below="@id/img1"

        android:layout_centerHorizontal="true"

        android:src="@drawable/pic5"/>

</RelativeLayout>
4.margin与padding的区别
初学者对于这两个属性可能会有一点混淆,这里区分下: 首先margin代表的是偏移,比如marginleft = "5dp"表示组件离容器左边缘偏移5dp; 而padding代表的则是填充,而填充的对象针对的是组件中的元素,比如TextView中的文字 比如为TextView设置paddingleft = "5dp",则是在组件里的元素的左边填充5dp的空间! margin针对的是容器中的组件,而padding针对的是组件中的元素,要区分开来! 下面通过简单的代码演示两者的区别:
比较示例代码如下:
<RelativeLayout xmlns:android="http://schemas.android.com/apk/res/android"

    xmlns:tools="http://schemas.android.com/tools"

    android:layout_width="match_parent"

    android:layout_height="match_parent"

    android:paddingBottom="@dimen/activity_vertical_margin"

    android:paddingLeft="@dimen/activity_horizontal_margin"

    android:paddingRight="@dimen/activity_horizontal_margin"

    android:paddingTop="@dimen/activity_vertical_margin"

    tools:context=".MainActivity" >

    <Button

        android:id="@+id/btn1"

        android:layout_height="wrap_content"

        android:layout_width="wrap_content"

        android:text="Button"/>

    <Button

        android:paddingLeft="100dp"

        android:layout_height="wrap_content"

        android:layout_width="wrap_content"

        android:text="Button"

        android:layout_toRightOf="@id/btn1"/>

    <Button

        android:id="@+id/btn2"

        android:layout_height="wrap_content"

        android:layout_width="wrap_content"

        android:text="Button"

        android:layout_alignParentBottom="true"/>

    <Button

        android:layout_marginLeft="100dp"

        android:layout_height="wrap_content"

        android:layout_width="wrap_content"

        android:text="Button"

        android:layout_toRightOf="@id/btn2"

        android:layout_alignParentBottom="true"/>

</RelativeLayout>
运行效果图比较:

5.很常用的一点:margin可以设置为负数
相信很多朋友都不知道一点吧,平时我们设置margin的时候都习惯了是正数的, 其实是可以用负数的,下面写个简单的程序演示下吧,模拟进入软件后,弹出广告 页面的,右上角的cancle按钮的margin则是使用负数的!
效果图如下:
贴出的广告Activity的布局代码吧,当然,如果你对这个有兴趣的话可以下下demo, 因为仅仅是实现效果,所以代码会有些粗糙!
<RelativeLayout xmlns:android="http://schemas.android.com/apk/res/android"

    xmlns:tools="http://schemas.android.com/tools"

    android:layout_width="match_parent"

    android:layout_height="match_parent"

    tools:context="com.jay.example.relativelayoutdemo.MainActivity"

    android:background="#00CCCCFF">

    <ImageView

        android:id="@+id/imgBack"

        android:layout_width="200dp"

        android:layout_height="200dp"

        android:layout_centerInParent="true"

        android:background="@drawable/myicon" />

    <ImageView

        android:id="@+id/imgCancle"

        android:layout_width="28dp"

        android:layout_height="28dp"

        android:layout_alignRight="@id/imgBack"

        android:layout_alignTop="@id/imgBack"

        android:background="@drawable/cancel"

        android:layout_marginTop="-15dp"

        android:layout_marginRight="-10dp" />

</RelativeLayout>
本节小结:
关于RelativeLayout的详解就到这里,有什么纰漏,错误,好的建议,欢迎提出~ 最后提供下上面的demo代码供大家下载:RelativeLayoutDemo
2.2.3 TableLayout(表格布局)
分类 Android 基础入门教程
本节引言:
前面我们已经学习了平时实际开发中用得较多的线性布局(LinearLayout)与相对布局(RelativeLayout), 其实学完这两个基本就够用了,笔者在实际开发中用得比较多的也是这两个,当然作为一个好学的程序猿, 都是喜欢刨根问题的,所以虽说用得不多,但是还是有必要学习一下基本的用法的,说不定哪一天能用得上呢! 你说是吧,学多点东西没什么的,又不吃亏!好了,扯淡就扯到这里,开始这一节的学习吧,这一节我们会学习 Android中的第三个布局:TableLayout(表格布局)!
1.本节学习路线图
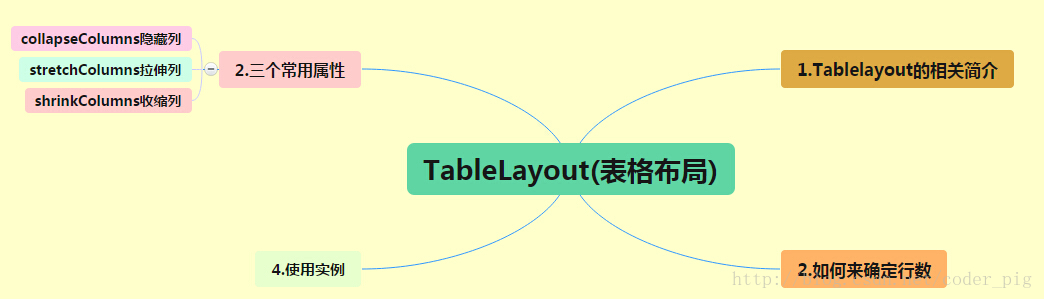
路线图分析: 从上面的路线图,可以看出TableLayout的用法还是很简单的,无非就是确定表格的行数,以及使用 那三个属性来设置每一行中的第某列的元素隐藏,拉伸,或者收缩即可!
2.TableLayout的介绍
相信学过HTML的朋友都知道,我们可以通过< table >< tr >< td >就可以生成一个HTML的表格, 而Android中也允许我们使用表格的方式来排列组件,就是行与列的方式,就说我们这节的TableLayout! 但却不像我们后面会讲到的Android 4.0后引入的GridLayout(网格)布局一样,直接就可以设置多少行与多少列!
3.如何确定行数与列数
- ①如果我们直接往TableLayout中添加组件的话,那么这个组件将占满一行!!!
- ②如果我们想一行上有多个组件的话,就要添加一个TableRow的容器,把组件都丢到里面!
- ③tablerow中的组件个数就决定了该行有多少列,而列的宽度由该列中最宽的单元格决定
- ④tablerow的layout_width属性,默认是fill_parent的,我们自己设置成其他的值也不会生效!!! 但是layout_height默认是wrapten——content的,我们却可以自己设置大小!
- ⑤整个表格布局的宽度取决于父容器的宽度(占满父容器本身)
- ⑥有多少行就要自己数啦,一个tablerow一行,一个单独的组件也一行!多少列则是看tableRow中 的组件个数,组件最多的就是TableLayout的列数
4.三个常用属性
android:collapseColumns:设置需要被隐藏的列的序号
android:shrinkColumns:设置允许被收缩的列的列序号
android:stretchColumns:设置运行被拉伸的列的列序号以上这三个属性的列号都是从0开始算的,比如shrinkColunmns = "2",对应的是第三列!
可以设置多个,用逗号隔开比如"0,2",如果是所有列都生效,则用"*"号即可
除了这三个常用属性,还有两个属性,分别就是跳格子以及合并单元格,这和HTML中的Table类似:android:layout_column="2":表示的就是跳过第二个,直接显示到第三个格子处,从1开始算的!
android:layout_span="4":表示合并4个单元格,也就说这个组件占4个单元格
属性使用示例:
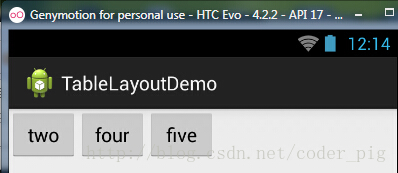
①collapseColumns(隐藏列)
流程:在TableRow中定义5个按钮后,接着在最外层的TableLayout中添加以下属性: android:collapseColumns = "0,2",就是隐藏第一与第三列,代码如下:
<TableLayout

    android:id="@+id/TableLayout2"

    android:layout_width="fill_parent"

    android:layout_height="wrap_content"

    android:collapseColumns="0,2" >

    <TableRow>

        <Button

            android:layout_width="wrap_content"

            android:layout_height="wrap_content"

            android:text="one" />

        <Button

            android:layout_width="wrap_content"

            android:layout_height="wrap_content"

            android:text="two" />

        <Button

            android:layout_width="wrap_content"

            android:layout_height="wrap_content"

            android:text="three" />

        <Button

            android:layout_width="wrap_content"

            android:layout_height="wrap_content"

            android:text="four" />

        <Button

            android:layout_width="wrap_content"

            android:layout_height="wrap_content"

            android:text="five" />

    </TableRow>

</TableLayout>
运行效果图:
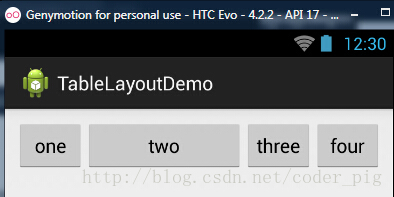
②stretchColumns(拉伸列)
流程:在TableLayout中设置了四个按钮,接着在最外层的TableLayout中添加以下属性: android:stretchColumns = "1"
设置第二列为可拉伸列,让该列填满这一行所有的剩余空间,代码如下:
<TableLayout

    android:id="@+id/TableLayout2"

    android:layout_width="fill_parent"

    android:layout_height="wrap_content"

    android:stretchColumns="1" >

    <TableRow>

        <Button

            android:layout_width="wrap_content"

            android:layout_height="wrap_content"

            android:text="one" />

        <Button

            android:layout_width="wrap_content"

            android:layout_height="wrap_content"

            android:text="two" />

        <Button

            android:layout_width="wrap_content"

            android:layout_height="wrap_content"

            android:text="three" />

        <Button

            android:layout_width="wrap_content"

            android:layout_height="wrap_content"

            android:text="four" />

    </TableRow>

</TableLayout>
运行效果图:
③shrinkColumns(收缩列)
步骤:这里为了演示出效果,设置了5个按钮和一个文本框,在最外层的TableLayout中添加以下属性: android:shrinkColumns = "1"
设置第二个列为可收缩列,代码如下:
<TableLayout

    android:id="@+id/TableLayout2"

    android:layout_width="fill_parent"

    android:layout_height="wrap_content"

    android:shrinkColumns="1" >

    <TableRow>

        <Button

            android:layout_width="wrap_content"

            android:layout_height="wrap_content"

            android:text="one" />

        <Button

            android:layout_width="wrap_content"

            android:layout_height="wrap_content"

            android:text="two" />

        <Button

            android:layout_width="wrap_content"

            android:layout_height="wrap_content"

            android:text="three" />

        <Button

            android:layout_width="wrap_content"

            android:layout_height="wrap_content"

            android:text="four" />

        <Button

            android:layout_width="wrap_content"

            android:layout_height="wrap_content"

            android:text="five" />

        <TextView

            android:layout_width="wrap_content"

            android:layout_height="wrap_content"

            android:text="文本XX" />

    </TableRow>

</TableLayout>
运行截图:
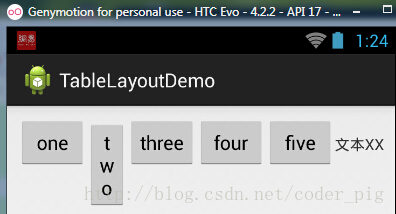
从图中我们可以看到two这个按钮被挤压成条条状,这个就是收缩,为了保证表格能适应 父容器的宽度!至于另外两个属性就不讲解了,用法和HTML相同!有兴趣的可以研究下!
5.使用实例
使用TableLayout来完成简单的登录界面,运行效果图如下:
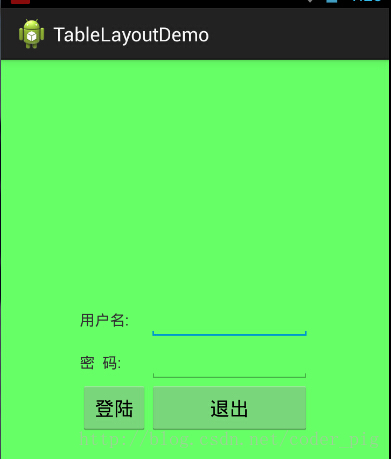
流程解析:
①调用gravity属性,设置为center_vertical,让布局里面的组件在竖直方向上居中
②将TableLayout中的第一和第四列设置为可拉伸
③在每个TableRow中添加两个TextView,用于拉伸填满该行,这样可以让表格水平居中
android:stretchColumns="0,3" 设置为0.3,是为了让两边都充满,那么中间部分就可以居中了
详细代码如下:
<TableLayout xmlns:android="http://schemas.android.com/apk/res/android"

    xmlns:tools="http://schemas.android.com/tools"

    android:id="@+id/TableLayout1"

    android:layout_width="match_parent"

    android:layout_height="match_parent"

    tools:context=".MainActivity"

    android:stretchColumns="0,3"

    android:gravity="center_vertical"

    android:background="#66FF66"

    >

    <TableRow>

        <TextView />

        <TextView

            android:layout_width="wrap_content"

            android:layout_height="wrap_content"

            android:text="用户名:"/>

        <EditText

            android:layout_width="wrap_content"

            android:layout_height="wrap_content"

            android:minWidth="150dp"/>

        <TextView />

    </TableRow>

    <TableRow>

        <TextView />

        <TextView

            android:layout_width="wrap_content"

            android:layout_height="wrap_content"

            android:text="密  码:"

        />

        <EditText

            android:layout_width="wrap_content"

            android:layout_height="wrap_content"

            android:minWidth="150dp"

        />

        <TextView />

    </TableRow>

    <TableRow>

        <TextView />

        <Button

            android:layout_width="wrap_content"

            android:layout_height="wrap_content"

            android:text="登陆"/>

        <Button

            android:layout_width="wrap_content"

            android:layout_height="wrap_content"

            android:text="退出"/>

        <TextView />

    </TableRow>

</TableLayout>
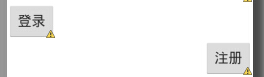
6.发现的问题
相信大家在使用这个这TableLayout的TableRow的时候会遇到这个警告:
当然,程序还是可以运行的,不过或许你是强迫症患者,看到黄色感叹号你就不爽的话! 而解决这个警告的方法也是很奇葩的:只要你的TableLayout里面有2个或以上的TableRow就可以了!

2.2.4 FrameLayout(帧布局)
分类 Android 基础入门教程
本节引言
FrameLayout(帧布局)可以说是六大布局中最为简单的一个布局,这个布局直接在屏幕上开辟出一块空白的区域,当我们往里面添加控件的时候,会默认把他们放到这块区域的左上角,而这种布局方式却没有任何的定位方式,所以它应用的场景并不多;帧布局的大小由控件中最大的子控件决定,如果控件的大小一样大的话,那么同一时刻就只能看到最上面的那个组件!后续添加的控件会覆盖前一个!虽然默认会将控件放置在左上角,但是我们也可以通过layout_gravity属性,指定到其他的位置!本节除了给大家演示一个最简单的例子外,还给大家带了两个好玩的例子,有兴趣的可以看看!
1.常用属性
FrameLayout的属性很少就两个,但是在说之前我们先介绍一个东西:
前景图像:永远处于帧布局最上面,直接面对用户的图像,就是不会被覆盖的图片。
两个属性:
- android:foreground:*设置改帧布局容器的前景图像
- android:foregroundGravity:设置前景图像显示的位置
2.实例演示
1)最简单的例子
运行效果图:

实现代码如下:
<FrameLayout xmlns:android="http://schemas.android.com/apk/res/android"

    xmlns:tools="http://schemas.android.com/tools"

    android:id="@+id/FrameLayout1"

    android:layout_width="match_parent"

    android:layout_height="match_parent"

    tools:context=".MainActivity"

    android:foreground="@drawable/logo"

    android:foregroundGravity="right|bottom">

    <TextView

        android:layout_width="200dp"

        android:layout_height="200dp"

        android:background="#FF6143" />

    <TextView

        android:layout_width="150dp"

        android:layout_height="150dp"

        android:background="#7BFE00" />

     <TextView

        android:layout_width="100dp"

        android:layout_height="100dp"

        android:background="#FFFF00" />

</FrameLayout>
代码解析: 很简单,三个TextView设置不同大小与背景色,依次覆盖,接着右下角的是前景图像,通过 android:foreground="@drawable/logo"设置前景图像的图片, android:foregroundGravity="right|bottom"设置前景图像的位置在右下角
2)随手指移动的萌妹子
效果图如下:

实现流程解析:
- step 1:先将main.xml布局设置为空白的FrameLayout,为其设置一个图片背景
- step 2:新建一个继承View类的MeziView自定义组件类,在构造方法中初始化view的初始坐标
- step 3:重写onDraw()方法,实例化一个空的画笔类Paint
- step 4:调用BitmapFactory.decodeResource()生成位图对象
- step 5:调用canvas.drawBitmap()绘制妹子的位图对象
- step 6:判断图片上是否回收,否则强制回收图片
- step 7:在主Java代码中获取帧布局对象,并且实例化一个MeziView类
- step 8:会实例化的mezi对象添加一个触摸事件的监听器,重写onTouch方法,改变mezi的X,Y坐标,调用invalidate()重绘方法
- step 9: 将mezi对象添加到帧布局中
布局代码:main_activity.xml
<FrameLayout xmlns:android="http://schemas.android.com/apk/res/android"

    xmlns:tools="http://schemas.android.com/tools"

    android:id="@+id/mylayout"

    android:layout_width="match_parent"

    android:layout_height="match_parent"

    tools:context=".MainActivity"

    android:background="@drawable/back" >

</FrameLayout>
自定义的MeziView.java
package com.jay.example.framelayoutdemo2;

import android.content.Context;

import android.graphics.Bitmap;

import android.graphics.BitmapFactory;

import android.graphics.Canvas;

import android.graphics.Paint;

import android.view.View;

public class MeziView extends View {

    //定义相关变量,依次是妹子显示位置的X,Y坐标

    public float bitmapX;

    public float bitmapY;

    public MeziView(Context context) {

        super(context);

        //设置妹子的起始坐标

        bitmapX = 0;

        bitmapY = 200;

    }

    //重写View类的onDraw()方法

    @Override

    protected void onDraw(Canvas canvas) {

        super.onDraw(canvas);

        //创建,并且实例化Paint的对象

        Paint paint = new Paint();

        //根据图片生成位图对象

        Bitmap bitmap = BitmapFactory.decodeResource(this.getResources(), R.drawable.s_jump);

        //绘制萌妹子

        canvas.drawBitmap(bitmap, bitmapX, bitmapY,paint);

        //判断图片是否回收,木有回收的话强制收回图片

        if(bitmap.isRecycled())

        {

            bitmap.recycle();

        }

    }

}
MainActivity.java:
package com.jay.example.framelayoutdemo2;

import android.os.Bundle;

import android.view.MotionEvent;

import android.view.View;

import android.view.View.OnTouchListener;

import android.widget.FrameLayout;

import android.app.Activity;

public class MainActivity extends Activity {

    @Override

    protected void onCreate(Bundle savedInstanceState) {

        super.onCreate(savedInstanceState);

        setContentView(R.layout.activity_main);

        FrameLayout frame = (FrameLayout) findViewById(R.id.mylayout);

        final MeziView mezi = new MeziView(MainActivity.this);

        //为我们的萌妹子添加触摸事件监听器

        mezi.setOnTouchListener(new OnTouchListener() {

            @Override

            public boolean onTouch(View view, MotionEvent event) {

                //设置妹子显示的位置

                mezi.bitmapX = event.getX() - 150;

                mezi.bitmapY = event.getY() - 150;

                //调用重绘方法

                mezi.invalidate();

                return true;

            }

        });

        frame.addView(mezi);

    }

}
代码解释: 见步骤,很简单,就是自定义一个View类,重写重绘方法,接着在Activity中为他添加一个触摸时间在触摸时间中重写onTouch方法获取点击焦点,另外还需要-150,不然那个坐标是自定义View的左上角,接着调用invalidate( )重绘方法,最后添加到帧布局中而已!
代码下载:FrameLayoutDemo2.zip
3)跑动的萌妹子
效果图如下:

实现流程:
- step 1:定义一个空的FrameLayout布局,将前景图像的位置设置为中央位置
- step 2:在Activity中获取到该FrameLayout布局,新建一个Handler对象,重写handlerMessage()方法,调用图像- 更新的方法
- step 3:自定义一个move()方法,通过switch动态设置前景图片显示的位图
- step 4:在onCreate()方法中新建一个计时器对象Timer,重写run方法,每隔170毫秒向handler发送空信息
实现代码如下:
布局文件:main_activity.xml:
<FrameLayout xmlns:android="http://schemas.android.com/apk/res/android"

    xmlns:tools="http://schemas.android.com/tools"

    android:id="@+id/myframe"

    android:layout_width="wrap_content"

    android:layout_height="wrap_content"

    android:foregroundGravity="center">

</FrameLayout>
MainActivity.java:
package com.jay.example.framelayoutdemo3;

import java.util.Timer;

import java.util.TimerTask;

import android.os.Bundle;

import android.os.Handler;

import android.os.Message;

import android.view.View;

import android.view.View.OnClickListener;

import android.widget.FrameLayout;

import android.app.Activity;

import android.graphics.drawable.Drawable;

public class MainActivity extends Activity {

    //初始化变量,帧布局

    FrameLayout frame = null;

    //自定义一个用于定时更新UI界面的handler类对象

        Handler handler = new Handler()

        {

            int i = 0;

            @Override

            public void handleMessage(Message msg) {

            //判断信息是否为本应用发出的

                if(msg.what == 0x123)

                {

                    i++;

                    move(i % 8 );

                }

                super.handleMessage(msg);

             }

        };

    //定义走路时切换图片的方法

    void move(int i)

    {

        Drawable a = getResources().getDrawable(R.drawable.s_1);

        Drawable b = getResources().getDrawable(R.drawable.s_2);

        Drawable c = getResources().getDrawable(R.drawable.s_3);

        Drawable d = getResources().getDrawable(R.drawable.s_4);

        Drawable e = getResources().getDrawable(R.drawable.s_5);

        Drawable f = getResources().getDrawable(R.drawable.s_6);

        Drawable g = getResources().getDrawable(R.drawable.s_7);

        Drawable h = getResources().getDrawable(R.drawable.s_8);

        //通过setForeground来设置前景图像

        switch(i)

        {

            case 0:

                frame.setForeground(a);

                break;

            case 1:

                frame.setForeground(b);

                break;

            case 2:

                frame.setForeground(c);

                break;

            case 3:

                frame.setForeground(d);

                break;

            case 4:

                frame.setForeground(e);

                break;

            case 5:

                frame.setForeground(f);

                break;

            case 6:

                frame.setForeground(g);

                break;

            case 7:

                frame.setForeground(h);

                break;

        }

    }

    @Override

    protected void onCreate(Bundle savedInstanceState) {

        super.onCreate(savedInstanceState);

        setContentView(R.layout.activity_main);

        frame = (FrameLayout) findViewById(R.id.myframe);

        //定义一个定时器对象,定时发送信息给handler

        new Timer().schedule(new TimerTask() {

            @Override

            public void run() {

                //发送一条空信息来通知系统改变前景图片

                handler.sendEmptyMessage(0x123);

            }},0,170);}}
代码解析: 代码也很简单,就是定义一个handler对象来刷新帧布局的前景图像,定义一个Timer定时器每隔170毫秒发送定时信息,i++;move(i%8);这里是因为我们使用8个图片作为动画素材!
代码下载:FrameLayoutDemo3.zip
本节小结
本节介绍了下FrameLayout(帧布局),主要掌握foreground和foregroundGravity属性的使用即可!帧布局比前面的表格布局用得稍微多一点!有兴趣可以像笔者这样写点小例子试试!
2.2.5 GridLayout(网格布局)
分类 Android 基础入门教程
本节引言
今天要介绍的布局是Android 4.0以后引入的一个新的布局,和前面所学的TableLayout(表格布局) 有点类似,不过他有很多前者没有的东西,也更加好用,
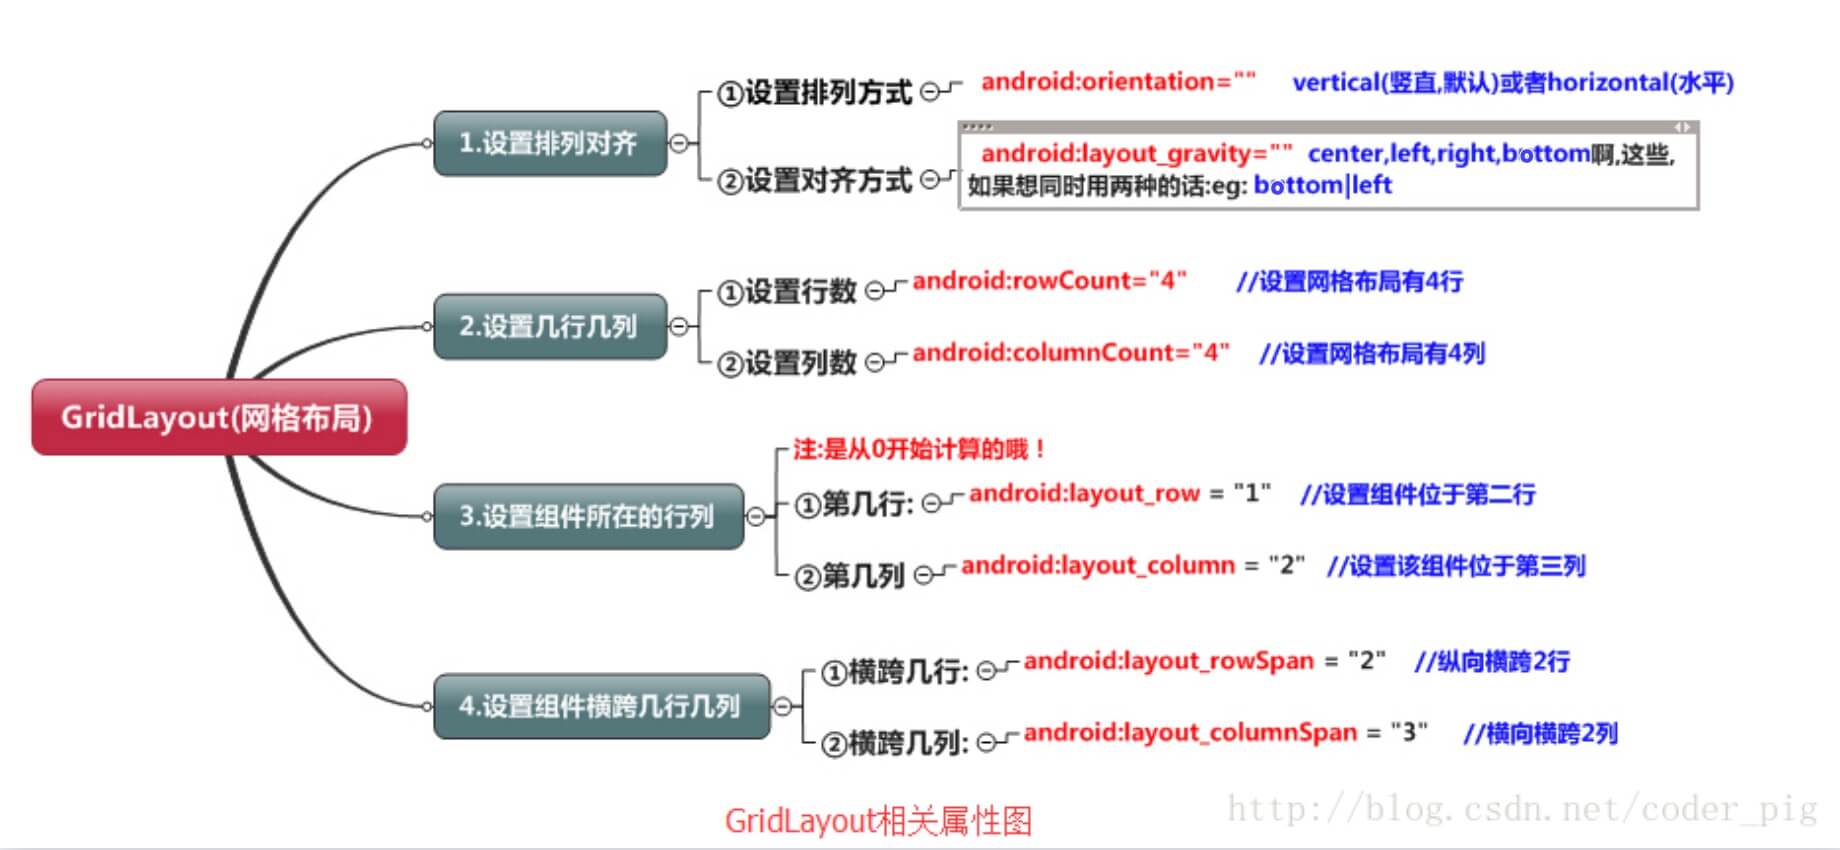
- 可以自己设置布局中组件的排列方式
- 可以自定义网格布局有多少行,多少列
- 可以直接设置组件位于某行某列
- 可以设置组件横跨几行或者几列
另外,除了上述内容外,本节还会给大家使用gridLayout时会遇到的问题,以及如何解决低版本 sdk如何使用GridLayout的方法!接下来就开始本节的课程吧!
1.相关属性总结图
2.使用实例:计算器布局的实现:
运行效果图:
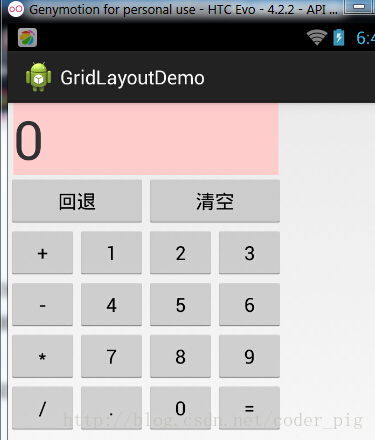
实现代码:
<GridLayout xmlns:android="http://schemas.android.com/apk/res/android"

    xmlns:tools="http://schemas.android.com/tools"

    android:id="@+id/GridLayout1"

    android:layout_width="wrap_content"

    android:layout_height="wrap_content"

    android:columnCount="4"

    android:orientation="horizontal"

    android:rowCount="6" >

    <TextView

        android:layout_columnSpan="4"

        android:layout_gravity="fill"

        android:layout_marginLeft="5dp"

        android:layout_marginRight="5dp"

        android:background="#FFCCCC"

        android:text="0"

        android:textSize="50sp" />

    <Button

        android:layout_columnSpan="2"

        android:layout_gravity="fill"

        android:text="回退" />

    <Button

        android:layout_columnSpan="2"

        android:layout_gravity="fill"

        android:text="清空" />

    <Button android:text="+" />

    <Button android:text="1" />

    <Button android:text="2" />

    <Button android:text="3" />

    <Button android:text="-" />

    <Button android:text="4" />

    <Button android:text="5" />

    <Button android:text="6" />

    <Button android:text="*" />

    <Button android:text="7" />

    <Button android:text="8" />

    <Button android:text="9" />

    <Button android:text="/" />

    <Button

        android:layout_width="wrap_content"

        android:text="." />

    <Button android:text="0" />

    <Button android:text="=" />

</GridLayout>
代码解析: 代码很简单,只是回退与清楚按钮横跨两列,而其他的都是直接添加的,默认每个组件都是 占一行一列,另外还有一点要注意的: 我们通过:android:layout_rowSpan与android:layout_columnSpan设置了组件横跨 多行或者多列的话,如果你要让组件填满横越过的行或列的话,需要添加下面这个属性: android:layout_gravity = "fill"!!!就像这个计算机显示数字的部分!
3.用法归纳:
①GridLayout使用虚细线将布局划分为行,列和单元格,同时也支持在行,列上进行交错排列 ②使用流程:
- step 1:先定义组件的对其方式 android:orientation 水平或者竖直,设置多少行与多少列
- step 2:设置组件所在的行或者列,记得是从0开始算的,不设置默认每个组件占一行一列
- step 3:设置组件横跨几行或者几列;设置完毕后,需要在设置一个填充:android:layout_gravity = "fill"
4.使用GridLayout要注意的地方:
因为GirdLayout是4.0后才推出的,所以minSDK版本要改为14或者以上的版本, 不然写布局代码的时候,这玩意就会莫名其妙地出错,说找不到这个GridLayout, 当然,如果你要低版本兼容的话,就要看下面的内容了!
5.低版本sdk如何使用GridLayout:
解决方法很简单:只需要导入v7包的gridlayout包即可! v7包一般在sdk下的:sdk\extras\android\support\v7\gridlayout目录下 如果你没有的话,也可以到这里下载: gridlayout_v7_jay.rar但是用的时候,标签却是这样写的:
<android.support.v7.widget.GridLayout>`
2.2.6 AbsoluteLayout(绝对布局)
分类 Android 基础入门教程
本节引言
前面已经介绍了,Android中的五大布局,在本节中会讲解第六个布局AbsoluteLayout(绝对布局), 之所以把这个放到最后,是因为绝对布局,我们基本上都是不会使用的,当然你也可以直接跳过这一 篇博文,不过作为一个喜欢增长姿势的程序员,我们还是可以了解这个AbsoluteLayout布局的, 相信大部分学过Java的都知道,我们在Java swing(不是spring哦)都用过这个绝对布局,但是Android 中我们用这个少的原因,就是因为我们开发的应用需要在很多的机型上面进行一个适配,如果你 使用了这个绝对布局的话,可能你在4寸的手机上是显示正常的,而换成5寸的手机,就可能出现偏移 和变形,所以的话,这个还是不建议使用了,当然,如果你不会写代码的话,又想玩玩android,那么写 布局的时候就可以通过ADT把需要的组件,拖拉到界面上!这个AbsoluteLayout是直接通过X,Y坐标来 控制组件在Activity中的位置的!另外这个但单位是dp!
1.四大控制属性(单位都是dp):
①控制大小: android:layout_width:组件宽度 android:layout_height:组件高度 ②控制位置: android:layout_x:设置组件的X坐标 android:layout_y:设置组件的Y坐标
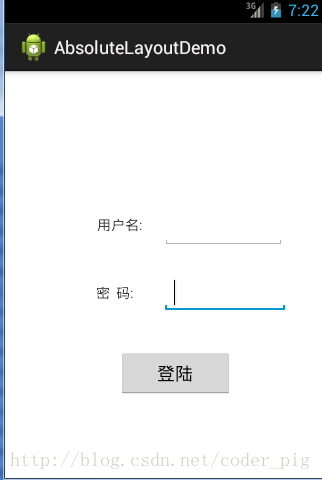
2.使用示例:
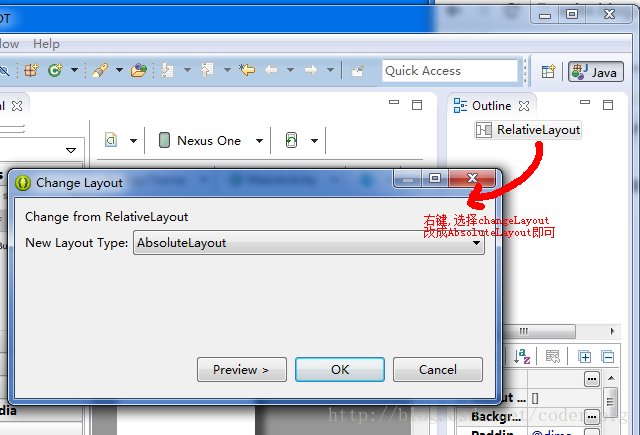
一个简单的登录界面,都是直接在ADT上拖拉出来的界面,代码就不贴了:
①先设置成AbsoluteLayout绝对布局:
②从左边拖拉两个TextView和EditText以及一个按钮到界面上,拖来拖去,知道看上去好看点为止
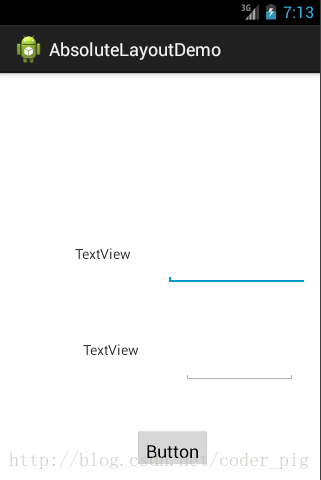
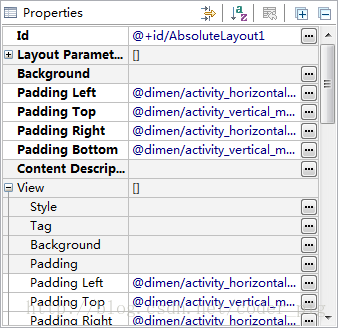
拖拉拖去,最后还是这个挫样,估计是ADT的问题,接下来你可以: ①进代码修改坐标,知道看上去好看点 ②当然,你也可以直接在右边设置坐标:
修改完后:
当然,或许以上两种方法都不喜欢,你想拖拉后就直接生成正确的代码~! ok,没问题,推荐你使用前面界面原型那里给大家介绍的一个工具:DroidDraw 
本节小结
好的,Android中的六大布局都给大家介绍完了,还是建议使用:LinearLayout的weight权重属性+ RelativeLayout来构建我们的界面~嗯,就到这里,谢谢~
runoob-Android 基础入门教程-1的更多相关文章
- 1.0 Android基础入门教程
1.0 Android基础入门教程 分类 Android 基础入门教程 本教程于2015年7月开始撰写,耗时半年,总共148节,涵盖了Android基础入门的大部分知识,由于当时能力局限,虽已竭尽全力 ...
- Android基础入门教程
http://www.kancloud.cn/wizardforcel/w3school-android/100491
- React Native基础&入门教程:初步使用Flexbox布局
在上篇中,笔者分享了部分安装并调试React Native应用过程里的一点经验,如果还没有看过的同学请点击<React Native基础&入门教程:调试React Native应用的一小 ...
- 《Delphi XE6 android 编程入门教程》推荐
近5.6年已经没有看见关于delphi的新技术的书出来了(看来在国内delphi的使用量确实很低了), 高勇同学最近出了一本<Delphi XE6 android 编程入门教程>,上周刚拿 ...
- Mongodb最基础入门教程
Mongodb最基础入门教程 如果想了解一下redis的入门教程,可以去看一下我的上一篇博客 Mongodb的安装大家可以参考一下其他博主的博客,这里我就不做介绍了.不过值得注意的是,在Linux ...
- [置顶] IOS 基础入门教程
IOS 基础入门教程 教程列表: IOS 简介 IOS环境搭建 Objective C 基础知识 创建第一款iPhone应用程序 IOS操作(action)和输出口(Outlet) iOS - 委托( ...
- Python基础入门教程
Python基础入门教程 Python基础教程 Python 简介 Python环境搭建 Python 基础语法 Python 变量类型 Python 运算符 Python 条件语句 Python 循 ...
- Linux基础入门教程
Linux基础入门教程 --------- Linux学习路径 Linux学习者,常常不知道自己改怎么学习linux:Linux初级,也就是入门linux前提是需要有一些计算机硬件相关的知识或是有一下 ...
- Android基础新手教程——1.10 反编译APK获代替码&资源
Android基础新手教程--1.10 反编译APK获代替码&资源 标签(空格分隔): Android基础新手教程 本节引言: "反编译Apk".看上去好像好像非常高端的样 ...
- Android基础新手教程——1.6 .9(九妹)图片怎么玩
Android基础新手教程--1.6 .9(九妹)图片怎么玩 标签(空格分隔): Android基础新手教程 1.本节引言: 可能有的一些疑问: 1.什么是.9图片? 答:图片后缀名前有.9的图片,如 ...
随机推荐
- 模拟器运行环境及Lua代码——使用遗传进化算法(neat算法)玩超级玛丽游戏
SuperMario_GeneticEvolution_Neat 项目介绍: 模拟器运行环境及Lua代码--使用遗传进化算法(neat算法)玩超级玛丽游戏 代码地址: https://openi.pc ...
- UE4纯C++实现游戏快捷栏
要想创建一个游戏中的快捷栏我们往往通过以下几步来实现(目录导航): 1.创建UI:我们首先需要有在游戏视口中添加一个快捷栏UI界面,以供玩家看到自身的快捷栏. 2.物品读取:其次有了界面之后我们需要往 ...
- salesforce零基础学习(一百四十一)刷新dev sandbox需要强制group
本篇参考:https://help.salesforce.com/s/articleView?id=sf.data_sandbox_selective_access.htm&type=5 背景 ...
- Codeforces Round 987 (Div. 2)
Codeforces Round 987 (Div. 2) 总结 A 常见的套路,将一个序列变为不下降序列所需要改变的值的最小数量,考虑最大能保留多少个,显然是求最长上升子序列,而这题给出的 \(a\ ...
- 全新向量数据库SQL Server 2025:带你迈入AI驱动的数据未来
全新向量数据库SQL Server 2025:带你迈入AI驱动的数据未来 上次大家下单的<微软憋大招:SQL Server + Copilot = 地表最强AI数据库!> 抱怨迟迟没有发货 ...
- Python prometheus_client使用方式
#!/usr/bin/env python # -*- coding: utf8 -*- import socket,re from prometheus_client import generate ...
- Maven多模块项目 eclipse热部署 Maven项目实现 tomcat热部署
Maven 多模块项目在eclipse下面热部署,即你可以体验下无论你修改整个项目里面的任何模块的代码,都不需要用maven打包就可以看到效果, 1.首先准备好创建一个maven多项目的代码,准备好一 ...
- Redis迁移工具之Redis-shake
Redis-shake is a tool for synchronizing data between two redis databases. Redis-shake是一个用于在两个redis之间 ...
- Threejs入门-灯光
在 Three.js 中,灯光是非常重要的元素之一,它能够模拟现实世界中的光照效果,帮助我们打造更加真实的三维场景.灯光的种类和配置方式可以影响整个场景的视觉效果,在不同的应用中,灯光的使用非常关键. ...
- windows安装tomcat10
下载安装jdk17 :jdk-17_windows-x64_bin.exe 配置JAVA环境变量 JAVA_HOME:C:\Program Files\Java\jdk-17 PATH:%Java_ ...