TensorFlow模型保存和加载方法
TensorFlow模型保存和加载方法
模型保存
import tensorflow as tf

w1 = tf.Variable(tf.constant(2.0, shape=[1]), name="w1-name")

w2 = tf.Variable(tf.constant(3.0, shape=[1]), name="w2-name")

a = tf.placeholder(dtype=tf.float32, name="a-name")

b = tf.placeholder(dtype=tf.float32, name="b-name")

y = a * w1 + b * w2

init = tf.global_variables_initializer()

saver = tf.train.Saver()

with tf.Session() as sess:

    sess.run(init)

    print(a)  # Tensor("a-name:0", dtype=float32)

    print(b)  # Tensor("b-name:0", dtype=float32)

    print(y)  # Tensor("add:0", dtype=float32)

    print(sess.run(y, feed_dict={a: 10, b: 10}))

saver.save(sess, "./model/model.ckpt")- 1
- 2
- 3
- 4
- 5
- 6
- 7
- 8
- 9
- 10
- 11
- 12
- 13
- 14
- 15
- 16
- 17
- 18
- 19
- 20
这段代码中,通过saver.save函数将TensorFlow模型保存到了model/model.ckpt文件中,这里代码中指定路径为"model/model.ckpt",也就是保存到了当前程序所在文件夹里面的model文件夹中。
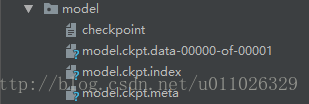
TensorFlow模型会保存在后缀为.ckpt的文件中。保存后在save这个文件夹中实际会出现3个文件,因为TensorFlow会将计算图的结构和图上参数取值分开保存。
model.ckpt.meta文件保存了TensorFlow计算图的结构,可以理解为神经网络的网络结构model.ckpt文件保存了TensorFlow程序中每一个变量的取值checkpoint文件保存了一个目录下所有的模型文件列表
模型加载:只加载变量,但是还是需要重新定义图结构
import tensorflow as tf

# 使用和保存模型代码中一样的方式来声明变量

# 变量rw1, rw2 不需要进行初始化

rw1 = tf.Variable(tf.constant(2.0, shape=[1]), name="w1-name")

rw2 = tf.Variable(tf.constant(3.0, shape=[1]), name="w2-name")

# 重新定义图结构

result = 10 * rw1 + 10 * rw2

saver = tf.train.Saver()

with tf.Session() as sess:

    saver.restore(sess, "./model/model.ckpt")

print(sess.run(result))- 1
- 2
- 3
- 4
- 5
- 6
- 7
- 8
- 9
- 10
- 11
- 12
- 13
- 14
- 15
tf.train.Saver类也支持在保存和加载时给变量重命名
import tensorflow as tf

# 声明的变量名称name与已保存的模型中的变量名称name不一致

rw1 = tf.Variable(tf.constant(2.0, shape=[1]), name="rw1-name")

rw2 = tf.Variable(tf.constant(3.0, shape=[1]), name="rw2-name")

# 重新定义图结构

result = 10 * rw1 + 10 * rw2

# 若直接生命Saver类对象,会报错变量找不到

# 使用一个字典dict重命名变量即可,{"已保存的变量的名称name": 重命名变量名}

# 原来名称name为 w1-name 的变量现在加载到变量 rw1(名称name为 rw1-name)中

saver = tf.train.Saver({"w1-name": rw1, "w2-name": rw2})

with tf.Session() as sess:

    saver.restore(sess, "./model/model.ckpt")

print(sess.run(result))- 1
- 2
- 3
- 4
- 5
- 6
- 7
- 8
- 9
- 10
- 11
- 12
- 13
- 14
- 15
- 16
- 17
模型加载: 不需要重新定义图结构
import tensorflow as tf

saver = tf.train.import_meta_graph("./model/model.ckpt.meta")

graph = tf.get_default_graph()

# 通过 Tensor 名获取变量

a = graph.get_tensor_by_name("a-name:0")

b = graph.get_tensor_by_name("b-name:0")

y = graph.get_tensor_by_name("add:0")

with tf.Session() as sess:

    saver.restore(sess, "./model/model.ckpt")

print(sess.run(y, feed_dict={a: 10, b: 10}))- 1
- 2
- 3
- 4
- 5
- 6
- 7
- 8
- 9
- 10
- 11
- 12
- 13
convert_variables_to_constants
# 通过convert_variables_to_constants函数将计算图中的变量及其取值通过常量的方式保存于一个文件中

import tensorflow as tf

from tensorflow.python.framework import graph_util

v1 = tf.Variable(tf.constant(1.0, shape=[1]), name="v1")

v2 = tf.Variable(tf.constant(2.0, shape=[1]), name="v2")

result = v1 + v2

with tf.Session() as sess:

    sess.run(tf.global_variables_initializer())

    # 导出当前计算图的GraphDef部分,即从输入层到输出层的计算过程部分

    graph_def = tf.get_default_graph().as_graph_def()

    output_graph_def = graph_util.convert_variables_to_constants(sess, graph_def, ['add'])

with tf.gfile.GFile("Model/combined_model.pb", 'wb') as f:

    f.write(output_graph_def.SerializeToString())

# 载入包含变量及其取值的模型

import tensorflow as tf

from tensorflow.python.platform import gfile

with tf.Session() as sess:

    model_filename = "Model/combined_model.pb"

    with gfile.FastGFile(model_filename, 'rb') as f:

        graph_def = tf.GraphDef()

        graph_def.ParseFromString(f.read())

    result = tf.import_graph_def(graph_def, return_elements=["add:0"])

print(sess.run(result)) # [array([ 3.], dtype=float32)]- 1
- 2
- 3
- 4
- 5
- 6
- 7
- 8
- 9
- 10
- 11
- 12
- 13
- 14
- 15
- 16
- 17
- 18
- 19
- 20
- 21
- 22
- 23
- 24
- 25
- 26
- 27
- 28
- 29
- 30
- 31
- 32
TensorFlow 模型保存/载入的两种方法
我们在上线使用一个算法模型的时候,首先必须将已经训练好的模型保存下来。tensorflow保存模型的方式与sklearn不太一样,sklearn很直接,一个sklearn.externals.joblib的dump与load方法就可以保存与载入使用。而tensorflow由于有graph,operation 这些概念,保存与载入模型稍显麻烦。
一、基本方法
网上搜索tensorflow模型保存,搜到的大多是基本的方法。即
保存
- 定义变量
- 使用saver.save()方法保存
载入
- 定义变量
- 使用saver.restore()方法载入
如 保存 代码如下
import tensorflow as tf

import numpy as np

W = tf.Variable([[1,1,1],[2,2,2]],dtype = tf.float32,name='w')

b = tf.Variable([[0,1,2]],dtype = tf.float32,name='b')

init = tf.initialize_all_variables()

saver = tf.train.Saver()

with tf.Session() as sess:

        sess.run(init)

save_path = saver.save(sess,"save/model.ckpt") - 1
- 2
- 3
- 4
- 5
- 6
- 7
- 8
- 9
- 10
- 11
载入代码如下:
import tensorflow as tf

import numpy as np

W = tf.Variable(tf.truncated_normal(shape=(2,3)),dtype = tf.float32,name='w')

b = tf.Variable(tf.truncated_normal(shape=(1,3)),dtype = tf.float32,name='b')

saver = tf.train.Saver()

with tf.Session() as sess:

saver.restore(sess,"save/model.ckpt") - 1
- 2
- 3
- 4
- 5
- 6
- 7
- 8
- 9
这种方法不方便的在于,在使用模型的时候,必须把模型的结构重新定义一遍,然后载入对应名字的变量的值。但是很多时候我们都更希望能够读取一个文件然后就直接使用模型,而不是还要把模型重新定义一遍。所以就需要使用另一种方法。
二、不需重新定义网络结构的方法
tf.train.import_meta_graph
import_meta_graph(

    meta_graph_or_file,

    clear_devices=False,

    import_scope=None,

    **kwargs

)- 1
- 2
- 3
- 4
- 5
- 6
这个方法可以从文件中将保存的graph的所有节点加载到当前的default graph中,并返回一个saver。也就是说,我们在保存的时候,除了将变量的值保存下来,其实还有将对应graph中的各种节点保存下来,所以模型的结构也同样被保存下来了。
比如我们想要保存计算最后预测结果的y,则应该在训练阶段将它添加到collection中。具体代码如下 :
保存
### 定义模型

input_x = tf.placeholder(tf.float32, shape=(None, in_dim), name='input_x')

input_y = tf.placeholder(tf.float32, shape=(None, out_dim), name='input_y')

w1 = tf.Variable(tf.truncated_normal([in_dim, h1_dim], stddev=0.1), name='w1')

b1 = tf.Variable(tf.zeros([h1_dim]), name='b1')

w2 = tf.Variable(tf.zeros([h1_dim, out_dim]), name='w2')

b2 = tf.Variable(tf.zeros([out_dim]), name='b2')

keep_prob = tf.placeholder(tf.float32, name='keep_prob')

hidden1 = tf.nn.relu(tf.matmul(self.input_x, w1) + b1)

hidden1_drop = tf.nn.dropout(hidden1, self.keep_prob)

### 定义预测目标

y = tf.nn.softmax(tf.matmul(hidden1_drop, w2) + b2)

# 创建saver

saver = tf.train.Saver(...variables...)

# 假如需要保存y,以便在预测时使用

tf.add_to_collection('pred_network', y)

sess = tf.Session()

for step in xrange(1000000):

    sess.run(train_op)

    if step % 1000 == 0:

        # 保存checkpoint, 同时也默认导出一个meta_graph

        # graph名为'my-model-{global_step}.meta'.

saver.save(sess, 'my-model', global_step=step)- 1
- 2
- 3
- 4
- 5
- 6
- 7
- 8
- 9
- 10
- 11
- 12
- 13
- 14
- 15
- 16
- 17
- 18
- 19
- 20
- 21
- 22
- 23
- 24
载入
with tf.Session() as sess:

  new_saver = tf.train.import_meta_graph('my-save-dir/my-model-10000.meta')

  new_saver.restore(sess, 'my-save-dir/my-model-10000')

  # tf.get_collection() 返回一个list. 但是这里只要第一个参数即可

  y = tf.get_collection('pred_network')[0]

  graph = tf.get_default_graph()

  # 因为y中有placeholder,所以sess.run(y)的时候还需要用实际待预测的样本以及相应的参数来填充这些placeholder,而这些需要通过graph的get_operation_by_name方法来获取。

  input_x = graph.get_operation_by_name('input_x').outputs[0]

  keep_prob = graph.get_operation_by_name('keep_prob').outputs[0]

  # 使用y进行预测

sess.run(y, feed_dict={input_x:...., keep_prob:1.0})- 1
- 2
- 3
- 4
- 5
- 6
- 7
- 8
- 9
- 10
- 11
- 12
- 13
- 14
具体示例
save.py
import tensorflow as tf

from tensorflow.examples.tutorials.mnist import input_data

# 加载数据集

mnist = input_data.read_data_sets("data", one_hot=True)

# Parameters

learning_rate = 0.001

batch_size = 100

display_step = 10

model_path = "save/model.ckpt"

# Network Parameters

n_hidden_1 = 256  # 1st layer number of features

n_hidden_2 = 256  # 2st layer number of features

n_input = 784  # MNIST data input (img shape: 28*28)

n_classes = 10  # MNIST total classes (0-9 digits)

# tf Graph input

x = tf.placeholder(tf.float32, [None, n_input], name="input_x")

y = tf.placeholder(tf.float32, [None, n_classes], name="input_y")

# Store layers weight & bias

weights = {

    'h1': tf.Variable(tf.random_normal([n_input, n_hidden_1])),

    'h2': tf.Variable(tf.random_normal([n_hidden_1, n_hidden_2])),

    'out': tf.Variable(tf.random_normal([n_hidden_2, n_classes]))

}

biases = {

    'b1': tf.Variable(tf.random_normal([n_hidden_1])),

    'b2': tf.Variable(tf.random_normal([n_hidden_2])),

    'out': tf.Variable(tf.random_normal([n_classes]))

}

# Create model

def multilayer_perceptron(x, weights, biases):

    # layer1

    h1 = tf.add(tf.matmul(x, weights['h1']), biases['b1'])

    h1 = tf.nn.relu(h1)

    # layer2

    h2 = tf.add(tf.matmul(h1, weights['h2']), biases['b2'])

    h2 = tf.nn.relu(h2)

    # out

    out = tf.add(tf.matmul(h2, weights['out']), biases['out'])

    return out

# Construct model

logits = multilayer_perceptron(x, weights, biases)

pred = tf.nn.softmax(logits)

# Define loss and optimizer

cost = tf.reduce_mean(tf.nn.softmax_cross_entropy_with_logits(logits=logits, labels=y))

optimizer = tf.train.AdamOptimizer(learning_rate=learning_rate).minimize(cost)

corrcet_pred = tf.equal(tf.argmax(pred, 1), tf.argmax(y, 1))

accuracy = tf.reduce_mean(tf.cast(corrcet_pred, tf.float32))

# Initializing the variables

init = tf.global_variables_initializer()

# 保存模型

saver = tf.train.Saver()

tf.add_to_collection("pred", pred)

tf.add_to_collection('acc', accuracy)

with tf.Session() as sess:

    sess.run(init)

    step = 0

    while step * batch_size < 180000:

        batch_xs, batch_ys = mnist.train.next_batch(batch_size)

        loss, _, acc = sess.run([cost, optimizer, accuracy], feed_dict={x: batch_xs, y: batch_ys})

        if step % display_step == 0:

            # step: 1790 loss: 16.9724 acc: 0.95

            print("step: ", step, "loss: ", loss, "acc: ", acc)

            saver.save(sess, save_path=model_path, global_step=step)

        step += 1

print("Train Finish!")- 1
- 2
- 3
- 4
- 5
- 6
- 7
- 8
- 9
- 10
- 11
- 12
- 13
- 14
- 15
- 16
- 17
- 18
- 19
- 20
- 21
- 22
- 23
- 24
- 25
- 26
- 27
- 28
- 29
- 30
- 31
- 32
- 33
- 34
- 35
- 36
- 37
- 38
- 39
- 40
- 41
- 42
- 43
- 44
- 45
- 46
- 47
- 48
- 49
- 50
- 51
- 52
- 53
- 54
- 55
- 56
- 57
- 58
- 59
- 60
- 61
- 62
- 63
- 64
- 65
- 66
- 67
- 68
- 69
- 70
- 71
- 72
- 73
- 74
- 75
- 76
- 77
- 78
- 79
- 80
- 81
- 82
- 83
checkpoint:
model_checkpoint_path: "model.ckpt-1790"

all_model_checkpoint_paths: "model.ckpt-1750"

all_model_checkpoint_paths: "model.ckpt-1760"

all_model_checkpoint_paths: "model.ckpt-1770"

all_model_checkpoint_paths: "model.ckpt-1780"

all_model_checkpoint_paths: "model.ckpt-1790"- 1
- 2
- 3
- 4
- 5
- 6
restore.py
import tensorflow as tf

from tensorflow.examples.tutorials.mnist import input_data

# load mnist data

mnist = input_data.read_data_sets("data", one_hot=True)

with tf.Session() as sess:

    new_saver = tf.train.import_meta_graph("save/model.ckpt-1790.meta")

    new_saver.restore(sess, "save/model.ckpt-1790")

    # tf.get_collection() 返回一个list. 但是这里只要第一个参数即可

    pred = tf.get_collection("pred")[0]

    acc = tf.get_collection("acc")[0]

    # 因为 pred, acc 中有 placeholder,所以 sess.run(acc)的时候还需要用实际待预测的样本以及相应的参数来填充这些placeholder,

    # 而这些需要通过graph的get_operation_by_name方法来获取。

    graph = tf.get_default_graph()

    x = graph.get_operation_by_name("input_x").outputs[0]

    y = graph.get_operation_by_name("input_y").outputs[0]

    test_xs = mnist.test.images

    test_ys = mnist.test.labels

    #test set acc:  [0.91820002]

    print("test set acc: ", sess.run([acc], feed_dict={

        x: test_xs,

        y: test_ys

    }))
原文:https://blog.csdn.net/u011026329/article/details/79190347
TensorFlow模型保存和加载方法的更多相关文章
- tensorflow 模型保存和加载
使用 tf.train.Saver 保存:tf.train.Saver.save(sess, save_path, global_step=None, latest_filename=None, me ...
- keras中的模型保存和加载
tensorflow中的模型常常是protobuf格式,这种格式既可以是二进制也可以是文本.keras模型保存和加载与tensorflow不同,keras中的模型保存和加载往往是保存成hdf5格式. ...
- 从头学pytorch(十二):模型保存和加载
模型读取和存储 总结下来,就是几个函数 torch.load()/torch.save() 通过python的pickle完成序列化与反序列化.完成内存<-->磁盘转换. Module.s ...
- 使用Pytorch在多GPU下保存和加载训练模型参数遇到的问题
最近使用Pytorch在学习一个深度学习项目,在模型保存和加载过程中遇到了问题,最终通过在网卡查找资料得已解决,故以此记之,以备忘却. 首先,是在使用多GPU进行模型训练的过程中,在保存模型参数时,应 ...
- tensorflow 模型保存与加载 和TensorFlow serving + grpc + docker项目部署
TensorFlow 模型保存与加载 TensorFlow中总共有两种保存和加载模型的方法.第一种是利用 tf.train.Saver() 来保存,第二种就是利用 SavedModel 来保存模型,接 ...
- Tensorflow模型保存与加载
在使用Tensorflow时,我们经常要将以训练好的模型保存到本地或者使用别人已训练好的模型,因此,作此笔记记录下来. TensorFlow通过tf.train.Saver类实现神经网络模型的保存和提 ...
- TensorFlow模型保存和提取方法
一.TensorFlow模型保存和提取方法 1. TensorFlow通过tf.train.Saver类实现神经网络模型的保存和提取.tf.train.Saver对象saver的save方法将Tens ...
- TensorFlow 模型保存/载入
我们在上线使用一个算法模型的时候,首先必须将已经训练好的模型保存下来.tensorflow保存模型的方式与sklearn不太一样,sklearn很直接,一个sklearn.externals.jobl ...
- 10 Tensorflow模型保存与读取
我们的模型训练出来想给别人用,或者是我今天训练不完,明天想接着训练,怎么办?这就需要模型的保存与读取.看代码: import tensorflow as tf import numpy as np i ...
随机推荐
- Charles 安装图解(Mac 抓包工具)
概述 Fidder使用C#开发的,所以就不能在Mac上使用了,不过还有另外一个抓包神器,就是Charles,它是Java开发的,所以跨平台,不仅可以在Mac上使用,Linux以及Window下都是可以 ...
- dubbo.provider和dubbo.consumer配置
Configure service provider <?xml version="1.0" encoding="UTF-8"?> <bean ...
- SQL 2008安装过程(转)
这几天因为需要,一直想安装SQL Server 2008来作为Web后台的数据库进行些实验,但总是没有时间,今天终于有时间了,便安装了SQL Server 2008,以下是我的安装的步骤,希望对于有需 ...
- !! zcl_TD 用法注释02 力攻(动能<4)
力攻(动能<4)创新高下M5可持有力攻(动能<4)不创新高下M5可减仓
- /*使用PHP创建一个数组,保存5個员工的信息(ename/sex/salary/birthday/pic)*/
<?php/*使用PHP创建一个数组,保存5個员工的信息(ename/sex/salary/birthday/pic)*/$empList=[ ['ename'=>'张学友','se ...
- Unity shader学习之Alpha Test
可以在fragment中使用cg的函数--clip来进行透明度测试. 函数定义如下: void clip(float4 x); void clip(float3 x); void clip(float ...
- Beta冲刺阶段5.0
1. 提供当天站立式会议照片一张 2. 每个人的工作 (有work item 的ID) 成员 昨天已完成的工作 今天计划完成的工作 工作中遇到的困难 具体贡献 郑晓丽 首页活动详情界面的美化 实现首页 ...
- Vue系列之 => 钩子函数生命周期
<!DOCTYPE html> <html lang="en"> <head> <meta charset="UTF-8&quo ...
- html5-增强的表单-表单的重写
<!DOCTYPE html><html lang="en"><head> <meta charset="UTF-8&qu ...
- C# 实现生产者消费者队列
开发过程中经常会碰到这样的场景:需要从一个地方获取一些数据,然后处理数据并将其保存在数据库中. 1 2 3 4 5 6 7 8 9 10 private void FetchData() {} pri ...