CentOS7安装配置PostgreSQL9.6
本文涉及CentOS7下PostgreSQL9.6的yum安装,访问配置及简单使用。
一.验证环境
1. 操作系统
CentOS-7-x86_64-Everything-1511
2. PostgresSQL版本
PostgreSQL 9.6.3:https://www.postgresql.org/download/linux/RedHat/
二.安装
1. 安装rpm
[root@psql_master ~]# yum install -y https://download.postgresql.org/pub/repos/yum/9.6/redhat/rhel-7-x86_64/pgdg-centos96-9.6-3.noarch.rpm
2. 安装客户端
[root@psql_master ~]# yum install -y postgresql96
3. 安装服务器端
#yum安装postgresql,默认会建一个名为”postgres”的系统账号,用于执行PostgreSQL;

#同时数据库中也会生成一个名为”postgres”的数据库用户,且密码已自动生成,需要进入数据库后修改;

#PostgreSQL在数据库用户同名的系统账号下登录免密。

[root@psql_master ~]# yum install -y postgresql96-server
4. 初始化
[root@psql_master bin]# /usr/pgsql-9.6/bin/postgresql96-setup initdb
5. 设置开机启动
[root@psql_master ~]# systemctl enable postgresql-9.6
6. 启动
[root@psql_master ~]# systemctl start postgresql-9.6
三.配置使用
1. 修改用户密码
#yum安装postgresql,默认会建一个名为”postgres”的系统账号,用于执行PostgreSQL;

[root@psql_master ~]# su - postgres

#切换用户后,提示符变更为“-bash-4.2$”;

#同时数据库中也会生成一个名为”postgres”的数据库用户,且密码已自动生成;

#PostgreSQL在数据库用户同名的系统账号下登录免密;

-bash-4.2$ psql -U postgres

#进入数据库后修改密码;

postgres=# alter user postgres with password 'postgres'

2. 允许远程访问
修改postgreSQL的配置文件/var/lib/pgsql/9.6/data/postgresql.conf
#配置文件中,默认只能本机访问postgresql;

#修改listen_addresses = 'localhost'为listen_addresses = '*',允许所有远程访问;

#修改配置文件需要重启服务。

[root@psql_master ~]# sed -i "s|#listen_addresses = 'localhost'|listen_addresses = '*'|g" /var/lib/pgsql/9.6/data/postgresql.conf
3. 主机认证
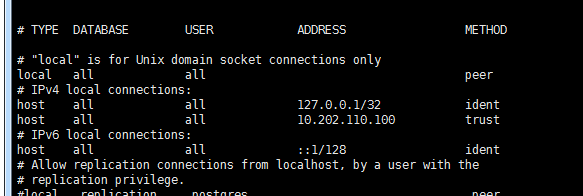
#在第82行之后,”IPv4 local connections”下新增允许的客户端;

#“host” 代表主机类型,第一个“all”代表db ,第二个“all”代表user ,“172.29.3.67/32” 代表client ip,“trust”代表认证方式;

#认证方式除“trust”外,还有“peer”, “ident”, “md5”, “password”等,具体可参考pg-hba文件: https://www.postgresql.org/docs/current/static/auth-pg-hba-conf.html

#修改pg.hba文件需要重启服务。

[root@psql_master ~]# vim /var/lib/pgsql/9.6/data/pg_hba.conf

host    all             all             172.29.3.67/32          trust
4. 设置环境变量
[root@psql_master ~]# vim /etc/profile

export PATH=$PATH:/usr/pgsql-9.6/bin

[root@psql_master ~]# source /etc/profile
5. 重启服务
[root@psql_master ~]# systemctl restart postgresql-9.6
6. iptables
#postgresql默认开启tcp5432端口

[root@psql_master ~]# vim /etc/sysconfig/iptables

-A INPUT -m state --state NEW -m tcp -p tcp --dport 5432 -j ACCEPT

[root@psql_master ~]# service iptables restart
四.使用验证
1. 查看端口
[root@psql_master ~]# netstat -tunlp

2. 简单使用
1)创建用户
postgres=# create user postuser1 with password 'user1@123';
2)创建数据库
#同时指定数据库的所有者

postgres=# create database postdb1 owner postuser1;
3)数据库赋权
#未赋权则账户只能登录控制台

postgres=# grant all privileges on database postdb1 to postuser1;

4)登录新建数据库
#在操作系统层使用新建的账号登录新建的数据库,登录后提示符为“postdb1=>”;

#如果在postgres账户下直接使用“postgres=# \c postdb1;”登录,则登录用户依然是postgres,

-bash-4.2$ psql -U postuser1 -d postdb1 -h 127.0.0.1 -p 5432

5)创建表
postdb1=> create table tb1(

          id int primary key,

          name VARCHAR(20),

          salary real

          );
6)插入数据
postdb1=> insert into tb1(

          id, name, salary)

          values(

          101, 'Mike', 5000.00

          );
7)查询
postdb1=>select * from tb1;

3. pgadmin连接postgresql
pgadmin下载地址:https://www.pgadmin.org/download/
截至2017-05-19的版本是:pgAdmin 4 v1.5
1)添加服务器
打开pgadmin—>添加新的服务器—>(通常标签)名称自定义—>(connection标签)主机名称与postgresql用户密码按需填写,其余可采用默认配置—>保存。

2)图形化查看

PostgreSQL 设置允许访问IP
PostgreSQL安装后默认只能localhost:5432访问
检验方法:
curl localhost:

# 访问成功提示

curl: () Empty reply from server
或
curl 127.0.0.1:

# 访问不成功提示

curl: () Failed to connect to 172.17.201.227 port : Connection refused
修改pg_hba.conf
pg_hba.conf和postgresql.conf的存放目录都在(9.5版本)/etc/postgresql/9.5/main
host all all 192.168.1.0/ trust
表示允许网段192.168.1.0上的所有主机使用所有合法的数据库用户名访问数据库,
其中,数字24是子网掩码,表示允许192.168.1.0–192.168.1.255的计算机访问
修改postgresql.conf
修改listen_addresses=’localhost’, 并放开注释(默认监听localhost)
# 192.168.1.111 为postgresql本机内网地址

listen_addresses='192.168.1.111'
重启postgresql
sudo /etc/init.d/postgresql restart
在本机
curl 192.168.1.111:

# 访问成功提示

curl: () Empty reply from server
在内网其他机器
curl 192.168.1.111:

# 访问成功提示

curl: () Empty reply from server
CentOS7安装配置PostgreSQL9.6的更多相关文章
- Centos7安装配置gitlab
Centos7安装配置gitlab 这篇文字我会介绍在Centos7上安装gitlab,配置gitlab的smtp,并且创建项目demo. sudo yum install openssh-serve ...
- Centos7安装配置Apache+PHP+Mysql+phpmyadmin
转载自: Centos7安装配置Apache+PHP+Mysql+phpmyadmin 一.安装Apache yum install httpd 安装成功后,Apache操作命令: systemctl ...
- Centos7安装配置JDK8
Centos7安装配置JDK8 一.准备工作 第一步,去甲骨文官网下载Jdk相应的版本,我这里下载的是jdk1.8. 第二步将你从官网上下载下来的jdk使用FTP工具上传到云服务器上的相应目录,我的是 ...
- centos7命令行和图形界面的相互切换(附centos7安装配置教程)
一.最近安装了centos7,发现在命令行和图形界面的相互切换命令上,与centos以往版本有很大不同,先整理如下,加深记忆. 1,centos7默认安装后,跟其他版本一样,启动默认进入图形界面: 2 ...
- (转)Centos7安装配置NFS服务和挂载
Centos7安装配置NFS服务和挂载 原文:https://www.u22e.com/601.html NFS简介 NFS(Network File System)即网络文件系统,是FreeBSD支 ...
- CentOS7 安装配置笔记
CentOS7 安装配置笔记 1.通过镜像安装 CentOS7 ==============================* 使用 UltraISO 9.7 或者 rufus-3.5p 制作ISO的 ...
- Centos7安装配置jenkins(Tomcat)
Centos7安装配置jenkins(Tomcat) 一.准备工作 1.1 安装JDK1.8 具体安装过程不在赘述. 1.2 下载jenkins的war包 jenkins官网下载地址:https:// ...
- CentOS7 安装配置rsync
centos7自带rsync,今天简单记录下. rsync安装配置步骤 服务器端: 1.修改默认配置文件/etc/rsyncd.conf,该成如下: # /etc/rsyncd: configurat ...
- centos7安装配置zabbix4.0
zabbix01 198.8.8.211 zabbix-server4.0 zabbix02 198.8.8.212 zabbix-agent4.0 一:zabbix服务端环境 ...
随机推荐
- LSOF查看linux中文件打开情况
如何查看linux中文件打开情况 前言 我们都知道,在linux下,“一切皆文件”,因此有时候查看文件的打开情况,就显得格外重要,而这里有一个命令能够在这件事上很好的帮助我们-它就是lsof. lin ...
- [codeforces Mail.Ru Cup 2018 Round 3][B Divide Candies ][思维+数学]
https://codeforces.com/contest/1056/problem/B 题意:输入n,m 求((a*a)+(b*b))%m==0的(a,b)种数(1<=a,b<= ...
- 远程登录多用户同时访问Win7系统远程桌面
https://jingyan.baidu.com/article/ca00d56c384ea0e99febcf45.html 一,远程电脑上新增三个用户名 1 在远程电脑桌面,右击[计算机]图标 ...
- 前端开发利器: Bootstrap + AngularJS
http://blog.csdn.net/conquer0715/article/details/51181391 概述 在HTML5盛行的互联网时代,涌现诸多的前端html/css/js框架,基于其 ...
- 炫龙笔记本的gtx965m显卡玩游戏很卡
这是我遇到的问题,我2016年10月份这样买了一款笔记本,主要看的是性价比吧!神舟.炫龙都是性价比,所以买了炫龙笔记本 配置如下 cpu:i7 4870hq 显卡:gtx965m 内存条:16G 固态 ...
- 【mybatis源码学习】mybtias扩展点
[1]org.apache.ibatis.reflection.ReflectorFactory 该扩展点,主要是对javaBean对象,进行反射操作. org.apache.ibatis.refle ...
- Java基础四(switch、数组、)
1.流程控制语句switch2.数组3.随机点名器案例 ###01switch语句解构 * A:switch语句解构 * a:switch只能针对某个表达式的值作出判断,从而决定程序执行哪一段代码. ...
- Pushpin How it works
转自:https://pushpin.org/docs/about/#how-it-works Introduction Pushpin is a reverse proxy server that ...
- TCP/IP option data aligement issue cause system broken
1 Problem Description The field reports show that xxx panel will lockup and then reboot while d ...
- kettle的资源库创建及修改密码
在kettle中的转换或者作业等资源的存储的仓库称为资源库:分为文件资源库.数据库资源库. 一个转换或者作业可以属于某个资源库或者一个单独的文件形态存在. 一.数据库资源库 1.1在mysql中创建一 ...