Python笔记 #20# SOM
SOM(自组织映射神经网络)是一种可以根据输入对象的特征自动进行分类(聚类)的神经网络。向该网络输入任意维度的向量都会得到一个二维图像, 不同特征的输入会被映射到二维图像的不同地方(所以SOM也可以用来降维)。它有两种学习规则:Winner-Take-All和Kohonen学习算法,后者在前者的基础上改进得到。
Som类最主要的三个方法:
- initialize方法,用于设定输出层节点数、输入向量维度
- mapping方法,方便用户应用模型做预测
- train方法,用来训练模型
- import numpy as np
- import matplotlib.pyplot as plt
- import math
- import csv
- # 向量归一化,转化为对应单位向量,这样计算欧几里得距离就
- # 可以转化为计算向量的点积(二维平面中,单位向量点积就是
- # cos theta),点积越大距离越近
- def normalize(vector):
- return vector / np.linalg.norm(vector)
- class Som:
- def initialize(self, model, dimension):
- self.nodes = []
- # 初始化节点
- for i in range(model[0]):
- temp = []
- for j in range(model[1]):
- vector = np.random.randn(dimension) # 每个节点都包含一个维度和输入向量维度相同的向量
- vector = normalize(vector) # 归一化
- temp.append(vector)
- self.nodes.append(temp)
- self.model = model # 便于遍历节点
- def best_matching_unit(self, vector):
- result = [0, 0] # 返回优胜节点坐标
- max = -10000
- for i in range(self.model[0]):
- for j in range(self.model[1]):
- temp = self.nodes[i][j].dot(vector)
- if temp > max:
- max = temp
- result[0], result[1] = i, j
- return result
- def get_r_p(self, N): # 根据距离优胜节点的距离变化的值
- return 1.0 / math.exp(N)
- def neighbor(self, pos, table):
- result = []
- x = pos[0]
- y = pos[1]
- if x - 1 >= 0:
- if not table[x - 1][y]:
- result.append([x - 1, y])
- table[x - 1][y] = True
- if x + 1 < self.model[0]:
- if not table[x + 1][y]:
- result.append([x + 1, y])
- table[x + 1][y] = True
- if y - 1 >= 0:
- if not table[x][y - 1]:
- result.append([x, y - 1])
- table[x][y - 1] = True
- if y + 1 < self.model[1]:
- if not table[x][y + 1]:
- result.append([x, y + 1])
- table[x][y + 1] = True
- return result
- def get_neighbor(self, BMU, r): # 获取邻居节点,返回值为[[距离为1坐标集合..], [距离为2坐标集合..], [...], ...]
- result = []
- if r > 0:
- table = [] # 记录已经存入的结点
- for i in range(self.model[0]):
- table.append([False] * self.model[1])
- table[BMU[0]][BMU[1]] = True
- # print("table=", table)
- neighbors = self.neighbor(BMU, table); # 距离为1的节点
- result.append(neighbors)
- for i in range(r - 1):
- temp = []
- for x in neighbors:
- temp += self.neighbor(x, table)
- neighbors = temp # 距离为2+i的结点
- result.append(neighbors)
- return result
- def update_nodes(self, BMU, example, r, eta): # 参数:优胜节点坐标,输入向量,优胜领域半径,学习率
- # print("r, eta=", r, eta)
- # print("before update=", self.nodes)
- w = self.nodes[BMU[0]][BMU[1]]
- w += eta * self.get_r_p(0) * (example - w) # 更新优胜节点
- self.nodes[BMU[0]][BMU[1]] = normalize(w)
- neighbors = self.get_neighbor(BMU, r);
- # print("neighbors=", neighbors)
- for i in range(len(neighbors)):
- for pos in neighbors[i]: # 更新距离为i+1的节点
- w = self.nodes[pos[0]][pos[1]]
- w += eta * self.get_r_p(i + 1) * (example - w)
- self.nodes[pos[0]][pos[1]] = normalize(w)
- # print("after update=", self.nodes)
- def eta(self, t): # 参数:当前迭代次数,隐含参数:最大迭代次数,学习率初始值
- if t <= self.MAX_ITERATION / 10: # 前1/10次迭代学习率线性下降到1/20
- return self.init_eta - t * self.k1
- else: # 后9/10次迭代学习率线性下降到0
- return self.init_eta / 20 - (t - self.MAX_ITERATION / 10) * self.k2
- def get_r(self, t): # 优胜邻域随着迭代次数变小
- return int(self.init_r * (1 - t / self.MAX_ITERATION)) # 向下取整
- def train(self, get_batch, MAX_ITERATION, init_eta, MIN_ETA, init_r): # 参数:获取每次迭代所需样本的函数,最大迭代次数,学习率初始值,最小学习率,优胜领域初始值
- self.MAX_ITERATION = MAX_ITERATION
- self.init_eta = init_eta # 学习率初始值
- self.k1 = (19/20 * self.init_eta) / (1/10 * self.MAX_ITERATION) # 学习率线性下降斜率1
- self.k2 = (1/20 * self.init_eta) / (9/10 * self.MAX_ITERATION) # 学习率线性下降斜率2
- self.init_r = init_r
- count = 0
- while count < MAX_ITERATION and self.eta(count) > MIN_ETA:
- batch = get_batch()
- # print(">>>>>>>>>>>>>>>>>count=", count)
- # print("batch=", batch)
- for example in batch:
- # print("example=", example)
- BMU = self.best_matching_unit(example)
- # print("BMU=",BMU)
- self.update_nodes(BMU, example, self.get_r(count), self.eta(count))
- count = count + 1
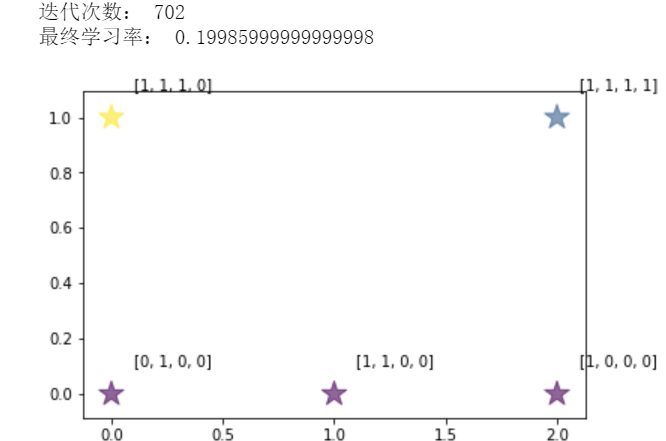
- print("迭代次数:", count)
- print("最终学习率:", self.eta(count))
- def mapping(self, vector):
- vector = normalize(vector)
- return self.best_matching_unit(vector) # 返回优胜节点坐标
- data = [[1, 0, 0, 0], [1, 1, 0, 0], [1, 1, 1, 0], [0, 1, 0, 0], [1, 1, 1, 1]]
- features = np.array(list(map(normalize, data))) # 归一化
- def full_batch():
- return features
- som = Som()
- som.initialize([3, 2], 4)
- def testModel():
- result = list(map(som.mapping, features))
- count_pos = {}
- for pos in result:
- if result.count(pos) >= 1:
- count_pos[str(pos[0]) + ',' + str(pos[1])] = result.count(pos)
- x = np.array(list(map(lambda x: x[0], result)));
- y = np.array(list(map(lambda x: x[1], result)));
- size = np.array(list(map(lambda x: count_pos[str(x[0]) + ',' + str(x[1])], result)));
- color = np.arctan2(y, x)
- plt.scatter(x, y, s=size * 300, c=color,alpha=0.6, marker='*')
- for i in range(len(x)): # 打上标签
- plt.annotate(str(data[i]), xy = (x[i], y[i]), xytext = (x[i]+0.1, y[i]+0.1))
- plt.show()
- som.train(full_batch, 10000, 0.6, 0.2, 3)
- testModel()
Python笔记 #20# SOM的更多相关文章
- python笔记-20 django进阶 (model与form、modelform对比,三种ajax方式的对比,随机验证码,kindeditor)
一.model深入 1.model的功能 1.1 创建数据库表 1.2 操作数据库表 1.3 数据库的增删改查操作 2.创建数据库表的单表操作 2.1 定义表对象 class xxx(models.M ...
- python笔记20(面向对象课程二)
今日内容 类成员 成员修饰符 内容回顾 & 补充 三大特性 封装 函数封装到类 数据封装到对象 * class Foo: def __init__(self,name,age): self.n ...
- 20.Python笔记之SqlAlchemy使用
Date:2016-03-27 Title:20.Python笔记之SqlAlchemy使用 Tags:python Category:Python 作者:刘耀 博客:www.liuyao.me 一. ...
- Python笔记之不可不练
如果您已经有了一定的Python编程基础,那么本文就是为您的编程能力锦上添花,如果您刚刚开始对Python有一点点兴趣,不怕,Python的重点基础知识已经总结在博文<Python笔记之不可不知 ...
- python笔记 - day3
python笔记 - day3 参考:http://www.cnblogs.com/wupeiqi/articles/5453708.html set特性: 1.无序 2.不重复 3.可嵌套 函数: ...
- python笔记之常用模块用法分析
python笔记之常用模块用法分析 内置模块(不用import就可以直接使用) 常用内置函数 help(obj) 在线帮助, obj可是任何类型 callable(obj) 查看一个obj是不是可以像 ...
- guxh的python笔记一:数据类型
1,基本概念 1.1,数据类型 基本数据类型:字符串,数字,布尔等 引用数据类型:相对不可变(元组),可变(列表,字典,集合等) 基本数据类型存放实际值,引用数据类型存放对象的地址(即引用) ==:判 ...
- python笔记-1(import导入、time/datetime/random/os/sys模块)
python笔记-6(import导入.time/datetime/random/os/sys模块) 一.了解模块导入的基本知识 此部分此处不展开细说import导入,仅写几个点目前的认知即可.其 ...
- 嵩天老师的零基础Python笔记:https://www.bilibili.com/video/av15123607/?from=search&seid=10211084839195730432#page=25 中的42-45讲 {字典}
#coding=gbk#嵩天老师的零基础Python笔记:https://www.bilibili.com/video/av15123607/?from=search&seid=1021108 ...
随机推荐
- [js]js的表单验证onsubmit方法
http://uule.iteye.com/blog/2183622 表单验证类 <form class="form" method="post" id= ...
- CentOS在VMware中 网络配置
一. 将centos安装好之后,发现ping, ifconfig等常见的命令都用不了,出现unknown service或command not found这样的字眼,这让我十分无语.查了一下资料,i ...
- 【LeetCode每天一题】Trapping Rain Water(获得雨水的容量)
Given n non-negative integers representing an elevation map where the width of each bar is 1, comput ...
- async await的用法
const fs = require('fs'); const readFile = function (fileName) { return new Promise(function (resolv ...
- CentOS6.5 安装Kafka集群
1.安装zookeeper 参考文档:http://www.cnblogs.com/hunttown/p/5452138.html 2.下载:https://www.apache.org/dyn/cl ...
- Roslyn编译器
概要 微软官方开源的C#/VB编译器.作为.net 2015的重要名角,负责将代码编译成IL,另外提供丰富的API用于代码分析,vs2015的实时代码分析就是使用的Roslyn提供的API. C#6. ...
- SQL Server之获取下周一的日期
今天项目中需要得到下周一的日期,故想到了一种解决办法,用slq语句解决了.当然实现方法肯定不只有这一种. -(select DATEPART(weekday,getdate())) /*下周一差几天 ...
- Sklearn的使用
初步接触要求时,从上图选自己数据所适用的方法, 首先看数据的样本是否 >50,小于则需要收集更多的数据 然后看问题适合分类.回归.聚类.降维中的哪一大类 Sklearn解决问题的一般步骤: 1. ...
- 关于第一次java课的感想
首先必须承认,这次的题目还是很简单的,因为这道题完全就是换了个包装的小学期题目,也就是说,如果让我用C++来编写,我可以保证3个小时内编写完毕,也许在一些小的方面,比如输入数字的合法性上存在问题,但毕 ...
- CSS border-radius边框圆角
在CSS3中提供了对边框进行圆角设定的支持,可对边框1~4个角进行圆角样式设置. 目录 1. 介绍 2. value值的格式和类型 3. border-radius 1~4个参数说明 4. 在线示例 ...