关于iOS应用管理之九宫格的坐标计算以及与UIScrollView的结合
关于九宫格的布局以及坐标的计算,对于大多数的iOS初学者甚至有一定能力的学者来说都是一大难题,在此写者通过自己的开发经验以及多次应用,把自己的所学所得分享给大家,就通过应用管理来进行浅谈一二。
 1、 功能分析:通过九宫格的样式添加相应的应用;当点击“下载”按钮时会执行相应的操作
2、实现步骤:1>.首先加载相应的应用信息;2>.根据应用的个数添加相对应的view;3>.实现按钮的点击事件,完成相应的后续操作
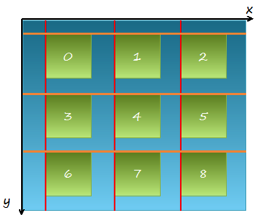
分析:格局布局的规律,每一个UIView的x坐标 和 y坐标与布局的行列有关
 每一行的 y 值都相同,y 由行号决定
每一列的 x 值都相同,x 值由列号决定
3、实现的思路:
1>.首先要明确每一个模块是用的是什么view;
2>.明确每个view之间的父子关系,一个父view可以有多个子view,而每个试图则只有一个父视图
3>在添加格子的时候,首先可以先添加一个格子,然后在尝试着使用 for 循环进行循环添加
4>.在加载app数据的时候,首先要明确加载数据的长度,而后根据加载数据的长度来决定创建多少个格子
5>.逐步添加格子内部的各个子控件
6>.给各自内部的子控件加载相应的数据,即,给子控件赋值
7>.实例化 UIScrollView 的对象,并设置相应的属性,而后把scrollView添加到控制器的view上,最后把布局好的九宫格添加到scrollView上
3、xib视图分析:
通过多种方法的测试发现,使用xib会使九宫格布变得更为简单易懂,因此,xib布局如下图所示
 分析:在一个xib 视图中共包含三个子控件:imageView、label 和button
4、代码展示:
1>.首先创建模型,声明plist文件中的数据信息
Model:
- // GWFAppListModel.h
- // 应用管理(xib 版)
- #import <Foundation/Foundation.h>
- @interface GWFAppListModel : NSObject
- @property (nonatomic,copy) NSString *name;
- @property (nonatomic,copy) NSString *icon;
- +(instancetype)getGWFAppListModelWithDict:(NSDictionary *)dict;
- @end
- // GWFAppListModel.m
- // 应用管理(xib 版)
- #import "GWFAppListModel.h"
- @implementation GWFAppListModel
- +(instancetype)getGWFAppListModelWithDict:(NSDictionary *)dict {
- GWFAppListModel *appModel = [[GWFAppListModel alloc] init];
- [appModel setValuesForKeysWithDictionary:dict];
- return appModel;
- }
- @end
View:
- // GWFAppListView.h
- // 应用管理(xib 版)
- #import <UIKit/UIKit.h>
- @class GWFAppListModel;
- @interface GWFAppListView : UIView
- @property (nonatomic,strong) GWFAppListModel *appModel;
- @end
- // GWFAppListView.m
- // 应用管理(xib 版)
- #import "GWFAppListView.h"
- #import "GWFAppListModel.h"
- @interface GWFAppListView ()
- @property (weak, nonatomic) IBOutlet UIImageView *iconView;
- @property (weak, nonatomic) IBOutlet UILabel *nameLabel;
- @property (weak, nonatomic) IBOutlet UIButton *downloadBtn;
- @end
- @implementation GWFAppListView
- //下载按钮的点击事件
- - (IBAction)downLoadBtnClick:(id)sender {
- //获取 appView 的superView
- UIView *superView = self.superview;
- //计算 superView 的尺寸
- CGSize superViewSize = superView.frame.size;
- //添加蒙版
- UIView *coverView = [[UIView alloc] initWithFrame:superView.bounds];
- //设置coverView 的颜色
- coverView.backgroundColor = [UIColor blackColor];
- //设置 coverView 的透明度
- coverView.alpha = ;
- //把 coverView 添加到 superView 上
- [superView addSubview:coverView];
- //添加一个 label
- CGFloat labelY = superViewSize.height / ;
- //实例化 label
- UILabel *label = [[UILabel alloc] initWithFrame:CGRectMake(, labelY, superViewSize.width, )];
- //设置 label 的文本
- label.text = @"正在下载,请稍后...";
- //设置文本对齐方式
- label.textAlignment = NSTextAlignmentCenter;
- //设置文本字体颜色
- label.textColor = [UIColor whiteColor];
- //设置文本字体大小
- label.font = [UIFont boldSystemFontOfSize:];
- //添加到 coverView 上
- [coverView addSubview:label];
- // completion 完成之后, 会调用block中的代码
- [UIView animateWithDuration: animations:^{
- //设置蒙版的透明度
- coverView.alpha = 0.6;
- } completion:^(BOOL finished) {
- [UIView animateWithDuration: delay: options:UIViewAnimationOptionCurveEaseInOut animations:^{
- coverView.alpha = ;
- } completion:^(BOOL finished) {
- //销毁 coverView
- [coverView removeFromSuperview];
- //关闭按钮的交互,并显示 已安装
- UIButton *button = sender;
- button.enabled = NO;
- [button setTitle:@"已安装" forState:UIControlStateNormal];
- //设置按钮的 title 的颜色
- [button setTitleColor:[UIColor grayColor] forState:UIControlStateDisabled];
- }];
- }];
- }
- -(void)setAppModel:(GWFAppListModel *)appModel {
- _appModel = appModel;
- //给子控件赋值
- self.iconView.image = [UIImage imageNamed:appModel.icon];
- self.nameLabel.text = appModel.name;
- }
- @end
Controller:
- // ViewController.m
- // 应用管理(xib 版)
- #import "ViewController.h"
- #import "GWFAppListModel.h"
- #import "GWFAppListView.h"
- @interface ViewController ()
- @property (nonatomic,strong) NSArray *dataArray;
- @property (nonatomic,strong) UIScrollView *scrollView;
- @end
- @implementation ViewController
- //懒加载
- -(NSArray *)dataArray {
- if (_dataArray == nil) {
- //读取 plist 文件路径
- NSString *path = [[NSBundle mainBundle] pathForResource:@"app.plist" ofType:nil];
- //创建一个数组接收文件内容
- NSArray *dictArr = [NSArray arrayWithContentsOfFile:path];
- //创建一个可变数组
- NSMutableArray *tempArr = [NSMutableArray arrayWithCapacity:dictArr.count];
- //遍历数组 dictArr
- [dictArr enumerateObjectsUsingBlock:^(id _Nonnull obj, NSUInteger idx, BOOL * _Nonnull stop) {
- NSDictionary *dict = obj;
- //字典转模型
- GWFAppListModel *appModel = [GWFAppListModel getGWFAppListModelWithDict:dict];
- //将数据模型 添加到可变数组
- [tempArr addObject:appModel];
- }];
- //赋值
- _dataArray = tempArr;
- }
- return _dataArray;
- }
- - (void)viewDidLoad {
- [super viewDidLoad];
- self.view.backgroundColor = [UIColor lightGrayColor];
- _scrollView = [[UIScrollView alloc] initWithFrame:self.view.bounds];
- //背景颜色
- [_scrollView setBackgroundColor:[UIColor grayColor]];
- //添加到 view上
- [self.view addSubview:_scrollView];
- //更新 UI 界面
- [self setUpdateUI];
- }
- //九宫格 布局 UI 界面
- -(void)setUpdateUI {
- //定义显示的列数
- int column = ;
- //定义 appView 的宽高
- CGFloat appViewWidth = ;
- CGFloat appViewHeight = ;
- //计算 appView 之间的间距
- CGFloat margin = (self.view.frame.size.width - column * appViewWidth) / (column + );
- //计算显示的 appView 的总数
- NSInteger count = self.dataArray.count;
- for (int i = ; i < count; i++) {
- //计算 行索引 和 列索引
- int colnumIndex = i % column;
- int rowIndex = i / column;
- //计算appView 的x y
- CGFloat appViewX = (colnumIndex + ) * margin + colnumIndex * appViewWidth;
- CGFloat appViewY = (rowIndex + ) *margin + rowIndex * appViewHeight;
- //通过 xib 安装目录添加 appView
- GWFAppListView *appView = [[[NSBundle mainBundle] loadNibNamed:@"GWFAppListView" owner:nil options:nil] lastObject];
- //设置 appView 的frame
- appView.frame = CGRectMake(appViewX, appViewY, appViewWidth, appViewHeight);
- //设置背景颜色
- [appView setBackgroundColor:[UIColor yellowColor]];
- //添加到 _scrollView 上
- [_scrollView addSubview:appView];
- //取出模型中的数据,并进行赋值
- GWFAppListModel *appModel = self.dataArray[i];
- appView.appModel = appModel;
- }
- //获取 scrollView DE 最后一个子 view
- UIView *view = _scrollView.subviews.lastObject;
- //设置 scrollView 的contentSize
- _scrollView.contentSize = CGSizeMake(, CGRectGetMaxY(view.frame));
- }
- @end
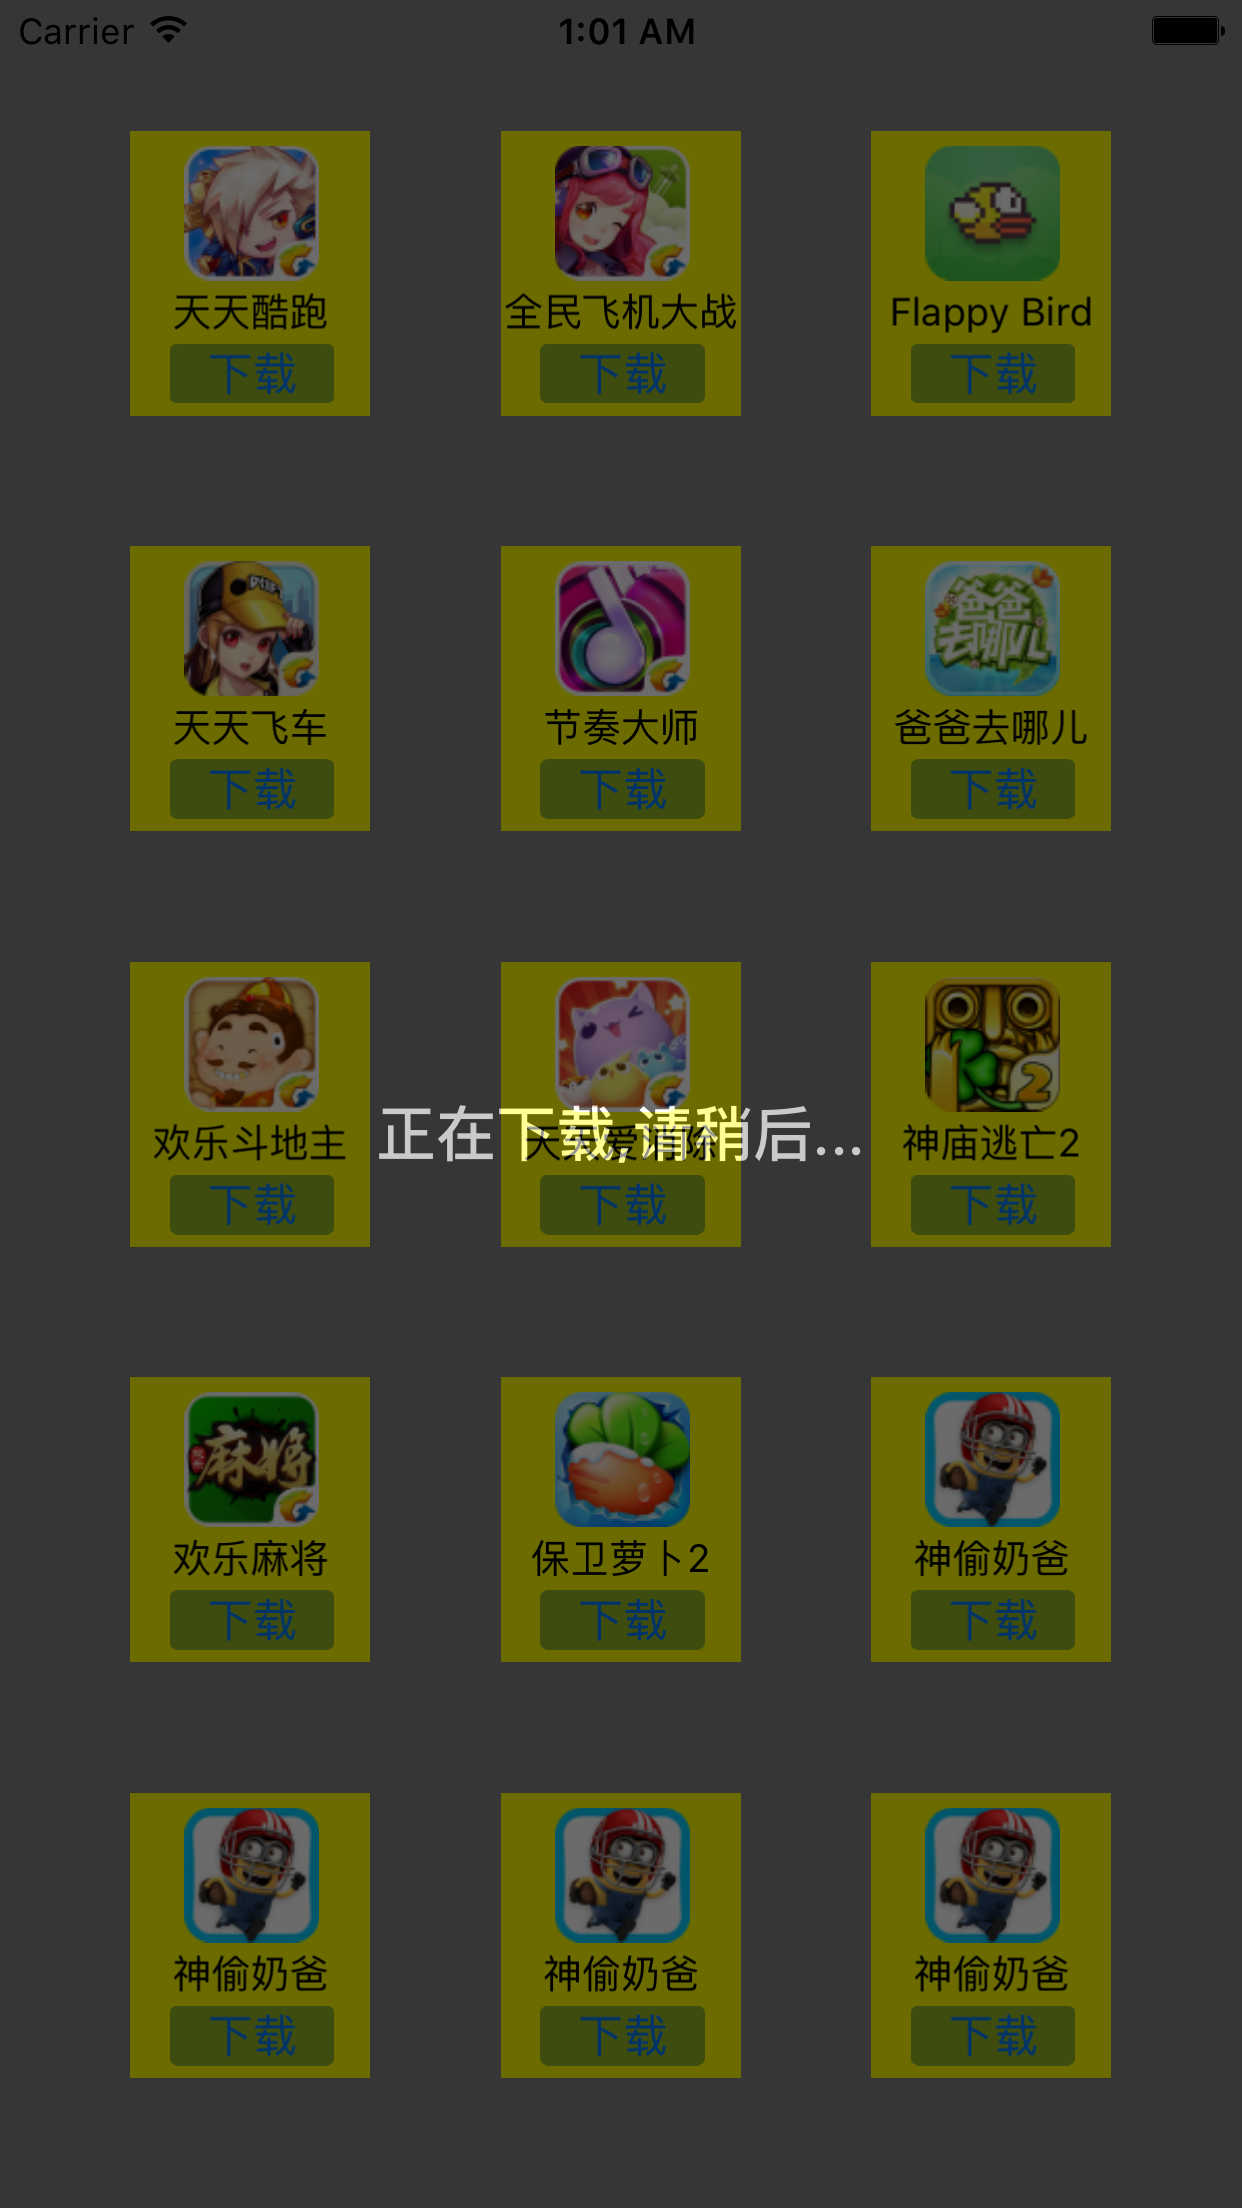
5、成果展示:随着数据长度的变化,九宫格视图的view个数随着变化,由于添加了 scrollView 应用可以上下滑动


关于iOS应用管理之九宫格的坐标计算以及与UIScrollView的结合的更多相关文章
- IOS 应用管理(九宫格) 总结笔记
1. 开发前的思路 ========================================1> 从mainBundle中加载Plist2> 按照plist中的数据数量先确定各个a ...
- iOS开发UI篇—九宫格坐标计算
iOS开发UI篇—九宫格坐标计算 一.要求 完成下面的布局 二.分析 寻找左边的规律,每一个uiview的x坐标和y坐标. 三.实现思路 (1)明确每一块用得是什么view (2)明确每个view之间 ...
- iOS开发 -------- 九宫格坐标计算
一 要求 完成下面的布局 二 分析 寻找规律,每一个UIView的x坐标和y坐标 三 实现思路 (1) 明确每一块用得是什么View; (2) 明确每个View之间的父子关系,每个视图都只有一个父视图 ...
- iOS内存管理
iOS内存管理的方式是引用计数机制.分为MRC(人式引用计数)和ARC(自动引用计数). 为什么要学习内存管理? 内存管理方式是引用计数机制,通过控制对象的引用计数来实现操作对象的功能.一个对象的生命 ...
- 【Bugly干货分享】iOS内存管理:从MRC到ARC实践
Bugly 技术干货系列内容主要涉及移动开发方向,是由Bugly邀请腾讯内部各位技术大咖,通过日常工作经验的总结以及感悟撰写而成,内容均属原创,转载请标明出处. 对于iOS程序员来说,内存管理是入门的 ...
- iOS内存管理个人总结
一.变量,本质代表一段可以操作的内存,她使用方式无非就是内存符号化+数据类型 1.保存变量有三个区域: 1>静态存储区 2>stack 3>heap 2.变量又根据声明的位置有两种称 ...
- IOS内存管理学习笔记
内存管理作为iOS中非常重要的部分,每一个iOS开发者都应该深入了解iOS内存管理,最近在学习iOS中整理出了一些知识点,先从MRC开始说起. 1.当一个对象在创建之后它的引用计数器为1,当调用这个对 ...
- iOS内存管理编程指南
iOS 内存管理 目录[-] 一:基本原则 二:成员变量的内存管理 三:容器对象与内存管理 四:稀缺资源的管理 五:AutoRelease 六:其他注意事项 iOS下内存管理的基本思想就是引用计数,通 ...
- 李洪强iOS开发之 - 实现九宫格并使用SDWebImage下载图片
李洪强iOS开发之 - 实现九宫格并使用SDWebImage下载图片 源码: // // ViewController.m // 08-九宫格扩展 // // Created by 李洪强 ...
随机推荐
- MLlib-聚类
聚类 例子 流聚类 例子 聚类 MLlib支持k-means聚类,一种最常用的聚类方法,将数据点聚成指定数据的簇.MLlib实现了一种k-means++的并行变种,叫做kmeansII.MLlib的实 ...
- 切换samba用户
打开cmd 输入命令 net use \\192.168.xxx.xxx\IPC$ /DELETE 192.168.xxxx.xxx是linux的ip地址
- struts2整合spring出现的Unable to instantiate Action异常
在struts2整合spring的时候,完全一步步按照官方文档上去做的,最后发现出现 Unable to instantiate Action,网上一搜发现很多人和我一样的问题,配置什么都没有错误,就 ...
- 自然语言处理(5)之Levenshtein最小编辑距离算法
自然语言处理(5)之Levenshtein最小编辑距离算法 题记:之前在公司使用Levenshtein最小编辑距离算法来实现相似车牌的计算的特性开发,正好本节来总结下Levenshtein最小编辑距离 ...
- 转:MongoDB调查总结
与关系型数据库相比,MongoDB的优点:①弱一致性(最终一致),更能保证用户的访问速度:举例来说,在传统的关系型数据库中,一个COUNT类型的操作会锁定数据集,这样可以保证得到“当前”情况下的精确值 ...
- listView中setOnItemClickListener和getSelectedItemPosition()取不到position问题
//也可以采用通过listview 索引 取得 item 可以转化到 cursor ,pos 是在listview 的选中事件中赋值. //Cursor v2 = (Cursor) listView. ...
- 【中国剩余定理】【容斥原理】【快速乘法】【数论】HDU 5768 Lucky7
题目链接: http://acm.hdu.edu.cn/showproblem.php?pid=5768 题目大意: T组数据,求L~R中满足:1.是7的倍数,2.对n个素数有 %pi!=ai 的数 ...
- yum puppet dashboard
该Dashboard是一种运行在Rails上的Ruby应用程序,它还不是可以添加到系统版本中的程序包,但是我们可以从Puppet Labs以RPM或者DEB包的形式获得该软件.我们也可以选择从资源进行 ...
- Flask+Mysql搭建网站之网页设计
不得不说,本人极度讨厌网页设计,感觉太麻烦了.不过整好啦还蛮有成就感的. 关于网页设计,现在流行的是扁平化设计. http://www.bootcss.com/ http://www.bootcss. ...
- Hadoop2以来的历次升级(不含2.2.0及以下)
2015年7月06:release 2.7.1(稳定)请参阅 Hadoop 2.7.1发布说明 对131个bug修复和列表 从先前版本2.7.0补丁. 请看看 2.7.0章节列表的增强功能启用 第一个 ...
