用Python代码实现微信跳一跳作弊器
最近随着微信版本的更新,在进入界面有个跳一跳的小游戏,在网上看到技术篇教你用Python来玩微信跳一跳 ( 转载自 " 工科给事中的技术博客 " )
本文旨在总结,技术全靠大神完成,本菜只是为学习技术总结并分享给大家。如何从“全白状态”,一步步靠近并完成跳一跳作弊器。
写在前面:
Android 系统手机:需在电脑上提前下载 Android adb 工具包 百度百科
adb的全称为Android Debug Bridge,就是起到调试桥的作用,作为一名开发者倒是常用到这个工具.借助adb工具,我们可以管理设备或手机模拟器的状态。还可以进行很多手机操作,如安装软件、卸载软件、系统升级、运行shell命令等等。adb就是连接Android手机与PC端的桥梁,可以让用户在电脑上对手机进行全面的操作。
IOS 系统手机:如果有mac本,直接安装 WebDriverAgentRunner (最下面有介绍) ,如果使用的是Windows电脑,则需要先同VMware虚拟机安装macos,再安装 WebDriverAgentRunner
Python 版本
首先:
安装 Python 详见这里,以前的随笔
按步骤安装完pip即可
测试安装是否成功:打开cmd,输入 python,会出现python版本号等一系列,自行判断即可
快速配置环境:新建 environmen.txt ,内容如下:
backports.functools-lru-cache==1.4

cycler==0.10.0

matplotlib==2.1.1

numpy==1.13.3

olefile==0.44

opencv-python==3.4.0.12

Pillow==4.3.0

pyparsing==2.2.0

python-dateutil==2.6.1

pytz==2017.3

six==1.11.0
python install -r environmen.txt 即可
github 大神的 代码下载 再次感谢分享
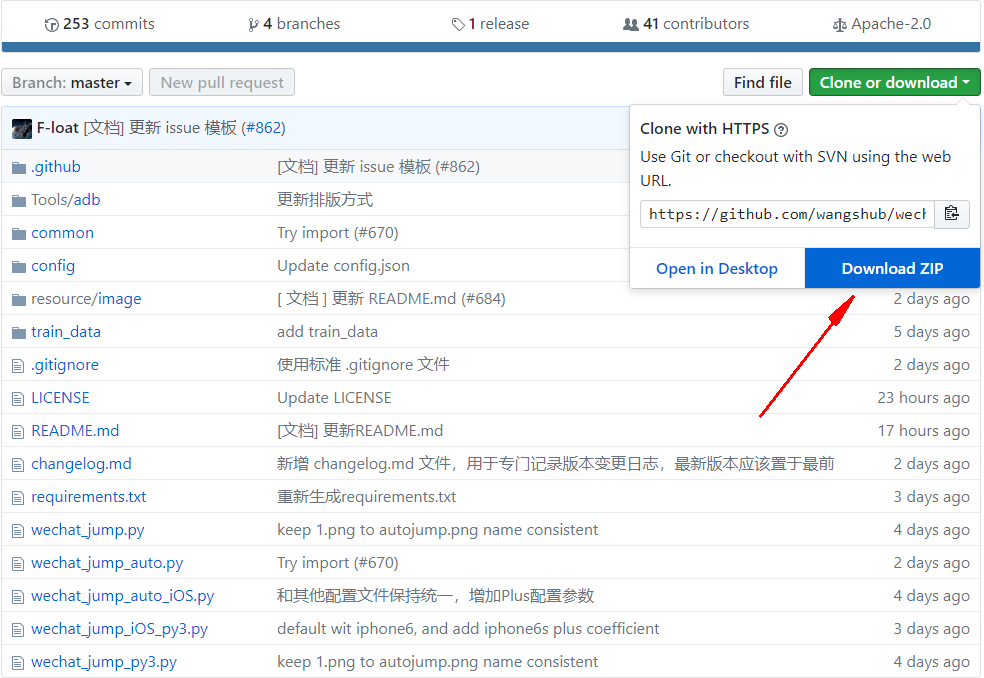
下载解压即可。
其实只需要两个文件,一个代码文件(下面的每个介绍都附有代码),另一个是配置文件,即对应不同手机而言,如果没有配置文件的话也可以,但是可能会出现失误,跳下去的情况。
在这个文件夹下,找到对应手机的机型,把其文件名改为 config.json 和代码放置同目录下即可。


Android 系统
自动版
- 新建python文件 jump.py ,写入一下代码
# coding=utf-8

import os

import sys

import subprocess

import time

import math

from PIL import Image

import random

from six.moves import input

try:

    from common import debug, config

except ImportError:

    print('请在项目根目录中运行脚本')

    exit(-1)

'''

# === 思路 ===

# 核心:每次落稳之后截图,根据截图算出棋子的坐标和下一个块顶面的中点坐标,

#      根据两个点的距离乘以一个时间系数获得长按的时间

# 识别棋子:靠棋子的颜色来识别位置,通过截图发现最下面一行大概是一条直线,就从上往下一行一行遍历,

#      比较颜色(颜色用了一个区间来比较)找到最下面的那一行的所有点,然后求个中点,

#      求好之后再让 Y 轴坐标减小棋子底盘的一半高度从而得到中心点的坐标

# 识别棋盘:靠底色和方块的色差来做,从分数之下的位置开始,一行一行扫描,由于圆形的块最顶上是一条线,

#      方形的上面大概是一个点,所以就用类似识别棋子的做法多识别了几个点求中点,

#      这时候得到了块中点的 X 轴坐标,这时候假设现在棋子在当前块的中心,

#      根据一个通过截图获取的固定的角度来推出中点的 Y 坐标

# 最后:根据两点的坐标算距离乘以系数来获取长按时间(似乎可以直接用 X 轴距离)

'''

# VERSION = "1.1.1"

debug_switch = False    # debug 开关,需要调试的时候请改为:True

config = config.open_accordant_config()

# Magic Number,不设置可能无法正常执行,请根据具体截图从上到下按需设置,设置保存在 config 文件夹中

under_game_score_y = config['under_game_score_y']

press_coefficient = config['press_coefficient']       # 长按的时间系数,请自己根据实际情况调节

piece_base_height_1_2 = config['piece_base_height_1_2']   # 二分之一的棋子底座高度,可能要调节

piece_body_width = config['piece_body_width']             # 棋子的宽度,比截图中量到的稍微大一点比较安全,可能要调节

screenshot_way = 2

def pull_screenshot():

    '''

    新的方法请根据效率及适用性由高到低排序

    '''

    global screenshot_way

    if screenshot_way == 2 or screenshot_way == 1:

        process = subprocess.Popen('adb shell screencap -p', shell=True, stdout=subprocess.PIPE)

        screenshot = process.stdout.read()

        if screenshot_way == 2:

            binary_screenshot = screenshot.replace(b'\r\n', b'\n')

        else:

            binary_screenshot = screenshot.replace(b'\r\r\n', b'\n')

        f = open('autojump.png', 'wb')

        f.write(binary_screenshot)

        f.close()

    elif screenshot_way == 0:

        os.system('adb shell screencap -p /sdcard/autojump.png')

        os.system('adb pull /sdcard/autojump.png .')

def set_button_position(im):

    '''

    将 swipe 设置为 `再来一局` 按钮的位置

    '''

    global swipe_x1, swipe_y1, swipe_x2, swipe_y2

    w, h = im.size

    left = int(w / 2)

    top = int(1584 * (h / 1920.0))

    left = int(random.uniform(left-50, left+50))

    top = int(random.uniform(top-10, top+10))    # 随机防 ban

    swipe_x1, swipe_y1, swipe_x2, swipe_y2 = left, top, left, top

def jump(distance):

    '''

    跳跃一定的距离

    '''

    press_time = distance * press_coefficient

    press_time = max(press_time, 200)   # 设置 200ms 是最小的按压时间

    press_time = int(press_time)

    cmd = 'adb shell input swipe {x1} {y1} {x2} {y2} {duration}'.format(

        x1=swipe_x1,

        y1=swipe_y1,

        x2=swipe_x2,

        y2=swipe_y2,

        duration=press_time

    )

    print(cmd)

    os.system(cmd)

    return press_time

def find_piece_and_board(im):

    '''

    寻找关键坐标

    '''

    w, h = im.size

    piece_x_sum = 0

    piece_x_c = 0

    piece_y_max = 0

    board_x = 0

    board_y = 0

    scan_x_border = int(w / 8)  # 扫描棋子时的左右边界

    scan_start_y = 0  # 扫描的起始 y 坐标

    im_pixel = im.load()

    # 以 50px 步长,尝试探测 scan_start_y

    for i in range(int(h / 3), int(h*2 / 3), 50):

        last_pixel = im_pixel[0, i]

        for j in range(1, w):

            pixel = im_pixel[j, i]

            # 不是纯色的线,则记录 scan_start_y 的值,准备跳出循环

            if pixel[0] != last_pixel[0] or pixel[1] != last_pixel[1] or pixel[2] != last_pixel[2]:

                scan_start_y = i - 50

                break

        if scan_start_y:

            break

    print('scan_start_y: {}'.format(scan_start_y))

    # 从 scan_start_y 开始往下扫描,棋子应位于屏幕上半部分,这里暂定不超过 2/3

    for i in range(scan_start_y, int(h * 2 / 3)):

        for j in range(scan_x_border, w - scan_x_border):  # 横坐标方面也减少了一部分扫描开销

            pixel = im_pixel[j, i]

            # 根据棋子的最低行的颜色判断,找最后一行那些点的平均值,这个颜色这样应该 OK,暂时不提出来

            if (50 < pixel[0] < 60) and (53 < pixel[1] < 63) and (95 < pixel[2] < 110):

                piece_x_sum += j

                piece_x_c += 1

                piece_y_max = max(i, piece_y_max)

    if not all((piece_x_sum, piece_x_c)):

        return 0, 0, 0, 0

    piece_x = int(piece_x_sum / piece_x_c)

    piece_y = piece_y_max - piece_base_height_1_2  # 上移棋子底盘高度的一半

    # 限制棋盘扫描的横坐标,避免音符 bug

    if piece_x < w/2:

        board_x_start = piece_x

        board_x_end = w

    else:

        board_x_start = 0

        board_x_end = piece_x

    for i in range(int(h / 3), int(h * 2 / 3)):

        last_pixel = im_pixel[0, i]

        if board_x or board_y:

            break

        board_x_sum = 0

        board_x_c = 0

        for j in range(int(board_x_start), int(board_x_end)):

            pixel = im_pixel[j, i]

            # 修掉脑袋比下一个小格子还高的情况的 bug

            if abs(j - piece_x) < piece_body_width:

                continue

            # 修掉圆顶的时候一条线导致的小 bug,这个颜色判断应该 OK,暂时不提出来

            if abs(pixel[0] - last_pixel[0]) + abs(pixel[1] - last_pixel[1]) + abs(pixel[2] - last_pixel[2]) > 10:

                board_x_sum += j

                board_x_c += 1

        if board_x_sum:

            board_x = board_x_sum / board_x_c

    last_pixel = im_pixel[board_x, i]

    # 从上顶点往下 +274 的位置开始向上找颜色与上顶点一样的点,为下顶点

    # 该方法对所有纯色平面和部分非纯色平面有效,对高尔夫草坪面、木纹桌面、药瓶和非菱形的碟机(好像是)会判断错误

    for k in range(i+274, i, -1): # 274 取开局时最大的方块的上下顶点距离

        pixel = im_pixel[board_x, k]

        if abs(pixel[0] - last_pixel[0]) + abs(pixel[1] - last_pixel[1]) + abs(pixel[2] - last_pixel[2]) < 10:

            break

    board_y = int((i+k) / 2)

    # 如果上一跳命中中间,则下个目标中心会出现 r245 g245 b245 的点,利用这个属性弥补上一段代码可能存在的判断错误

    # 若上一跳由于某种原因没有跳到正中间,而下一跳恰好有无法正确识别花纹,则有可能游戏失败,由于花纹面积通常比较大,失败概率较低

    for l in range(i, i+200):

        pixel = im_pixel[board_x, l]

        if abs(pixel[0] - 245) + abs(pixel[1] - 245) + abs(pixel[2] - 245) == 0:

            board_y = l+10

            break

    if not all((board_x, board_y)):

        return 0, 0, 0, 0

    return piece_x, piece_y, board_x, board_y

def check_screenshot():

    '''

    检查获取截图的方式

    '''

    global screenshot_way

    if os.path.isfile('autojump.png'):

        os.remove('autojump.png')

    if (screenshot_way < 0):

        print('暂不支持当前设备')

        sys.exit()

    pull_screenshot()

    try:

        Image.open('./autojump.png').load()

        print('采用方式 {} 获取截图'.format(screenshot_way))

    except Exception:

        screenshot_way -= 1

        check_screenshot()

def yes_or_no(prompt, true_value='y', false_value='n', default=True):

    default_value = true_value if default else false_value

    prompt = '%s %s/%s [%s]: ' % (prompt, true_value, false_value, default_value)

    i = input(prompt)

    if not i:

        return default

    while True:

        if i == true_value:

            return True

        elif i == false_value:

            return False

        prompt = 'Please input %s or %s: ' % (true_value, false_value)

        i = input(prompt)

def main():

    '''

    主函数

    '''

    op = yes_or_no('请确保手机打开了 ADB 并连接了电脑,然后打开跳一跳并【开始游戏】后再用本程序,确定开始?')

    if not op:

        print('bye')

        return

    # print('程序版本号:{}'.format(VERSION))

    debug.dump_device_info()

    check_screenshot()

    i, next_rest, next_rest_time = 0, random.randrange(3, 10), random.randrange(5, 10)

    while True:

        pull_screenshot()

        im = Image.open('./autojump.png')

        # 获取棋子和 board 的位置

        piece_x, piece_y, board_x, board_y = find_piece_and_board(im)

        ts = int(time.time())

        print(ts, piece_x, piece_y, board_x, board_y)

        set_button_position(im)

        jump(math.sqrt((board_x - piece_x) ** 2 + (board_y - piece_y) ** 2))

        if debug_switch:

            debug.save_debug_screenshot(ts, im, piece_x, piece_y, board_x, board_y)

            debug.backup_screenshot(ts)

        i += 1

        if i == next_rest:

            print('已经连续打了 {} 下,休息 {}s'.format(i, next_rest_time))

            for j in range(next_rest_time):

                sys.stdout.write('\r程序将在 {}s 后继续'.format(next_rest_time - j))

                sys.stdout.flush()

                time.sleep(1)

            print('\n继续')

            i, next_rest, next_rest_time = 0, random.randrange(30, 100), random.randrange(10, 60)

        time.sleep(random.uniform(0.9, 1.2))   # 为了保证截图的时候应落稳了,多延迟一会儿,随机值防 ban

if __name__ == '__main__':

    main()
用adb连接手机
- 通过usb
把手机通过usb接上pc,打开手机USB调试,传输模式选MTP。
可通过cmd打开adb.exe所在目录输入 adb devices 查看是否有设备已连接。
如果adb并没有连接上手机,于是下载了android驱动程序(驱动精灵等软件就能下载),安装了, 就好了。 - 通过wifi
adb connect 192.168.1.100
其中192.168.1.100为手机的ip(需要在手机信息里面查找),如果连接成功, 就可以进入android的shell了。
- 通过usb
打开微信跳一跳,点击开始游戏
用cmd打开至jump.py所在目录,输入 python jump.py 运行jump.py
附:运行时可能会出现 ImportError: No module named PIL 错误,缺少PIL模块,pip install PIL 即可
手动版
工具介绍
Python
Android 手机
Adb 驱动
Python Matplot绘图
1. 安装 matslpotlib
- pip insatll matsloptlib

官网下载 安装包:matplotlib-2.1.1-cp27-cp27m-win_amd64.whl (27,是你的Python版本对应的,如果你是3.6版本,则为36)
下载的可能会有一些慢,注意安装过程需要翻墙,实在不行就安装离线版本,参考 在这里翻墙 ( 转载自CSDN )
2. 安装 Pillow
由于运行完前面几步,还会出错,出现 "ImportError:No module named PIL" 。
由 资料 可知需要安装Pillow。
pip install Pillow

3. 代码如下
# coding=utf-8

import numpy as np

import matplotlib.pyplot as plt

import matplotlib.animation as animation

from PIL import Image

import math

import time

import os

def pull_screenshot():

    os.system('adb shell screencap -p /sdcard/autojump.png')

    os.system('adb pull /sdcard/autojump.png .')

def jump(distance):

    press_time = distance * 1.35

    press_time = int(press_time)

    cmd = 'adb shell input swipe 320 410 320 410 ' + str(press_time)

    print(cmd)

    os.system(cmd)

fig = plt.figure()

index = 0

cor = [0, 0]

pull_screenshot()

img = np.array(Image.open('autojump.png'))

update = True

click_count = 0

cor = []

def update_data():

    return np.array(Image.open('autojump.png'))

im = plt.imshow(img, animated=True)

def updatefig(*args):

    global update

    if update:

        time.sleep(1.5)

        pull_screenshot()

        im.set_array(update_data())

        update = False

    return im,

def onClick(event):

    global update

    global ix, iy

    global click_count

    global cor

    # next screenshot

    ix, iy = event.xdata, event.ydata

    coords = []

    coords.append((ix, iy))

    print('now = ', coords)

    cor.append(coords)

    click_count += 1

    if click_count > 1:

        click_count = 0

        cor1 = cor.pop()

        cor2 = cor.pop()

        distance = (cor1[0][0] - cor2[0][0])**2 + (cor1[0][1] - cor2[0][1])**2

        distance = distance ** 0.5

        print('distance = ', distance)

        jump(distance)

        update = True

fig.canvas.mpl_connect('button_press_event', onClick)

ani = animation.FuncAnimation(fig, updatefig, interval=50, blit=True)

plt.show()
4. 用adb连接手机
5. 手机打开微信小程序,进入跳一跳。
在cmd中用cd命令切换到源代码的目录

然后运行代码

python wechat_jump_py3.py
6. 需要两次点击,第一次是起始位置,第二次是开始位置,才会跳起来(会有个手机屏幕截屏放置电脑上,在电脑上操作)
提示:(别搞太高分,适可而止,小心被封号就尴尬了...)代码来源对应的文章
iOS系统
首先要做的:
如果你有Mac本就可以按照 iOS WebDriverAgent 环境搭建入门 ,里面的操作挺详细的,最终手机里会有一个WebDriverAgentRunner 的app,点进去就会退出来是正常的。
可见微信跳一跳 mac + iphone 图文教程 ,这个iOS总结玩跳一跳的还是挺好的。如果你用的是windows ,那么就很惨了,首先需要安装一个虚拟机,然后再虚拟机里面安装macOS系统,然后安装 WebDriverAgentRunner
详细步骤可见 xcode windows版安装使用教程
运行游戏的话:
- 首先安装 WebDriverAgentRunner
- 然后打开手机运行WebDriverAgentRunner
- 把手机点到跳一跳界面,点开始游戏
- 新建文件jump.py文件
python jump.py运行即可
jump.py 代码如下:
# -*- coding: utf-8 -*-

import os

import shutil

import time

import math

import random

import json

from PIL import Image, ImageDraw

import wda

with open('config.json', 'r') as f:

    config = json.load(f)

# Magic Number,不设置可能无法正常执行,请根据具体截图从上到下按需设置

under_game_score_y = config['under_game_score_y']

# 长按的时间系数,请自己根据实际情况调节

press_coefficient = config['press_coefficient']

# 二分之一的棋子底座高度,可能要调节

piece_base_height_1_2 = config['piece_base_height_1_2']

# 棋子的宽度,比截图中量到的稍微大一点比较安全,可能要调节

piece_body_width = config['piece_body_width']

time_coefficient = config['press_coefficient']

# 模拟按压的起始点坐标,需要自动重复游戏请设置成“再来一局”的坐标

swipe = config.get('swipe', {

    "x1": 320,

    "y1": 410,

    "x2": 320,

    "y2": 410

    })

c = wda.Client()

s = c.session()

screenshot_backup_dir = 'screenshot_backups/'

if not os.path.isdir(screenshot_backup_dir):

    os.mkdir(screenshot_backup_dir)

def pull_screenshot():

    c.screenshot('1.png')

def jump(distance):

    press_time = distance * time_coefficient / 1000

    print('press time: {}'.format(press_time))

    s.tap_hold(200, 200, press_time)

def backup_screenshot(ts):

    """

    为了方便失败的时候 debug

    """

    if not os.path.isdir(screenshot_backup_dir):

        os.mkdir(screenshot_backup_dir)

    shutil.copy('1.png', '{}{}.png'.format(screenshot_backup_dir, ts))

def save_debug_creenshot(ts, im, piece_x, piece_y, board_x, board_y):

    draw = ImageDraw.Draw(im)

    # 对debug图片加上详细的注释

    draw.line((piece_x, piece_y) + (board_x, board_y), fill=2, width=3)

    draw.line((piece_x, 0, piece_x, im.size[1]), fill=(255, 0, 0))

    draw.line((0, piece_y, im.size[0], piece_y), fill=(255, 0, 0))

    draw.line((board_x, 0, board_x, im.size[1]), fill=(0, 0, 255))

    draw.line((0, board_y, im.size[0], board_y), fill=(0, 0, 255))

    draw.ellipse(

        (piece_x - 10, piece_y - 10, piece_x + 10, piece_y + 10),

        fill=(255, 0, 0))

    draw.ellipse(

        (board_x - 10, board_y - 10, board_x + 10, board_y + 10),

        fill=(0, 0, 255))

    del draw

    im.save('{}{}_d.png'.format(screenshot_backup_dir, ts))

def set_button_position(im):

    """

    将swipe设置为 `再来一局` 按钮的位置

    """

    global swipe_x1, swipe_y1, swipe_x2, swipe_y2

    w, h = im.size

    left = w / 2

    top = 1003 * (h / 1280.0) + 10

    swipe_x1, swipe_y1, swipe_x2, swipe_y2 = left, top, left, top

def find_piece_and_board(im):

    w, h = im.size

    print("size: {}, {}".format(w, h))

    piece_x_sum = piece_x_c = piece_y_max = 0

    board_x = board_y = 0

    scan_x_border = int(w / 8)  # 扫描棋子时的左右边界

    scan_start_y = 0  # 扫描的起始 y 坐标

    im_pixel = im.load()

    # 以 50px 步长,尝试探测 scan_start_y

    for i in range(under_game_score_y, h, 50):

        last_pixel = im_pixel[0, i]

        for j in range(1, w):

            pixel = im_pixel[j, i]

            # 不是纯色的线,则记录scan_start_y的值,准备跳出循环

            if pixel != last_pixel:

                scan_start_y = i - 50

                break

        if scan_start_y:

            break

    print("scan_start_y: ", scan_start_y)

    # 从 scan_start_y 开始往下扫描,棋子应位于屏幕上半部分,这里暂定不超过 2/3

    for i in range(scan_start_y, int(h * 2 / 3)):

        # 横坐标方面也减少了一部分扫描开销

        for j in range(scan_x_border, w - scan_x_border):

            pixel = im_pixel[j, i]

            # 根据棋子的最低行的颜色判断,找最后一行那些点的平均值,这个颜

            # 色这样应该 OK,暂时不提出来

            if (50 < pixel[0] < 60) \

                    and (53 < pixel[1] < 63) \

                    and (95 < pixel[2] < 110):

                piece_x_sum += j

                piece_x_c += 1

                piece_y_max = max(i, piece_y_max)

    if not all((piece_x_sum, piece_x_c)):

        return 0, 0, 0, 0

    piece_x = piece_x_sum / piece_x_c

    piece_y = piece_y_max - piece_base_height_1_2  # 上移棋子底盘高度的一半

    for i in range(int(h / 3), int(h * 2 / 3)):

        last_pixel = im_pixel[0, i]

        if board_x or board_y:

            break

        board_x_sum = 0

        board_x_c = 0

        for j in range(w):

            pixel = im_pixel[j, i]

            # 修掉脑袋比下一个小格子还高的情况的 bug

            if abs(j - piece_x) < piece_body_width:

                continue

            # 修掉圆顶的时候一条线导致的小 bug,这个颜色判断应该 OK,暂时不提出来

            if abs(pixel[0] - last_pixel[0]) \

                    + abs(pixel[1] - last_pixel[1]) \

                    + abs(pixel[2] - last_pixel[2]) > 10:

                board_x_sum += j

                board_x_c += 1

        if board_x_sum:

            board_x = board_x_sum / board_x_c

    # 按实际的角度来算,找到接近下一个 board 中心的坐标 这里的角度应该

    # 是 30°,值应该是 tan 30°, math.sqrt(3) / 3

    board_y = piece_y - abs(board_x - piece_x) * math.sqrt(3) / 3

    if not all((board_x, board_y)):

        return 0, 0, 0, 0

    return piece_x, piece_y, board_x, board_y

def main():

    while True:

        pull_screenshot()

        im = Image.open("./1.png")

        # 获取棋子和 board 的位置

        piece_x, piece_y, board_x, board_y = find_piece_and_board(im)

        ts = int(time.time())

        print(ts, piece_x, piece_y, board_x, board_y)

        if piece_x == 0:

            return

        set_button_position(im)

        distance = math.sqrt(

            (board_x - piece_x) ** 2 + (board_y - piece_y) ** 2)

        jump(distance)

        save_debug_creenshot(ts, im, piece_x, piece_y, board_x, board_y)

        backup_screenshot(ts)

        # 为了保证截图的时候应落稳了,多延迟一会儿,随机值防 ban

        time.sleep(random.uniform(1, 1.1))

if __name__ == '__main__':

    main()
用Python代码实现微信跳一跳作弊器的更多相关文章
- 用Python来玩微信跳一跳
微信2017年12月28日发布了新版本,在小程序里面有一个跳一跳小游戏,试着点一点玩了下.第二天刚好在一篇技术公众号中,看到有大神用Python代码计算出按压时间,向手机发送android adb命令 ...
- PYTHON 实现的微信跳一跳【辅助工具】仅作学习
备注原地址:https://my.oschina.net/anlve/blog/1604163 我又做了一些优化,防止WX检测作弊 准备环境: Windows 10安卓手机,源码中有适配ios,然后链 ...
- 微信跳一跳Python
微信最新的小程序里面出了个叫“跳一跳”的小游戏,大神们也通过Python实现了自动玩游戏具体代码 如下: Github地址: https://github.com/wangshub/wechat_ju ...
- 微信跳一跳辅助自动跳Python
一.说明 此代码借鉴github一位大神所写,已经做了简化合并处理,如果能成功连上手机并运行,可以实现程序自动玩游戏,刷个1000+的分数轻轻松松 github源码地址 https://github. ...
- 微信跳一跳Python辅助无需配置一键操作
作者:NiceCui 本文谢绝转载,如需转载需征得作者本人同意,谢谢. 本文链接:http://www.cnblogs.com/NiceCui/p/8350329.html 邮箱:moyi@moyib ...
- 微信跳一跳,Python辅助自动跳程序
一.说明 此代码借鉴一位大神提供在gitHub上的源码,已经做了简化合并处理,成功连上手机并运行后,可实现自动玩微信跳一跳游戏,刷个1000+的分数轻轻松松 github源码地址 https://gi ...
- 【辅助工具】Python实现微信跳一跳
最近迷上了微信跳一跳小游戏,正好也看到知乎上有大神分享了技术贴,我也参考了好多资料,原理就是通过abd命令截取图片,python计算两个点距离,然后转化按压时间,让电脑来完成游戏.我花了很长时间才把程 ...
- Python操作微信跳一跳
“跳一跳”这个东西还是今天刚接触到的,看到了python群中有人再问“微信跳一跳的外挂有人写了没”,“早就有了”,“github”,“等着出个更详细的教程教程没看懂,主要没有用过adb”. 不过没关系 ...
- python 微信跳一跳辅助 复现
本来用的是苹果ios得手机,但是步骤较为复杂,没有吃透,最后妥协用了android的机器搞得. 首先找到大牛的github https://github.com/wangshub/wechat_jum ...
随机推荐
- linux父子进程问题
今天遇到一个linux进程启动时指定Max open files不对的问题,导致程序建立socket异常,进而导致fullgc问题,影响正常服务.所以顺带又温习了下linux下的父子进程的特性. 孤儿 ...
- ArrayList 与 List 关系与代码示例 - Java
关系 List 是 Java Interface, ArrayList 是 Java Class,它们都属于 java.util 包. Java List 是有序的集合(ordered collect ...
- onchange,onfocus ,oninput事件
compositionstart 在输入一段需要确认的文本如拼音to汉字.语音时会触发 compositionend 在拼音选词完成.语音输入完毕时会触发 addEventListener() 方法 ...
- Linux->ZooKeeper集群搭建
人,总免不了有心结,限制着自己,难以前行.对于ZooKeeper的理解,以及实践也拖了很久,今天用零散时间学习一下,补点干货. 一.简述 Zookeeper是Google的Chubby一个开源的实现, ...
- 动态给table添加动态航
<html> <head> <title>usually function</title> <meta http-equiv="Cont ...
- WCF如何使用X509证书 z
WCF如何使用X509证书 如何创建证书: makecert.exe -sr LocalMachine -ss My -a sha1 -n CN=JiangServer -sky exchange - ...
- 安卓渗透测试工具Drozer学习笔记
下载,并安装. pip安装即可,安装完成后可能会出现缺少twisted依赖库的问题 ➜ vul git:(master) ✗ drozer console connect drozer Server ...
- 使用 PHP Curl 做数据中转
流程 收集头部信息 收集请求数据 转换头部信息为 CURL 头部请求格式 使用 Curl 进行转发 收集 HTTP 头信息 function getAllHeaders() { $headers = ...
- vue中图片返回404时,显示默认的图片
图片返回404时候的处理 <img :src="userMsg.portrait" ref="img" alt=""> _thi ...
- Android客户端与服务器端通过DES加密认证
转载地址:http://blog.csdn.net/spring21st/article/details/6730283 由于Android应用没有像web开发中的session机制,所以采用PHPS ...