对狂神说java的springboot中spring security的总结
1.spring security的环境搭建
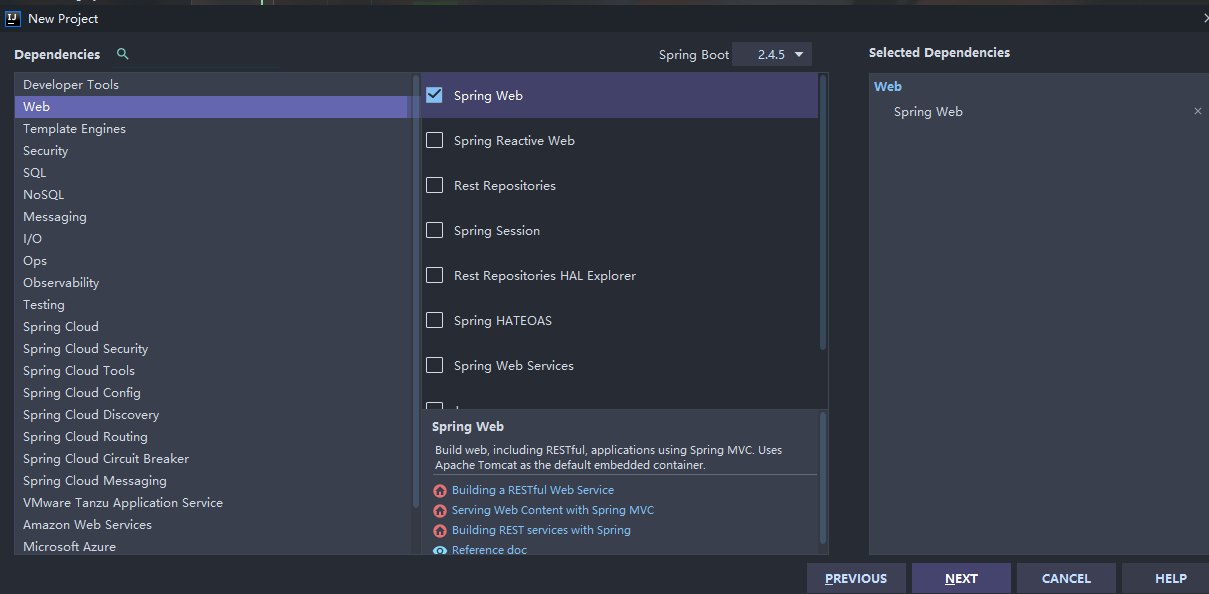
首先新建一个springboot项目,只够选web中的spring web依赖
然后在pom.xml导入相关依赖
        <!--thymeleaf模块-->

        <dependency>

            <groupId>org.thymeleaf</groupId>

            <artifactId>thymeleaf-spring5</artifactId>

        </dependency>

        <dependency>

            <groupId>org.thymeleaf.extras</groupId>

            <artifactId>thymeleaf-extras-java8time</artifactId>

        </dependency>
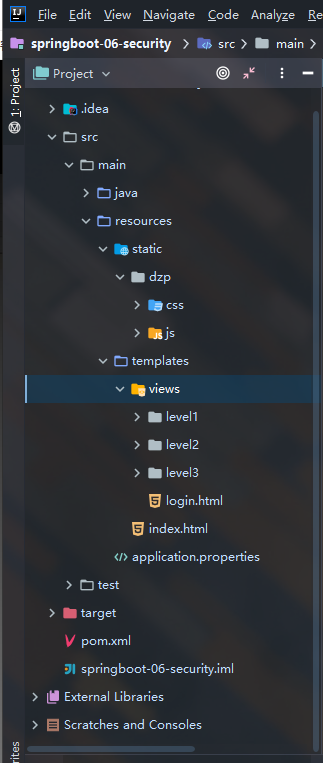
然后导入素材
项目所需要的素材我放到我的github上,需要的自取
导入资源并删掉多余的东西,如图
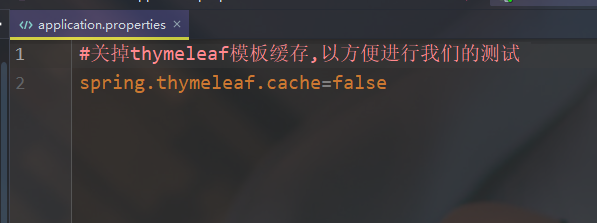
在application.properties配置文件里关掉thymeleaf模板缓存,以方便进行我们的测试
#关掉thymeleaf模板缓存,以方便进行我们的测试

spring.thymeleaf.cache=false
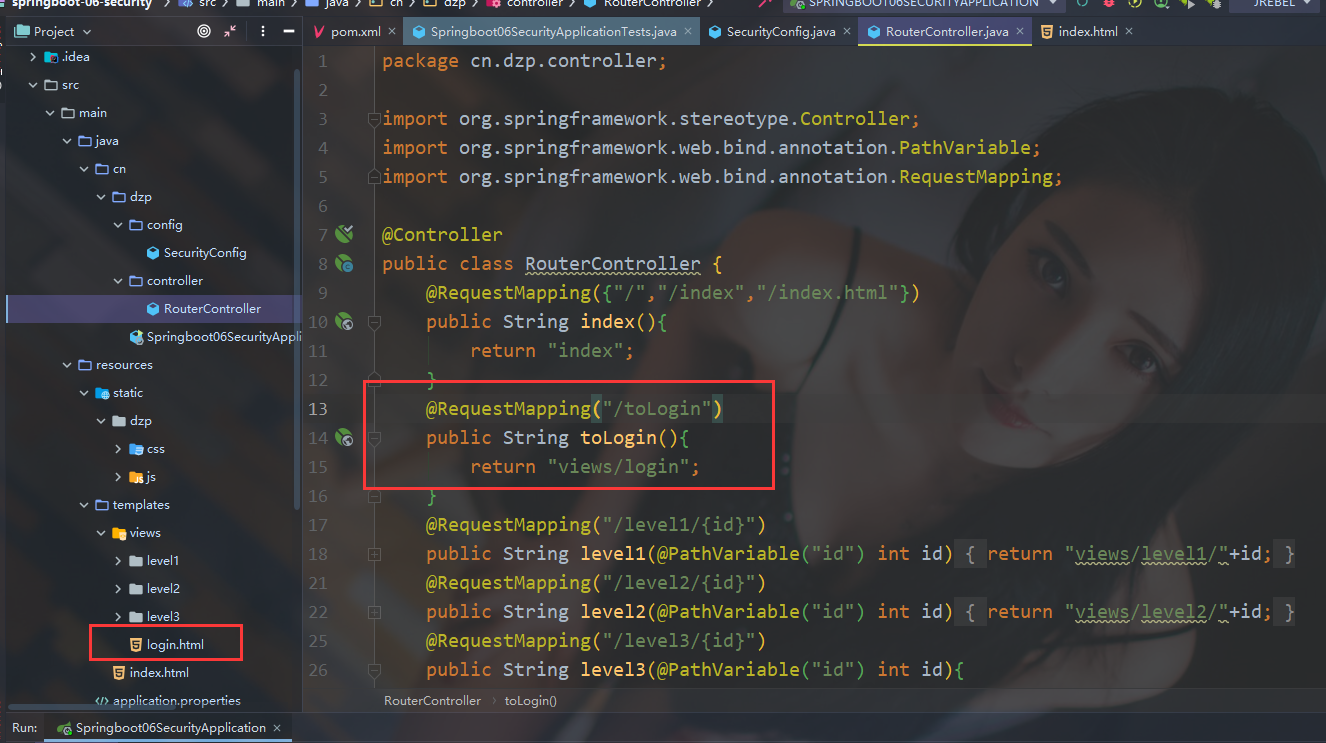
紧接着新建一个controller包,在包下编写一个controller类RouterController,作为我们的路由转发
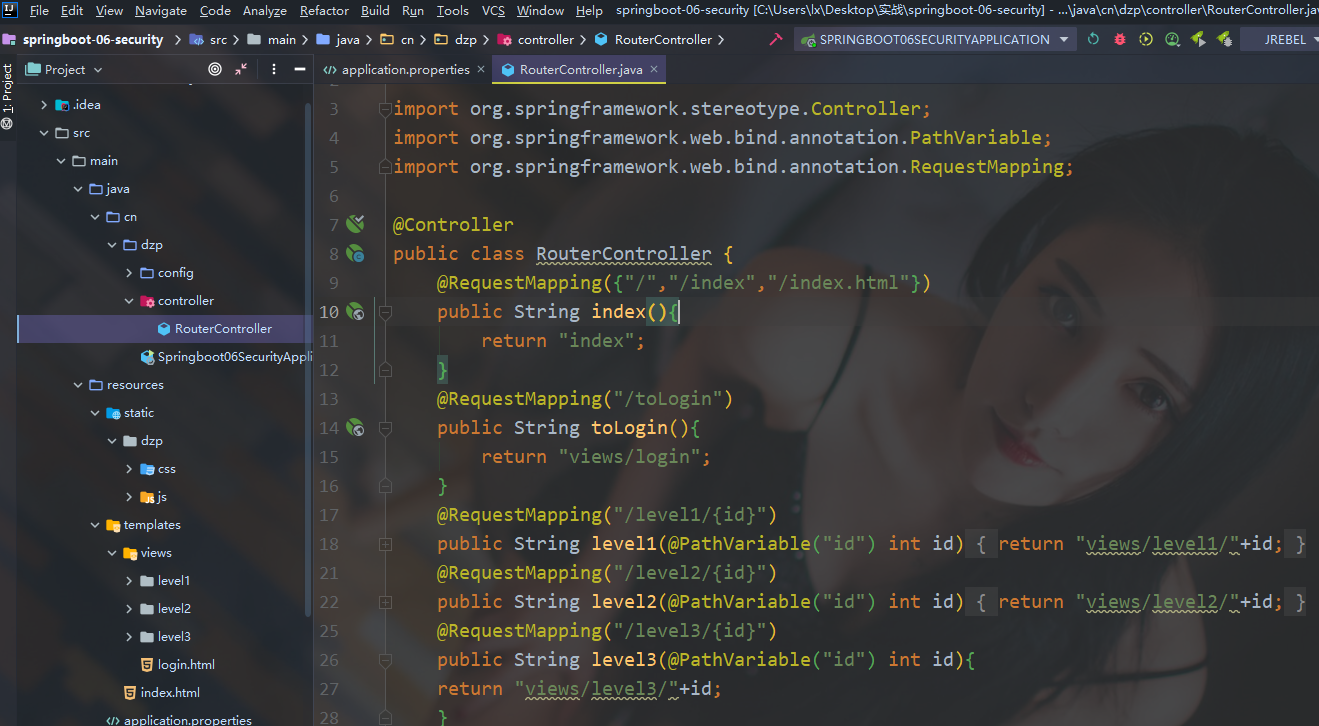
完整代码如下:
package cn.dzp.controller;

import org.springframework.stereotype.Controller;

import org.springframework.web.bind.annotation.PathVariable;

import org.springframework.web.bind.annotation.RequestMapping;

@Controller

public class RouterController {

//使得访问/,/index,/index.html都能跳到主页

    @RequestMapping({"/","/index","/index.html"})

    public String index(){

        return "index";

    }

    @RequestMapping("/toLogin")

    public String toLogin(){

        return "views/login";

    }

//实现对level的三个页面的跳转,下面也是如此

    @RequestMapping("/level1/{id}")

    public String level1(@PathVariable("id") int id){

        return "views/level1/"+id;

    }

    @RequestMapping("/level2/{id}")

    public String level2(@PathVariable("id") int id){

        return "views/level2/"+id;

    }

    @RequestMapping("/level3/{id}")

    public String level3(@PathVariable("id") int id){

    return "views/level3/"+id;

    }

}
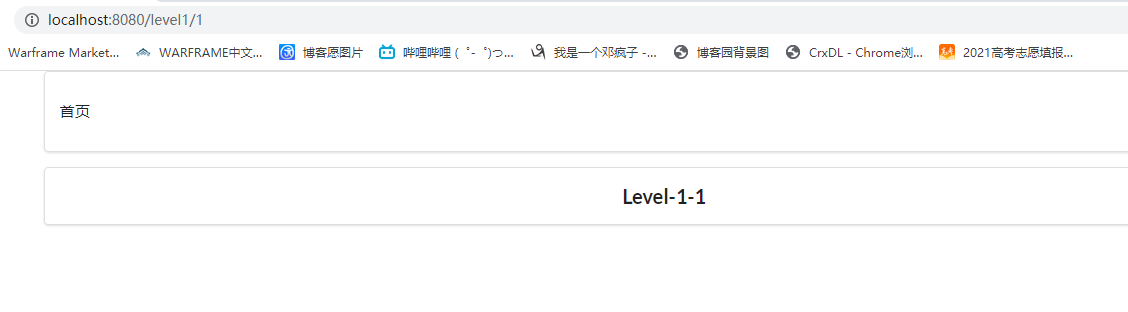
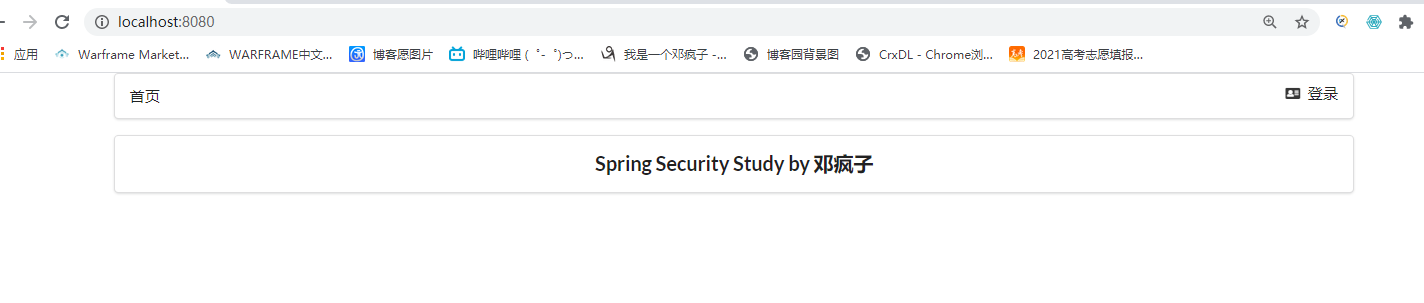
启动项目查看效果
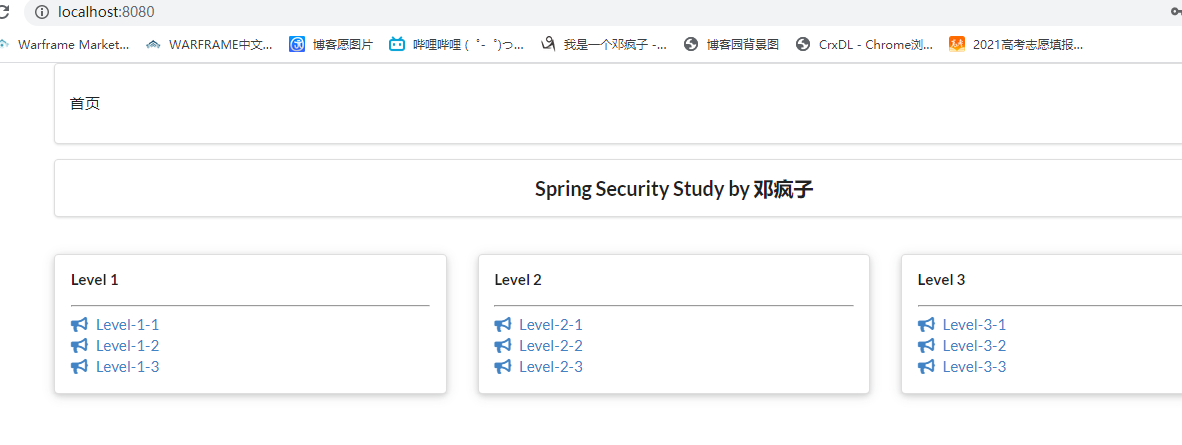
点击对应的level等级页面也能跳转
2.用户认证和授权
"认证"(Authentication)
"授权"(Authorization)
这两个概念是通用的,而不是只在Spring security中存在
导入security依赖
<!--security-->

        <dependency>

            <groupId>org.springframework.boot</groupId>

            <artifactId>spring-boot-starter-security</artifactId>

        </dependency>
创建一个config包,编写一个SecurityConfig类
完整代码如下:
package cn.dzp.config;
import org.springframework.security.config.annotation.authentication.builders.AuthenticationManagerBuilder;
import org.springframework.security.config.annotation.web.builders.HttpSecurity;
import org.springframework.security.config.annotation.web.configuration.EnableWebSecurity;
import org.springframework.security.config.annotation.web.configuration.WebSecurityConfigurerAdapter;
import org.springframework.security.crypto.bcrypt.BCryptPasswordEncoder;
@EnableWebSecurity
public class SecurityConfig extends WebSecurityConfigurerAdapter {
//链式编程
// 授权
@Override
protected void configure(HttpSecurity http) throws Exception {
// 首页所有人可以访问,功能页只有对应权限的人才能访问
// 请求授权的规则
http.authorizeRequests()
.antMatchers("/").permitAll()
.antMatchers("/level1/**").hasRole("level1")
.antMatchers("/level2/**").hasRole("level2")
.antMatchers("/level3/**").hasRole("level3");
// 没有权限默认会跳到登录页面,需要开启登录的页面
http.formLogin();
// 防止网站攻击:get;post
http.csrf().disable();//关闭csrf(跨站请求伪造)功能,登出失败可能产生的原因
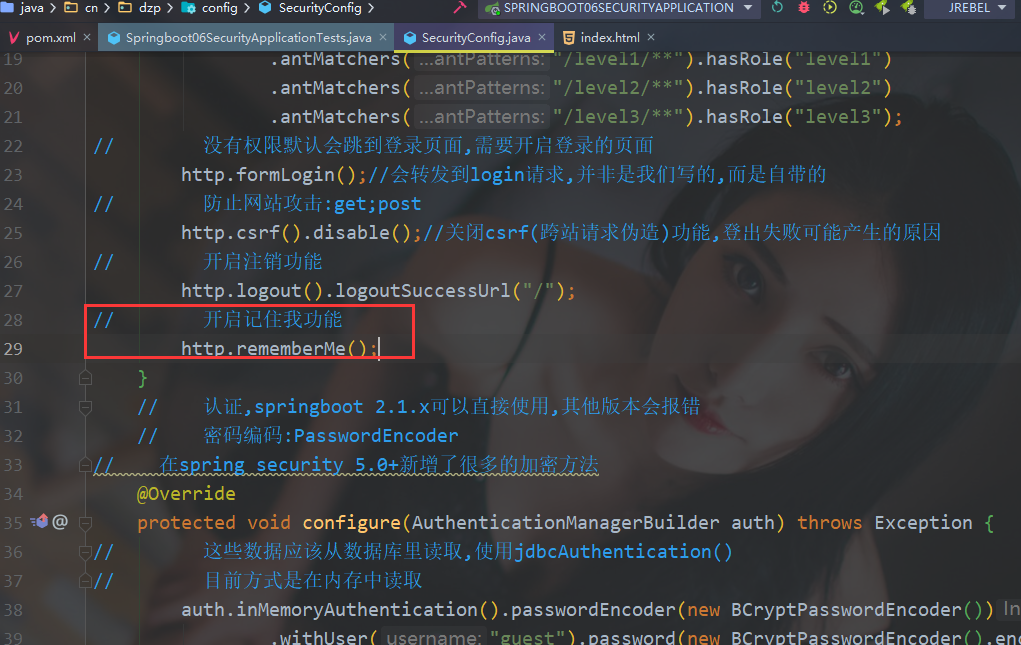
// 开启注销功能
http.logout().logoutSuccessUrl("/");
}
// 认证,springboot 2.1.x可以直接使用,其他版本会报错(或者采用下面的密码编码解决)
// 密码编码:PasswordEncoder
// 在spring security 5.0+新增了很多的加密方法
@Override
protected void configure(AuthenticationManagerBuilder auth) throws Exception {
// 这些数据应该从数据库里读取,使用jdbcAuthentication()
// 目前方式是在内存中读取
auth.inMemoryAuthentication().passwordEncoder(new BCryptPasswordEncoder())
.withUser("guest").password(new BCryptPasswordEncoder().encode("123456")).roles("level1")
.and()
.withUser("dzp").password(new BCryptPasswordEncoder().encode("456789")).roles("level1","level2")
.and()
.withUser("root").password(new BCryptPasswordEncoder().encode("root")).roles("level3","level2","level1");
}
}
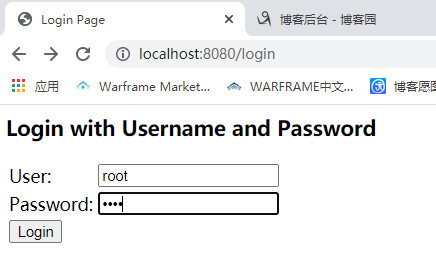
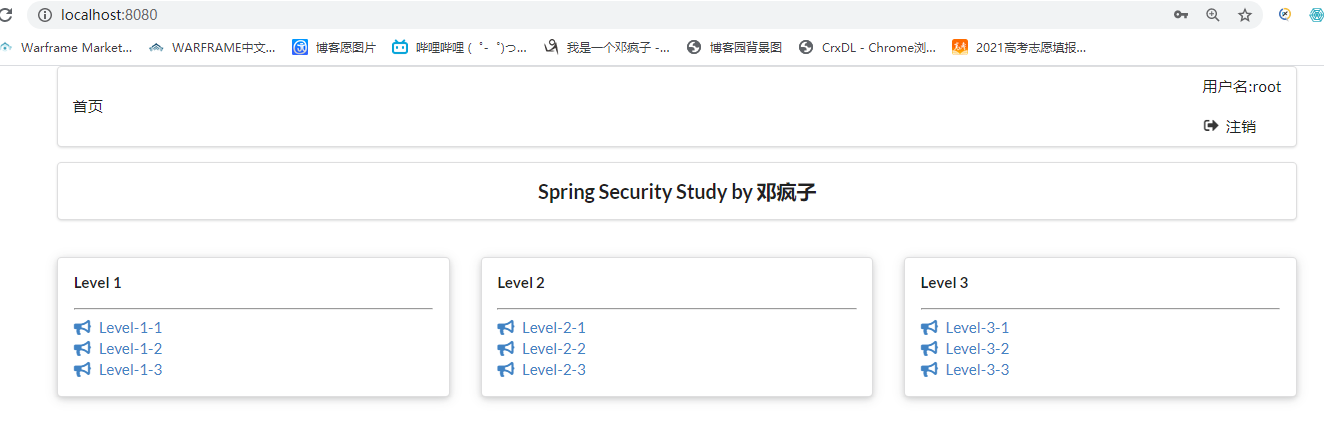
登录最高权限账户
3.注销以及权限控制
由于本次使用到了thymeleaf与spring security的整合,所以需要导入依赖
<!-- security与themeleaf整合包       -->

        <dependency>

            <groupId>org.thymeleaf.extras</groupId>

            <artifactId>thymeleaf-extras-springsecurity4</artifactId>

            <version>3.0.4.RELEASE</version>

        </dependency>
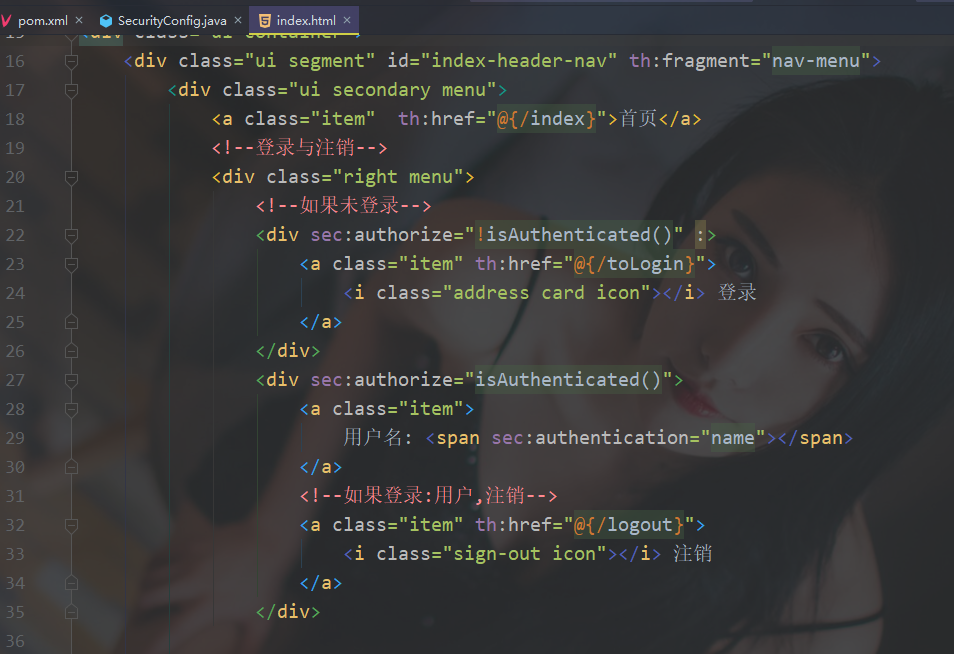
并且要在index.html中导入对应的约束
xmlns:sec="http://www.thymeleaf.org/thymeleaf-extras-springsecurity4"
在index.html实现对应的登录与注销
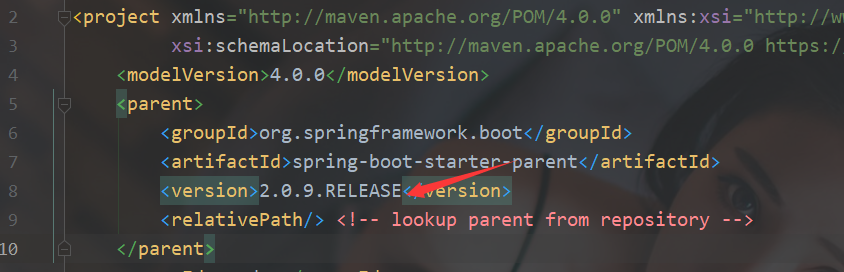
注意:运行会出现一下结果
这是因为springboot版本太高不支持,最低支持2.0.9.RELEASE版本
启动项目Springboot06SecurityApplicationTests会报错,修改下即可,因为降低了版本对应的导入也不相同

启动项目
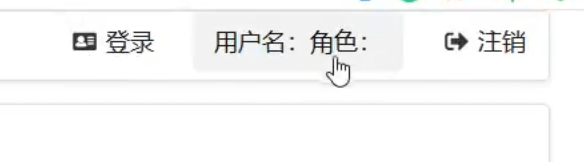
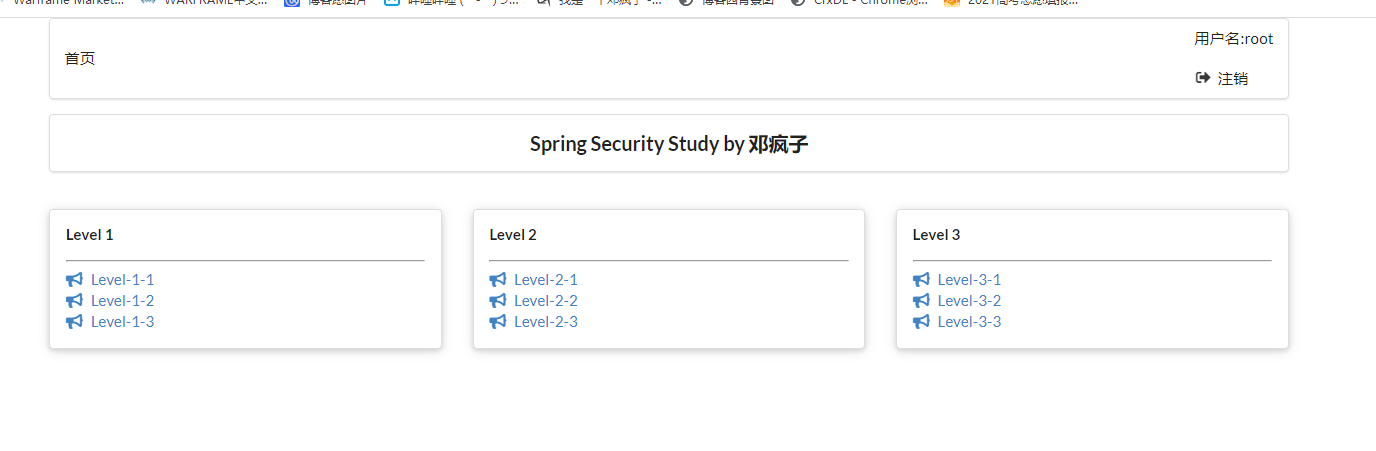
然后登录,可以查看到对应的注销按钮和用户名
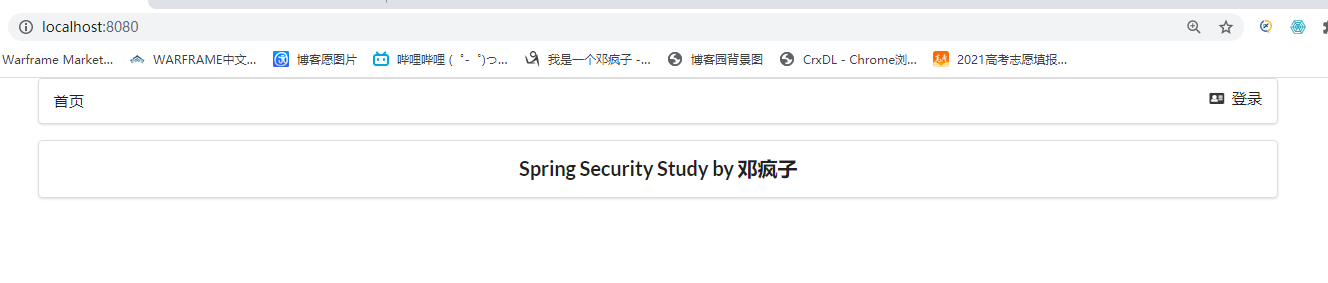
点击注销,成功回到首页,可以看到对应的用户名也清除掉了
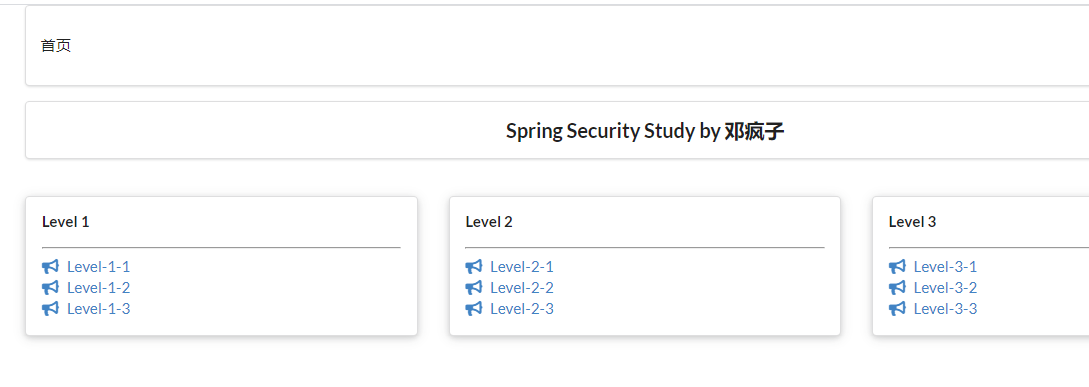
再来看看实现的根据用户权限展示相对应的页面,展示我们用dzp用户更清楚

也成功实现
4.记住我以及首页定制
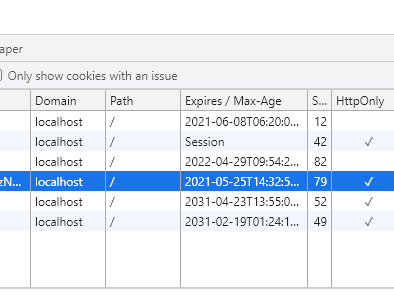
开启记住我功能(cookie的实现)
启动项目试试
虽然不好看,但是已经看到实现了remember me的功能
开启记住我登录root用户在关掉浏览器重新打开检查是否还存在root

可以看到再次打开有了remember me的cookie,说明成功

remember me默认保存的世界为14天==两周,如果清掉cookie,主页则会自动跳到首页(测试时间为2021.5.11)

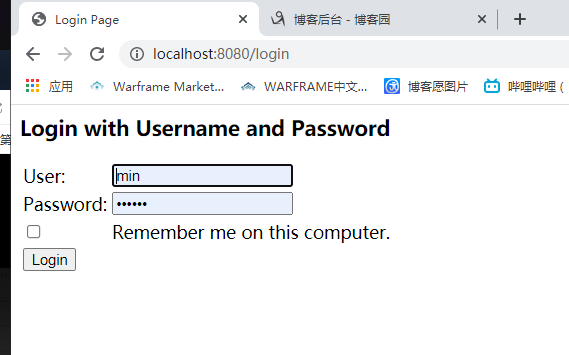
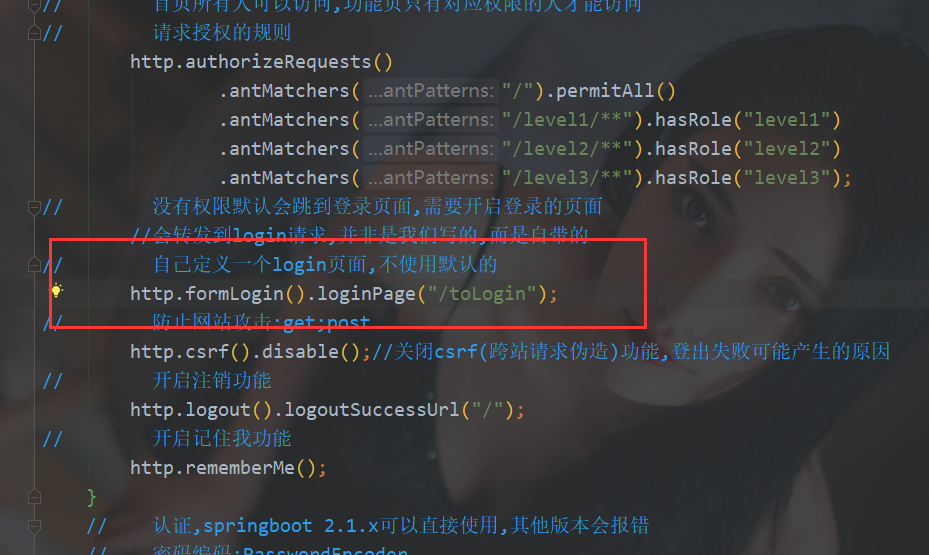
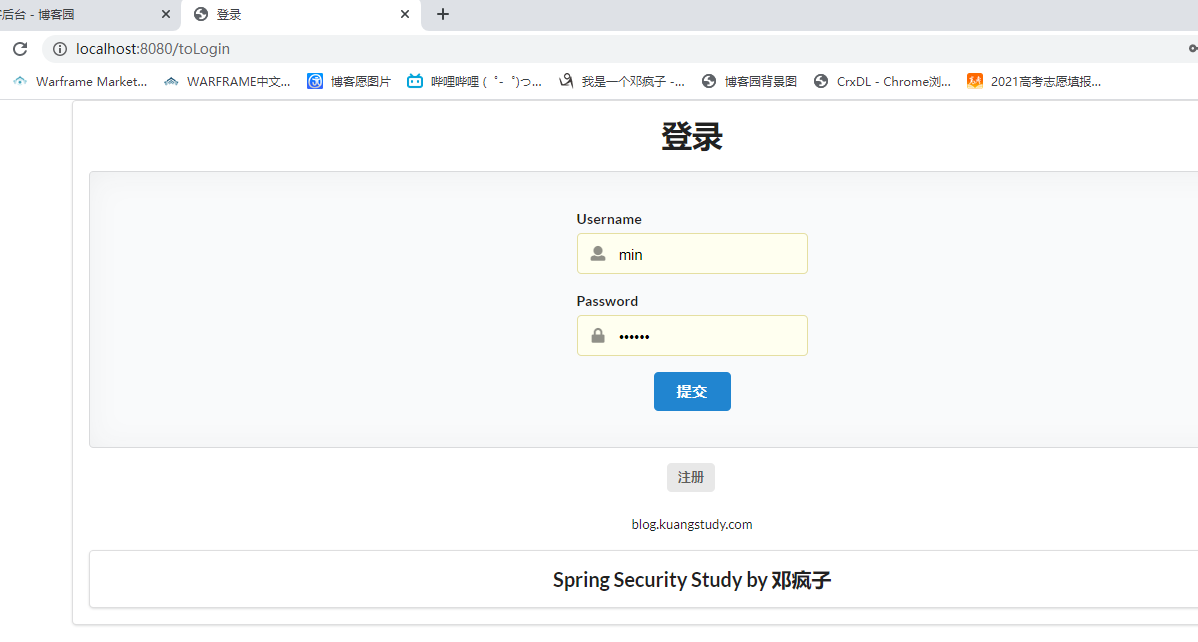
自己定义登录页面
重启项目测试,确实跳转成功
注意坑:前端登录页面传的参数可能和默认的username,password不一样,则会传递参数失败,可以根据前端的name进行设置
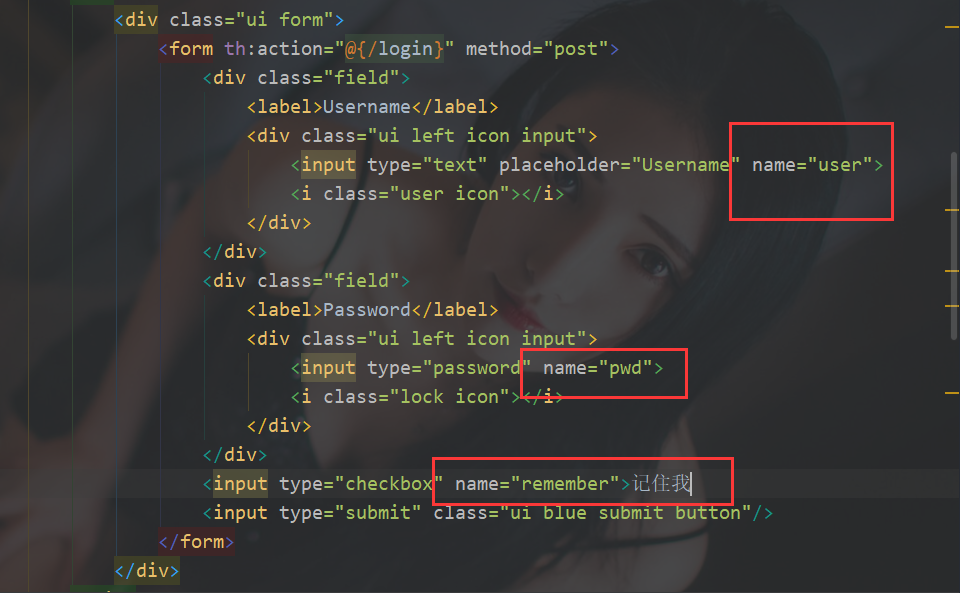
http.formLogin().loginPage("/toLogin").usernameParameter("user").passwordParameter("pwd").loginProcessingUrl("/login");

http.rememberMe().rememberMeParameter("remember");
重启项目测试
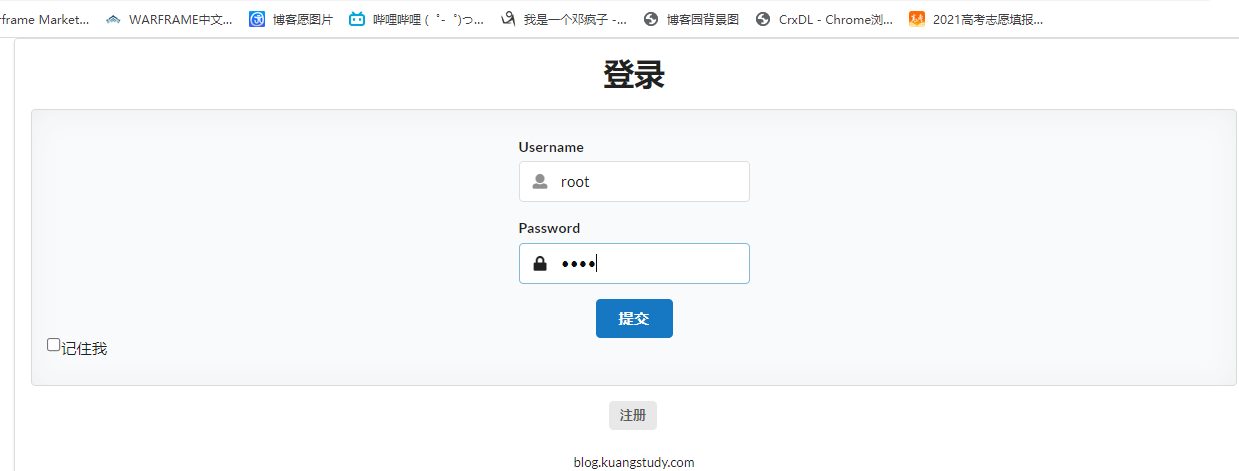
成功登录
到此关于security所有功能实现!
对狂神说java的springboot中spring security的总结的更多相关文章
- springboot中spring.profiles.include
springboot中spring.profiles.include的妙用. 我们有这样的一个springboot项目.项目分为开发.测试.生产三个不同阶段(环境),每个阶段都会有db.ftp.red ...
- SpringBoot集成Spring Security入门体验
一.前言 Spring Security 和 Apache Shiro 都是安全框架,为Java应用程序提供身份认证和授权. 二者区别 Spring Security:重量级安全框架 Apache S ...
- SpringBoot集成Spring Security(5)——权限控制
在第一篇中,我们说过,用户<–>角色<–>权限三层中,暂时不考虑权限,在这一篇,是时候把它完成了. 为了方便演示,这里的权限只是对角色赋予权限,也就是说同一个角色的用户,权限是 ...
- SpringBoot集成Spring Security(4)——自定义表单登录
通过前面三篇文章,你应该大致了解了 Spring Security 的流程.你应该发现了,真正的 login 请求是由 Spring Security 帮我们处理的,那么我们如何实现自定义表单登录呢, ...
- springBoot整合spring security实现权限管理(单体应用版)--筑基初期
写在前面 在前面的学习当中,我们对spring security有了一个小小的认识,接下来我们整合目前的主流框架springBoot,实现权限的管理. 在这之前,假定你已经了解了基于资源的权限管理模型 ...
- springBoot整合spring security+JWT实现单点登录与权限管理--筑基中期
写在前面 在前一篇文章当中,我们介绍了springBoot整合spring security单体应用版,在这篇文章当中,我将介绍springBoot整合spring secury+JWT实现单点登录与 ...
- springboot配置spring security 静态资源不能访问
在springboot整合spring security 过程中曾遇到下面问题:(spring boot 2.0以上版本 spring security 5.x (spring secur ...
- SpringBoot集成Spring Security(7)——认证流程
文章目录 一.认证流程 二.多个请求共享认证信息 三.获取用户认证信息 在前面的六章中,介绍了 Spring Security 的基础使用,在继续深入向下的学习前,有必要理解清楚 Spring Sec ...
- SpringBoot集成Spring Security(6)——登录管理
文章目录 一.自定义认证成功.失败处理 1.1 CustomAuthenticationSuccessHandler 1.2 CustomAuthenticationFailureHandler 1. ...
随机推荐
- Day13_67_interrupt() 方法
interrupt() 方法 中断线程 * interrupt()方法的简单理解 - interrupt() 方法只是改变线程的阻塞状态而已,让一个正在阻塞状态的线程,恢复执行.但是它不会中断一个正在 ...
- Webpack的理解以及解决了的问题
一.背景 Webpack 最初的目标是实现前端项目的模块化,旨在更高效地管理和维护项目中的每一个资源 模块化 最早的时候,我们会通过文件划分的形式实现模块化,也就是将每个功能及其相关状态数据各自单独放 ...
- C#通过rabbitmq实现定时任务(延时队列)
本文主要讲解如何通过RabbitMQ实现定时任务(延时队列) 环境准备 需要在MQ中进行安装插件 地址链接 插件介绍地址:https://www.rabbitmq.com/blog/2015/04/1 ...
- 使用vue-element-admin框架从后端动态获取菜单
1.前言 vue-element-admin是一个纯前端的框架,左侧菜单是根据路由生成的.实际开发中经常需要根据当前登陆人员的信息从后端获取菜单进行展示,本文将详细介绍如何实现该功能. 2.详解 ...
- hdu1960 最小路径覆盖
题意: 给你明天的出租车订单,订单中包含每个人的起点和终点坐标,还有时间,如果一辆出租车想接一个乘客必须在每个订单前1分钟到达,也就是小于等于time-1,问你完成所有订单要最少多少量出租 ...
- 病毒木马查杀实战第010篇:QQ盗号木马之十六进制代码分析
前言 按照我的个人习惯,在运用诸如IDA Pro与OllyDBG对病毒进行逆向分析之前,我都会利用一些自动化的工具,通过静态或动态的分析方法(参见<病毒木马查杀第008篇:熊猫烧香之病毒查杀总结 ...
- Docker网络配置进阶
Docker启动会默认创建docker0虚拟网桥,是Linux的一个bridge,可以理解成一个软件交换机.它会在挂载到它的网口之间进行转发. 之后所有容器都是在172.17.0.x的网段上,并且可以 ...
- [CTF]ACSII码
[CTF]ACSII码 ----------转自百度百科 https://baike.baidu.com/item/ASCII/309296?fromtitle=ascii码&fromid=9 ...
- Ubuntu Linux 学习篇 配置DNS服务器
BIND9 DNS(Domain Name Server,域名服务器)是进行域名(domain name)和与之相对应的IP地址 (IP address)转换的服务器.DNS中保存了一张域名(doma ...
- redux和mobx入门使用
redux和mobx入门使用 项目涉及技术 公共插件 create-react-app react-dom react-router react-router-dom react-hook redux ...