Flume(三)【进阶】
[toc]
一.Flume 数据传输流程
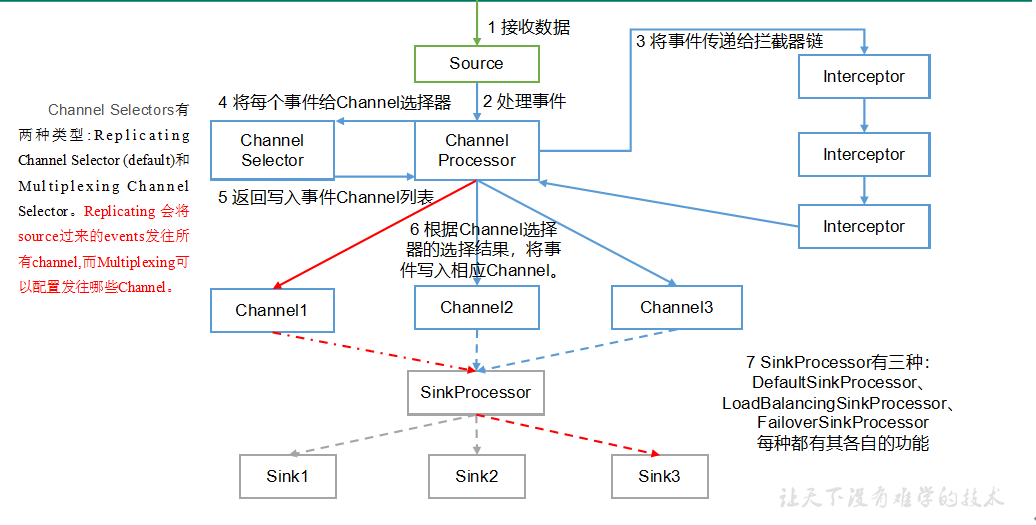
重要组件:
1)Channel选择器(ChannelSelector)
ChannelSelector的作用就是选出Event将要被发往哪个Channel。其共有两种类型,分别是Replicating(复制)和**Multiplexing**(多路复用)。
ReplicatingSelector会将同一个Event发往所有的Channel,Multiplexing会根据相应的原则,将不同的Event发往不同的Channel。
2)SinkProcessor
SinkProcessor共有三种类型,分别是DefaultSinkProcessor、LoadBalancingSinkProcessor和FailoverSinkProcessor
DefaultSinkProcessor对应的是单个的Sink,LoadBalancingSinkProcessor和FailoverSinkProcessor对应的是Sink Group,LoadBalancingSinkProcessor可以实现负载均衡的功能,FailoverSinkProcessor可以错误恢复的功能。
二.Flume 事务
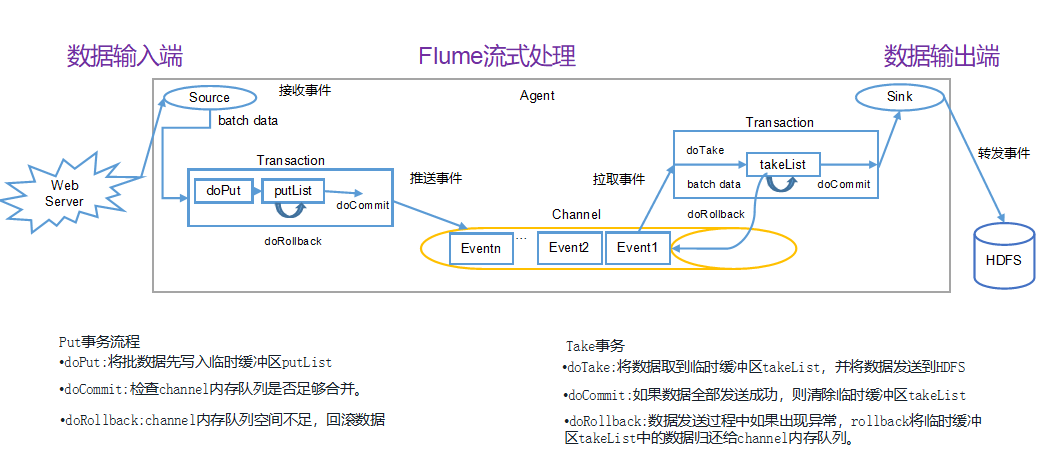
1.Put 事务流程
将批数据先写入临时缓冲区 putList,检查 channel 内存队列是否足够合并,channel 内存队列空间不足,回滚数据。
2.Take 事务流程
将数据取到临时缓冲区 takeList,并将数据发送到 HDFS,如果数据全部发送成功,则清除临时缓冲区 takeList数据,发送过程中如果出现异常,rollback 将临时缓冲区 takeList 中的数据归还给 channel 内存队列。
三.Flume 拓扑结构和案例实操
1.简单串联

这种模式是将多个flume顺序连接起来了,从最初的source开始到最终sink传送的目的存储系统。此模式不建议桥接过多的flume数量, flume数量过多不仅会影响传输速率,而且一旦传输过程中某个节点flume宕机,会影响整个传输系统。
2.复制和多路复用
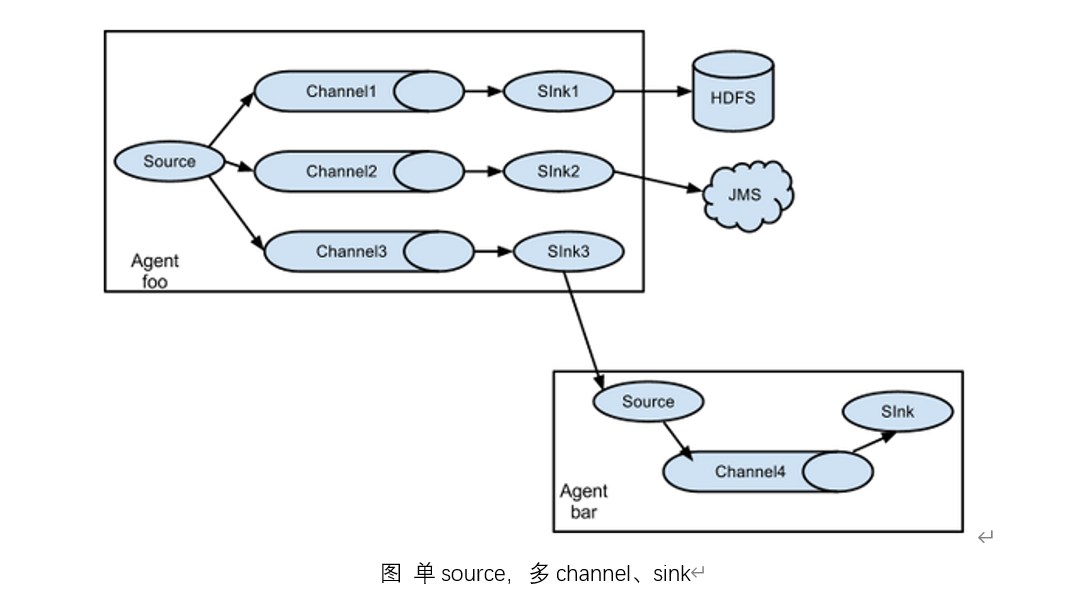
Flume支持将事件流向一个或者多个目的地。这种模式可以将相同数据复制到多个channel中,或者将不同数据分发到不同的channel中,sink可以选择传送到不同的目的地。
案例
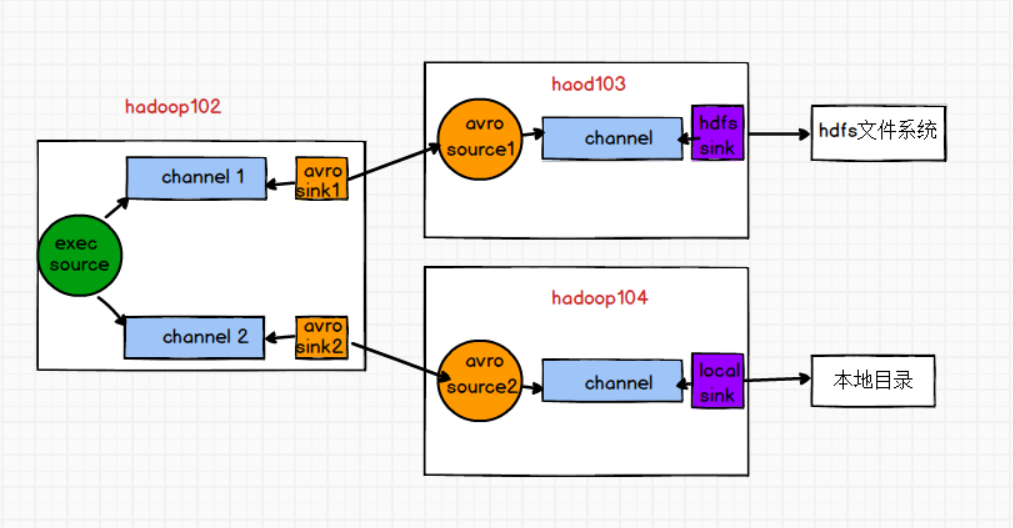
需求:使用Flume-1监控文件变动,Flume-1将变动内容传递给Flume-2,Flume-2负责存储到HDFS。同时Flume-1将变动内容传递给Flume-3,Flume-3负责输出到Local FileSystem.
需求分析
步骤
1)准备工作
在/opt/module/flume/job目录下创建group1文件夹
[atguigu@hadoop102 job]$ cd group1/
在/opt/module/datas/目录下创建flume3文件夹
[atguigu@hadoop102 datas]$ mkdir flume3
2)编写Flume Agent配置文件
Flume1(hadoop102)
在hadoop102上/opt/module/flume/job/group1创建flume-exec-arvo.conf配置文件
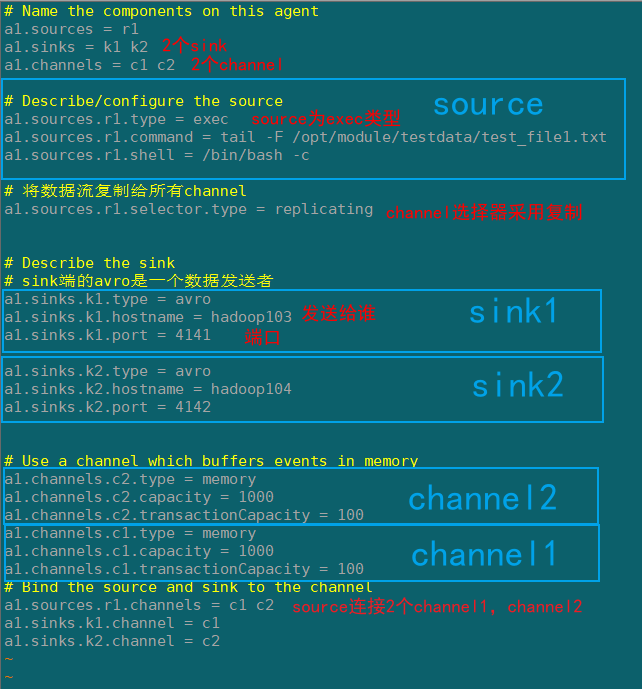
# Name the components on this agent

a1.sources = r1

a1.sinks = k1 k2

a1.channels = c1 c2

# Describe/configure the source

a1.sources.r1.type = exec

a1.sources.r1.command = tail -F /opt/module/testdata/test_file1.txt

a1.sources.r1.shell = /bin/bash -c

# 将数据流复制给所有channel

a1.sources.r1.selector.type = replicating

# Describe the sink

# sink端的avro是一个数据发送者

a1.sinks.k1.type = avro

a1.sinks.k1.hostname = hadoop103

a1.sinks.k1.port = 4141

a1.sinks.k2.type = avro

a1.sinks.k2.hostname = hadoop104

a1.sinks.k2.port = 4142

# Use a channel which buffers events in memory

a1.channels.c2.type = memory

a1.channels.c2.capacity = 1000

a1.channels.c2.transactionCapacity = 100

a1.channels.c1.type = memory

a1.channels.c1.capacity = 1000

a1.channels.c1.transactionCapacity = 100

# Bind the source and sink to the channel

a1.sources.r1.channels = c1 c2

a1.sinks.k1.channel = c1

a1.sinks.k2.channel = c2
Flume2(hadoop103)
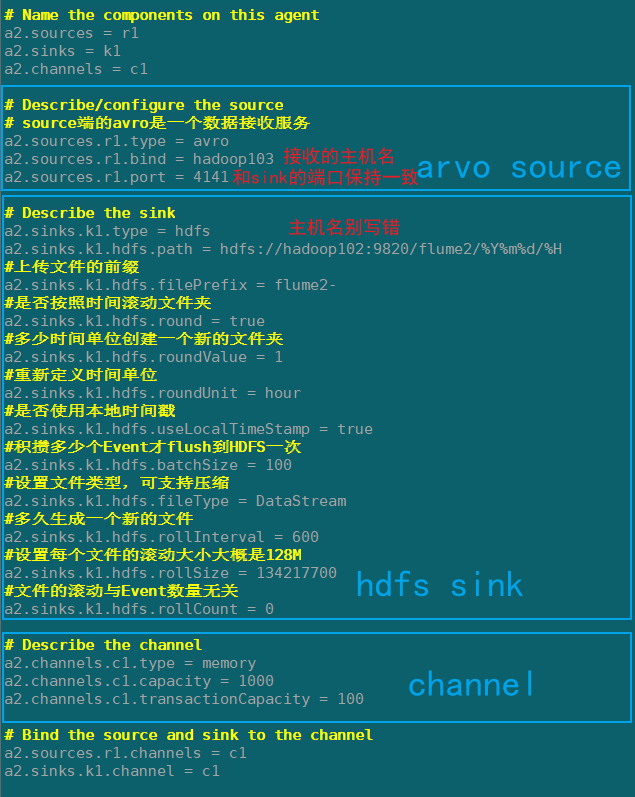
在hadoop103上/opt/module/flume/job/group1创建flume-arvo-hdfs.conf配置文件
添加以下内容:
# Name the components on this agent

a2.sources = r1

a2.sinks = k1

a2.channels = c1

# Describe/configure the source

# source端的avro是一个数据接收服务

a2.sources.r1.type = avro

a2.sources.r1.bind = hadoop103

a2.sources.r1.port = 4141

# Describe the sink

a2.sinks.k1.type = hdfs

a2.sinks.k1.hdfs.path = hdfs://hadoop102:9820/flume2/%Y%m%d/%H

#上传文件的前缀

a2.sinks.k1.hdfs.filePrefix = flume2-

#是否按照时间滚动文件夹

a2.sinks.k1.hdfs.round = true

#多少时间单位创建一个新的文件夹

a2.sinks.k1.hdfs.roundValue = 1

#重新定义时间单位

a2.sinks.k1.hdfs.roundUnit = hour

#是否使用本地时间戳

a2.sinks.k1.hdfs.useLocalTimeStamp = true

#积攒多少个Event才flush到HDFS一次

a2.sinks.k1.hdfs.batchSize = 100

#设置文件类型,可支持压缩

a2.sinks.k1.hdfs.fileType = DataStream

#多久生成一个新的文件

a2.sinks.k1.hdfs.rollInterval = 600

#设置每个文件的滚动大小大概是128M

a2.sinks.k1.hdfs.rollSize = 134217700

#文件的滚动与Event数量无关

a2.sinks.k1.hdfs.rollCount = 0

# Describe the channel

a2.channels.c1.type = memory

a2.channels.c1.capacity = 1000

a2.channels.c1.transactionCapacity = 100

# Bind the source and sink to the channel

a2.sources.r1.channels = c1

a2.sinks.k1.channel = c1
flume3(hadoop104)
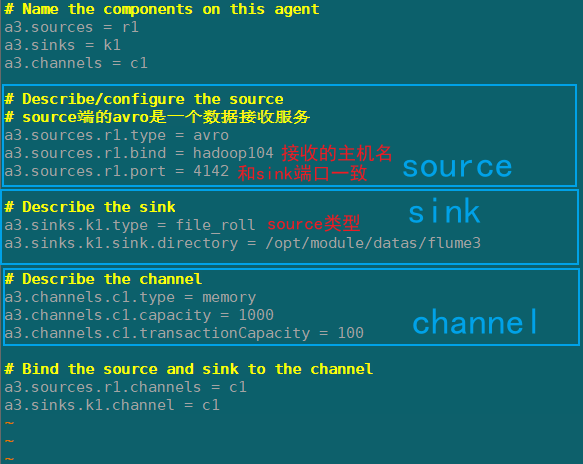
在hadoop104上/opt/module/flume/job/group1创建flume-arvo-fileroll.conf配置文件
配置上级Flume输出的Source,输出是到本地目录的Sink。
注意:输出的本地目录必须是已经存在的目录,如果该目录不存在,并不会创建新的目录。
添加以下内容:
# Name the components on this agent

a3.sources = r1

a3.sinks = k1

a3.channels = c1

# Describe/configure the source

# source端的avro是一个数据接收服务

a3.sources.r1.type = avro

a3.sources.r1.bind = hadoop104

a3.sources.r1.port = 4142

# Describe the sink

a3.sinks.k1.type = file_roll

a3.sinks.k1.sink.directory = /opt/module/datas/flume3

# Describe the channel

a3.channels.c1.type = memory

a3.channels.c1.capacity = 1000

a3.channels.c1.transactionCapacity = 100

# Bind the source and sink to the channel

a3.sources.r1.channels = c1

a3.sinks.k1.channel = c1
3)启动flume agent
依次启动flume,先启下游,再启上游
flume-arvo-filerool-->flume-arvo-hdfsk-->flume-exec-arvo
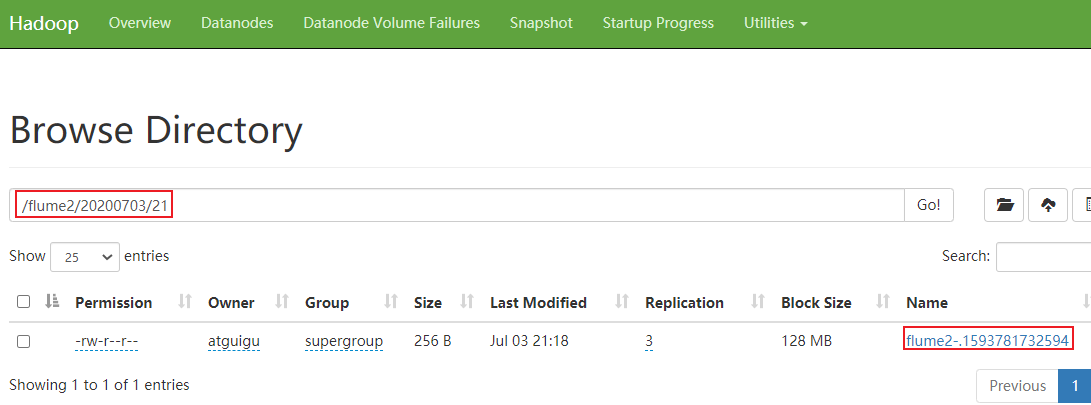
4)检查hdfs数据和本地文件的数据

3.负载均衡和故障转移
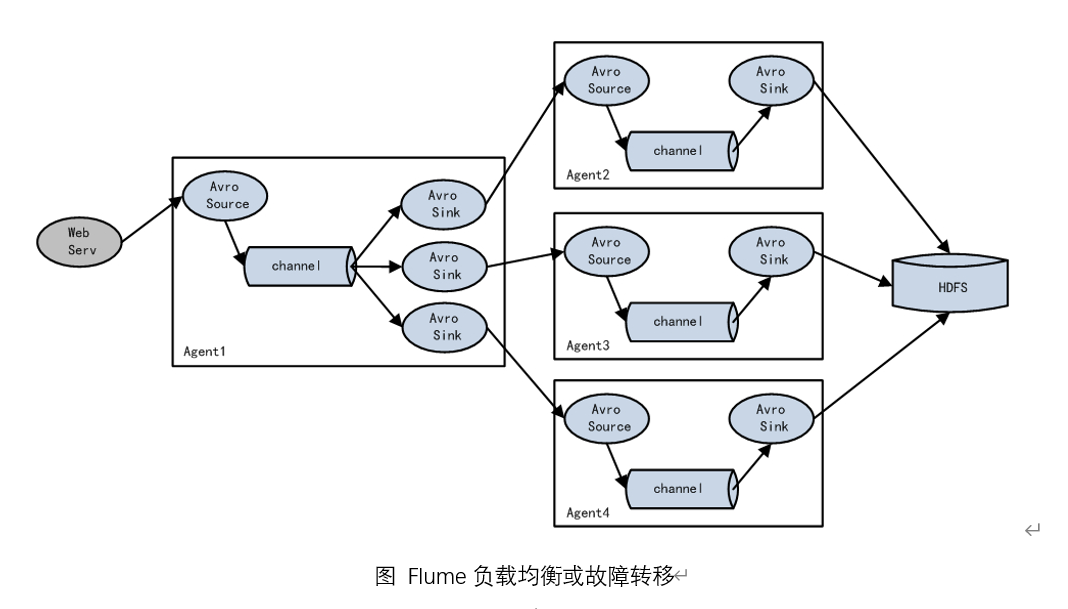
Flume支持使用将多个sink逻辑上分到一个sink组,sink组配合不同的SinkProcessor可以实现负载均衡和错误恢复的功能。
案例
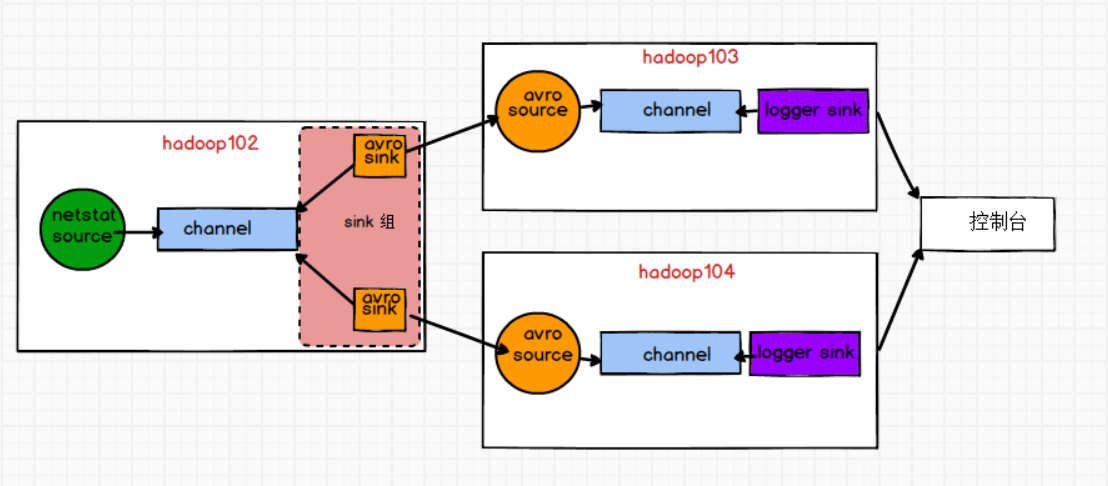
需求:使用Flume1(hadoop102)监控一个端口,其sink组中的sink分别对接Flume2(hadoop103)和Flume3(hadoop104),分别采用Load balancing Sink Processor实现负载均衡,FailoverSinkProcessor实现故障转移的功能
需求分析
步骤
1)flume1(hadoop102)
在job下新建group2文件夹,新建flume-netstat-arvo.conf
# Name the components on this agent( 描述这个Agent,给各个组件取名字)

a1.sources = r1

a1.channels = c1

a1.sinkgroups = g1

a1.sinks = k1 k2

# Describe/configure the source

a1.sources.r1.type = exec

a1.sources.r1.command = tail -F /opt/module/testdata/3.txt

a1.sources.r1.shell = /bin/bash -c

###########################################配置为负载均衡(failover)

#指定类型为故障转移, 启动k1的权重为5,k2为10,k2启动为active,k1备用

a1.sinkgroups.g1.processor.type = failover

a1.sinkgroups.g1.processor.priority.k1 = 5

a1.sinkgroups.g1.processor.priority.k2 = 10

a1.sinkgroups.g1.processor.maxpenalty = 10000

# Describe the sink

# sink端的avro是一个数据发送者

a1.sinks.k1.type = avro

#发送的目的主机ip

a1.sinks.k1.hostname = hadoop103

a1.sinks.k1.port = 4141

a1.sinks.k2.type = avro

#发送的目的主机ip

a1.sinks.k2.hostname = hadoop104

a1.sinks.k2.port = 4141

# Describe the channel

#channel的类型为memory或者file

a1.channels.c1.type = memory

a1.channels.c1.capacity = 1000

a1.channels.c1.transactionCapacity = 100

# Bind the source and sink to the channel

#1个source,2个channel

a1.sources.r1.channels = c1

#sink组

a1.sinkgroups.g1.sinks = k1 k2

a1.sinks.k1.channel = c1

a1.sinks.k2.channel = c1
- flume2(hadoop103)
在job下新建group2文件夹,新建flume-avro-logger.conf
# Name the components on this agent( 描述这个Agent,给各个组件取名字)

a2.sources = r1

a2.channels = c1

a2.sinks = k1

# Describe/configure the source

# source端的avro是一个数据接收服务

a2.sources.r1.type = avro

#接收的主机

a2.sources.r1.bind = hadoop103

#要和上级的avro的sink的端口一致

a2.sources.r1.port = 4141

# Describe the sink

a2.sinks.k1.type = logger

# Describe the channel

#channel的类型为memory或者file

a2.channels.c1.type = memory

a2.channels.c1.capacity = 1000

a2.channels.c1.transactionCapacity = 100

# Bind the source and sink to the channel

#1个source,2个channel

a2.sources.r1.channels = c1

a2.sinks.k1.channel = c1
- flume3(hadoop104)
在job下新建group2文件夹,新建flume-avro-logger.conf
# Name the components on this agent( 描述这个Agent,给各个组件取名字)

a3.sources = r1

a3.channels = c1

a3.sinks = k1

# Describe/configure the source

# source端的avro是一个数据接收服务

a3.sources.r1.type = avro

#接收的主机

a3.sources.r1.bind = hadoop104

#要和上级的avro的sink的端口一致

a3.sources.r1.port = 4141

# Describe the sink

a3.sinks.k1.type = logger

# Describe the channel

#channel的类型为memory或者file

a3.channels.c1.type = memory

a3.channels.c1.capacity = 1000

a3.channels.c1.transactionCapacity = 100

# Bind the source and sink to the channel

#1个source,2个channel

a3.sources.r1.channels = c1

a3.sinks.k1.channel = c1
4)分别启动flume2,flume3,最后启动fulme1
#flume2

bin/flume-ng agent -c conf/ -n a2 -f job/group2/flume-avro-logger.conf -Dflume.root.logger=INFO,console

#flume3

bin/flume-ng agent -c conf/ -n a3 -f job/group2/flume-avro-logger.conf -Dflume.root.logger=INFO,console

#flume1

bin/flume-ng agent -c conf/ -n a1 -f job/group2/flume-avro-logger.conf
5)观察现象,向flume1发数据,数据只会发往flume3,flume2没有数据;
然后kill掉flume3,继续往flume1发数据,flume2会收到数据
4.聚合
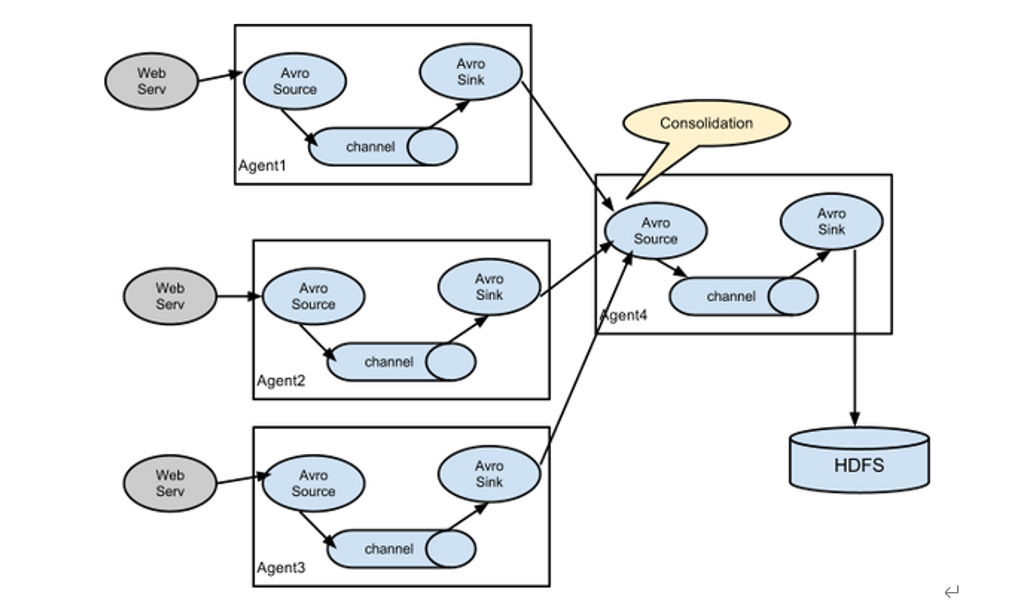
案例
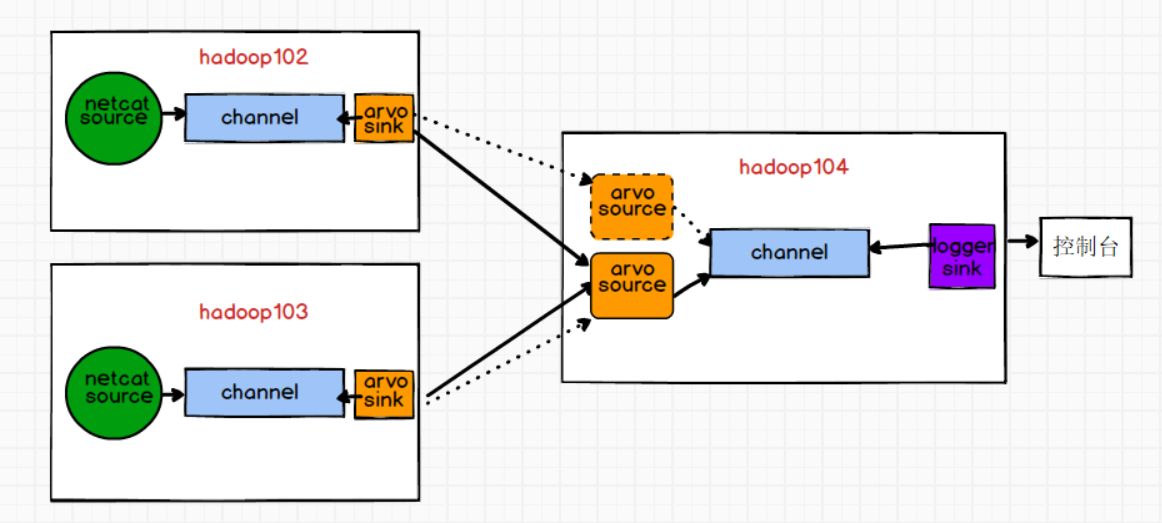
需求:Flume1(hadoop102)与Flume2(hadoop103)将数据发送给Flume3(hadoop104),Flume3将最终数据打印到控制台。
需求分析
1.单source
1)flume1(hadoop102)
# Name the components on this agent

a1.sources = r1

a1.sinks = k1

a1.channels = c1

# Describe/configure the source

a1.sources.r1.type = exec

a1.sources.r1.command = tail -F /opt/module/testdata/3.txt

a1.sources.r1.shell = /bin/bash -c

# Describe the sink

# sink端的avro是一个数据发送者

a1.sinks.k1.type = avro

a1.sinks.k1.hostname = hadoop104

a1.sinks.k1.port = 4141

# Use a channel which buffers events in memory

a1.channels.c1.type = memory

a1.channels.c1.capacity = 1000

a1.channels.c1.transactionCapacity = 100

# Bind the source and sink to the channel

a1.sources.r1.channels = c1

a1.sinks.k1.channel = c1
2)flume2(hadoop103)
# Name the components on this agent

a2.sources = r1

a2.sinks = k1

a2.channels = c1

# Describe/configure the source

a2.sources.r1.type = exec

a2.sources.r1.command = tail -F /opt/module/testdata/3.txt

a2.sources.r1.shell = /bin/bash -c

# Describe the sink

# sink端的avro是一个数据发送者

a2.sinks.k1.type = avro

a2.sinks.k1.hostname = hadoop104

a2.sinks.k1.port = 4141

# Use a channel which buffers events in memory

a2.channels.c1.type = memory

a2.channels.c1.capacity = 1000

a2.channels.c1.transactionCapacity = 100

# Bind the source and sink to the channel

a2.sources.r1.channels = c1

a2.sinks.k1.channel = c1
3)flume3(hadoop104)
# Name the components on this agent

a3.sources = r1

a3.sinks = k1

a3.channels = c1

# Describe/configure the source

a3.sources.r1.type = avro

a3.sources.r1.bind = hadoop104

a3.sources.r1.port = 4141

# Describe the sink

a3.sinks.k1.type = logger

# Describe the channel

a3.channels.c1.type = memory

a3.channels.c1.capacity = 1000

a3.channels.c1.transactionCapacity = 100

# Bind the source and sink to the channel

a3.sources.r1.channels = c1

a3.sinks.k1.channel = c1
2.多source
只需要更改flume3,增加一个source, 需要注意2个source的端口不能一样, flume1,flume2分别对接这个2个端口
# Name the components on this agent

a3.sources = r1 r2

a3.sinks = k1

a3.channels = c1

# Describe/configure the source

a3.sources.r1.type = avro

a3.sources.r1.bind = hadoop104

a3.sources.r1.port = 4141

a3.sources.r2.type = avro

a3.sources.r2.bind = hadoop104

a3.sources.r2.port = 4142

# Describe the sink

a3.sinks.k1.type = logger

# Describe the channel

a3.channels.c1.type = memory

a3.channels.c1.capacity = 1000

a3.channels.c1.transactionCapacity = 100

# Bind the source and sink to the channel

a3.sources.r1.channels = c1

a3.sources.r2.channels = c1

a3.sinks.k1.channel = c1
四.自定义Interceptor
在实际的开发中,一台服务器产生的日志类型可能有很多种,不同类型的日志可能需要发送到不同的分析系统。此时会用到Flume拓扑结构中的Multiplexing(**多路复用)**结构,结合channel选择器根据event中Header的某个key的值,将不同的event发送到不同的Channel中,所以我们需要自定义一个Interceptor,为不同类型的event的Header中的value赋予不同的值。
案例
需求:判断消息boby中是否含有“hello”,有发往hadoop103,并打印出来;其余发往hadoop104;
需求分析
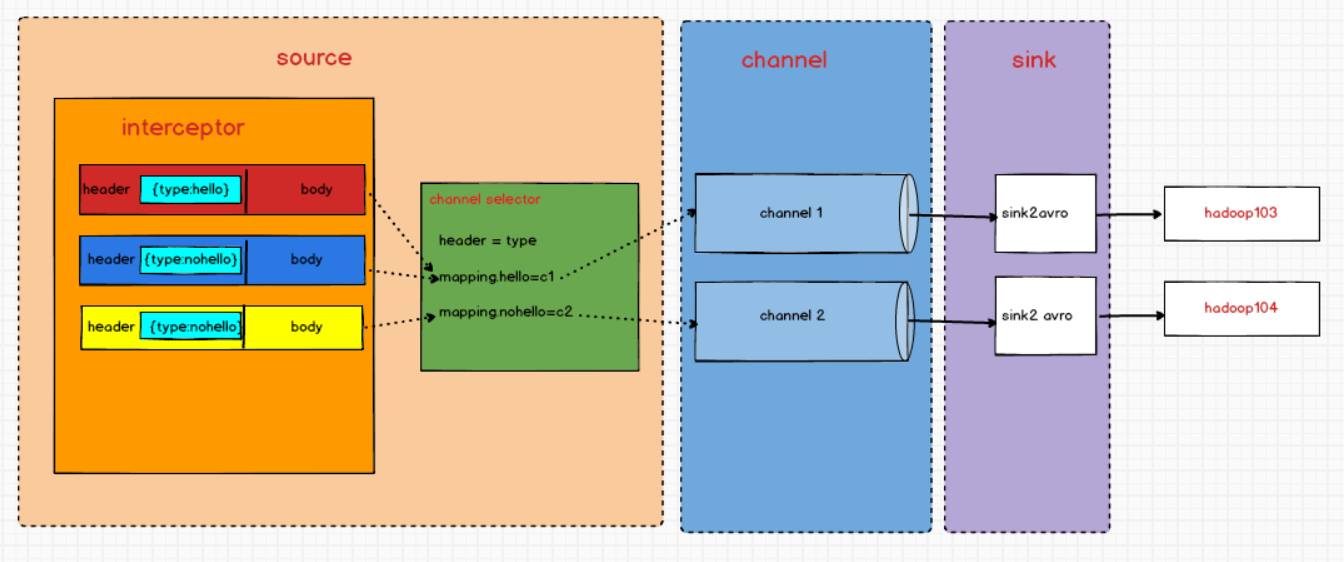
1)创建模块
2)引入依赖
<dependency>

    <groupId>org.apache.flume</groupId>

    <artifactId>flume-ng-core</artifactId>

    <version>1.9.0</version>

</dependency>
3)自定义interceptor,实现Interceptor接口
package com.bigdata.interceptor;

import org.apache.flume.Context;

import org.apache.flume.Event;

import org.apache.flume.interceptor.Interceptor;

import java.util.ArrayList;

import java.util.List;

import java.util.Map;

public class TypeInterceptor implements Interceptor {

    public List<Event> addEventList;

    @Override

    public void initialize() {

     addEventList=new ArrayList<>();

    }

    @Override

    // 单个处理event

    public Event intercept(Event event) {

        // 1. 获取event的头信息

        Map<String, String> headers = event.getHeaders();

        // 2. 获取event的里面的身体信息

        String body = new String(event.getBody());

        // 3. 判断 body里面是否包含hello 来决定加头信息

        if (body.contains("hello")){

            // 4. 如果包含,在头信息加上值为hello的键值对

            headers.put("type","hello");

        }else {

            // 5. 如果不包含,在头信息加上值为nohello的键值对

            headers.put("type","nohello");

        }

        return event;

    }

    @Override

    //批量处理event

    public List<Event> intercept(List<Event> events) {

        // 清空事件集合

        addEventList.clear();

        // for添加到集合中

        for (Event event : events) {

            addEventList.add(intercept(event));

        }

        return addEventList;

    }

    @Override

    public void close() {

    }

    public static class Builder implements Interceptor.Builder{

        @Override

        public Interceptor build() {

            return new TypeInterceptor();

        }

        @Override

        // 获取或设定配置信息

        public void configure(Context context) {

        }

    }
4)打jar包,上传至/opt/module/kafka/lib目录下
5)flume1的配置文件
# Name the components on this agent

a1.sources = r1

a1.sinks = k1 k2

a1.channels = c1 c2

# Describe/configure the source

a1.sources.r1.type = netcat

a1.sources.r1.bind = localhost

a1.sources.r1.port = 44444

#自定义过滤器名称

a1.sources.r1.interceptors = i1

#全类名+$Builder

a1.sources.r1.interceptors.i1.type = com.atguigu.interceptor.TypeInterceptor$Builder

a1.sources.r1.selector.type = multiplexing

#header的key

a1.sources.r1.selector.header = type

a1.sources.r1.selector.mapping.hello = c1

a1.sources.r1.selector.mapping.nohello = c2

# Describe the sink

a1.sinks.k1.type = avro

a1.sinks.k1.hostname = hadoop103

a1.sinks.k1.port = 4141

a1.sinks.k2.type=avro

a1.sinks.k2.hostname = hadoop104

a1.sinks.k2.port = 4242

# Use a channel which buffers events in memory

a1.channels.c1.type = memory

a1.channels.c1.capacity = 1000

a1.channels.c1.transactionCapacity = 100

# Use a channel which buffers events in memory

a1.channels.c2.type = memory

a1.channels.c2.capacity = 1000

a1.channels.c2.transactionCapacity = 100

# Bind the source and sink to the channel

a1.sources.r1.channels = c1 c2

a1.sinks.k1.channel = c1

a1.sinks.k2.channel = c2
6)flume2配置文件
a2.sources = r1

a2.sinks = k1

a2.channels = c1

a2.sources.r1.type = avro

a2.sources.r1.bind = hadoop103

a2.sources.r1.port = 4141

a2.sinks.k1.type = logger

a2.channels.c1.type = memory

a2.channels.c1.capacity = 1000

a2.channels.c1.transactionCapacity = 100

a2.sinks.k1.channel = c1

a2.sources.r1.channels = c1
7)flume3配置文件
a3.sources = r1

a3.sinks = k1

a3.channels = c1

a3.sources.r1.type = avro

a3.sources.r1.bind = hadoop104

a3.sources.r1.port = 4242

a3.sinks.k1.type = logger

a3.channels.c1.type = memory

a3.channels.c1.capacity = 1000

a3.channels.c1.transactionCapacity = 100

a3.sinks.k1.channel = c1

a3.sources.r1.channels = c1
8)分别在hadoop103,hadoop104,hadoop102上启动flume进程,注意先后顺序。
9)在hadoop102使用netcat向localhost:44444发送字母和数字。
10)观察hadoop103和hadoop104打印的日志
Flume(三)【进阶】的更多相关文章
- 用JSON-server模拟REST API(三) 进阶使用
用JSON-server模拟REST API(三) 进阶使用 前面演示了如何安装并运行 json server , 和使用第三方库真实化模拟数据 , 下面将展开更多的配置项和数据操作. 目录: 配置项 ...
- 04 mysql 基础三 (进阶)
mysql 基础三 阶段一 mysql 单表查询 1.查询所有记录 select * from department; select * from student; select * from ...
- 三、Silverlight中使用MVVM(三)——进阶
这篇主要引申出Command结合MVVM模式在应用程序中的使用 我们要做出的效果是这样的 就是提供了一个简单的查询功能将结果绑定到DataGrid中,在前面的基础上,这个部分相对比较容易实现了 我们在 ...
- flume中的agent配置和启动
首先创建一个文件example.conf(touch example.conf) 然后在文件中,进行agent文件的如下的配置(vi example.conf) agent文件的配置:(配置ag ...
- flume架构初接触
flume优点 1.存储数据到任何中央数据库 2.进入数据速率大于写出速率,可以起到缓存作用,保证流的平稳 3.提供文本式路由 4.支持事务 5.可靠.容错.可伸缩.可定制.可管理 put的缺点 1. ...
- Java的进阶之道
Java的进阶之道 一.温馨提示 尽量用google查找技术资料.(条件允许的话) 有问题在stackoverflow找找,大部分都已经有人回答. 多看官方的技术文档. ibm developerwo ...
- 20145202马超《网络对抗》Exp3免杀 进阶
木马化正常软件,如通过改变机器指令.实现可免杀免防火墙提示的后门. 继上次实验3所做的代码在主函数里面加上一行调用就可以 改各种属性,这里我参考了郝浩同学的博客 最后我还是遇到了问题 后来发现虽然有那 ...
- Flume安装部署
Flume安装部署 Flume的安装(非常简单) 上传安装包到数据源所在节点上,实际上不是数据源节点也是可以的,只要运行Flume的这台机器与数据源节点的这台机器能够通过某种协议进行通信即可. 然后解 ...
- flume面试题
1 你是如何实现Flume数据传输的监控的使用第三方框架Ganglia实时监控Flume. 2 Flume的Source,Sink,Channel的作用?你们Source是什么类型?1.作用 (1)S ...
随机推荐
- 输出单层结点 牛客网 程序员面试金典 C++ Python
输出单层结点 牛客网 程序员面试金典 C++ Python 题目描述 对于一棵二叉树,请设计一个算法,创建含有某一深度上所有结点的链表. 给定二叉树的根结点指针TreeNode* root,以及链表上 ...
- hdu 3047 Zjnu Stadium(并查集)
题意: 300个座位构成一个圈. 有N个人要入座. 共有M个说明 :A B X ,代表B坐在A顺时针方向第X个座位上.如果这个说明和之前的起冲突,则它是无效的. 问总共有多少个无效的. 思路: 并查集 ...
- Windows内核基础知识-5-调用门(32-Bit Call Gate)
Windows内核基础知识-5-调用门(32-Bit Call Gate) 调用门有一个关键的作用,就是用来提权.调用门其实就是一个段. 调用门: 这是段描述符的结构体,里面的s字段用来标记是代码段还 ...
- SpringCloud 2020.0.4 系列之 Bus
1. 概述 老话说的好:会休息的人才更会工作,身体是革命的本钱,身体垮了,就无法再工作了. 言归正传,之前我们聊了 SpringCloud 的 分布式配置中心 Config,文章里我们聊了config ...
- 记一次排查CPU高的问题
背景 将log4j.xml的日志级别从error调整为info后,进行压测发现CPU占用很高达到了90%多(之前也就是50%,60%的样子). 问题排查 排查思路: 看进程中的线程到底执行的是什么, ...
- 子查询之 exists 和 in
exists exists用于检查一个子查询是否至少会返回一行数据(即检测行的存在),返回值为boolean型,true或false 语法 exists subquery /* 参数: subquer ...
- PTA 7-1 邻接矩阵表示法创建无向图 (20分)
PTA 7-1 邻接矩阵表示法创建无向图 (20分) 采用邻接矩阵表示法创建无向图G ,依次输出各顶点的度. 输入格式: 输入第一行中给出2个整数i(0<i≤10),j(j≥0),分别为图G的顶 ...
- [python]selenium常用的操作
浏览器 1.火狐浏览器 br = webdriver.Firefox() #最大化窗口br.maximize_window() br.get('http://baidu.com') 2.谷歌浏览器 b ...
- rz安装
rpm -ivh http://www.rpmfind.net/linux/centos/6.10/os/x86_64/Packages/lrzsz-0.12.20-27.1.el6.x86_64.r ...
- Python基础(序列化)
#pickling import pickle,json # d = dict(name='傻狗1',age=300,score=100) # d1 = pickle.dumps(d)#pickle. ...
