透视RPC协议:SOFA-BOLT协议源码分析
前提
最近在看Netty相关的资料,刚好SOFA-BOLT是一个比较成熟的Netty自定义协议栈实现,于是决定研读SOFA-BOLT的源码,详细分析其协议的组成,简单分析其客户端和服务端的源码实现。
- 吐槽一下:
SOFA-BOLT的代码缩进和FastJson类似,变量名称强制对齐,对于一般开发者来说看着源码会有不适感
当前阅读的源码是2021-08左右的SOFA-BOLT仓库的master分支源码。
SOFA-BOLT简单介绍
SOFA-BOLT是蚂蚁金融服务集团开发的一套基于Netty实现的网络通信框架,本质是一套Netty私有协议栈封装,目的是为了让开发者能将更多的精力放在基于网络通信的业务逻辑实现上,而不是过多的纠结于网络底层NIO的实现以及处理难以调试的网络问题和Netty二次开发问题。SOFA-BOLT的架构设计和功能如下:
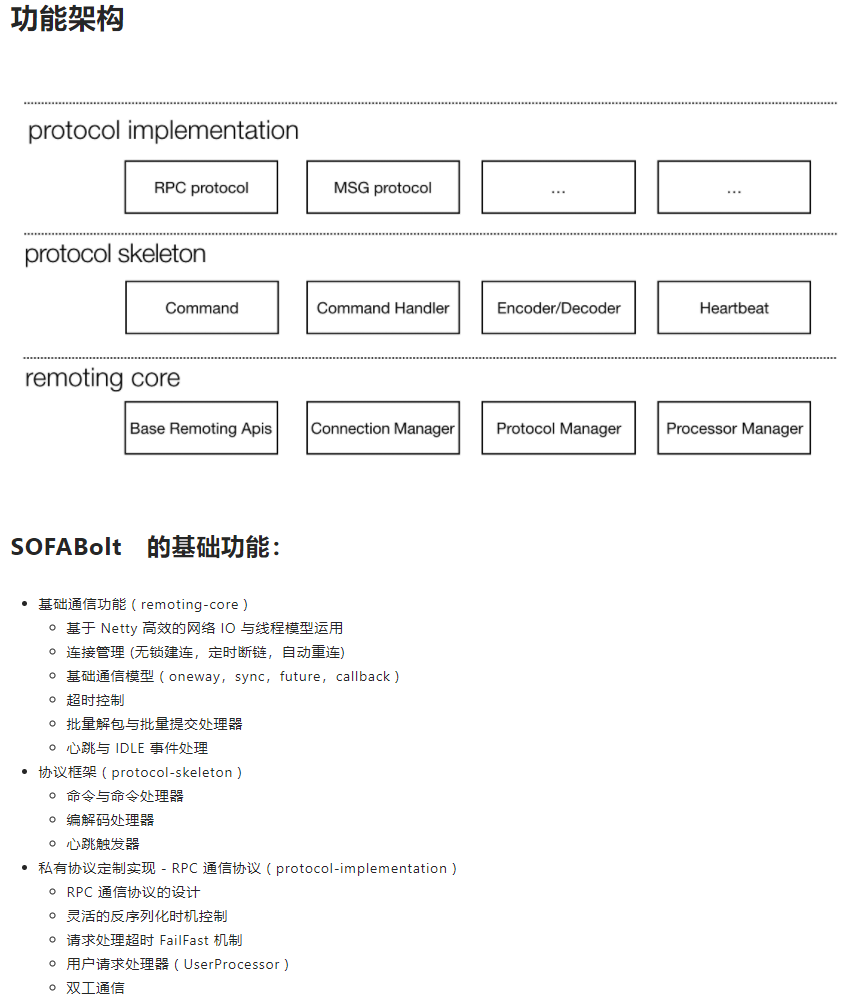
上图来源于SOFA-BOLT官网https://www.sofastack.tech/projects/sofa-bolt/overview
SOFA-BOLT协议透视
由于SOFA-BOLT协议是基于Netty实现的自定义协议栈,协议本身的实现可以快速地在Encoder和Decoder的实现中找到,进一步定位到com.alipay.remoting.rpc包中。从源码得知,SOFA-BOLT协议目前有两个版本,协议在RpcProtocol和RpcProtocolV2的类顶部注释中有比较详细的介绍,基于这些介绍可以简单整理出两个版本协议的基本构成。
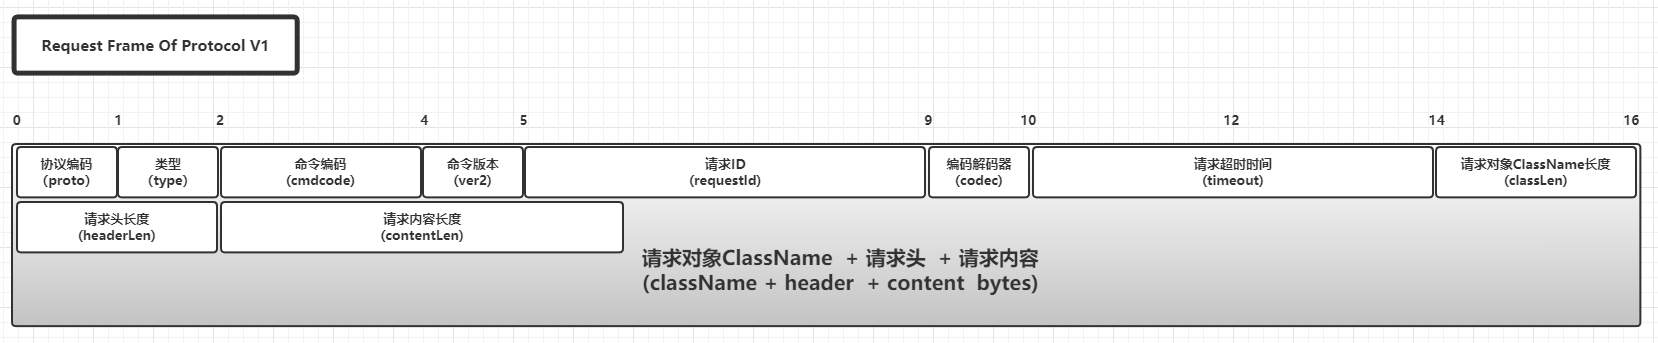
V1版本协议的基本构成
V1版本的协议请求Frame基本构成:
V1版本的协议响应Frame基本构成:

针对V1版本的协议,各个属性展开如下:
- 请求
Frame和响应Frame的公共属性:
| 属性Code | 属性含义 | Java类型 | 大小(byte) | 备注 |
|---|---|---|---|---|
| proto | 协议编码 | byte | 1 | V1版本下,proto = 1,V2版本下,proto = 2 |
| type | 类型 | byte | 1 | 0 => RESPONSE,1 => REQUEST,2 => REQUEST_ONEWAY |
| cmdcode | 命令编码 | short | 2 | 1 => rpc request,2 => rpc response |
| ver2 | 命令版本 | byte | 1 | 从源码得知目前固定为1 |
| requestId | 请求ID | int | 4 | 某个请求CMD的全局唯一标识 |
| codec | 编码解码器 | byte | 1 | - |
上表中,codec从字面上理解是编码解码器,实际上是序列化和反序列实现的标记,V1和V2目前都是固定codec = 1,通过源码跟踪到SerializerManager的配置值为Hessian2 = 1,也就是默认使用Hessian2进行序列化和反序列化,详细见源码中的HessianSerializer
- 请求
Frame特有的属性:
| 属性Code | 属性含义 | Java类型 | 大小(byte) | 备注 |
|---|---|---|---|---|
| timeout | 请求超时时间 | int | 4 | |
| classLen | 请求对象(参数)类型的名称长度 | short | 2 | 值>=0 |
| headerLen | 请求头长度 | short | 2 | 值>=0 |
| contentLen | 请求内容长度 | int | 4 | 值>=0 |
| className bytes | 请求对象(参数)类型的名称 | byte[] |
- | |
| header bytes | 请求头 | byte[] |
- | |
| content bytes | 请求内容 | byte[] |
- |
- 响应
Frame特有的属性:
| 属性Code | 属性含义 | Java类型 | 大小(byte) | 备注 |
|---|---|---|---|---|
| respstatus | 响应状态值 | short | 2 | 在ResponseStatus中定义,目前内置13种状态,例如0 => SUCCESS |
| classLen | 响应对象(参数)类型的名称长度 | short | 2 | 值>=0 |
| headerLen | 响应头长度 | short | 2 | 值>=0 |
| contentLen | 响应内容长度 | int | 4 | 值>=0 |
| className bytes | 响应对象(参数)类型的名称 | byte[] |
- | |
| header bytes | 响应头 | byte[] |
- | |
| content bytes | 响应内容 | byte[] |
- |
这里可以看出V1版本中的请求Frame和响应Frame只有细微的差别,(请求Frame中独立存在timeout属性,而响应Frame独立存在respstatus属性),绝大部分的属性都是复用的,并且三个长度和三个字节数组是相互制约的:
classLen <=> className bytesheaderLen <=> header bytescontentLen <=> content bytes
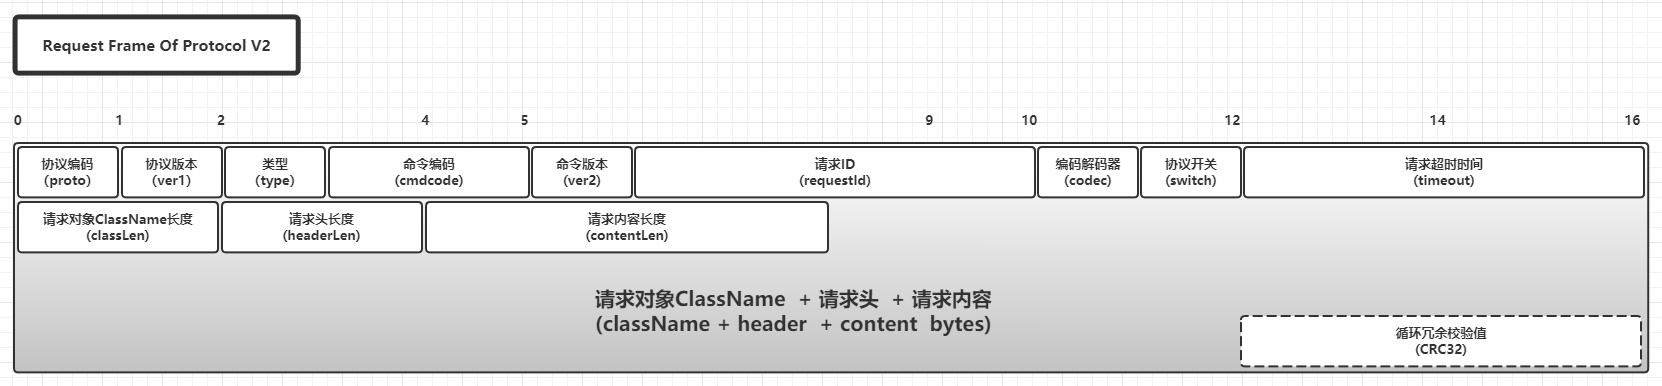
V2版本协议的基本构成
V2版本的协议请求Frame基本构成:
V2版本的协议响应Frame基本构成:
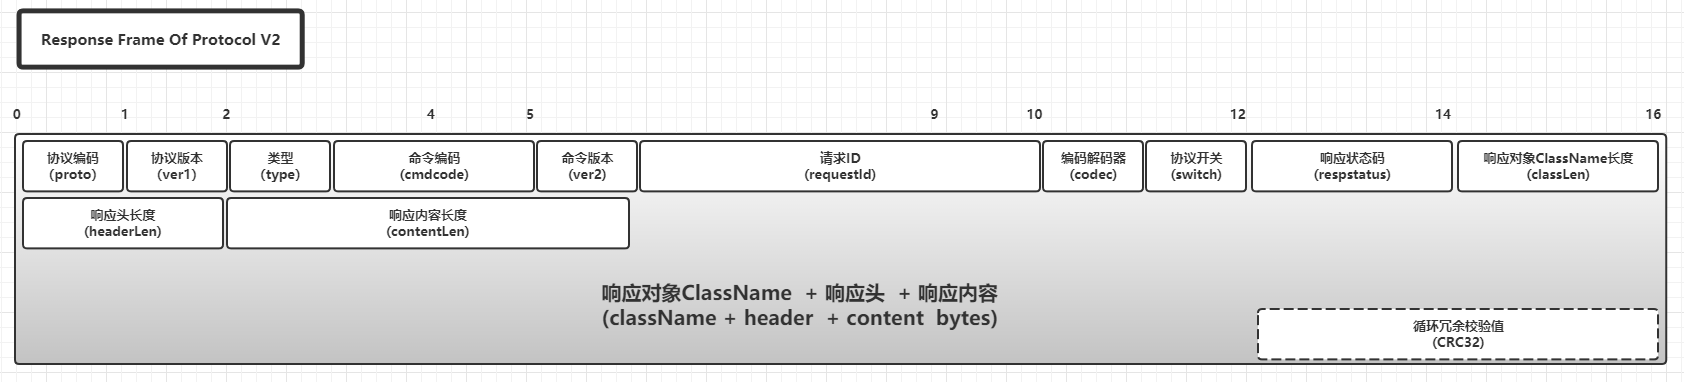
V2版本的协议相比V1版本多了2个必传公共属性和1个可选公共属性:
| 属性Code | 属性含义 | Java类型 | 大小(byte) | 备注 |
|---|---|---|---|---|
| ver1 | 协议版本 | byte | 1 | 是为了在V2版本协议中兼容V1版本的协议 |
| switch | 协议开关 | byte | 1 | 基于BitSet实现的开关,最多8个 |
| CRC32 | 循环冗余校验值 | int | 4 | 可选的,由开关ProtocolSwitch.CRC_SWITCH_INDEX决定是否启用,启用的时候会基于整个Frame进行计算 |
这几个新增属性中,switch代表ProtocolSwitch实现中的BitSet转换出来的byte字段,由于byte只有8位,因此协议在传输过程中最多只能传递8个开关的状态,这些开关的下标为[0,7]。CRC32是基于整个Frame转换出来的byte数组进行计算,JDK中有原生从API,可以简单构建一个工具类如下进行计算:
public enum Crc32Utils {

    /**

     * 单例

     */

    X;

    /**

     * 进行CRC32结果计算

     *

     * @param content 内容

     * @return crc32 result

     */

    public long crc32(byte[] content) {

        CRC32 crc32 = new CRC32();

        crc32.update(content, 0, content.length);

        long r = crc32.getValue();

        // crc32.reset();

        return r;

    }

}
V2版本协议把CRC32的计算结果强制转换为int类型,可以思考一下这里为什么不会溢出。
SOFA-BOLT架构
考虑到如果分析源码,文章篇幅会比较长,并且如果有开发过Netty自定义协议栈的经验,SOFA-BOLT的源码并不复杂,这里仅仅分析SOFA-BOLT的架构和核心组件功能。协议由接口Protocol定义:
public interface Protocol {

    // 命令编码器

    CommandEncoder getEncoder();

    // 命令解码器

    CommandDecoder getDecoder();

    // 心跳触发器

    HeartbeatTrigger getHeartbeatTrigger();

    // 命令处理器

    CommandHandler getCommandHandler();

    // 命令工厂

    CommandFactory getCommandFactory();

}
由V2版本协议实现RpcProtocolV2可以得知:

另外,所有需要发送或者接收的Frame都被封装为Command,而Command的类族如下:

也就是:
RequestCommand定义了请求命令需要的所有属性,最终由RpcCommandEncoderV2进行编码ResponseCommand定义了响应命令需要的所有属性,最终由RpcCommandDecoderV2进行解码
梳理完上面的组件就可以画出下面的一个基于SOFA-BOLT协议进行的Client => Server的交互图:

SOFA-BOLT使用
由于sofa-bolt已经封装好了完整的RpcClient和RpcServer,使用此协议只需要引用依赖,然后初始化客户端和服务端,编写对应的UserProcessor实现即可。引入相关依赖:
<dependency>

    <groupId>com.alipay.sofa</groupId>

    <artifactId>bolt</artifactId>

    <version>1.6.3</version>

</dependency>

<dependency>

    <groupId>com.caucho</groupId>

    <artifactId>hessian</artifactId>

    <version>4.0.65</version>

</dependency>
新建请求实体类RequestMessage、响应实体类ResponseMessage和对应的处理器RequestMessageProcessor:
@Data

public class RequestMessage implements Serializable {

    private Long id;

    private String content;

}

@Data

public class ResponseMessage implements Serializable {

    private Long id;

    private String content;

    private Long status;

}

public class RequestMessageProcessor extends SyncUserProcessor<RequestMessage> {

    @Override

    public Object handleRequest(BizContext bizContext, RequestMessage requestMessage) throws Exception {

        ResponseMessage message = new ResponseMessage();

        message.setContent(requestMessage.getContent());

        message.setId(requestMessage.getId());

        message.setStatus(10087L);

        return message;

    }

    @Override

    public String interest() {

        return RequestMessage.class.getName();

    }

}
其中处理器需要同步处理需要继承超类SyncUserProcessor,选用异步处理的时候需要继承超类AsyncUserProcessor,作为参数的所有实体类必须实现Serializable接口(如果有嵌套对象,每个嵌套对象所在类也必须实现Serializable接口),否则会出现序列化相关的异常。最后编写客户端和服务端的代码:
@Slf4j

public class BlotApp {

    private static final int PORT = 8081;

    private static final String ADDRESS = "127.0.0.1:" + PORT;

    public static void main(String[] args) throws Exception {

        RequestMessageProcessor processor = new RequestMessageProcessor();

        RpcServer server = new RpcServer(8081, true);

        server.startup();

        server.registerUserProcessor(processor);

        RpcClient client = new RpcClient();

        client.startup();

        RequestMessage request = new RequestMessage();

        request.setId(99L);

        request.setContent("hello bolt");

        ResponseMessage response = (ResponseMessage) client.invokeSync(ADDRESS, request, 2000);

        log.info("响应结果:{}", response);

    }

}
运行输出结果:
响应结果:ResponseMessage(id=99, content=hello bolt, status=10087)
基于SOFA-BOLT协议编写简单CURD项目
本地测试MySQL服务构建客户表如下:
CREATE DATABASE test;

USE test;

CREATE TABLE t_customer

(

    id            BIGINT UNSIGNED NOT NULL AUTO_INCREMENT PRIMARY KEY,

    customer_name VARCHAR(32)     NOT NULL

);
为了简化JDBC操作,引入spring-boot-starter-jdbc(这里只借用JdbcTemplate的轻度封装)相关依赖:
<dependency>

    <groupId>mysql</groupId>

    <artifactId>mysql-connector-java</artifactId>

    <version>8.0.20</version>

</dependency>

<dependency>

    <groupId>org.springframework.boot</groupId>

    <artifactId>spring-boot-starter-jdbc</artifactId>

    <version>2.3.0.RELEASE</version>

</dependency>
编写核心同步处理器:
// 创建

@Data

public class CreateCustomerReq implements Serializable {

    private String customerName;

}

@Data

public class CreateCustomerResp implements Serializable {

    private Long code;

    private Long customerId;

}

public class CreateCustomerProcessor extends SyncUserProcessor<CreateCustomerReq> {

    private final JdbcTemplate jdbcTemplate;

    public CreateCustomerProcessor(JdbcTemplate jdbcTemplate) {

        this.jdbcTemplate = jdbcTemplate;

    }

    @Override

    public Object handleRequest(BizContext bizContext, CreateCustomerReq req) throws Exception {

        KeyHolder keyHolder = new GeneratedKeyHolder();

        jdbcTemplate.update(connection -> {

            PreparedStatement ps = connection.prepareStatement("insert into t_customer(customer_name) VALUES (?)",

                    Statement.RETURN_GENERATED_KEYS);

            ps.setString(1, req.getCustomerName());

            return ps;

        }, keyHolder);

        CreateCustomerResp resp = new CreateCustomerResp();

        resp.setCustomerId(Objects.requireNonNull(keyHolder.getKey()).longValue());

        resp.setCode(RespCode.SUCCESS);

        return resp;

    }

    @Override

    public String interest() {

        return CreateCustomerReq.class.getName();

    }

}

// 更新

@Data

public class UpdateCustomerReq implements Serializable {

    private Long customerId;

    private String customerName;

}

public class UpdateCustomerProcessor extends SyncUserProcessor<UpdateCustomerReq> {

    private final JdbcTemplate jdbcTemplate;

    public UpdateCustomerProcessor(JdbcTemplate jdbcTemplate) {

        this.jdbcTemplate = jdbcTemplate;

    }

    @Override

    public Object handleRequest(BizContext bizContext, UpdateCustomerReq req) throws Exception {

        UpdateCustomerResp resp = new UpdateCustomerResp();

        int updateCount = jdbcTemplate.update("UPDATE t_customer SET customer_name = ? WHERE id = ?", ps -> {

            ps.setString(1, req.getCustomerName());

            ps.setLong(2, req.getCustomerId());

        });

        if (updateCount > 0) {

            resp.setCode(RespCode.SUCCESS);

        }

        return resp;

    }

    @Override

    public String interest() {

        return UpdateCustomerReq.class.getName();

    }

}

// 删除

@Data

public class DeleteCustomerReq implements Serializable {

    private Long customerId;

}

@Data

public class DeleteCustomerResp implements Serializable {

    private Long code;

}

public class DeleteCustomerProcessor extends SyncUserProcessor<DeleteCustomerReq> {

    private final JdbcTemplate jdbcTemplate;

    public DeleteCustomerProcessor(JdbcTemplate jdbcTemplate) {

        this.jdbcTemplate = jdbcTemplate;

    }

    @Override

    public Object handleRequest(BizContext bizContext, DeleteCustomerReq req) throws Exception {

        DeleteCustomerResp resp = new DeleteCustomerResp();

        int updateCount = jdbcTemplate.update("DELETE FROM t_customer WHERE id = ?", ps -> ps.setLong(1,req.getCustomerId()));

        if (updateCount > 0){

            resp.setCode(RespCode.SUCCESS);

        }

        return resp;

    }

    @Override

    public String interest() {

        return DeleteCustomerReq.class.getName();

    }

}

// 查询

@Data

public class SelectCustomerReq implements Serializable {

    private Long customerId;

}

@Data

public class SelectCustomerResp implements Serializable {

    private Long code;

    private Long customerId;

    private String customerName;

}

public class SelectCustomerProcessor extends SyncUserProcessor<SelectCustomerReq> {

    private final JdbcTemplate jdbcTemplate;

    public SelectCustomerProcessor(JdbcTemplate jdbcTemplate) {

        this.jdbcTemplate = jdbcTemplate;

    }

    @Override

    public Object handleRequest(BizContext bizContext, SelectCustomerReq req) throws Exception {

        SelectCustomerResp resp = new SelectCustomerResp();

        Customer result = jdbcTemplate.query("SELECT * FROM t_customer WHERE id = ?", ps -> ps.setLong(1, req.getCustomerId()), rs -> {

            Customer customer = null;

            if (rs.next()) {

                customer = new Customer();

                customer.setId(rs.getLong("id"));

                customer.setCustomerName(rs.getString("customer_name"));

            }

            return customer;

        });

        if (Objects.nonNull(result)) {

            resp.setCustomerId(result.getId());

            resp.setCustomerName(result.getCustomerName());

            resp.setCode(RespCode.SUCCESS);

        }

        return resp;

    }

    @Override

    public String interest() {

        return SelectCustomerReq.class.getName();

    }

    @Data

    public static class Customer {

        private Long id;

        private String customerName;

    }

}
编写数据源、客户端和服务端代码:
public class CurdApp {

    private static final int PORT = 8081;

    private static final String ADDRESS = "127.0.0.1:" + PORT;

    public static void main(String[] args) throws Exception {

        HikariConfig config = new HikariConfig();

        config.setJdbcUrl("jdbc:mysql://localhost:3306/test?useSSL=false&characterEncoding=UTF-8&serverTimezone=Asia/Shanghai");

        config.setDriverClassName(Driver.class.getName());

        config.setUsername("root");

        config.setPassword("root");

        HikariDataSource dataSource = new HikariDataSource(config);

        JdbcTemplate jdbcTemplate = new JdbcTemplate(dataSource);

        CreateCustomerProcessor createCustomerProcessor = new CreateCustomerProcessor(jdbcTemplate);

        UpdateCustomerProcessor updateCustomerProcessor = new UpdateCustomerProcessor(jdbcTemplate);

        DeleteCustomerProcessor deleteCustomerProcessor = new DeleteCustomerProcessor(jdbcTemplate);

        SelectCustomerProcessor selectCustomerProcessor = new SelectCustomerProcessor(jdbcTemplate);

        RpcServer server = new RpcServer(PORT, true);

        server.registerUserProcessor(createCustomerProcessor);

        server.registerUserProcessor(updateCustomerProcessor);

        server.registerUserProcessor(deleteCustomerProcessor);

        server.registerUserProcessor(selectCustomerProcessor);

        server.startup();

        RpcClient client = new RpcClient();

        client.startup();

        CreateCustomerReq createCustomerReq = new CreateCustomerReq();

        createCustomerReq.setCustomerName("throwable.club");

        CreateCustomerResp createCustomerResp = (CreateCustomerResp)

                client.invokeSync(ADDRESS, createCustomerReq, 5000);

        System.out.println("创建用户[throwable.club]结果:" + createCustomerResp);

        SelectCustomerReq selectCustomerReq = new SelectCustomerReq();

        selectCustomerReq.setCustomerId(createCustomerResp.getCustomerId());

        SelectCustomerResp selectCustomerResp = (SelectCustomerResp)

                client.invokeSync(ADDRESS, selectCustomerReq, 5000);

        System.out.println(String.format("查询用户[id=%d]结果:%s", selectCustomerReq.getCustomerId(),

                selectCustomerResp));

        UpdateCustomerReq updateCustomerReq = new UpdateCustomerReq();

        updateCustomerReq.setCustomerId(selectCustomerReq.getCustomerId());

        updateCustomerReq.setCustomerName("throwx.cn");

        UpdateCustomerResp updateCustomerResp = (UpdateCustomerResp)

                client.invokeSync(ADDRESS, updateCustomerReq, 5000);

        System.out.println(String.format("更新用户[id=%d]结果:%s", updateCustomerReq.getCustomerId(),

                updateCustomerResp));

        selectCustomerReq.setCustomerId(updateCustomerReq.getCustomerId());

        selectCustomerResp = (SelectCustomerResp)

                client.invokeSync(ADDRESS, selectCustomerReq, 5000);

        System.out.println(String.format("查询更新后的用户[id=%d]结果:%s", selectCustomerReq.getCustomerId(),

                selectCustomerResp));

        DeleteCustomerReq deleteCustomerReq = new DeleteCustomerReq();

        deleteCustomerReq.setCustomerId(selectCustomerResp.getCustomerId());

        DeleteCustomerResp deleteCustomerResp = (DeleteCustomerResp)

                client.invokeSync(ADDRESS, deleteCustomerReq, 5000);

        System.out.println(String.format("删除用户[id=%d]结果:%s", deleteCustomerReq.getCustomerId(),

                deleteCustomerResp));

    }

}
执行结果如下:
创建用户[throwable.club]结果:CreateCustomerResp(code=0, customerId=1)

查询用户[id=1]结果:SelectCustomerResp(code=0, customerId=1, customerName=throwable.club)

更新用户[id=1]结果:UpdateCustomerResp(code=0)

查询更新后的用户[id=1]结果:SelectCustomerResp(code=0, customerId=1, customerName=throwx.cn)

更新用户[id=1]结果:DeleteCustomerResp(code=0)
确认最后删除操作结束后验证数据库表,确认t_customer表为空。
基于GO语言编写SOFA-BOLT协议客户端
这里尝试使用GO语言编写一个SOFA-BOLT协议客户端,考虑到实现一个完整版本会比较复杂,这里简化为只实现Encode和命令调用部分,暂时不处理响应和Decode。编写结构体RequestCommand如下:
// RequestCommand sofa-bolt v2 req cmd

type RequestCommand struct {

	ProtocolCode    uint8

	ProtocolVersion uint8

	Type            uint8

	CommandCode     uint16

	CommandVersion  uint8

	RequestId       uint32

	Codec           uint8

	Switch          uint8

	Timeout         uint32

	ClassLength     uint16

	HeaderLength    uint16

	ContentLength   uint32

	ClassName       []byte

	Header          []byte

	Content         []byte

}
这里注意一点,所有的整数类型必须使用具体的类型,例如uint必须用uint32,否则会出现Buffer写入异常的问题。接着编写一个编码方法:
// encode req => slice

func encode(cmd *RequestCommand) []byte {

	container := make([]byte, 0)

	buf := bytes.NewBuffer(container)

	buf.WriteByte(cmd.ProtocolCode)

	buf.WriteByte(cmd.ProtocolVersion)

	buf.WriteByte(cmd.Type)

	binary.Write(buf, binary.BigEndian, cmd.CommandCode)

	buf.WriteByte(cmd.CommandVersion)

	binary.Write(buf, binary.BigEndian, cmd.RequestId)

	buf.WriteByte(cmd.Codec)

	buf.WriteByte(cmd.Switch)

	binary.Write(buf, binary.BigEndian, cmd.Timeout)

	binary.Write(buf, binary.BigEndian, cmd.ClassLength)

	binary.Write(buf, binary.BigEndian, cmd.HeaderLength)

	binary.Write(buf, binary.BigEndian, cmd.ContentLength)

	buf.Write(cmd.ClassName)

	buf.Write(cmd.Header)

	buf.Write(cmd.Content)

	return buf.Bytes()

}
最后编写TCP客户端:
type Req struct {

	Id   int64  `json:"id"`

	Name string `json:"name"`

}

package main

import (

	"bytes"

	"encoding/binary"

	"encoding/json"

	"fmt"

	"net"

)

func main() {

	con, err := net.Dial("tcp", "127.0.0.1:9999")

	if err != nil {

		fmt.Println("err:", err)

		return

	}

	defer con.Close()

	req := &Req{

		Id:   8080,

		Name: "throwx.cn",

	}

	content, err := json.Marshal(req)

	if err != nil {

		fmt.Println("err:", err)

		return

	}

	var header []byte

	className := []byte("com.alipay.remoting.Req")

	cmd := &RequestCommand{

		ProtocolCode:    2,

		ProtocolVersion: 2,

		Type:            1,

		CommandCode:     1,

		CommandVersion:  1,

		RequestId:       10087,

		Codec:           1,

		Switch:          0,

		Timeout:         5000,

		ClassLength:     uint16(len(className)),

		HeaderLength:    0,

		ContentLength:   uint32(len(content)),

		ClassName:       className,

		Header:          header,

		Content:         content,

	}

	pkg := encode(cmd)

	_, err = con.Write(pkg)

	if err != nil {

		fmt.Println("err:", err)

		return

	}

}
协议的V2版本Crc32属性是可选的,这里为了简化处理也暂时忽略了
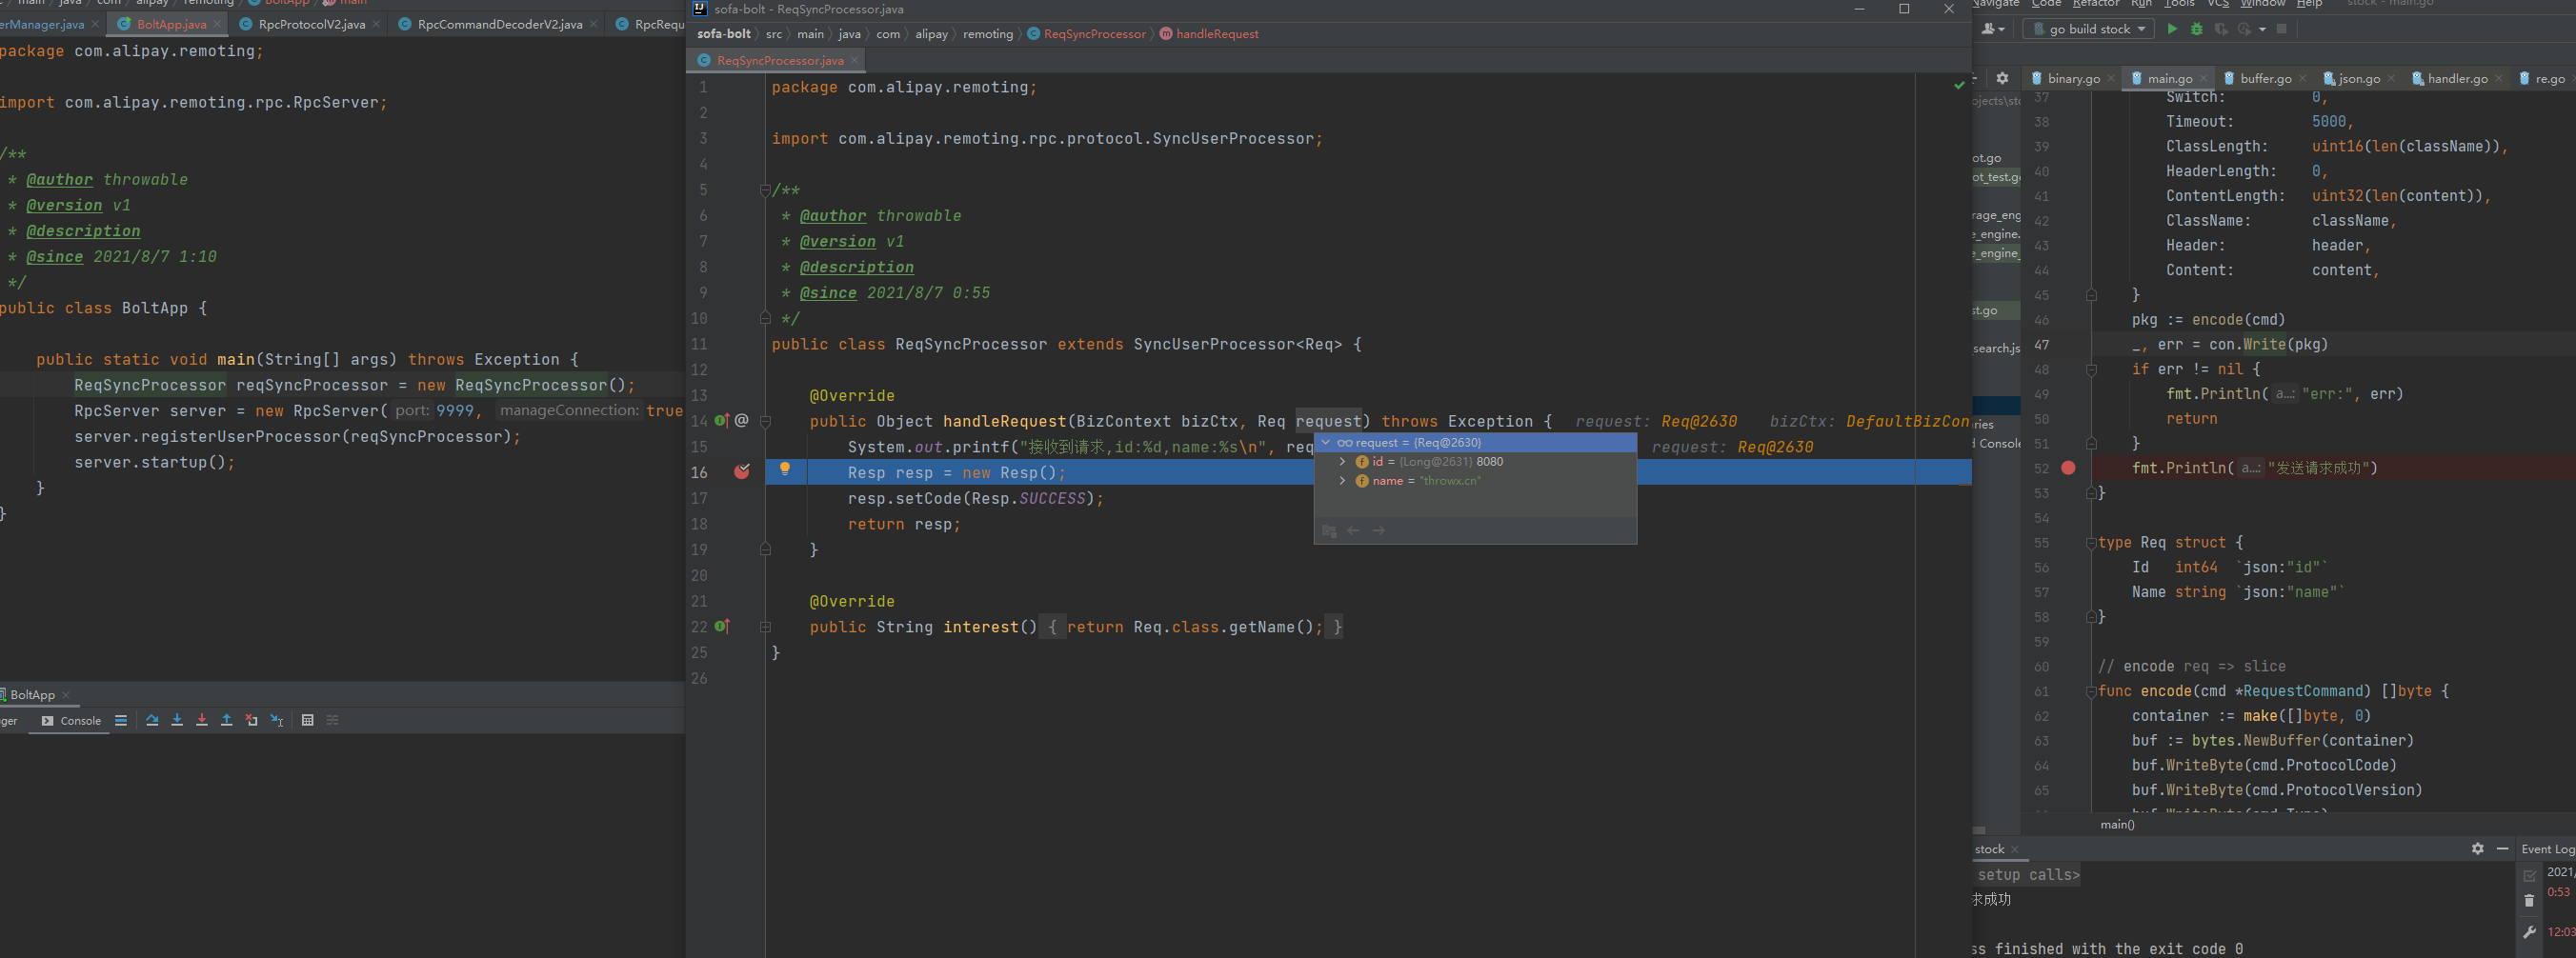
这里看到Content属性为了简化处理使用了JSON做序列化,因此需要稍微改动SOFA-BOLT的源码,引入FastJson和FastJsonSerializer,改动见下图:

先启动BoltApp(SOFA-BOLT服务端),再执行GO编写的客户端,结果如下:
小结
SOFA-BOLT是一个高性能成熟可扩展的Netty私有协议封装,比起原生Netty编程,提供了便捷的同步、异步调用,提供基础心跳支持和重连等特性。引入SyncUserProcessor和AsyncUserProcessor的功能,对于业务开发更加友好。SOFA-BOLT协议本质也是一个紧凑、高性能的RPC协议。在考虑引入Netty进行底层通讯的场景,可以优先考虑使用SOFA-BOLT或者考虑把SOFA-BOLT作为候选方案之一,只因SOFA-BOLT是轻量级的,学习曲线平缓,基本没有其他中间件依赖。
Demo所在仓库:
(本文完 c-5-d e-a-20210806)
透视RPC协议:SOFA-BOLT协议源码分析的更多相关文章
- zookeeper ZAB协议 Follower和leader源码分析
Follower处理逻辑 void followLeader() throws InterruptedException { //... try { //获取leader server QuorumS ...
- dubbo源码分析4-基于netty的dubbo协议的server
dubbo源码分析1-reference bean创建 dubbo源码分析2-reference bean发起服务方法调用 dubbo源码分析3-service bean的创建与发布 dubbo源码分 ...
- dubbo源码分析6-telnet方式的管理实现
dubbo源码分析1-reference bean创建 dubbo源码分析2-reference bean发起服务方法调用 dubbo源码分析3-service bean的创建与发布 dubbo源码分 ...
- dubbo源码分析1-reference bean创建
dubbo源码分析1-reference bean创建 dubbo源码分析2-reference bean发起服务方法调用 dubbo源码分析3-service bean的创建与发布 dubbo源码分 ...
- dubbo源码分析2-reference bean发起服务方法调用
dubbo源码分析1-reference bean创建 dubbo源码分析2-reference bean发起服务方法调用 dubbo源码分析3-service bean的创建与发布 dubbo源码分 ...
- dubbo源码分析3-service bean的创建与发布
dubbo源码分析1-reference bean创建 dubbo源码分析2-reference bean发起服务方法调用 dubbo源码分析3-service bean的创建与发布 dubbo源码分 ...
- dubbo源码分析5-dubbo的扩展点机制
dubbo源码分析1-reference bean创建 dubbo源码分析2-reference bean发起服务方法调用 dubbo源码分析3-service bean的创建与发布 dubbo源码分 ...
- SOFABolt 源码分析
SOFABolt 是一个轻量级.高性能.易用的远程通信框架,基于netty4.1,由蚂蚁金服开源. 本系列博客会分析 SOFABolt 的使用姿势,设计方案及详细的源码解析.后续还会分析 SOFABo ...
- Spark 源码分析系列
如下,是 spark 源码分析系列的一些文章汇总,持续更新中...... Spark RPC spark 源码分析之五--Spark RPC剖析之创建NettyRpcEnv spark 源码分析之六- ...
随机推荐
- SpringBoot实战:10分钟快速搞定环境
什么是 springboot Spring Boot是由Pivotal团队提供的全新框架,其设计目的是用来简化新Spring应用的初始搭建以及开发过程. 该框架使用了特定的方式来进行配置,从而使开发人 ...
- 9.10、mysql进程、状态在线修改参数重要知识
1.-e :改参数表示不用登陆mysql就可以使用mysql的命令,有利于于加管道符对数据进行处理: mysql -uroot -p123456 -e "show databases;&qu ...
- Vue 两个字段联合校验典型例子--修改密码
1.前言 本文是前文<Vue Element-ui表单校验规则,你掌握了哪些?>针对多字段联合校验的典型应用. 在修改密码时,一般需要确认两次密码一致,涉及2个属性字段.类似的涉及 ...
- Python 脚本退出
return:在定义函数时从函数中返回一个函数的返回值,终止函数的执行. os._exit(),sys.exit(),exit(),quit()都能够退出当前执行脚本,差别在于os._exit()直接 ...
- PHP Kafka 消息队列使用
转载自:https://learnku.com/articles/44442 1. 安装 Kafka 服务# 直接到 kafka 官网 , 下载最新的 wget https://mirror.bi ...
- ctf Decode
这题其实没啥好说的,就是直接解,听学长说好像网上有现成的轮子可以用,我太年轻了,手动写了个decode函数. 也成功得到了flag.嘿嘿开心
- Java刷题常用API
目录 输入输出 快速查看 最大最小值 string stringbuilder 集合 map queue stack set 优先队列 PriorityQueue (Heap) 数组 静态数组 动态数 ...
- 1.在配置XML文件时出现reference file contains errors (http://www.springframework.org/schema/beans/...解决方案
解决方案: 第一步:将 Preferences > XML > XML Files > Validation中"Honour all XML schema location ...
- if函数+isna函数+vlookup函数实现不同列相同单元格内容排列在同一行
1,首先学习的网址:https://jingyan.baidu.com/album/22a299b5dd0f959e19376a22.html?picindex=1 2,excel 这也许是史上最好最 ...
- 微信小程序云开发-云存储-下载并打开文件文件(word/excel/ppt/pdf)
一.wxml文件 1.写文本框,用来获取文件链接. 2.按钮,点击下载文件 <!-- 下载文件(word/excel/ppt/pdf等) --> <view class=" ...