学习mybatis框架>从零开始学JAVA
学习mybatis框架
mybatis框架的介绍
什么是mybatis框架
- mybatis是一个持久层的框架(访问数据库)
- 是一个半自动化(需要自己写sql语句)的ORM(对象关系映射,通过数据库表中的字段直接映射成对象)框架
为什么要使用mybatis框架
1、传统jdbc代码冗余,出现增删改查出现大量重复代码
解决方案:抽取成一个DBUtils来进行增删改查操作
2、传统jdbc代码每次增删改查都需要创建数据库连接、销毁连接,导致效率低下
解决方案:自定义一个数据库连接池来使用
3、在进行对象关系映射时出现大量的重复操作,resultSet获取数据封装成对象,增删改时将对象属性获取到再通过Statement向数据库发送请求
解决方案:使用mybatis对象关系映射
4、java代码与sql的耦合
解决方案:使用mybatis解决耦合
mybatis的优点
- 代码简洁,简化了大量冗余代码
- 效率高,使用数据库连接池中的连接进行数据库的操作
- 解决了对象关系映射问题
- 解决了sql与java代码的高耦合,可以采用xml的方式存储sql文件,再通过读取xml配置文件,通过反射动态创建代理对象执行sql
Mybatis框架环境搭建
去官网下载jar包
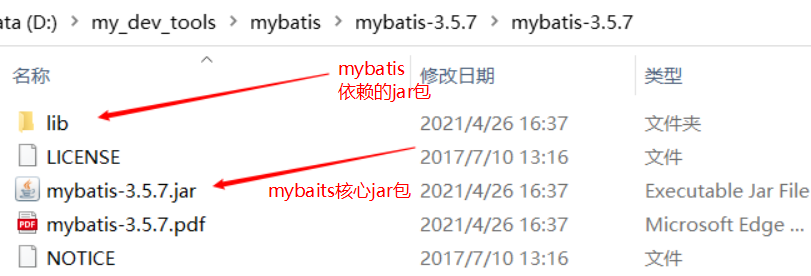
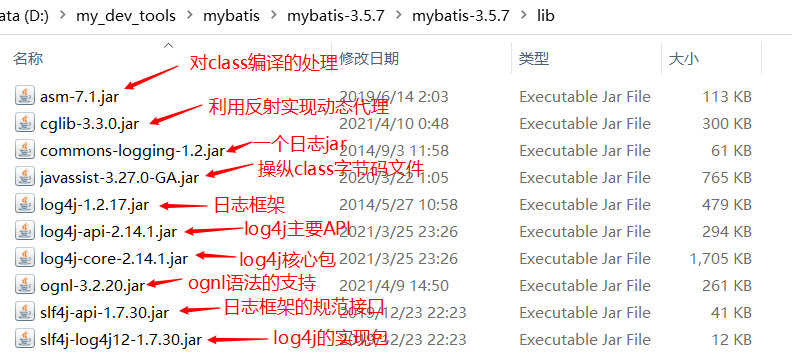
创建一个普通的java项目导入jar包

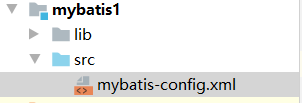
创建mybatis的配置文件放在src类路径下
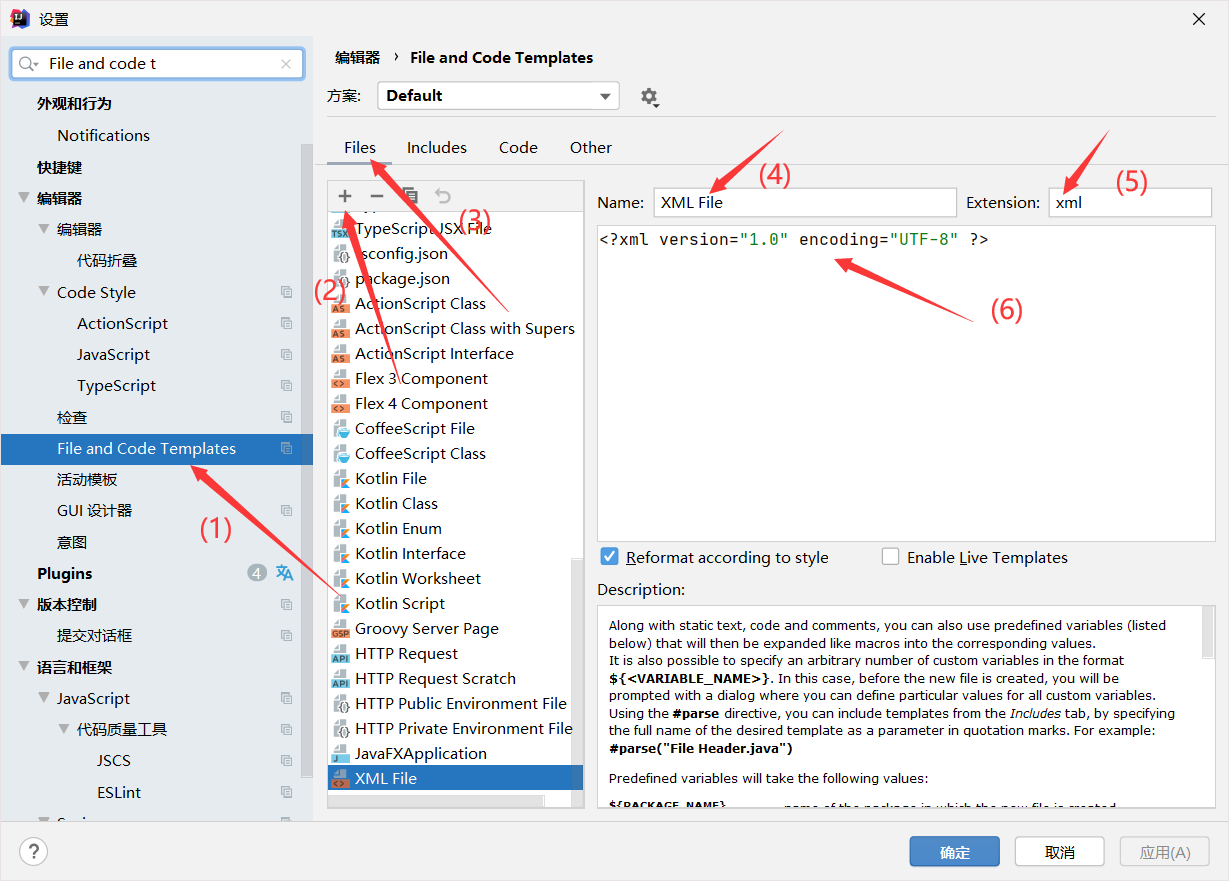
配置idea创建xml文件的模板
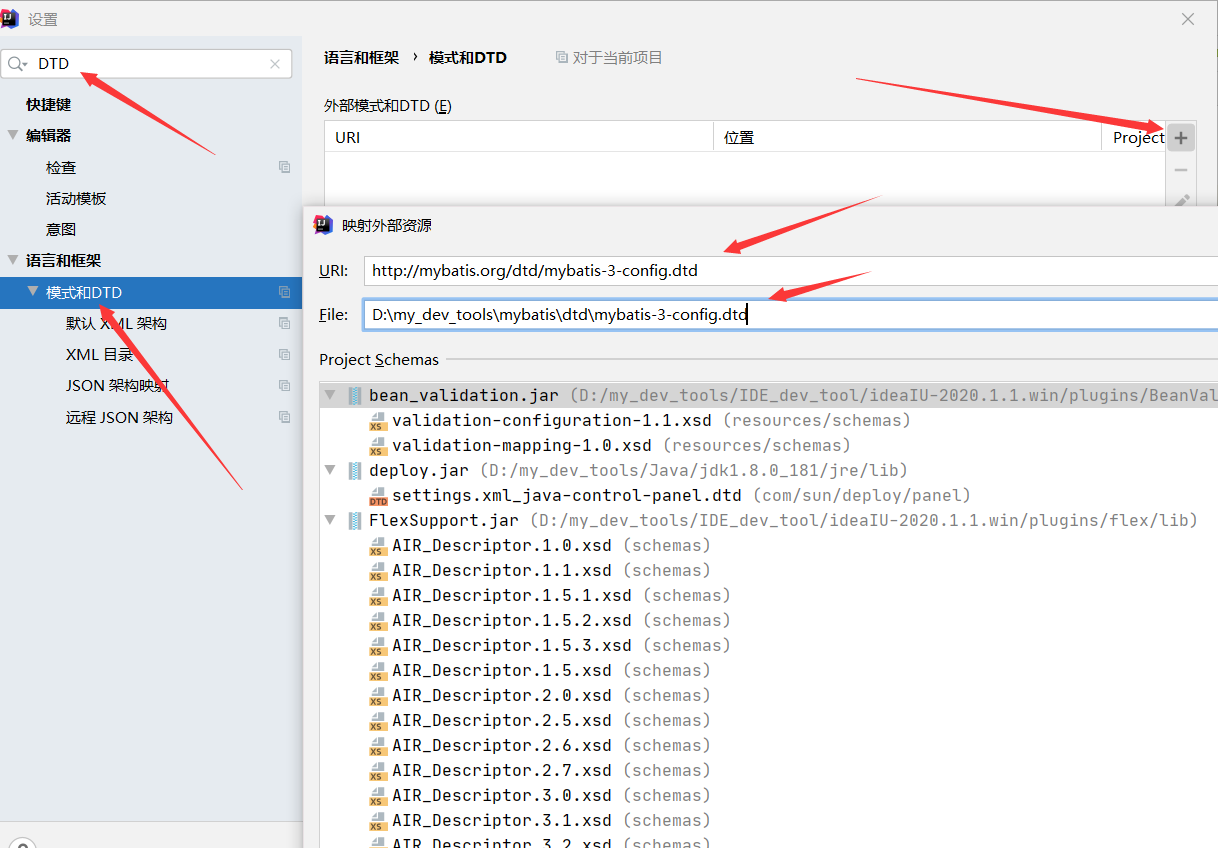
配置dtd文件与本地映射(使没网时也能拥有提示)
例如:http://mybatis.org/dtd/mybatis-3-config.dtd 需要与本地的文件映射
步骤1:先把这个dtd复制到浏览器上将其下载下来
步骤2:放在本地的任意位置

步骤3:配置idea完成映射
在src目录下创建jdbc.properties文件
jdbc.driver=com.mysql.cj.jdbc.Driver

jdbc.url=jdbc:mysql://127.0.0.1:3306/mybatisdb?useSSL=false&useUnicode=true&characterEncoding=utf8&serverTimezone=Asia/Shanghai

jdbc.username=root

jdbc.password=root
在src目录下创建log4j.properties文件
## 全局日志输出,输出error级别的,输出 stdout,logfile(这2个名字是自己定义的)

log4j.rootLogger = error,stdout,logfile

# 指定单个类输出日志,这里指定通过xml文件动态生成的代理类,这样可以打印sql语句

# 可以理解为 com.dqx.mapper.*,会打印该命名空间下所有类的日志

log4j.logger.com.dqx.mapper=debug

### 输出信息到控制台

log4j.appender.stdout = org.apache.log4j.ConsoleAppender

log4j.appender.stdout.Target = System.out

log4j.appender.stdout.layout = org.apache.log4j.PatternLayout

log4j.appender.stdout.layout.ConversionPattern = [%-5p] %d{yyyy-MM-dd HH:mm:ss,SSS} method:%l%n%m%n

### 文件日志,只记录error日志到 D盘下的error.log文件

log4j.appender.logfile = org.apache.log4j.DailyRollingFileAppender

log4j.appender.logfile.File =D://error.log

log4j.appender.logfile.Append = true

# 指定日志消息输出的最低层次

log4j.appender.logfile.Threshold = ERROR

log4j.appender.logfile.layout = org.apache.log4j.PatternLayout

log4j.appender.logfile.layout.ConversionPattern = %-d{yyyy-MM-dd HH:mm:ss}  [ %t:%r ] - [ %p ]  %m%n
创建mybatis配置文件
<?xml version="1.0" encoding="UTF-8" ?>

<!DOCTYPE configuration

        PUBLIC "-//mybatis.org//DTD Config 3.0//EN"

        "http://mybatis.org/dtd/mybatis-3-config.dtd">

<configuration>

    <!-- 添加配置文件 -->

    <properties resource="jdbc.properties"/>

    <!-- 配置日志 -->

    <settings>

        <!-- 指定哪个日志实现,具体取值可查看帮助文档,会自动在类路径下寻找log4j.properties配置文件 -->

        <setting name="logImpl" value="LOG4J"></setting>

    </settings>

    <typeAliases>

        <!-- 配置单个别名 -->

        <!--<typeAlias type="com.dqx.entity.Student" alias="student"></typeAlias>-->

        <!-- 该包下的所有类的别名都为其类名,例如 Student类 的别名就为 student,Student,小写大写都支持,但是建议使用小写 -->

        <package name="com.dqx.entity"/>

    </typeAliases>

    <!-- 配置数据源环境,default 为数据源的id,选中哪个使用哪个 -->

    <environments default="mysql">

        <environment id="mysql">

            <!-- 配置事物管理器为默认JDBC的提交和回滚,还有另外一个可选参数为:MANAGED 表示不管理事物,啥也不干,将事物交给其他容器管理 -->

            <transactionManager type="JDBC"/>

            <dataSource type="POOLED">

                <property name="driver" value="${jdbc.driver}"/>

                <property name="url" value="${jdbc.url}"/>

                <property name="username" value="${jdbc.username}"/>

                <property name="password" value="${jdbc.password}"/>

            </dataSource>

        </environment>

        <!-- 可以配置多个数据源,这是第二个-->

        <!--<environment id="oracle"> </environment>-->

    </environments>

    <!-- 扫描映射文件 -->

    <mappers>

        <!-- 扫描单个映射文件 -->

        <mapper resource="com/dqx/mapper/StudentMapper.xml"></mapper>

    </mappers>

</configuration>
在数据库创建一个数据表,并且创建对应的实体类
- 数据表
create table student(

	id int primary key auto_increment,

	name varchar(6) not null,

	age int not null

)
- 实体类
public class Student implements Serializable {

    private static final long serialVersionUID = 1L;

    private int id;

    private String name;

    private int age;

	// 有参构造,无参构造 get,set... toString

}
创建一个StudentMapper.xml
<?xml version="1.0" encoding="UTF-8" ?>

<!DOCTYPE mapper

        PUBLIC "-//mybatis.org//DTD Mapper 3.0//EN"

        "http://mybatis.org/dtd/mybatis-3-mapper.dtd">

<!-- 命名空间,调用其中的sql时通过命名空间来指定具体的Mapper文件 -->

<mapper namespace="com.dqx.mapper.StudentMapper">

</mapper>
创建一个Test测试类(有个印象就行,实习开发中不会用到这种方式)
package com.dqx.test;

import org.apache.ibatis.io.Resources;

import org.apache.ibatis.session.SqlSession;

import org.apache.ibatis.session.SqlSessionFactory;

import org.apache.ibatis.session.SqlSessionFactoryBuilder;

import java.io.InputStream;

public class Test {

    public static void main(String[] args) throws Exception {

        // 1,获取mybatis-config配置文件

        InputStream config = Resources.getResourceAsStream("/mybatis-config.xml");

        // 2,创建sqlSessionFactory

        SqlSessionFactory sqlSessionFactory = new SqlSessionFactoryBuilder().build(config);

        // 3,创建SqlSession

        SqlSession sqlSession = sqlSessionFactory.openSession();

        // 4,执行方法

        // 6,提交事物,因为mybatis默认是不自动提交事物的,可以在openSession时指定是否自动提交

        //sqlSession.commit();

        // 5,关闭资源

        sqlSession.close();

    }

}
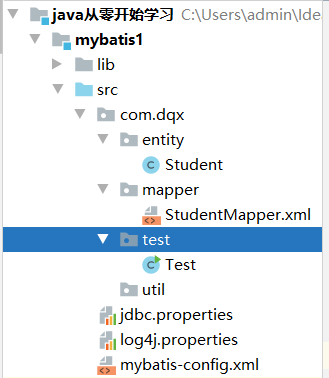
最后项目的目录结果如下
Mybatis的基础使用
三种查询操作
查询结果为List
- 修改StudentMapper.xml 文件,添加一个标签
<!-- resultType 返回值类型,必须为类的全类名,但是由于这里的实体类配置了别名,所以直接写student -->

    <select id="selectList" resultType="student" >

        select * from student

    </select>
- 测试类
public class Test {

    public static void main(String[] args) throws Exception {

        // 1,获取mybatis-config配置文件

        InputStream config = Resources.getResourceAsStream("mybatis-config.xml");

        // 2,创建sqlSessionFactory

        SqlSessionFactory sqlSessionFactory = new SqlSessionFactoryBuilder().build(config);

        // 3,创建SqlSession

        SqlSession sqlSession = sqlSessionFactory.openSession();

        // 4,执行方法

        List<Student> selectList = sqlSession.selectList("com.dqx.mapper.StudentMapper.selectList");

        System.out.println(selectList);

        // 6,提交事物,因为mybatis默认是不自动提交事物的,可以在openSession时指定是否自动提交

        //sqlSession.commit();

        // 5,关闭资源

        sqlSession.close();

    }

}
查询结果为单个对象
- 测试类
Student student = sqlSession.selectOne("com.dqx.mapper.StudentMapper.selectOne");

        System.out.println(student);
- xml文件
    <select id="selectOne" resultType="student" >

        select * from student where id = 1

    </select>
查询结果为Map(了解)
- 测试类
// 第二个参数id指的是使用哪个字段表示key

Map<Object, Object> key = sqlSession.selectMap("com.dqx.mapper.StudentMapper.selectMap", "id");
- xml文件
    <!-- resultType不使用全限定类名是因为mybatis已经提前设置好了一些常用类的别名 -->

    <select id="selectMap" resultType="map" >

        select * from student

    </select>
参数传递的三种方式
传递一个基本类型
- 测试类
Student student = sqlSession.selectOne("com.dqx.mapper.StudentMapper.selectOneBasisType",1);
- xml
<!-- _int代表java.lang.int,其实这里底层是将参数存到一个map集合中,

key为 param1,value为你传递的第一个值,以此类推为param2,param3,

但是sqlSession的方式只能传递一个参数 -->

    <select id="selectOneBasisType" resultType="student" parameterType="_int">

        select * from student where id = #{param1}

    </select>
传递一个引用类型
- 测试类
Student s = new Student(1,"张三",12);

        Student student = sqlSession.selectOne("com.dqx.mapper.StudentMapper.selectOneCiteType",s);
- xml
<!-- 会调用该引用类型的get方法来获取到对应的id和name -->

    <select id="selectOneCiteType" resultType="student" parameterType="student">

        select * from student where id = #{id} and name = #{name}

    </select>
传递一个Map类型
- 测试类
        Map<String,Object> map = new HashMap();

        map.put("mapid",1);

        map.put("mapname","张三");

        Student student = sqlSession.selectOne("com.dqx.mapper.StudentMapper.selectOneMapType",map);
- xml
<!-- 使用key可以获得到其value -->

    <select id="selectOneMapType" resultType="student" parameterType="map">

        select * from student where id = #{mapid} and name = #{mapname}

    </select>
增删改查方法(这里举例一个)
<!-- 这里可以不指定传入参数类型,mybatis会自动识别,

如果传入引用类型就使用其get set获取其属性,

如果传入map,就根据key获取属性,传入普通类型的参数,

则存入一个map集合中,key:param1 ,value:你传入的值,以此类推 -->

<insert id="insertOne">

        insert into student values(default, #{id},#{name})

    </insert>
使用sqlSeesion有什么不足之处
- 没有接口,直接使用mybatis利用动态代理技术通过xml创建的对象完成的增删改查
- 代码的编写可读性较低
- 后期维护成本增加
解决方法:使用动态代理的方式动态创建接口对象,面向接口编程
使用动态代理的方式实现增删改查
动态代理的实现原理。
- 扫描加载了xml映射文件后,根据其命名空间指定的全路径寻找当前项目中是否有其接口
- 如果有其接口,则以该接口动态生成其代理对象
创建一个接口
public interface StudentMapper {

    Student selectOne();

}
配置xml文件
<mapper namespace="com.dqx.mapper.StudentMapper">

    <select id="selectOne" resultType="student">

        select * from student where id = 1

    </select>

</mapper>
mybatis-config.xml 文件中扫描该mapper文件
 <!-- 扫描映射文件 -->

    <mappers>

        <!-- 扫描单个映射文件 -->

        <mapper resource="com/dqx/mapper/StudentMapper.xml"></mapper>

        <!-- 配置包,这个的意思是扫描该包下的所有接口,

        然后通过接口的全路径类名寻找同全路径的xml文件,通过xml文件生成该接口的动态代理对象,

        例如com.dqx.mapper.StudentMapper.java 接口会寻找 com.dqx.mapper.StudentMapper.xml -->

        <!--<package name="com.dqx.mapper"/>-->

    </mappers>
解决只能传一个参数的问题
- 接口
Student selectOne(@Param("myid") int id, @Param("myname") String name);

Student selectByStudent(Student stu1,Student stu2);
- xml
<select id="selectOne" resultType="student">

        select * from student where id = #{myid} and name = #{myname}

    </select>

   <select id="selectByStudent" resultType="student">

        select * from student where id = #{param1.id} and name = #{param2.name}

    </select>
动态SQL的学习
IF (if条件判断)
// 接口

List<Student> selectAll(String name, int age);
    <select id="selectAll" resultType="student">

        select * from student where 1=1

        <if test="param1!=null and param1!=''">

            and name like concat('%',#{param1},'%')

        </if>

        <if test="param2!=0">

            and age = #{param2}

        </if>

    </select>
if进行字符串之间的判断时出现的问题
问题:
如上,我们写判断空字符串写的是 == '' 。
但是,如果我们想要判断字符串是否等于1之类的, == '1',则会出现判断错误。无法正常进行比较。要写成如下格式
<if test='strong != null and strong == "1"'> 或者

<if test="strong != null and strong == '1'.toString()">
Where(动态添加where子句,以及去除第一个and)
// 接口

List<Student> selectAll2(String name, int age);
    <select id="selectAll2" resultType="student">

        select * from student

        <!-- 会根据其内部条件添加where 条件,并且删除第一个and -->

        <where>

            <if test="param1!=null and param1!=''">

                name like concat('%',#{param1},'%')

            </if>

            <if test="param2!=0">

                and age = #{param2}

            </if>

        </where>

    </select>
when(if,elseif,else)
// 接口

    List<Student> selectAll3(String name, int age);
<select id="selectAll3" resultType="student">

        select * from student

        <!-- 会根据其内部条件添加where 条件,并且删除第一个and -->

        <where>

            <!-- 一个个的when 就相当于 if,else if ,otherwis就是最后的else -->

            <choose>

                <when test="param1!=null and param1!=''">

                    name like concat('%',#{param1},'%')

                </when>

                <when test="param2!=0">

                    and age = #{param2}

                </when>

                <otherwise>

                    and 1 = 1

                </otherwise>

            </choose>

        </where>

    </select>
set(更新时使用)
// 接口

int updateOne(Student student);
<update id="updateOne">

        update student

        <!-- 自动添加set语句,并去除最后的逗号,如果这里只传一个name也不会出错 -->

        <set>

            <if test="name!=null and name!=''">

                name = #{name},

            </if>

            <if test="age!=0">

                age = #{age}

            </if>

        </set>

        where id = #{id}

    </update>
trim(功能强大,可以添加前缀,添加后缀,替换前缀、替换后缀)
// 接口

int updateOne2(Student student);
<update id="updateOne2">

        update student

        <!--

            trim:

                prefix:需要添加的前缀

                prefixOverrides:需要替换的前缀

                suffix:需要添加的后缀

                suffixOverrides:需要替换的后缀(相当于去除)

         -->

        <trim prefix='set'  suffixOverrides=','>

            <if test="name!=null and name!=''">

                name = #{name},

            </if>

            <if test="age!=0">

                age = #{age}

            </if>

        </trim>

        where id = #{id}

    </update>
foreach(用于遍历List集合)
// 接口

    List<Student> selectByList(List<Integer> idList);
<select id="selectByList" resultType="student">

        select * from student

        <where>

                <if test="list!=null and list.size()>0 ">

                    id in

                    <!-- mybatis默认传List会更换别名为list, map.put('list',value) -->

                    <foreach collection="list" open="(" separator="," close=")" item="i">

                        #{i}

                    </foreach>

                </if>

        </where>

    </select>
bind(用于模糊查询)
List<Student> selectLike(String name);
    <select id="selectLike" resultType="student">

        select * from student

        <where>

            <if test="param1!=null and param1!='' ">

                <bind name="lname" value="'%'+param1+'%'"></bind>

                name like #{lname}

            </if>

        </where>

    </select>
include、sql (公共代码抽取)
    <select id="selectAllStudent" resultType="student">

        select

        <include refid="commonField"></include>

        from student

    </select>

    <sql id="commonField">

            id,name,age

    </sql>
mybatis多表查询的三种方式
- 练习准备,2个数据库表,学生表与课程表,关系为1对多
create table student(

	sid int primary key auto_increment,

	sname varchar(8),

	classno int -- 这里不适用外键约束,而是逻辑关联即可

)

insert into student values(default,'张三',1);

insert into student values(default,'李四',1);

insert into student values(default,'王五',2);

insert into student values(default,'何明',3);

insert into student values(default,'王华',4);

create table clazz(

	classno int primary key auto_increment,

	cname varchar(32)

)

insert into clazz values(1, 'java进阶班');

insert into clazz values(2, '大数据就业班');

insert into clazz values(3, 'python就业班');

insert into clazz values(4, 'go进阶班');
- 2个实体类
public class Student implements Serializable {

    private static final long serialVersionUID = -3554321513742818495L;

    private int sid;

    private String sname;

    private int classno;

    private Clazz clazz;

	// get,set,toString,有参无参构造

}

public class Clazz implements Serializable {

    private static final long serialVersionUID = -5193069544331983488L;

    private int classno;

    private String cname;

    private List<Student> students;

	// get,set,toString,有参无参构造

}
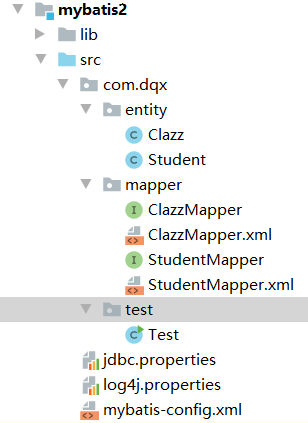
- 项目结构如下
业务代码查询(本质就是2个单表查询,通过java代码的方式关联查询)
查询所有的学生以及它对应的班级
// StudentMapper接口

public interface StudentMapper {

    List<Student> selectAll();

}

// ClazzMapper接口

public interface ClazzMapper {

    Clazz selectOne(@Param("classno") int classno);

}

// StudentMapper.xml

<mapper namespace="com.dqx.mapper.StudentMapper">

    <select id="selectAll" resultType="student">

        select <include refid="basisField" /> from student

    </select>

    <sql id="basisField">

        sid,sname,classno

    </sql>

</mapper>

// ClazzMapper.xml

<mapper namespace="com.dqx.mapper.ClazzMapper">

    <select id="selectOne" resultType="clazz">

        select classno,cname from clazz where classno = #{classno}

    </select>

</mapper>

// Test类

public class Test {

    public static void main(String[] args) throws IOException {

        InputStream config = Resources.getResourceAsStream("mybatis-config.xml");

        SqlSessionFactory factory = new SqlSessionFactoryBuilder().build(config);

        SqlSession sqlSession = factory.openSession();

        // 获取Mapper接口对象

        StudentMapper studentMapper = sqlSession.getMapper(StudentMapper.class);

        ClazzMapper clazzMapper = sqlSession.getMapper(ClazzMapper.class);

        // 查询所有的学生以及对应的班级

        // 查询到所有的学生

        List<Student> students = studentMapper.selectAll();

        // 通过遍历的方式,使用学生中的classno再去查询出对应的班级

        for (Student student : students) {

            int classno = student.getClassno();

            Clazz clazz = clazzMapper.selectOne(classno);

            student.setClazz(clazz);

        }

        // 遍历所有的学生

        for (Student student : students) {

            System.out.println(student);

        }

    }

}
查询班级 ,以及班级所对应的学生
// StudentMapper接口增加方法

List<Student> selectByClassno();

// ClazzMapper接口增加方法

List<Clazz> findAll();

// StudentMapper.xml中增加方法

<select id="selectByClassno" resultType="student">

        select sid,sname,classno from student where classno = #{param1}

    </select>

// ClazzMapper.xml增加方法

<select id="findAll" resultType="clazz">

	select classno,cname from clazz

</select>

// 测试类中增加如下代码

// 查询班级,以及班级对应的学生

        // 查询到所有班级

        List<Clazz> clazzList = clazzMapper.findAll();

        // 再通过班级号查询学生,将查询到的学生集合存放到clazz对象中

        for (Clazz clazz : clazzList) {

            int classno = clazz.getClassno();

            List<Student> studentList = studentMapper.selectByClassno(classno);

            clazz.setStudents(studentList);

        }

        // 遍历班级

        for (Clazz clazz : clazzList) {

            System.out.println(clazz);

        }
n+1方式查询(因为第一次查询有几行,就需要再发送几条sql)
其实底层的实现也是业务代码实现的方式,但是现在是由mybatis替我们完成
n+1方式查询学生信息(包括班级)
// 在StudentMapper接口中添加方法

List<Student> selectNandOneAll();

// 在StudentMapper.xml中添加方法

<select id="selectNandOneAll" resultMap="rm1">

        select * from student

    </select>

    <!-- id:给该resultMap命名(唯一), type:返回值的类型 -->

    <resultMap id="rm1" type="student">

        <!--

            id标签,代表是一个主键字段,result为普通字段。

            column: 数据库中的字段

            property: java类中的属性

            该标签的作用就是将数据库中的字段与java类中的字段建立映射关系

            有一点需要注意,如果该resultMap中不全都是赋值操作,则对象中的属性名与

			数据库中的字段名称相同时,映射关系可以省略。

            公共字段也不可以省略:就是在association标签或者collection标签中需要映射到的字段column

        -->

        <id column="sid" property="sid"></id>

        <result column="sname" property="sname"></result>

        <result column="classno" property="classno"></result>

        <!--

            association标签: 映射一个引用数据类型

            select: 表示使用哪个Mapper接口的哪个方法

            column: 表示使用数据库中的哪个字段作为参数传递

            javaType: 表示该 association标签的返回值类型

            property: 表示使用Student类中的哪个属性来接收返回值

        -->

        <association

                select="com.dqx.mapper.ClazzMapper.selectOne"

                column="classno"

                property="clazz"

                javaType="clazz"></association>

    </resultMap>

// 测试类中添加测试代码

// 查询所有的学生以及对应的班级 n+1的方式

        List<Student> studentList = studentMapper.selectNandOneAll();

        for (Student student : studentList) {

            System.out.println(student);

        }
n+1方式查询班级信息(包括班级中的学生)
// 在ClazzMapper接口中添加方法

    List<Clazz> findNandOneAll();

// 在ClazzMapper.xml 中添加方法

<select id="findNandOneAll" resultMap="rm1">

        select classno,cname from clazz

    </select>

    <resultMap id="rm1" type="clazz">

        <id column="classno" property="classno"></id>

        <id column="cname" property="cname"></id>

        <!--

            collection标签:映射一个List集合

            select:表示调用哪个Mapper的哪个方法

            column: 使用数据库中的哪个字段作为参数传递

            property: 使用Clazz对象中的哪个属性接收返回值

            ofType: List的泛型

         -->

        <collection

                select="com.dqx.mapper.StudentMapper.selectByClassno"

                column="classno"

                property="students"

                ofType="student"></collection>

    </resultMap>

// 测试代码

// 查询所有的班级以及对应的学生 n+1的方式

        List<Clazz> nandOneAll = clazzMapper.findNandOneAll();

        for (Clazz clazz : nandOneAll) {

            System.out.println(clazz);

        }
sql语句实现多表查询
查询学生及其班级信息
// 在StudentMapper接口中添加方法

    List<Student> selectBySql();

// 在StudentMapper.xml中添加方法

    <select id="selectBySql" resultMap="rm2">

            select s.sid,s.sname,s.classno,c.cname

        from student s

        join clazz c

        on (s.classno = c.classno)

    </select>

    <resultMap id="rm2" type="student">

        <!-- 像这里,这里的任何一个映射字段都不能省略,因为该resultMap中全都是赋值操作 -->

        <id column="sid" property="sid" />

        <id column="sname" property="sname" />

        <id column="classno" property="classno" />

        <association  javaType="clazz" property="clazz">

            <id column="classno" property="classno"></id>

            <result column="cname" property="cname"></result>

        </association>

    </resultMap>

// 测试代码

 // 查询所有的学生以及对应的班级 sql方式

        List<Student> studentList = studentMapper.selectBySql();

        for (Student student : studentList) {

            System.out.println(student);

        }
查询班级及其学生信息
// 在ClazzMapper接口中增加方法

List<Clazz> findAllbySql();

// 在ClazzMapper.xml中添加方法

    <select id="findAllbySql" resultMap="rm2">

        select c.classno,c.cname,s.sid,s.sname

        from clazz c

        join student s

        on c.classno = s.classno

    </select>

    <resultMap id="rm2" type="clazz" >

        <id column="classno" property="classno"></id>

        <result column="cname" property="cname"></result>

        <collection ofType="student" property="students">

            <id column="sid" property="sid"></id>

            <result column="sname" property="sname"></result>

            <result column="classno" property="classno"></result>

        </collection>

    </resultMap>

// 测试代码

// 查询所有的教师以及对应的学生 sql方式

        List<Clazz> allbySql = clazzMapper.findAllbySql();

        for (Clazz clazz : allbySql) {

            System.out.println(clazz);

        }
insert插入时候获取到自增的主键
<!--

	useGeneratedKeys :是否返回主键

	keyProperty:将返回的主键放在对象中的哪个字段内

-->

<insert id="insert" useGeneratedKeys="true" keyProperty="expId">

</insert>
缓存机制
一级缓存
一级缓存为sqlSession缓存,缓存仅仅存在于当前sqlSession中。
在该sqlSession执行DML操作时,会清空缓存
mybatis默认开启一级缓存,可以在mybatis-config.xml文件的settings中配置关闭
二级缓存
二级缓存为factory工厂缓存,所有的sqlSession可以共享
配置Mapper.xml文件中添加cache,设置只读属性,即可开启该mapper二级缓存

运行机制
当一个查询结果执行时。
1、先在二级缓存中查询
如果找到:直接返回
没找到:执行第2步
2、在一级缓存中查询
找到:返回
没找到:执行第3步
3、访问数据库获取到对应的数据,并将其放入一级缓存中
4、如果开启了二级缓存,则该sqlSession进行 close(关闭) 或者 Commit(提交)时,会将一级缓存中的数据移动到二级缓存中。其他sqlSession就可以共享了
解决一个线程创建多个SqlSession造成的问题
将获取sqlSession封装成一个工具类
public class DBUtil {

    private static SqlSessionFactory factory;

    static {

        try {

            InputStream in = Resources.getResourceAsStream("mybatis-config.xml");

            factory = new SqlSessionFactoryBuilder().build(in);

        } catch (IOException e) {

            e.printStackTrace();

        }

    }

    /**

     * 返回SqlSession

     * @return

     */

    public static SqlSession getSqlSession() {

        return getSqlSession(false);

    }

    /**

     * 返回SqlSession

     * @param isAutoCommit 是否自动提交

     * @return

     */

    public static SqlSession getSqlSession(boolean isAutoCommit) {

        return factory.openSession(isAutoCommit);

    }

}
这样做会出现什么问题?
当一个请求过来的时候,如果一个方法中调用了getSqlSession
而该方法调用的其他方法也调用了getSqlSession
可能会导致一个请求创建了多个新的sqlSession,会大量的影响性能,并会造成资源的浪费
分析:一个请求就是一个线程执行
解决方案:那么只要每个线程都使用同一个SqlSession就可以解决问题
解决方法,使用ThreadLocal
ThreadLocal是什么:是一个线程内部的存储类,可以在指定线程中存储数据,数据存储以后,只有指定线程可以得到存储数据,每个线程都有单独的一个ThreadLocalMap。
ThreadLocal的作用: 实现同一个线程中,数据(SqlSession)的共享
实现原理:底层是一个Map集合,存储时,由于每个线程的id都不一致。通过线程id为key,要存储的值为value将其存入map集合中,当其线程去取的时,就会通过该线程的id当key去每个线程都有单独的一个ThreadLocalMap集合中取数据
使用示范
public class DBUtil {

    private static ThreadLocal<SqlSession> threadLocal = new ThreadLocal<SqlSession>();

    private static SqlSessionFactory factory;

    static {

        try {

            InputStream in = Resources.getResourceAsStream("mybatis-config.xml");

            factory = new SqlSessionFactoryBuilder().build(in);

        } catch (IOException e) {

            e.printStackTrace();

        }

    }

    /**

     * 返回SqlSession

     * @return

     */

    public static SqlSession getSqlSession() {

        return getSqlSession(false);

    }

    /**

     * 返回SqlSession

     * @param isAutoCommit 是否自动提交

     * @return

     */

    public static SqlSession getSqlSession(boolean isAutoCommit) {

        SqlSession sqlSession = threadLocal.get();

        if (sqlSession == null) {

            sqlSession = factory.openSession(isAutoCommit);

            threadLocal.set(sqlSession);

            System.out.println("创建了一个SqlSession对象");

        }

        return sqlSession;

    }

    public static void closeAll() {

        SqlSession sqlSession = threadLocal.get();

        if(sqlSession != null){

            sqlSession.close();

            threadLocal.remove();

        }

    }

}
测试代码
从运行结果可以看到,开启了2个线程,每个线程都分别调用了2次getSqlSession(一共4次),但是却只创建了2个SqlSession对象
public class Test2 {

    public static void main(String[] args) {

        SqlSession sqlSession = DBUtil.getSqlSession(true);

        StudentMapper mapper = sqlSession.getMapper(StudentMapper.class);

        method(mapper);

        new Thread(()->{

            SqlSession sqlSession2 = DBUtil.getSqlSession(true);

            StudentMapper mapper2 = sqlSession2.getMapper(StudentMapper.class);

            method(mapper2);

        }).start();

    }

    public static void method(StudentMapper studentMapper) {

        List<Student> studentList = studentMapper.selectAll();

        method2();

    }

    public static void method2(){

        SqlSession sqlSession = DBUtil.getSqlSession(true);

        ClazzMapper mapper = sqlSession.getMapper(ClazzMapper.class);

        mapper.findAllbySql();

    }

}
mybatis对注解的支持
- 创建一个接口,该接口必须被配置类中的Mappers配置的package扫描到,这样才会创建其动态代理对象
public interface ClazzAnnoMapper {

    @Select("select * from clazz")

    List<Clazz> selectAll();

    @Insert("insert into clazz values(#{classno},#{cname}) ")

    int insertOne(Clazz clazz);

    @Delete("delete from clazz where classno = #{param1}")

    int deleteOne(int classno);

    @Update("update clazz set classno = #{classno}, cname = #{cname} where classno = #{classno}")

    int update(Clazz clazz);

}
- 优点与缺点
- 优点: 编码简单
- 缺点
- 无法实现SQL动态拼接
- 多表查询很麻烦
- 没有实现sql与java代码的解耦
mybatis运行原理浅析
获得mybatis配置文件的InputStream输入流
InputStream config = Resources.getResourceAsStream("mybatis-config.xml");
创建一个SqlSessionFactory对象
SqlSessionFactory factory = new SqlSessionFactoryBuilder().build(config);
- 其中的build方法中是实例化一个DefaultSqlSessionFactory
- 在实例化DefaultSqlSessionFactory之前要先创建XmlConfigBuilder对XML文件进行解析,解析后把结果存放到 Configuration类中
- 然后将Configuration类传递给 new DefaultSqlSessionFactory(config),创建SqlSessionFactory对象成功
接下来由SqlSeesionFactory创建SqlSession
- 每次创建SqlSeesion时都由TransactionFactory创建Transaction对象来确定SqlSession的事物
- 并创建Excutor 执行器(底层使用了PreParStatment),最后实例化 DefaultSqlSession(excutor)
- 最后得到SqlSession对象
学习mybatis框架>从零开始学JAVA的更多相关文章
- 从零开始学 Java - 我放弃了 .NET ?
这不是一篇引起战争的文章 毫无疑问,我之前是一名在微软温暖怀抱下干了近三年的 .NET 开发者,为什么要牛(sha)X一样去搞 Java 呢?因为我喜欢 iOS 阿!哈哈,开个玩笑.其实,开始学 Ja ...
- 从零开始学 Java - 搭建 Spring MVC 框架
没有什么比一个时代的没落更令人伤感的了 整个社会和人都在追求创新.进步.成长,没有人愿意停步不前,一个个老事物慢慢从我们生活中消失掉真的令人那么伤感么?或者说被取代?我想有些是的,但有些东西其实并不是 ...
- 从零开始学 Java - Spring 集成 ActiveMQ 配置(一)
你家小区下面有没有快递柜 近两年来,我们收取快递的方式好像变了,变得我们其实并不需要见到快递小哥也能拿到自己的快递了.对,我说的就是类似快递柜.菜鸟驿站这类的代收点的出现,把我们原来快递小哥必须拿着快 ...
- 从零开始学 Java - Spring 集成 Memcached 缓存配置(一)
硬盘和内存的作用是什么 硬盘的作用毫无疑问我们大家都清楚,不就是用来存储数据文件的么?如照片.视频.各种文档或等等,肯定也有你喜欢的某位岛国老师的动作片,这个时候无论我们电脑是否关机重启它们永远在那里 ...
- 从零开始学 Java - Spring 集成 ActiveMQ 配置(二)
从上一篇开始说起 上一篇从零开始学 Java - Spring 集成 ActiveMQ 配置(一)文章中讲了我关于消息队列的思考过程,现在这一篇会讲到 ActivMQ 与 Spring 框架的整合配置 ...
- 从零开始学 Java - Spring MVC 实现跨域资源 CORS 请求
论职业的重要性 问:为什么所有家长都希望自己的孩子成为公务员? 答:体面.有权.有钱又悠闲. 问:为什么所有家长都希望自己的孩子成为律师或医生? 答:体面.有钱.有技能. 问:为什么所有家长都不怎么知 ...
- 从零开始学Java——个人笔记(持续更新中)
从零开始学Java 学习流程 第一阶段:建立编程思想 Java概述 变量 运算符 控制结构 数组.排序和查找 面向对象编程(基础) 面向对象编程(中级) 项目&学习以致用 编程之乐 第二阶段: ...
- 从零开始学 Java - Spring 集成 Memcached 缓存配置(二)
Memcached 客户端选择 上一篇文章 从零开始学 Java - Spring 集成 Memcached 缓存配置(一)中我们讲到这篇要谈客户端的选择,在 Java 中一般常用的有三个: Memc ...
- 从零开始学 Java - 利用 Nginx 负载均衡实现 Web 服务器更新不影响访问
还记得那些美妙的夜晚吗 你洗洗打算看一个小电影就睡了,这个时候突然想起来今天晚上是服务器更新的日子,你要在凌晨时分去把最新的代码更新到服务器,以保证明天大家一觉醒来打开网站,发现昨天的 Bug 都不见 ...
随机推荐
- Python-对比两个目录中Excel文件
背景:我在5月20日收到了一批Excel文件数据,由于文件很多大约有将近5000个,已经通过编写python脚本处理完成.但是6月9日的时候,又收到了一批新的Excel数据.但是在处理过程中发现,本次 ...
- 01-ubuntu18.04安装docker脚本[含自动配置apt]
01-ubuntu18.04安装docker脚本[含自动配置apt] 脚本一键安装docker,并配置阿里云的docker镜像加速. #!/bin/bash #更新apt源为清华源 echo &quo ...
- javascript之一切都是对象
在学习的过程中,我们常常能听到这样一句话:一切皆是对象.那么这句话该如何理解呢?首先,我们要明确对象的概念.要明白除了基本数据类型都是对象. typeof操作符是大家经常使用的,我们常用它来检测给定变 ...
- CapsuleAO实现的学习
正是一个炎夏,又到了整活的好时候.最近抽些时间研究下CapsuleAO,记述实践体会. 1.简介 这是一个通过在角色骨骼上绑定虚拟胶囊体并以数学方法实现胶囊近似的AO环境光遮蔽效果的方法, 当角色处于 ...
- 重新整理 .net core 实践篇————熔断与限流[三十五]
前言 简单整理一下熔断与限流,跟上一节息息相关. 正文 polly 的策略类型分为两类: 被动策略(异常处理.结果处理) 主动策略(超时处理.断路器.舱壁隔离.缓存) 熔断和限流通过下面主动策略来实现 ...
- Unity的AnimationCurve
转自:风宇冲Unity3D教程学院http://blog.sina.com.cn/s/blog_471132920101f8nv.html,本文有多处增删减改,详细内容请查看原文. 1.介绍 Anim ...
- 重新整理 .net core 实践篇————网关[三十六]
前言 简单整理一下网关. 正文 在介绍网关之前,介绍一下BFF,BFF全称是Backend For Frontend,它负责认证授权,服务聚合,目标是为前端提供服务. 说的通透一点,就是有没有见过这种 ...
- 配置本地yum源以及挂载镜像
配置本地yum源以及挂载镜像(centos7.6) 配置yum源 # cd /etc/yum.repos.d 可以备份或者删除里面的文件 新建文件 # touch /etc/yum.repos.d/l ...
- Linux-远程服务ssh
1.远程管理服务介绍 (1)SSH是(Secure Shell Protocol)的简写,由IETF网络工作小组制定:在进行数据传输之前,SSH先对联机数据包通过加密技术进行机密处理,加密后在进行文件 ...
- noi 162 post office dp
大致题意: 有v个村庄,每个村庄有各自的位置,且每个位置互不相同.现在要在村庄上设立P个邮局,使每个村庄到最近的邮局的距离之和最小. 分析: 定义状态d[i][j]表示前i个村庄,在这i个村庄中设立j ...