Android Studio下SQLite数据库的配置与使用(完)
一,AS开发app用,所用的数据库有限制,必须使用较小的SQLite(MySql和Sql Server想想就不显示)
但是该数据库并不需要我们单独下载,安装的SDK中已经有了,在C:\AndroidSDK\platform-tools目录下
最下面一个exe文件就是,双击可以打开dos界面进行编写
将上述讲的SQLite的目录(C:\AndroidSDK\platform-tools)添加到环境变量path下就可以完成配置
验证是否完成配置:打开dos界面,输入SQLite3,出现以下界面就表示成功了

二,分享一款SQLite3的可视化操作界面
黑框框虽然看起来逼格非常高,但是个人觉得太捞比了,主要是太麻烦了(个人很懒)
一个可视化界面的exe文件:SQLiteStudio 百度云盘地址 http://pan.baidu.com/s/1dES3Zep
不用安装,解压后直接使用
三,以下分享一个在百度上找了很久的很小的对于数据库增删改查操作的实践~~~
原文出处:http://www.jianshu.com/p/ee08f75b407c
<一>界面部分
我个人看法,开发app,首先可以把各个界面设计出来,这样也就明确了自己想要实现什么功能,那么在后面的代码实现过程中,就相应的有了目的性,界面不够,我们再添加就好了~
首先上两张图,也就是这个小project中的两个界面,也就是我们要实现的几个功能
界面一:显示所有学生名字,然后点某个人,跳到界面二

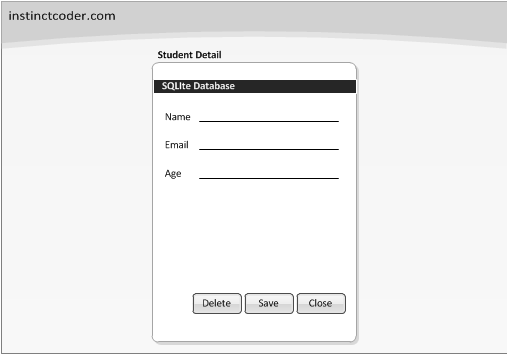
界面二:某个学生的具体信息,可以对这个学生进行删改,或者添加新同学~
1,首先创建一个project,名字随意
2,实现第一个页面布局activity_main.xml(也就是页面一)
(我个人直接把学习网站的代码拔过来了,但是会有一些warning)
比如:android:text="Add"
最好在strings.xml中配置一下 :
添加一条 <string name="add">Add</string>
然后改成android:text = "@string/add"
并不是说第一种错了,而是第二种规范性更棒,日后管理更新等操作更加方便,只需要在strings中改一下就ok了
 <RelativeLayout xmlns:android="http://schemas.android.com/apk/res/android"

     xmlns:tools="http://schemas.android.com/tools"

     android:layout_width="match_parent"

     android:layout_height="match_parent"

     android:paddingLeft="@dimen/activity_horizontal_margin"

     android:paddingRight="@dimen/activity_horizontal_margin"

     android:paddingTop="@dimen/activity_vertical_margin"

     android:paddingBottom="@dimen/activity_vertical_margin"

     tools:context=".MainActivity">

     <Button

         android:layout_width="wrap_content"

         android:layout_height="wrap_content"

         android:text="@string/add"

         android:id="@+id/btnAdd"

         android:layout_alignParentBottom="true"

         android:layout_alignParentLeft="true"

         tools:ignore="RtlHardcoded" />

     <ListView

         android:id="@android:id/list"

         android:layout_width="wrap_content"

         android:layout_height="wrap_content"

         android:layout_above="@+id/btnAdd"

         />

     <Button

         android:layout_width="wrap_content"

         android:layout_height="wrap_content"

         android:text="@string/ListAll"

         android:id="@+id/btnGetAll"

         tools:ignore="RtlHardcoded"

         android:layout_alignParentBottom="true"

         android:layout_toEndOf="@+id/btnAdd" />

 </RelativeLayout>
activity_main
3,接下来,画出界面二
我们可以直接创建一个新的activity,因为没个界面都要配合一个动作的嘛~,因此可以直接new一个新的activity,StudentDetail.java
其布局为第二个页面activity_student_detail.xml
 <?xml version="1.0" encoding="utf-8"?>

 <RelativeLayout xmlns:android="http://schemas.android.com/apk/res/android"

     xmlns:tools="http://schemas.android.com/tools"

     android:id="@+id/activity_student_detail"

     android:layout_width="match_parent"

     android:layout_height="match_parent"

     android:paddingBottom="@dimen/activity_vertical_margin"

     android:paddingLeft="@dimen/activity_horizontal_margin"

     android:paddingRight="@dimen/activity_horizontal_margin"

     android:paddingTop="@dimen/activity_vertical_margin"

     tools:context="examples.ouc.com.sqlitedemo.StudentDetail">

     <TextView

         android:layout_width="wrap_content"

         android:layout_height="wrap_content"

         android:text="@string/name"

         android:id="@+id/tvName"

         android:layout_alignParentTop="true"

         android:layout_alignParentLeft="true"

         android:layout_alignParentStart="true"

         android:layout_marginTop="30dp" />

     <TextView

         android:layout_width="wrap_content"

         android:layout_height="wrap_content"

         android:text="@string/email"

         android:id="@+id/tvEmail"

         android:layout_below="@id/tvName"

         android:layout_alignParentLeft="true"

         android:layout_alignParentStart="true"

         android:layout_marginTop="30dp" />

     <TextView

         android:layout_width="wrap_content"

         android:layout_height="wrap_content"

         android:text="@string/age"

         android:id="@+id/tvAge"

         android:layout_below="@id/tvEmail"

         android:layout_alignParentLeft="true"

         android:layout_alignParentStart="true"

         android:layout_marginTop="30dp" />

     <EditText

         android:layout_width="wrap_content"

         android:layout_height="wrap_content"

         android:id="@+id/etName"

         android:inputType="textPersonName"

         android:ems="10"

         android:layout_above="@id/tvEmail"

         android:layout_toEndOf="@id/tvName"

         android:layout_alignParentRight="true"

         android:layout_alignParentEnd="true" />

     <EditText

         android:layout_width="match_parent"

         android:layout_height="wrap_content"

         android:id="@+id/etEmail"

         android:layout_toEndOf="@id/tvEmail"

         android:inputType="textEmailAddress"

         android:ems="10"

         android:layout_above="@id/tvAge"

         android:layout_alignParentRight="true"

         android:layout_alignParentEnd="true" />

     <Button

         android:layout_width="wrap_content"

         android:layout_height="wrap_content"

         android:id="@+id/btnClose"

         android:text="@string/close"

         android:layout_alignParentBottom="true"

         android:layout_alignParentRight="true"

         />

     <Button

         android:layout_width="wrap_content"

         android:layout_height="wrap_content"

         android:id="@+id/btnSave"

         android:text="@string/save"

         android:layout_alignParentBottom="true"

         android:layout_toStartOf="@id/btnClose"/>

     <Button

         android:layout_width="wrap_content"

         android:layout_height="wrap_content"

         android:id="@+id/btnDelete"

         android:text="@string/delete"

         android:layout_alignParentBottom="true"

         android:layout_toStartOf="@id/btnSave"/>

     <EditText

         android:layout_width="match_parent"

         android:layout_height="wrap_content"

         android:id="@+id/etAge"

         android:inputType="number"

         android:ems="10"

         android:layout_alignBottom="@+id/tvAge"

         android:layout_toEndOf="@+id/tvName" />

 </RelativeLayout>
activity_student_detail
4(直接复制自网友,因为我没有很理解)
当用户点击ListView的item时展示学生的详细信息的activity,所以我们需要一个特殊的id来检索学生的详细信息,并且这个id必须来自ListView,可以通过两个方法实现:
- 最简单的方法,可以放id和name进listview的item中,展示给用户(不好的UI设计),当用户点击选中item时,将检索的记录传递到StudentDetail.java的activity。
- 创建一个layout作为listview的item,通过item中包含学生的id(不过设置成隐藏)来检索学生的详细信息;
采用第二种方法,创建一个新的layout,view_student_entry.xml,代码如下:
 <?xml version="1.0" encoding="utf-8"?>

 <LinearLayout xmlns:android="http://schemas.android.com/apk/res/android"

     android:orientation="vertical" android:layout_width="match_parent"

     android:layout_height="match_parent"

     android:weightSum="1">

     <TextView

         android:layout_width="wrap_content"

         android:layout_height="wrap_content"

         android:id="@+id/student_Id"

         android:visibility="gone"

         android:layout_weight="0.00" />

     <TextView

         android:id="@+id/student_Name"

         android:layout_width="match_parent"

         android:layout_height="wrap_content"

         android:paddingLeft="6dip"

         android:paddingTop="6dip"

         android:textSize="22sp"

         android:textStyle="bold"/>

 </LinearLayout>
view_student_entry
<二>实现代码部分:
1,为了创建表,需要使用到SQLiteDatabase类(实现CRUD操作)和SQLiteOpenHelper(用于数据库的创建和版本管理),
下面先创建一个DBHelper类
CRUD:在MVC系统中,CRUD是什么意思?
CRUD 的意思就是 Create(创建C)、Read(读取R)、Update(更新U)和Delete(删除D)的缩写。
注意:每次我们调用数据库,都会自动打开并连接,所以注意代码实现过程中要close()数据库。
 1 public class DBHelper extends SQLiteOpenHelper {

 2

 3     //version number to upgrade database version

 4     //each time if you Add, Edit table, you need to change the

 5     //version number.

 6     //每次你对数据表进行编辑,添加时候,你都需要对数据库的版本进行提升

 7

 8     //数据库版本

 9     private static final int DATABASE_VERSION=3;

10

11     //数据库名称

12     private static final String DATABASE_NAME="sqlitestudy.db";

13

14

15     public DBHelper(Context context){

16         super(context,DATABASE_NAME,null,DATABASE_VERSION);

17     }

18

19     @Override

20     public void onCreate(SQLiteDatabase db) {

21         //创建数据表

22         String CREATE_TABLE_STUDENT="CREATE TABLE "+ Student.TABLE+"("

23                 +Student.KEY_ID+" INTEGER PRIMARY KEY AUTOINCREMENT ,"

24                 +Student.KEY_name+" TEXT, "

25                 +Student.KEY_age+" INTEGER, "

26                 +Student.KEY_email+" TEXT)";

27         db.execSQL(CREATE_TABLE_STUDENT);

28     }

29

30     @Override

31     public void onUpgrade(SQLiteDatabase db, int oldVersion, int newVersion) {

32         //如果旧表存在,删除,所以数据将会消失

33         db.execSQL("DROP TABLE IF EXISTS "+ Student.TABLE);

34

35         //再次创建表

36         onCreate(db);

37     }

38 }
DBHelper
2,然后我们进入实体类创建 Student
包含有Student数据库表的列信息,也可以单独用于存储某个学生的信息,作为单个对象进行处理。
 package examples.ouc.com.sqlitedemo;

 /**

  * Created by Huskyboy on 2016/10/25.

  */

 public class Student {

     //表名

     public static final String TABLE="Student";

     //表的各个域名

     public static final String KEY_ID="id";

     public static final String KEY_name="name";

     public static final String KEY_email="email";

     public static final String KEY_age="age";

     //属性

     public int student_ID;

     public String name;

     public String email;

     public int age;

 }
Student
3,新建StudentRepo类,编写CRUD函数。
 public class StudentRepo {

     private DBHelper dbHelper;

     public StudentRepo(Context context){

         dbHelper=new DBHelper(context);

     }

     public int insert(Student student){

         //打开连接,写入数据

         SQLiteDatabase db=dbHelper.getWritableDatabase();

         ContentValues values=new ContentValues();

         values.put(Student.KEY_age,student.age);

         values.put(Student.KEY_email,student.email);

         values.put(Student.KEY_name,student.name);

         //

         long student_Id=db.insert(Student.TABLE,null,values);

         db.close();

         return (int)student_Id;

     }

     public void delete(int student_Id){

         SQLiteDatabase db=dbHelper.getWritableDatabase();

         db.delete(Student.TABLE,Student.KEY_ID+"=?", new String[]{String.valueOf(student_Id)});

         db.close();

     }

     public void update(Student student){

         SQLiteDatabase db=dbHelper.getWritableDatabase();

         ContentValues values=new ContentValues();

         values.put(Student.KEY_age,student.age);

         values.put(Student.KEY_email,student.email);

         values.put(Student.KEY_name,student.name);

         db.update(Student.TABLE,values,Student.KEY_ID+"=?",new String[] { String.valueOf(student.student_ID) });

         db.close();

     }

     public ArrayList<HashMap<String, String>> getStudentList(){

         SQLiteDatabase db=dbHelper.getReadableDatabase();

         String selectQuery="SELECT "+

                 Student.KEY_ID+","+

                 Student.KEY_name+","+

                 Student.KEY_email+","+

                 Student.KEY_age+" FROM "+Student.TABLE;

         ArrayList<HashMap<String,String>> studentList=new ArrayList<HashMap<String, String>>();

         Cursor cursor=db.rawQuery(selectQuery,null);

         if(cursor.moveToFirst()){

             do{

                 HashMap<String,String> student=new HashMap<String,String>();

                 student.put("id",cursor.getString(cursor.getColumnIndex(Student.KEY_ID)));

                 student.put("name",cursor.getString(cursor.getColumnIndex(Student.KEY_name)));

                 studentList.add(student);

             }while(cursor.moveToNext());

         }

         cursor.close();

         db.close();

         return studentList;

     }

     public Student getStudentById(int Id){

         SQLiteDatabase db=dbHelper.getReadableDatabase();

         String selectQuery="SELECT "+

                 Student.KEY_ID + "," +

                 Student.KEY_name + "," +

                 Student.KEY_email + "," +

                 Student.KEY_age +

                 " FROM " + Student.TABLE

                 + " WHERE " +

                 Student.KEY_ID + "=?";

         int iCount=0;

         Student student=new Student();

         Cursor cursor=db.rawQuery(selectQuery,new String[]{String.valueOf(Id)});

         if(cursor.moveToFirst()){

             do{

                 student.student_ID =cursor.getInt(cursor.getColumnIndex(Student.KEY_ID));

                 student.name =cursor.getString(cursor.getColumnIndex(Student.KEY_name));

                 student.email  =cursor.getString(cursor.getColumnIndex(Student.KEY_email));

                 student.age =cursor.getInt(cursor.getColumnIndex(Student.KEY_age));

             }while(cursor.moveToNext());

         }

         cursor.close();

         db.close();

         return student;

     }

 }
实现CRUD
4,然后创建StudentDetail的Activity,我们用它来配合显示每个同学具体信息的界面
 public class StudentDetail extends AppCompatActivity implements View.OnClickListener {

     Button btnSava, btnDelete;

     Button btnClose;

     EditText editTextName;

     EditText editTextEmail;

     EditText editTextAge;

     private int _Student_ID=0;

     @Override

     protected void onCreate(Bundle savedInstanceState) {

         super.onCreate(savedInstanceState);

         setContentView(R.layout.activity_student_detail);

         btnSava = (Button) findViewById(R.id.btnSave);

         btnDelete = (Button) findViewById(R.id.btnDelete);

         btnClose = (Button) findViewById(R.id.btnClose);

         btnSava.setOnClickListener(this);

         btnDelete.setOnClickListener(this);

         btnClose.setOnClickListener(this);

         _Student_ID = 0;

         Intent intent = new Intent();

         _Student_ID = intent.getIntExtra("student_Id",0);

         StudentRepo repo = new StudentRepo(this);

         Student student;

         student = repo.getStudentById(_Student_ID);

         editTextAge.setText(String.valueOf(student.age));

         editTextName.setText(student.name);

         editTextEmail.setText(student.email);

     }

     @Override

     public void onClick(View v) {

         StudentRepo repo = new StudentRepo(this);

         if (v == findViewById(R.id.btnSave)){

             Student student = new Student();

             student.age = Integer.parseInt(editTextAge.getText().toString());

             student.email = editTextEmail.getText().toString();

             student.name = editTextName.getText().toString();

             student.student_ID = _Student_ID;

             if(_Student_ID==0){

                 _Student_ID = repo.insert(student);

                 Toast.makeText(this,"New Student Insert",Toast.LENGTH_SHORT).show();

             }else{

                 repo.update(student);

                 Toast.makeText(this,"Student Record updated",Toast.LENGTH_SHORT).show();

             }

         }else if (v == findViewById(R.id.btnDelete)){

             repo.delete(_Student_ID);

             Toast.makeText(this,"Student Record deleted",Toast.LENGTH_SHORT).show();

             finish();

         }else if (v == findViewById(R.id.btnClose)){

             finish();

         }

     }

 }
StudentDetail
5,最后对主界面MainActivity编写代码
注意:这里MainActivity一定要技能ListActivity,否则ListView无法使用
 public class MainActivity extends ListActivity implements android.view.View.OnClickListener {

     private Button btnAdd,btnGetAll;

     private TextView student_Id;

     @Override

     protected void onCreate(Bundle savedInstanceState) {

         super.onCreate(savedInstanceState);

         setContentView(R.layout.activity_main);

         btnAdd = (Button) findViewById(R.id.btnAdd);

         btnAdd.setOnClickListener(this);

         btnGetAll = (Button) findViewById(R.id.btnGetAll);

         btnGetAll.setOnClickListener(this);

     }

     @Override

     public void onClick(View v) {

         if (v== findViewById(R.id.btnAdd)){

             Intent intent = new Intent(MainActivity.this,StudentDetail.class);

             intent.putExtra("student_Id",0);

             startActivity(intent);

         }else {

             StudentRepo repo = new StudentRepo(this);

             ArrayList<HashMap<String, String>> studentList =  repo.getStudentList();

             if(studentList.size()!=0) {

                 ListView lv = getListView();

                 lv.setOnItemClickListener(new AdapterView.OnItemClickListener() {

                     @Override

                     public void onItemClick(AdapterView<?> parent, View view,int position, long id) {

                         student_Id = (TextView) view.findViewById(R.id.student_Id);

                         String studentId = student_Id.getText().toString();

                         Intent objIndent = new Intent(getApplicationContext(),StudentDetail.class);

                         objIndent.putExtra("student_Id", Integer.parseInt( studentId));

                         startActivity(objIndent);

                     }

                 });

                 ListAdapter adapter = new SimpleAdapter( MainActivity.this,studentList, R.layout.view_student_entry, new String[] { "id","name"}, new int[] {R.id.student_Id, R.id.student_Name});

                 setListAdapter(adapter);

             }else{

                 Toast.makeText(this, "No student!", Toast.LENGTH_SHORT).show();

             }

         }

     }

 }
MainActivity
6,最后附上一点我个人在编写过程中遇到得一点傻逼错误,希望自己和看官老爷(如果有幸的话)引以为戒
我们在学习Intent时候,它可以用来帮忙跳转界面,也可以用来帮助传递数据和参数。
例如下面这个例子(MainActivity中跳转到添加界面)
 if (v== findViewById(R.id.btnAdd)){

            Intent intent = new Intent(MainActivity.this,StudentDetail.class);

            intent.putExtra("student_Id",0);

            startActivity(intent);

        }
我们利用intent.putExtra("student_Id",0); 将int型的0,放入了intent,“student_Id”类似于身份的id
在 StudentDetail 我们可以获取到我们传入的这个0
 _Student_ID = 0;

         Intent intent = new Intent();

         //getIntExtra的第二个参数表示:

         //如果没有获取到student_Id的值,那么我们就返回0

         _Student_ID = intent.getIntExtra("student_Id",0);
而我犯的错是。。。。开始没有写第二个参数,因为getStringExtra是不用写第二个参数的,返回的应该是null?
再有就是,我前后的 student_Id 居然写的不一样,一直获取不到,导致app 一直各种闪退和崩溃
Android Studio下SQLite数据库的配置与使用(完)的更多相关文章
- Visual Studio下SQLite数据库开发环境设置
由于我们介绍的内容都是基于微软的Visual Studio下开发的Win32平台,所以下边我们介绍Visual Studio下SQLite数据库开发环境设置.具体而言我们有两种方式可以在Visual ...
- Android studio下gradle Robolectric单元测试配置
android studio下gradle Robolectric单元测试配置 1.Robolectric Robolectric是一个基于junit之上的单元测试框架.它并不依赖于Android提供 ...
- Android Studio 查看SQLite数据库存储位置及文件
前言: 之前开发的一个记账本APP,用的是SQLite数据库,会有一些网友问如何查看数据库,这篇博文对此进行一个说明. 操作: 1.通过DDMS(Dalvik Debug Monitor Servic ...
- Android Studio连接SQLite数据库与SQLite Studio实时同步的实现
最近学习用到了android开发连接数据库这一块,发现连接成功后,都要先访问安卓项目的数据库路径data/data/项目/databases,然后把对应的db文件拷出来,再在SQLite的可视化工具中 ...
- Android Studio下通过Gradle配置实现资源文件的模块化
当开发一个app模块个数很多的时候,资源文件就会特别多,布局也会多起来,这时所有的layout都放在同一个目录下,就会显得臃肿,而且不好找相应的布局. 最近看到相关资料,发现在Android Stud ...
- Android studio 下JNI编程实例并生成so库
Android studio 下JNI编程实例并生成so库 因为公司需要为Android相机做美颜等图像后期处理,需要使用JNI编程,最近学了下JNI,并且在Android Studio下实现了一个小 ...
- Android Studio下打jar包
在我们使用Eclipse时,我们常常使用的第三方类库文件大多都是jar包形式,用起来很方便.但是jar包只能打包class文件,对于Android UI类库而言,我们常常需要打包资源文件,对于界面不多 ...
- Android Studio C/C++开发环境配置
Android Studio C/C++开发环境配置 我的开发环境 : Win 10 + android studio 1.5 一, 安装NDK 开发环境: 1. Settings -> ...
- Android Studio下多渠道打包
Android Studio下实现多渠道打包 直接上步骤 步骤 1. 清单文件添加属性(以友盟统计为例) 在application标签下添加meta-data属性 <application -- ...
随机推荐
- vm虚拟机启动失败 Global\vmx86
workstation12 PRO 启动虚拟机异常报错:无法打开内核设备“\\.\Global\vmx86”: 系统找不到指定的文件 解决方法,启动windows系统服务:
- html+css复习之第3篇 | jquery | bootstrap
html+css复习之第3篇 | jquery | bootstrap
- myisam压缩(前缀压缩)索引
myisam使用前缀压缩来减少索引的大小,从而让更多的索引可以放入内存中,默认只压缩字符串,但通过参数配置也可以对整数做压缩,myisam压缩每个索引块的方法是,先完全保存索引块中的第一个值,然后将其 ...
- 细话 - 如何在web应用中使用百度地图
初步接触了高德地图嵌入到网站应用中的知识后,对高德地图提供的文档,源码以及使用快捷,方便非常满意. 由此,利用周末时间研究了下如何使用 百度地图 . 总的来说,方式方法都差不多,都提供了源码和文档实例 ...
- java第三章动手动脑
public class InitializeBlockDemo { /** * @param args */ public static void main(String[] args) { Ini ...
- mac下 codeigniter在apache下去掉index.php
原文:http://blog.csdn.net/tutngfei1129287460/article/details/18359191 1.要修改Apache 的配置文件,让Apache支持rewri ...
- file_get_contents微信头像等待时间过长的原因
UPDATE 2016/05/13 stackoverflow上的解决方法:http://stackoverflow.com/questions/3629504/php-file-get-conten ...
- Windows Internals学习笔记(六)Windows关键系统组件
参考资料: 1. <Windows Internals> 2. Dependency Walker 3. Ntoskrnl.exe 4. Livekd的使用 5. WinDbg的使用(一) ...
- XAF学习资源整合大全
近期有很多XAF初学者与我联系,我多数时间在重复很多入门问题,所以决定整理一篇XAF资源列表,方便大家查找资料,也请知晓其他资源的人留言或与我联系,我将新资源追加到本篇文章中,方便更多人. 一.本博客 ...
- iOS - C 应用
前言 1)操作符两端必须加空格,(每行第一个赋值语句对齐). 2)变量名必须是英文(不能是拼音):英文.数字.下划线和美元符号. 3)等于号 == 反过来写(0 == i%4)防止少些赋值号的错误. ...