【转】Hostapd工作流程分析
【转】Hostapd工作流程分析
转自:http://blog.chinaunix.net/uid-30081165-id-5290531.html
Hostapd是一个运行在用户态的守护进程,可以通过Hostapd来读取配置文件,通过nl802.11来控制底层的状态如RTS/CTS beacon帧间隔等等信息;也可以读取相关的信息。
其代码框架如下图所示:hostapd_cli是基于文本的命令命令界面,GUI则是图形控制界面;event loop是一个死循环函数用于接收和处理各种事件信息。
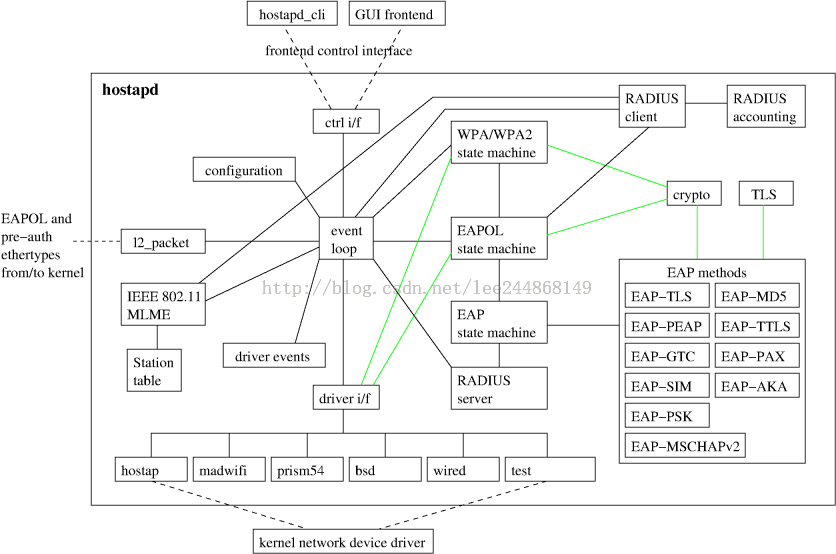
下图是各种命令配置工具以及无线工作流程:

实际上可以看到无论是wpa_supplient iw还是hostapd工具都是通过调用libnl的相关方法来完成信息的配置预读取的。
接下来分析hostaod的主函数:
int main(int argc, char *argv[])

{

    struct hapd_interfaces interfaces;

    int ret = ;

    size_t i, j;

    int c, debug = ;

    const char *log_file = NULL;

    const char *entropy_file = NULL;

    char **bss_config = NULL, **tmp_bss;

    size_t num_bss_configs = ;

#ifdef CONFIG_DEBUG_LINUX_TRACING

    int enable_trace_dbg = ;

#endif /* CONFIG_DEBUG_LINUX_TRACING */

    if (os_program_init())

        return -;

    os_memset(&interfaces, , sizeof(interfaces));

    interfaces.reload_config = hostapd_reload_config;

    interfaces.config_read_cb = hostapd_config_read;

    interfaces.for_each_interface = hostapd_for_each_interface;

    interfaces.ctrl_iface_init = hostapd_ctrl_iface_init;

    interfaces.ctrl_iface_deinit = hostapd_ctrl_iface_deinit;

    interfaces.driver_init = hostapd_driver_init;

    interfaces.global_iface_path = NULL;

    interfaces.global_iface_name = NULL;

    interfaces.global_ctrl_sock = -;

    wpa_supplicant_event = hostapd_wpa_event;

    //分析配置文件信息

    for (;;) {

        c = getopt(argc, argv, "b:Bde:f:hKP:Ttu:g:G:v::");

        if (c < )

            break;

        switch (c) {

        case 'h':

            usage();

            break;

        case 'd':

            debug++;

            if (wpa_debug_level > )

                wpa_debug_level--;

            break;

        case 'B':

            daemonize++;

            break;

        case 'e':

            entropy_file = optarg;

            break;

        case 'f':

            log_file = optarg;

            break;

        case 'K':

            wpa_debug_show_keys++;

            break;

        case 'P':

            os_free(pid_file);

            pid_file = os_rel2abs_path(optarg);

            break;

        case 't':

            wpa_debug_timestamp++;

            break;

#ifdef CONFIG_DEBUG_LINUX_TRACING

        case 'T':

            enable_trace_dbg = ;

            break;

#endif /* CONFIG_DEBUG_LINUX_TRACING */

        case 'v':

            if (optarg)

                exit(!has_feature(optarg));

            show_version();

            exit();

            break;

        case 'g':

            if (hostapd_get_global_ctrl_iface(&interfaces, optarg))

                return -;

            break;

        case 'G':

            if (hostapd_get_ctrl_iface_group(&interfaces, optarg))

                return -;

            break;

        case 'b':

            tmp_bss = os_realloc_array(bss_config,

                num_bss_configs + ,

                sizeof(char *));

            if (tmp_bss == NULL)

                goto out;

            bss_config = tmp_bss;

            bss_config[num_bss_configs++] = optarg;

            break;

#ifdef CONFIG_WPS

        case 'u':

            return gen_uuid(optarg);

#endif /* CONFIG_WPS */

        default:

            usage();

            break;

        }

    }

    if (optind == argc && interfaces.global_iface_path == NULL &&

        num_bss_configs == )

        usage();

    wpa_msg_register_ifname_cb(hostapd_msg_ifname_cb);

    if (log_file)

        wpa_debug_open_file(log_file);

#ifdef CONFIG_DEBUG_LINUX_TRACING

    if (enable_trace_dbg) {

        int tret = wpa_debug_open_linux_tracing();

        if (tret) {

            wpa_printf(MSG_ERROR, "Failed to enable trace logging");

            return -;

        }

    }

#endif /* CONFIG_DEBUG_LINUX_TRACING */

    interfaces.count = argc - optind;

    if (interfaces.count || num_bss_configs) {

        interfaces.iface = os_calloc(interfaces.count + num_bss_configs,

            sizeof(struct hostapd_iface *));

        if (interfaces.iface == NULL) {

            wpa_printf(MSG_ERROR, "malloc failed");

            return -;

        }

    }

    //初始化global context信息

    if (hostapd_global_init(&interfaces, entropy_file)) {

        wpa_printf(MSG_ERROR, "Failed to initilize global context");

        return -;

    }

    /* Allocate and parse configuration for full interface files */

    for (i = ; i < interfaces.count; i++) {

        interfaces.iface[i] = hostapd_interface_init(&interfaces,

            argv[optind + i],

            debug);

        if (!interfaces.iface[i]) {

            wpa_printf(MSG_ERROR, "Failed to initialize interface");

            goto out;

        }

    }

    /* Allocate and parse configuration for per-BSS files */

    for (i = ; i < num_bss_configs; i++) {

        struct hostapd_iface *iface;

        char *fname;

        wpa_printf(MSG_INFO, "BSS config: %s", bss_config[i]);

        fname = os_strchr(bss_config[i], ':');

        if (fname == NULL) {

            wpa_printf(MSG_ERROR,

                "Invalid BSS config identifier '%s'",

                bss_config[i]);

            goto out;

        }

        *fname++ = '\0';

        iface = hostapd_interface_init_bss(&interfaces, bss_config[i],

            fname, debug);

        if (iface == NULL)

            goto out;

        for (j = ; j < interfaces.count; j++) {

            if (interfaces.iface[j] == iface)

                break;

        }

        if (j == interfaces.count) {

            struct hostapd_iface **tmp;

            tmp = os_realloc_array(interfaces.iface,

                interfaces.count + ,

                sizeof(struct hostapd_iface *));

            if (tmp == NULL) {

                hostapd_interface_deinit_free(iface);

                goto out;

            }

            interfaces.iface = tmp;

            interfaces.iface[interfaces.count++] = iface;

        }

    }

    /*

    * Enable configured interfaces. Depending on channel configuration,

    * this may complete full initialization before returning or use a

    * callback mechanism to complete setup in case of operations like HT

    * co-ex scans, ACS, or DFS are needed to determine channel parameters.

    * In such case, the interface will be enabled from eloop context within

    * hostapd_global_run().

    */

    interfaces.terminate_on_error = interfaces.count;

    for (i = ; i < interfaces.count; i++) {

        //根据配置文件设置iface信息

        if (hostapd_driver_init(interfaces.iface[i]) ||

            //将配置文件通过写入驱动          hostapd_setup_interface(interfaces.iface[i]))

            goto out;

    }

    hostapd_global_ctrl_iface_init(&interfaces);

        // hostapd_global_run死循环,接收处理信息

    if (hostapd_global_run(&interfaces, daemonize, pid_file)) {

        wpa_printf(MSG_ERROR, "Failed to start eloop");

        goto out;

    }

    ret = ;

out:

    hostapd_global_ctrl_iface_deinit(&interfaces);

    /* Deinitialize all interfaces */

    for (i = ; i < interfaces.count; i++) {

        if (!interfaces.iface[i])

            continue;

        interfaces.iface[i]->driver_ap_teardown =

            !!(interfaces.iface[i]->drv_flags &

                WPA_DRIVER_FLAGS_AP_TEARDOWN_SUPPORT);

        hostapd_interface_deinit_free(interfaces.iface[i]);

    }

    os_free(interfaces.iface);

    hostapd_global_deinit(pid_file);

    os_free(pid_file);

    if (log_file)

        wpa_debug_close_file();

    wpa_debug_close_linux_tracing();

    os_free(bss_config);

    os_program_deinit();

    return ret;

}
分析:
1) 函数主要分为三部分,第一部是读取命令行参数作相应的处理。
2) 第二部分主要是根据配置文件设置hapd_interface的参数然后通过一系列的函数调用进入内核态设置相应的内核参数。核心代码如下:
首先是通过调用函数hostapd_driver_init获取配置信息保存在iface[i]中,然后通过调用函数hostapd_setup_interface函数将其配置信息写入内核。
for (i = ; i < interfaces.count; i++) {

        //根据配置文件设置iface信息

        if (hostapd_driver_init(interfaces.iface[i]) ||

            //将配置文件通过写入驱动          hostapd_setup_interface(interfaces.iface[i]))

            goto out;

    }
下面来跟一下写入的过程:
通过依次调用
hostapd_setup_interface
------>setup_interface
------>hostapd_set_country
------>setup_interface2
------>hostapd_setup_interface_complete
------>hostapd_set_freq
------>hostapd_set_rts
------>hostapd_set_state
------>hostapd_tx_queue_para,
通过这几个调用进入netlink层,后面的过程此处不做详解。
全局变量eloop是执行这个死循环的重要结构体,其定义如下所示:
struct eloop_sock {

    int sock;

    void *eloop_data;

    void *user_data;

    eloop_sock_handler handler;

    WPA_TRACE_REF(eloop);

    WPA_TRACE_REF(user);

    WPA_TRACE_INFO

};

struct eloop_sock_table {

    int count;

    struct eloop_sock *table;

#ifdef CONFIG_ELOOP_EPOLL

    eloop_event_type type;

#else /* CONFIG_ELOOP_EPOLL */

    int changed;

#endif /* CONFIG_ELOOP_EPOLL */

};

struct eloop_data {

    int max_sock;

    int count; /* sum of all table counts */

#ifdef CONFIG_ELOOP_POLL

    int max_pollfd_map; /* number of pollfds_map currently allocated */

    int max_poll_fds; /* number of pollfds currently allocated */

    struct pollfd *pollfds;

    struct pollfd **pollfds_map;

#endif /* CONFIG_ELOOP_POLL */

#ifdef CONFIG_ELOOP_EPOLL

    int epollfd;

    int epoll_max_event_num;

    int epoll_max_fd;

    struct eloop_sock *epoll_table;

    struct epoll_event *epoll_events;

#endif /* CONFIG_ELOOP_EPOLL */

    struct eloop_sock_table readers;

    struct eloop_sock_table writers;

    struct eloop_sock_table exceptions;

    struct dl_list timeout;

    int signal_count;

    struct eloop_signal *signals;

    int signaled;

    int pending_terminate;

    int terminate;

};
也就是说其主要定义了reader,wri
首先是对sock timeout 和event三个函数table的初始化,在main中调用函数
hostapd_global_init完成,其代码如下:首先通过调用eloop_init完成了对eloop这个全局变量的初始化。
static int hostapd_global_init(struct hapd_interfaces *interfaces,

    const char *entropy_file)

{

    int i;

    os_memset(&global, , sizeof(global));

    hostapd_logger_register_cb(hostapd_logger_cb);

    if (eap_server_register_methods()) {

        wpa_printf(MSG_ERROR, "Failed to register EAP methods");

        return -;

    }

    if (eloop_init()) {

        wpa_printf(MSG_ERROR, "Failed to initialize event loop");

        return -;

    }

    random_init(entropy_file);

#ifndef CONFIG_NATIVE_WINDOWS

    eloop_register_signal(SIGHUP, handle_reload, interfaces);

    eloop_register_signal(SIGUSR1, handle_dump_state, interfaces);

#endif /* CONFIG_NATIVE_WINDOWS */

    eloop_register_signal_terminate(handle_term, interfaces);

#ifndef CONFIG_NATIVE_WINDOWS

    openlog("hostapd", , LOG_DAEMON);

#endif /* CONFIG_NATIVE_WINDOWS */

    for (i = ; wpa_drivers[i]; i++)

        global.drv_count++;

    if (global.drv_count == ) {

        wpa_printf(MSG_ERROR, "No drivers enabled");

        return -;

    }

    global.drv_priv = os_calloc(global.drv_count, sizeof(void *));

    if (global.drv_priv == NULL)

        return -;

    return ;

}
接着是对各个事件的注册,如下所示即为注册socket的函数:
int eloop_register_sock(int sock, eloop_event_type type,
eloop_sock_handler handler,
void *eloop_data, void *user_data)
{
struct eloop_sock_table *table;
assert(sock >= 0);
table = eloop_get_sock_table(type);
return eloop_sock_table_add_sock(table, sock, handler,
eloop_data, user_data);
}
分析代码即为将相应的handler和data放进sock_table表中即可。
最后是在函数hostapd_global_run中死循环来检测socket或者timeout或者event的相关量是否发生变化进而调用相应的提前注册到该事件上的函数。
其处理socket事件的核心代码如下:将其添加进相应的表中
eloop_sock_table_set_fds(&eloop.readers, rfds);

eloop_sock_table_set_fds(&eloop.writers, wfds);

eloop_sock_table_set_fds(&eloop.exceptions, efds);

res = select(eloop.max_sock + , rfds, wfds, efds,

                 timeout ? &_tv : NULL);
最后执行相应的提前注册的函数:
eloop_sock_table_dispatch(&eloop.readers, rfds);

eloop_sock_table_dispatch(&eloop.writers, wfds);

eloop_sock_table_dispatch(&eloop.exceptions, efds);
至此hostapd的基本流程分析完了。
【转】Hostapd工作流程分析的更多相关文章
- 第2章 rsync算法原理和工作流程分析
本文通过示例详细分析rsync算法原理和rsync的工作流程,是对rsync官方技术报告和官方推荐文章的解释. 以下是本文的姊妹篇: 1.rsync(一):基本命令和用法 2.rsync(二):ino ...
- [国嵌笔记][030][U-Boot工作流程分析]
uboot工作流程分析 程序入口 1.打开顶层目录的Makefile,找到目标smdk2440_config的命令中的第三项(smdk2440) 2.进入目录board/samsung/smdk244 ...
- rsync算法原理和工作流程分析
本文通过示例详细分析rsync算法原理和rsync的工作流程,是对rsync官方技术报告和官方推荐文章的解释.本文不会介绍如何使用rsync命令(见rsync基本用法),而是详细解释它如何实现高效的增 ...
- nodejs的Express框架源码分析、工作流程分析
nodejs的Express框架源码分析.工作流程分析 1.Express的编写流程 2.Express关键api的使用及其作用分析 app.use(middleware); connect pack ...
- Mysql工作流程分析
Mysql工作流程图 工作流程分析 1. 所有的用户连接请求都先发往连接管理器 2. 连接管理器 (1)一直处于侦听状态 (2)用于侦听用户请求 3. 线程管理器 (1)因为每个用户 ...
- u-boot分析(二)----工作流程分析
u-boot分析(二) 由于这两天家里有点事,所以耽误了点时间,没有按时更新,今天我首先要跟大家说说我对于u-boot分析的整体的思路,然后呢我以后的博客会按照这个内容更新,希望大家关注. 言归正传, ...
- Struts2的工作流程分析
Struts2的工作流程分析 Posted on 2011-02-22 09:32 概述 本章讲述Struts2的工作原理. 读者如果曾经学习过Struts1.x或者有过Struts1.x的开发经验, ...
- rsync(三)算法原理和工作流程分析
在开始分析算法原理之前,简单说明下rsync的增量传输功能. 假设待传输文件为A,如果目标路径下没有文件A,则rsync会直接传输文件A,如果目标路径下已存在文件A,则发送端视情况决定是否要传输文件A ...
- Kafka工作流程分析
Kafka工作流程分析 生产过程分析 写入方式 producer采用推(push)模式将消息发布到broker,每条消息都被追加(append)到分区(patition)中,属于顺序写磁盘(顺序写磁盘 ...
随机推荐
- 滚轮事件js
<!DOCTYPE html> <html> <head> <title>jane</title> <style>div ...
- 图文详解MFC程序设置菜单快捷键
原来觉得添加个快捷键就只要几分钟,上网搜索文章都写得很模糊, 只有这边文章不错. http://www.cplusplus.me/1263.html http://blog.sina.com.cn/s ...
- java中日历代码的实现
import java.util.Scanner; com.lv.calendarWatch//包名 /* * 需求:输入一个年份和月份 ,显示当前月日情况 ,星期数要对应准确 * 1.1900年1月 ...
- 关于队列queue
1.在多线程和多进程中都有queue.调用方式不同,使用方式一致: 线程中: import queue q = queue.Queue(maxsize = 2) 进程中: from multiproc ...
- 优化SQL Sever查询语句的几个要点
1.不要在Where子句中的“=”左边进行函数.算术运算或其他表达式运算,否则系统将可能无法正确使用索引. 2.尽量不要在Where条件中使用函数,否则将不能利用索引. 3.在Where条件中使用明确 ...
- maven记录
1. 跳过测试 mvn -Dmaven.test.skip=true 2. 依赖树 mvn dependency:tree 3. 生成UTF-8的eclipse工程 构成目录中的.settings文 ...
- Ruby 类案例
#!/user/bin/ruby # -*-coding:UTF-8-*- class Customer @@no_of_customers=0 def initialize(id,name,addr ...
- (copy) Shell Script to Check Linux System Health
source: http://linoxide.com/linux-shell-script/shell-script-check-linux-system-health/ This article ...
- VS2010的Razor智能感知和语法高亮突然消失
猜想可能是安装了VS2008的原因,尝试重新安装下面的组件,看看是否解决问题: 用于 Visual Studio 2010 SP1 和 Visual Web Developer 2010 SP1 的 ...
- LUA OOP 单例模式实现的 一个 方案
单例 存在这么一类class, 无论class怎么初始化, 产生的instance都是同一个对象. Code string.toHTMLCode = function(self) return enc ...