Android课程---课下练习(表格、线性和相对布局)
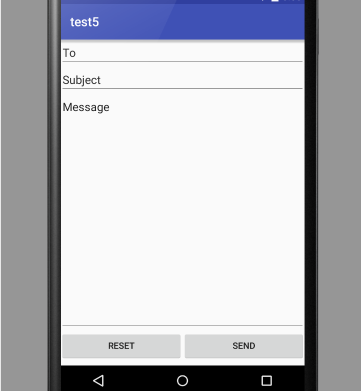
1.表格布局
练习代码:
<?xml version="1.0" encoding="utf-8"?>

<TableLayout xmlns:android="http://schemas.android.com/apk/res/android"

    android:layout_width="match_parent"

    android:layout_height="match_parent"

    android:stretchColumns="4,2">

    <TableRow>

        <EditText

            android:layout_width="wrap_content"

            android:layout_height="wrap_content"

            android:hint="To:"

            android:layout_span="4"/>

        </TableRow>

    <TableRow>

        <EditText

            android:layout_width="wrap_content"

            android:layout_height="wrap_content"

            android:hint="Subject:"

            android:layout_span="4"/>

    </TableRow>

    <TableRow>

        <EditText

            android:layout_width="wrap_content"

            android:layout_height="wrap_content"

            android:hint="Message:"

            android:layout_span="4"

            android:paddingBottom="340dp"/>

    </TableRow>

    <TableRow>

        <Button

            android:layout_width="wrap_content"

            android:layout_height="wrap_content"

            android:text="Reset"

            android:layout_weight="1"/>

        <Button

            android:layout_width="wrap_content"

            android:layout_height="wrap_content"

            android:text="Send"

            android:layout_weight="1"/>

    </TableRow>

</TableLayout>
效果图:

2.线性布局
练习代码:
<?xml version="1.0" encoding="utf-8"?>

<LinearLayout xmlns:android="http://schemas.android.com/apk/res/android"

    android:layout_width="match_parent"

    android:layout_height="match_parent"

    android:orientation="vertical">

    <LinearLayout

        android:layout_width="match_parent"

        android:layout_height="wrap_content">

    <EditText

        android:layout_width="match_parent"

        android:layout_height="wrap_content"

        android:hint="To:"/>

    </LinearLayout>

    <LinearLayout

        android:layout_width="match_parent"

        android:layout_height="wrap_content">

    <EditText

        android:layout_width="match_parent"

        android:layout_height="wrap_content"

        android:hint="Subject:"/>

    </LinearLayout>

    <LinearLayout

        android:layout_width="match_parent"

        android:layout_height="wrap_content">

    <EditText

        android:layout_width="match_parent"

        android:layout_height="wrap_content"

        android:hint="Message:"

        android:paddingBottom="340dp"/>

    </LinearLayout>

    <LinearLayout

        android:layout_width="match_parent"

        android:layout_height="wrap_content"

        android:layout_gravity="center_horizontal">

    <Button

        android:layout_width="wrap_content"

        android:layout_height="wrap_content"

        android:text="Reset"

        android:layout_weight="1"/>

    <Button

        android:layout_width="wrap_content"

        android:layout_height="wrap_content"

        android:text="Send"

        android:layout_weight="1"/>

    </LinearLayout>

</LinearLayout>
效果图:

3.相对布局
练习代码:
<?xml version="1.0" encoding="utf-8"?>

<RelativeLayout xmlns:android="http://schemas.android.com/apk/res/android"

    android:layout_width="match_parent"

    android:layout_height="match_parent">

    <EditText

        android:layout_width="match_parent"

        android:layout_height="wrap_content"

        android:hint="To:"

        android:id="@+id/to"/>

    <EditText

        android:layout_width="match_parent"

        android:layout_height="wrap_content"

        android:hint="Subject:"

        android:layout_below="@+id/to"

        android:id="@+id/su"/>

    <EditText

        android:layout_width="match_parent"

        android:layout_height="wrap_content"

        android:hint="Message:"

        android:layout_below="@+id/su"

        android:paddingBottom="350dp"/>

    <Button

        android:layout_width="wrap_content"

        android:layout_height="wrap_content"

        android:text="Reset"

        android:layout_alignParentBottom="true"

        android:id="@+id/re"

        android:layout_marginLeft="90dp"

        />

    <Button

        android:layout_width="wrap_content"

        android:layout_height="wrap_content"

        android:text="Send"

        android:layout_alignParentBottom="true"

        android:layout_centerInParent="true"

        android:layout_toRightOf="@+id/re"

        />

</RelativeLayout>
效果图:

ps:是不是发现最后一张效果图与前面2张不一样了,其实前面那2张才是正确的,那你就该问了,为什么最后一个不一样啊?事实是我试了好多办法,练习了好久,遗憾的是最后用相对布局方法还是没能做出来,只能放上我做的这张图了
Android课程---课下练习(表格、线性和相对布局)的更多相关文章
- android从放弃到坚持放弃第二课(下)
续第二课( 下) 续第二课 下 活动的生命周期 返回栈 活动状态 活动的生存期 体验活动的生命周期 活动被回收怎么办 活动的启动模式 standard singleTop singleTask sin ...
- 【Xamarin开发 Android 系列 7】 Android 结构基础(下)
原文:[Xamarin开发 Android 系列 7] Android 结构基础(下) *******前期我们不打算进行太深入的东西,省的吓跑刚进门的,感觉门槛高,so,我们一开始就是跑马灯一样,向前 ...
- android第二课:运行你的应用
如果你按照前面课程创建了 Android 项目,它包含了可以立即运行的 "Hello World"源代码文件. 由两该条件来决定如何运行你的应用:你是否拥有运行着 Android ...
- 20175234 数据库MySQL(课下作业)
20175234 数据库MySQL(课下作业) 内容: 1.下载附件中的world.sql.zip, 参考http://www.cnblogs.com/rocedu/p/6371315.html#SE ...
- 课下测试补交(ch01、ch02、ch07)
课下测试补交(ch01.ch02.ch07) 课下测试ch01 1.Amdahl定律说明,我们对系统的某个部分做出重大改进,可以显著获得一个系统的加速比.(B) A . 正确 B . 错误 解析:课本 ...
- # 课下测试补交(ch01)20155337
课下测试补交(ch01) 1.Amdahl定律说明,我们对系统的某个部分做出重大改进,可以显著获得一个系统的加速比.(B) A .正确 B .错误 解析:Amdahl定律,该定律的主要思想是,当我们对 ...
- 2017-2018-1 20155327 《信息安全系统设计基础》课堂测试&课下作业
2017-2018-1 20155327 <信息安全系统设计基础>课堂测试&课下作业 学习使用stat(1),并用C语言实现 提交学习stat(1)的截图 man -k ,grep ...
- 课下测试CH01补交
课下测试CH01补交 ( 单选题 | 1 分) Amdahl定律说明,我们对系统的某个部分做出重大改进,可以显著获得一个系统的加速比. A . 正确 B . 错误 正确答案: B 你的答案: 未作答 ...
- Android课程设计第一天Android Studio安装
注意:课程设计只为完成任务,不做细节描述~ 学校有一个Android的课设,所以顺便把Android Studio安装了上去. 实际上安装过程并不复杂,只有几个地方需要注意~ 安装包可以去http:/ ...
随机推荐
- ASP.NET MVC3 中整合 NHibernate3.3、Spring.NET2.0 使用AOP执行事务处理
方法1 <object id="ServiceOperation" type="Spring.Aop.Support.SdkRegularExpressionMet ...
- LIS(n^2) POJ 2533 Longest Ordered Subsequence
题目传送门 题意:LIS(Longest Increasing Subsequence)裸题 分析:状态转移方程:dp[i] = max (dp[j]) + 1 (a[j] < a[i],1 ...
- MFC MSBDutyTable下载地址
点击此处跳转到下载地址 简明教程: 对于非制表人,只需要添加空余时间-新建,然后点星期和节数有课的那个按钮,勾选自己有课的周数.全部勾好后,生成空余时间表.然后查看自己的空余时间表,并导出,发给制表人 ...
- django 安装
git clone https://github.com/django/django.git 或者到django的官网下载 然后 python setup.py install
- ccc this 指针
cc.Class({ extends: cc.Component, properties: { musicPlayer: { default: null, type: cc.AudioSource } ...
- BZOJ3946 : 无聊的游戏
首先把所有串拼起来,后插入的串在前面,得到一个大串. 那么任意时刻,每个串是由这个大串的若干个不相交的子串从左到右拼接而成. 用线段树维护每个串,每个节点维护一个标记,表示区间内的串要加上什么前缀. ...
- Android -----listView的属性大全
http://www.cnblogs.com/zhengbeibei/archive/2013/03/29/2988814.html 01 <?xml version="1.0 ...
- CentOS6.4 安装SSDB
1.安装 wget --no-check-certificate https://github.com/ideawu/ssdb/archive/master.zipunzip mastercd ssd ...
- ACM: HDU 1028 Ignatius and the Princess III-DP
HDU 1028 Ignatius and the Princess III Time Limit:1000MS Memory Limit:32768KB 64bit IO Form ...
- GO语言练习:第二个工程--模拟音乐播放器
1.代码 2.编译及运行 1.目录结构 1.1) $ tree . ├── mplayer.go └── src ├── mlib │ ├── manager.go │ └── manager ...
