一脸懵逼学习Hive的元数据库Mysql方式安装配置
1:要想学习Hive必须将Hadoop启动起来,因为Hive本身没有自己的数据管理功能,全是依赖外部系统,包括分析也是依赖MapReduce;
2:七个节点跑HA集群模式的:
第一步:必须先将Zookeeper启动起来(HA里面好多组件都依赖Zookeeper):
切换目录,启动Zookeeper(master节点,slaver1节点,slaver2节点):./zkServer.sh start
第二步:启动HDFS(千万不要格式化了,不然肯定报错给你):
直接在slaver3节点启动:start-dfs.sh
第三步:启动yarn:
直接在slaver4节点,slaver5节点启动:start-yarn.sh
第四步:使用hive:
切换目录使用(slaver3节点):./hive
这启动过程和上篇博客启动集群的模式完全吻合,所以一定注意启动节点,以及启动节点的进程的步骤和过程哦;
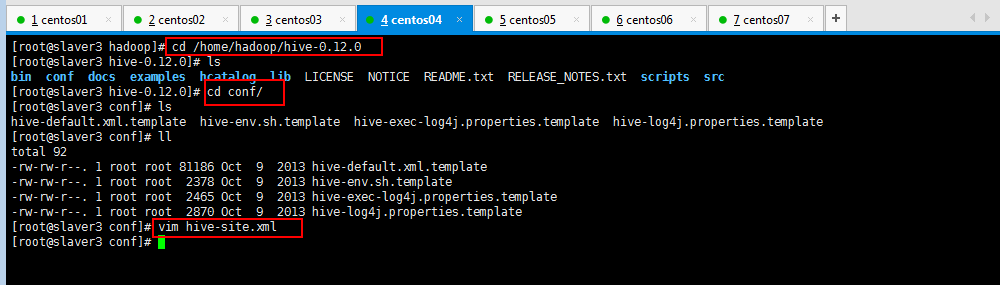
3:Hive配置Mysql方便对数据的管理(切换到hive目录下面的conf目录):
注意:发现内置默认的metastore存在问题
(1)换执行路径后,原来的表不存在了。
(2)只能有一个用户访问同一个表。
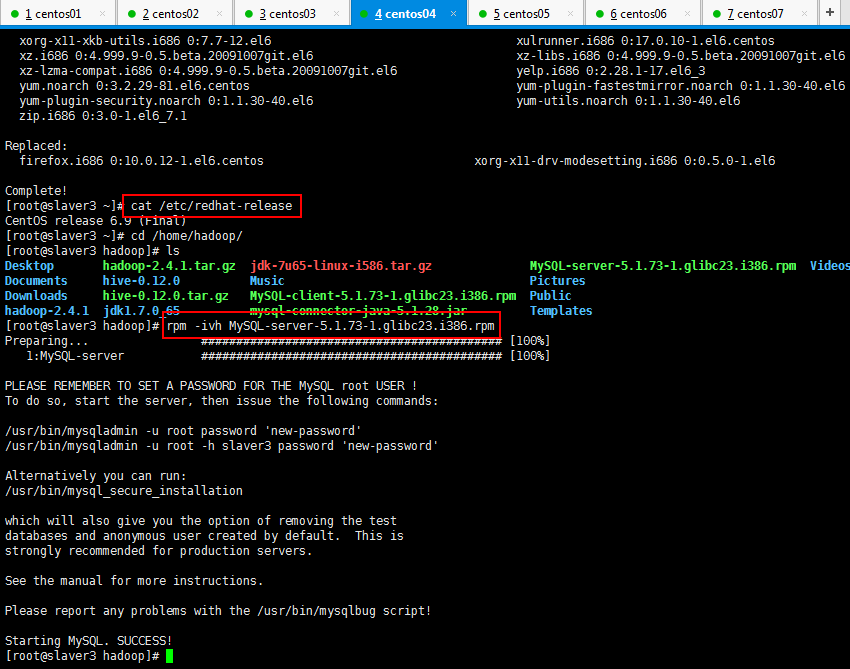
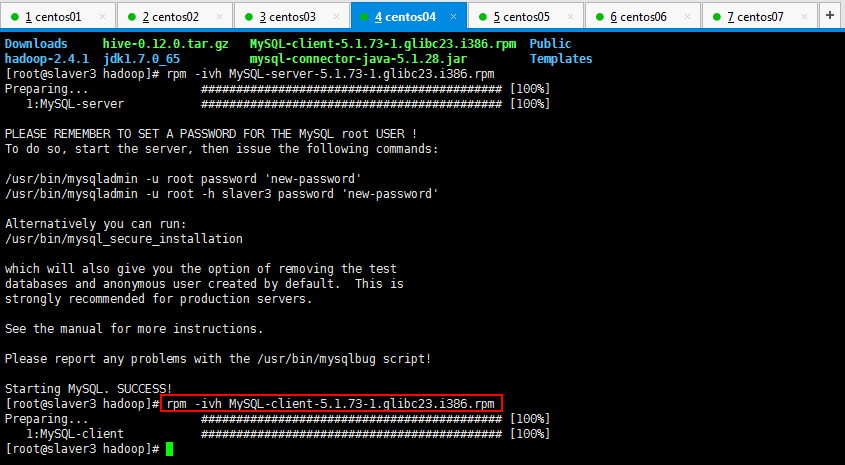
(3)配置mysql的metastore,上传两个mysql的rpm包
1)rpm -qa | grep mysql
rpm -e mysql-libs-5.1.66-2.el6_3.i686 --nodeps
rpm -ivh MySQL-server-5.1.73-1.glibc23.i386.rpm
rpm -ivh MySQL-client-5.1.73-1.glibc23.i386.rpm2)配置mysql
/usr/bin/mysql_secure_installation
3)授权
GRANT ALL PRIVILEGES ON test.* TO 'root'@'%' IDENTIFIED BY '密码' WITH GRANT OPTION;
//刷新授权命令FLUSH PRIVILEGES;
4)安装hive和mysql完成后,将mysql的连接jar包拷贝到$HIVE_HOME/lib目录下
如果出现没有权限的问题,在mysql授权(在安装mysql的机器上执行)
mysql -uroot -p密码注意:(执行下面的语句 *.*代表所有库下的所有表 %:任何IP地址或主机都可以连接)
GRANT ALL PRIVILEGES ON *.* TO 'root'@'%' IDENTIFIED BY '密码' WITH GRANT OPTION;
FLUSH PRIVILEGES;

然后将hive-default.xml.template复制一份为hive-site.xml:
[root@slaver3 conf]# cp hive-default.xml.template hive-site.xml
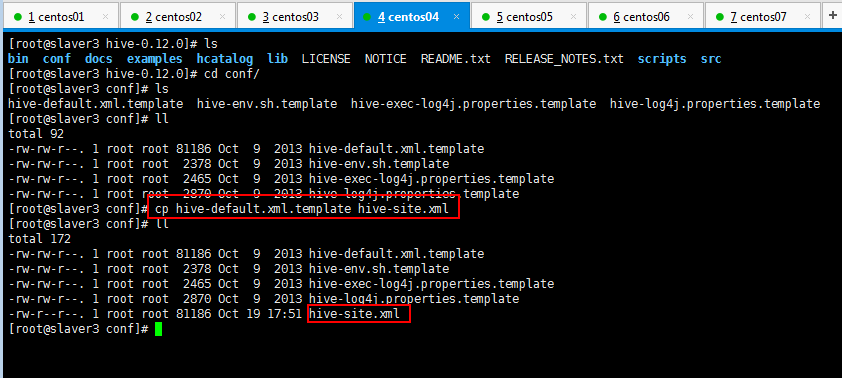
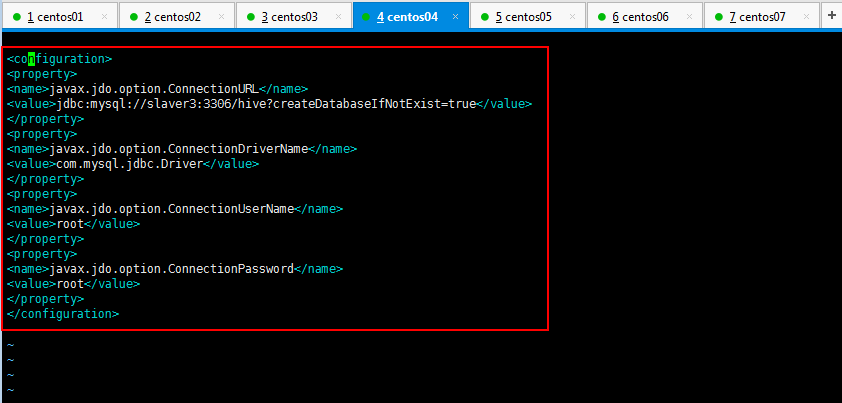
要想使用Mysql对Hive的元数据进行管理,需要在hive-site.xml配置一下(由于要修改hive-site.xml,里面内容比较多,可以将复制的删除了,新建一个空白的文件):
[root@slaver3 conf]# vim hive-site.xml 
然后对内容进行编辑,编辑内容就是Mysql的驱动,账号,密码,路径,如下所示:
如果数据库不存在自动创建:?createDatabaseIfNotExist=true
如果hive数据库不存在就创建一个:hive?createDatabaseIfNotExist=true
<property>

<name>javax.jdo.option.ConnectionURL</name>

<value>jdbc:mysql://slaver3:3306/hive?createDatabaseIfNotExist=true</value>

</property>

<property>

<name>javax.jdo.option.ConnectionDriverName</name>

<value>com.mysql.jdbc.Driver</value>

</property>

<property>

<name>javax.jdo.option.ConnectionUserName</name>

<value>root</value>

</property>

<property>

<name>javax.jdo.option.ConnectionPassword</name>

<value>123456</value>

</property>
4:Centos安装mysql:
如果安装好了,直接登陆mysql -u账号 -p密码;
如果没安装先安装;
如果不知道是否安装可以whereis mysql查看一下mysql是否安装(查看路径的);
如果查找mysql路径登陆不了就先将mysql删除了,然后安装mysql;思路就是这个,百度方法也很多,我也是边学习边百度,大家都互相脑补吧。
rpm方式安装mysql(包括安装mysql的客户端和服务器端),如下所示,首先将mysql的下载好客户端和服务器端上传到虚拟机上面:

使用rpm命令安装:
rpm -ivh MySQL-server-5.1.73-1.glibc23.i386.rpm
注意:命令解释:i:install v:显示详情 h:显示进度条
下面分别安装服务器端和客户端:
如果遇到如下所示的错误:
解决方法如下所示,把之前的Mysql版本删除了:
[root@slaver1 package]# yum -y remove mysql-libs-5.1.*
错误如下所示:
 [root@slaver1 package]# rpm -ivh MySQL-server-5.1.-.glibc23.i386.rpm

 Preparing...                ########################################### [%]

     file /usr/share/mysql/charsets/README from install of MySQL-server-5.1.-.glibc23.i386 conflicts with file from package mysql-libs-5.1.-.el6_3.i686

     file /usr/share/mysql/charsets/Index.xml from install of MySQL-server-5.1.-.glibc23.i386 conflicts with file from package mysql-libs-5.1.-.el6_3.i686

     file /usr/share/mysql/charsets/armscii8.xml from install of MySQL-server-5.1.-.glibc23.i386 conflicts with file from package mysql-libs-5.1.-.el6_3.i686

     file /usr/share/mysql/charsets/ascii.xml from install of MySQL-server-5.1.-.glibc23.i386 conflicts with file from package mysql-libs-5.1.-.el6_3.i686

     file /usr/share/mysql/charsets/cp1250.xml from install of MySQL-server-5.1.-.glibc23.i386 conflicts with file from package mysql-libs-5.1.-.el6_3.i686

     file /usr/share/mysql/charsets/cp1251.xml from install of MySQL-server-5.1.-.glibc23.i386 conflicts with file from package mysql-libs-5.1.-.el6_3.i686

     file /usr/share/mysql/charsets/cp1256.xml from install of MySQL-server-5.1.-.glibc23.i386 conflicts with file from package mysql-libs-5.1.-.el6_3.i686

     file /usr/share/mysql/charsets/cp1257.xml from install of MySQL-server-5.1.-.glibc23.i386 conflicts with file from package mysql-libs-5.1.-.el6_3.i686

     file /usr/share/mysql/charsets/cp850.xml from install of MySQL-server-5.1.-.glibc23.i386 conflicts with file from package mysql-libs-5.1.-.el6_3.i686

     file /usr/share/mysql/charsets/cp852.xml from install of MySQL-server-5.1.-.glibc23.i386 conflicts with file from package mysql-libs-5.1.-.el6_3.i686

     file /usr/share/mysql/charsets/cp866.xml from install of MySQL-server-5.1.-.glibc23.i386 conflicts with file from package mysql-libs-5.1.-.el6_3.i686

     file /usr/share/mysql/charsets/dec8.xml from install of MySQL-server-5.1.-.glibc23.i386 conflicts with file from package mysql-libs-5.1.-.el6_3.i686

     file /usr/share/mysql/charsets/geostd8.xml from install of MySQL-server-5.1.-.glibc23.i386 conflicts with file from package mysql-libs-5.1.-.el6_3.i686

     file /usr/share/mysql/charsets/greek.xml from install of MySQL-server-5.1.-.glibc23.i386 conflicts with file from package mysql-libs-5.1.-.el6_3.i686

     file /usr/share/mysql/charsets/hebrew.xml from install of MySQL-server-5.1.-.glibc23.i386 conflicts with file from package mysql-libs-5.1.-.el6_3.i686

     file /usr/share/mysql/charsets/hp8.xml from install of MySQL-server-5.1.-.glibc23.i386 conflicts with file from package mysql-libs-5.1.-.el6_3.i686

     file /usr/share/mysql/charsets/keybcs2.xml from install of MySQL-server-5.1.-.glibc23.i386 conflicts with file from package mysql-libs-5.1.-.el6_3.i686

     file /usr/share/mysql/charsets/koi8r.xml from install of MySQL-server-5.1.-.glibc23.i386 conflicts with file from package mysql-libs-5.1.-.el6_3.i686

     file /usr/share/mysql/charsets/koi8u.xml from install of MySQL-server-5.1.-.glibc23.i386 conflicts with file from package mysql-libs-5.1.-.el6_3.i686

     file /usr/share/mysql/charsets/latin1.xml from install of MySQL-server-5.1.-.glibc23.i386 conflicts with file from package mysql-libs-5.1.-.el6_3.i686

     file /usr/share/mysql/charsets/latin2.xml from install of MySQL-server-5.1.-.glibc23.i386 conflicts with file from package mysql-libs-5.1.-.el6_3.i686

     file /usr/share/mysql/charsets/latin5.xml from install of MySQL-server-5.1.-.glibc23.i386 conflicts with file from package mysql-libs-5.1.-.el6_3.i686

     file /usr/share/mysql/charsets/latin7.xml from install of MySQL-server-5.1.-.glibc23.i386 conflicts with file from package mysql-libs-5.1.-.el6_3.i686

     file /usr/share/mysql/charsets/macce.xml from install of MySQL-server-5.1.-.glibc23.i386 conflicts with file from package mysql-libs-5.1.-.el6_3.i686

     file /usr/share/mysql/charsets/macroman.xml from install of MySQL-server-5.1.-.glibc23.i386 conflicts with file from package mysql-libs-5.1.-.el6_3.i686

     file /usr/share/mysql/charsets/swe7.xml from install of MySQL-server-5.1.-.glibc23.i386 conflicts with file from package mysql-libs-5.1.-.el6_3.i686

     file /usr/share/mysql/czech/errmsg.sys from install of MySQL-server-5.1.-.glibc23.i386 conflicts with file from package mysql-libs-5.1.-.el6_3.i686

     file /usr/share/mysql/danish/errmsg.sys from install of MySQL-server-5.1.-.glibc23.i386 conflicts with file from package mysql-libs-5.1.-.el6_3.i686

     file /usr/share/mysql/dutch/errmsg.sys from install of MySQL-server-5.1.-.glibc23.i386 conflicts with file from package mysql-libs-5.1.-.el6_3.i686

     file /usr/share/mysql/english/errmsg.sys from install of MySQL-server-5.1.-.glibc23.i386 conflicts with file from package mysql-libs-5.1.-.el6_3.i686

     file /usr/share/mysql/estonian/errmsg.sys from install of MySQL-server-5.1.-.glibc23.i386 conflicts with file from package mysql-libs-5.1.-.el6_3.i686

     file /usr/share/mysql/french/errmsg.sys from install of MySQL-server-5.1.-.glibc23.i386 conflicts with file from package mysql-libs-5.1.-.el6_3.i686

     file /usr/share/mysql/german/errmsg.sys from install of MySQL-server-5.1.-.glibc23.i386 conflicts with file from package mysql-libs-5.1.-.el6_3.i686

     file /usr/share/mysql/greek/errmsg.sys from install of MySQL-server-5.1.-.glibc23.i386 conflicts with file from package mysql-libs-5.1.-.el6_3.i686

     file /usr/share/mysql/hungarian/errmsg.sys from install of MySQL-server-5.1.-.glibc23.i386 conflicts with file from package mysql-libs-5.1.-.el6_3.i686

     file /usr/share/mysql/italian/errmsg.sys from install of MySQL-server-5.1.-.glibc23.i386 conflicts with file from package mysql-libs-5.1.-.el6_3.i686

     file /usr/share/mysql/japanese/errmsg.sys from install of MySQL-server-5.1.-.glibc23.i386 conflicts with file from package mysql-libs-5.1.-.el6_3.i686

     file /usr/share/mysql/korean/errmsg.sys from install of MySQL-server-5.1.-.glibc23.i386 conflicts with file from package mysql-libs-5.1.-.el6_3.i686

     file /usr/share/mysql/norwegian-ny/errmsg.sys from install of MySQL-server-5.1.-.glibc23.i386 conflicts with file from package mysql-libs-5.1.-.el6_3.i686

     file /usr/share/mysql/norwegian/errmsg.sys from install of MySQL-server-5.1.-.glibc23.i386 conflicts with file from package mysql-libs-5.1.-.el6_3.i686

     file /usr/share/mysql/polish/errmsg.sys from install of MySQL-server-5.1.-.glibc23.i386 conflicts with file from package mysql-libs-5.1.-.el6_3.i686

     file /usr/share/mysql/portuguese/errmsg.sys from install of MySQL-server-5.1.-.glibc23.i386 conflicts with file from package mysql-libs-5.1.-.el6_3.i686

     file /usr/share/mysql/romanian/errmsg.sys from install of MySQL-server-5.1.-.glibc23.i386 conflicts with file from package mysql-libs-5.1.-.el6_3.i686

     file /usr/share/mysql/russian/errmsg.sys from install of MySQL-server-5.1.-.glibc23.i386 conflicts with file from package mysql-libs-5.1.-.el6_3.i686

     file /usr/share/mysql/serbian/errmsg.sys from install of MySQL-server-5.1.-.glibc23.i386 conflicts with file from package mysql-libs-5.1.-.el6_3.i686

     file /usr/share/mysql/slovak/errmsg.sys from install of MySQL-server-5.1.-.glibc23.i386 conflicts with file from package mysql-libs-5.1.-.el6_3.i686

     file /usr/share/mysql/spanish/errmsg.sys from install of MySQL-server-5.1.-.glibc23.i386 conflicts with file from package mysql-libs-5.1.-.el6_3.i686

     file /usr/share/mysql/swedish/errmsg.sys from install of MySQL-server-5.1.-.glibc23.i386 conflicts with file from package mysql-libs-5.1.-.el6_3.i686

     file /usr/share/mysql/ukrainian/errmsg.sys from install of MySQL-server-5.1.-.glibc23.i386 conflicts with file from package mysql-libs-5.1.-.el6_3.i686
然后操作如下所示:
使用命令初始化mysql数据库(用户名和密码设置):
查看安装过程中提醒的信息,主要告诉我们如何初始化数据库:
[root@slaver3 hadoop]# rpm -ivh MySQL-server-5.1.-.glibc23.i386.rpm

Preparing...                ########################################### [%]

   :MySQL-server           ########################################### [%]

PLEASE REMEMBER TO SET A PASSWORD FOR THE MySQL root USER !

To do so, start the server, then issue the following commands:

/usr/bin/mysqladmin -u root password 'new-password'

/usr/bin/mysqladmin -u root -h slaver3 password 'new-password'

Alternatively you can run:

/usr/bin/mysql_secure_installation

which will also give you the option of removing the test

databases and anonymous user created by default.  This is

strongly recommended for production servers.

See the manual for more instructions.

Please report any problems with the /usr/bin/mysqlbug script!

Starting MySQL. SUCCESS!

[root@slaver3 hadoop]# rpm -ivh MySQL-client-5.1.-.glibc23.i386.rpm

Preparing...                ########################################### [%]

   :MySQL-client           ########################################### [%]

[root@slaver3 hadoop]#
输入如下命令初始化mysql:
Alternatively you can run:(翻译:或者你可以跑)
/usr/bin/mysql_secure_installation
按照提示安装:
Enter current password for root (enter for none):回车
Set root password? [Y/n]输入 Y
New password:输入新的密码
Re-enter new password:再输一遍密码
Remove anonymous users? [Y/n] Y
Disallow root login remotely? [Y/n] n
Remove test database and access to it? [Y/n] y
Reload privilege tables now? [Y/n] y
我的操作如下所示:
[root@slaver3 hadoop]# /usr/bin/mysql_secure_installation

NOTE: RUNNING ALL PARTS OF THIS SCRIPT IS RECOMMENDED FOR ALL MySQL

      SERVERS IN PRODUCTION USE!  PLEASE READ EACH STEP CAREFULLY!

In order to log into MySQL to secure it, we'll need the current

password for the root user.  If you've just installed MySQL, and

you haven't set the root password yet, the password will be blank,

so you should just press enter here.

Enter current password for root (enter for none):

OK, successfully used password, moving on...

Setting the root password ensures that nobody can log into the MySQL

root user without the proper authorisation.

Set root password? [Y/n] y

New password:

Re-enter new password:

Password updated successfully!

Reloading privilege tables..

 ... Success!

By default, a MySQL installation has an anonymous user, allowing anyone

to log into MySQL without having to have a user account created for

them.  This is intended only for testing, and to make the installation

go a bit smoother.  You should remove them before moving into a

production environment.

Remove anonymous users? [Y/n] y

 ... Success!

Normally, root should only be allowed to connect from 'localhost'.  This

ensures that someone cannot guess at the root password from the network.

Disallow root login remotely? [Y/n] n

 ... skipping.

By default, MySQL comes with a database named 'test' that anyone can

access.  This is also intended only for testing, and should be removed

before moving into a production environment.

Remove test database and access to it? [Y/n] y

 - Dropping test database...

 ... Success!

 - Removing privileges on test database...

 ... Success!

Reloading the privilege tables will ensure that all changes made so far

will take effect immediately.

Reload privilege tables now? [Y/n] y

 ... Success!

Cleaning up...

All done!  If you've completed all of the above steps, your MySQL

installation should now be secure.

Thanks for using MySQL!

[root@slaver3 hadoop]#
下面使用客户端登录:

5:mysql安装成功以后就可以继续学习Hive了,是不是很开心,反正我挺开心的:
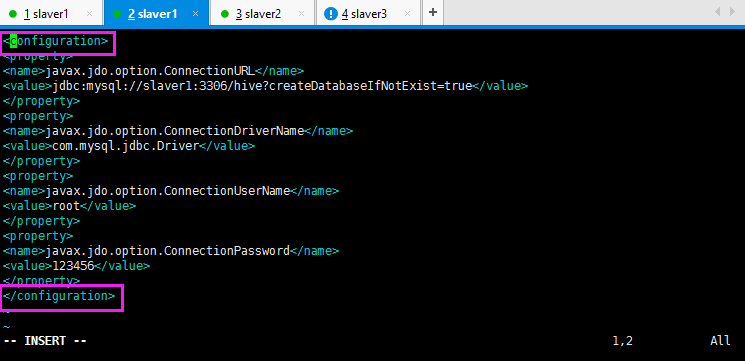
在hive.site.xml里面写如下内容:
<configuration>

<property>

<name>javax.jdo.option.ConnectionURL</name>

<value>jdbc:mysql://slaver3:3306/hive?createDatabaseIfNotExist=true</value>

</property>

<property>

<name>javax.jdo.option.ConnectionDriverName</name>

<value>com.mysql.jdbc.Driver</value>

</property>

<property>

<name>javax.jdo.option.ConnectionUserName</name>

<value>root</value>

</property>

<property>

<name>javax.jdo.option.ConnectionPassword</name>
<!--自己mysql的密码哦-->

<value>123456</value>

</property>

</configuration>
然后运行一下hive,如下所示:
启动的时候如果出现下面的这个错误,都真是太不小心了:
 [root@slaver1 bin]# ./hive

 [Fatal Error] hive-site.xml::: The markup in the document following the root element must be well-formed.

 // :: FATAL conf.Configuration: error parsing conf file:/home/hadoop/soft/hive-0.13.-cdh5.3.6/conf/hive-site.xml

 org.xml.sax.SAXParseException; systemId: file:/home/hadoop/soft/hive-0.13.-cdh5.3.6/conf/hive-site.xml; lineNumber: ; columnNumber: ; The markup in the document following the root element must be well-formed.

     at org.apache.xerces.parsers.DOMParser.parse(Unknown Source)

     at org.apache.xerces.jaxp.DocumentBuilderImpl.parse(Unknown Source)

     at javax.xml.parsers.DocumentBuilder.parse(DocumentBuilder.java:)

     at org.apache.hadoop.conf.Configuration.parse(Configuration.java:)

     at org.apache.hadoop.conf.Configuration.parse(Configuration.java:)

     at org.apache.hadoop.conf.Configuration.loadResource(Configuration.java:)

     at org.apache.hadoop.conf.Configuration.loadResources(Configuration.java:)

     at org.apache.hadoop.conf.Configuration.getProps(Configuration.java:)

     at org.apache.hadoop.conf.Configuration.get(Configuration.java:)

     at org.apache.hadoop.hive.conf.HiveConf.initialize(HiveConf.java:)

     at org.apache.hadoop.hive.conf.HiveConf.<init>(HiveConf.java:)

     at org.apache.hadoop.hive.common.LogUtils.initHiveLog4jCommon(LogUtils.java:)

     at org.apache.hadoop.hive.common.LogUtils.initHiveLog4j(LogUtils.java:)

     at org.apache.hadoop.hive.cli.CliDriver.run(CliDriver.java:)

     at org.apache.hadoop.hive.cli.CliDriver.main(CliDriver.java:)

     at sun.reflect.NativeMethodAccessorImpl.invoke0(Native Method)

     at sun.reflect.NativeMethodAccessorImpl.invoke(NativeMethodAccessorImpl.java:)

     at sun.reflect.DelegatingMethodAccessorImpl.invoke(DelegatingMethodAccessorImpl.java:)

     at java.lang.reflect.Method.invoke(Method.java:)

     at org.apache.hadoop.util.RunJar.run(RunJar.java:)

     at org.apache.hadoop.util.RunJar.main(RunJar.java:)

 Exception in thread "main" java.lang.RuntimeException: org.xml.sax.SAXParseException; systemId: file:/home/hadoop/soft/hive-0.13.-cdh5.3.6/conf/hive-site.xml; lineNumber: ; columnNumber: ; The markup in the document following the root element must be well-formed.

     at org.apache.hadoop.conf.Configuration.loadResource(Configuration.java:)

     at org.apache.hadoop.conf.Configuration.loadResources(Configuration.java:)

     at org.apache.hadoop.conf.Configuration.getProps(Configuration.java:)

     at org.apache.hadoop.conf.Configuration.get(Configuration.java:)

     at org.apache.hadoop.hive.conf.HiveConf.initialize(HiveConf.java:)

     at org.apache.hadoop.hive.conf.HiveConf.<init>(HiveConf.java:)

     at org.apache.hadoop.hive.common.LogUtils.initHiveLog4jCommon(LogUtils.java:)

     at org.apache.hadoop.hive.common.LogUtils.initHiveLog4j(LogUtils.java:)

     at org.apache.hadoop.hive.cli.CliDriver.run(CliDriver.java:)

     at org.apache.hadoop.hive.cli.CliDriver.main(CliDriver.java:)

     at sun.reflect.NativeMethodAccessorImpl.invoke0(Native Method)

     at sun.reflect.NativeMethodAccessorImpl.invoke(NativeMethodAccessorImpl.java:)

     at sun.reflect.DelegatingMethodAccessorImpl.invoke(DelegatingMethodAccessorImpl.java:)

     at java.lang.reflect.Method.invoke(Method.java:)

     at org.apache.hadoop.util.RunJar.run(RunJar.java:)

     at org.apache.hadoop.util.RunJar.main(RunJar.java:)

 Caused by: org.xml.sax.SAXParseException; systemId: file:/home/hadoop/soft/hive-0.13.-cdh5.3.6/conf/hive-site.xml; lineNumber: ; columnNumber: ; The markup in the document following the root element must be well-formed.

     at org.apache.xerces.parsers.DOMParser.parse(Unknown Source)

     at org.apache.xerces.jaxp.DocumentBuilderImpl.parse(Unknown Source)

     at javax.xml.parsers.DocumentBuilder.parse(DocumentBuilder.java:)

     at org.apache.hadoop.conf.Configuration.parse(Configuration.java:)

     at org.apache.hadoop.conf.Configuration.parse(Configuration.java:)

     at org.apache.hadoop.conf.Configuration.loadResource(Configuration.java:)

     ...  more

 [root@slaver1 bin]#
记得加上第一行和最后一行哦:
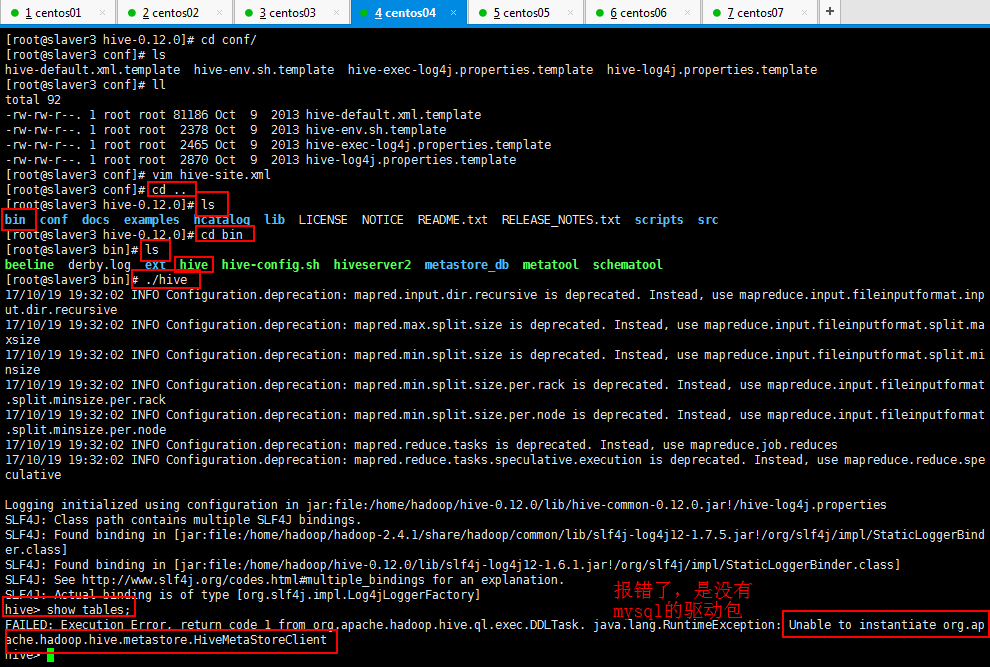
将mysql的驱动包加到hive的lib里面:
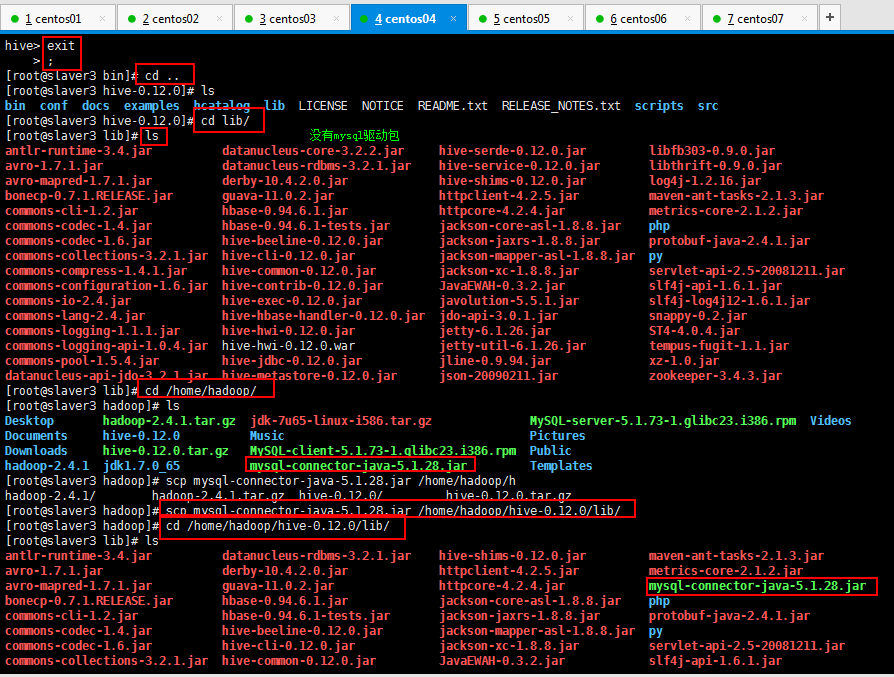
然后再试hive查看数据表是否成功:
FAILED: Execution Error, return code from org.apache.hadoop.hive.ql.exec.DDLTask. java.lang.RuntimeException: Unable to instantiate org.apache.hadoop.hive.metastore.HiveMetaStoreClient
然后还报这个错误,可是我明明将mysql驱动包上传到hive的lib目录下面了:
百度一下呗,瞄到可能是hive-site.xml的配置出错,想想自己刚才安装的mysql,看了一下,是自己讲密码123456写成了root了,修改即可:

然后创建数据表,自己明明知道一些节点的进程没有启动,还去创建数据表,然后就卡着不动了,然后ctrl+c结束,然后启动节点的进程,然后再创建数据表:
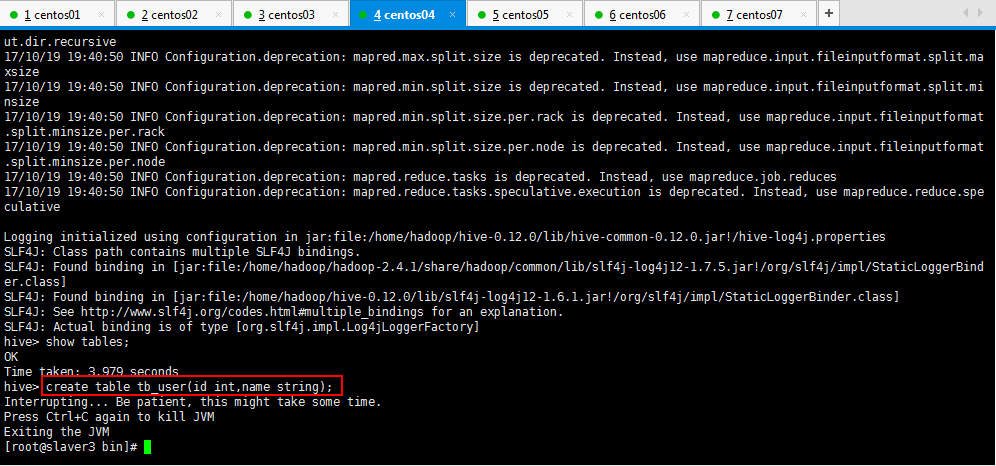
启动节点的进程,根据自己那个节点没启动,来启动你节点的进程,注意启动顺序,如果你的nodeManager没有启动,先将yarn关闭,stop-yarn-sh,如果你的slaver3的namenode没有启动,先将dfs关闭了,stop-dfs.sh,然后再启动dfs进程,start-dfs.sh,然后启动yarn,start-yarn.sh,总之根据你的节点进程的启动情况来决定你如何启动你的节点的进程:
hive> create table tb_user(id int,name string);

FAILED: Execution Error, return code  from org.apache.hadoop.hive.ql.exec.DDLTask. MetaException(message:Got exception: org.apache.hadoop.ipc.RemoteException org.apache.hadoop.hdfs.server.namenode.SafeModeException: Cannot create directory /user/hive/warehouse/tb_user. Name node is in safe mode.

The reported blocks  needs additional  blocks to reach the threshold 0.9990 of total blocks .

The number of live datanodes  has reached the minimum number . Safe mode will be turned off automatically once the thresholds have been reached.

    at org.apache.hadoop.hdfs.server.namenode.FSNamesystem.checkNameNodeSafeMode(FSNamesystem.java:)

    at org.apache.hadoop.hdfs.server.namenode.FSNamesystem.mkdirsInt(FSNamesystem.java:)

    at org.apache.hadoop.hdfs.server.namenode.FSNamesystem.mkdirs(FSNamesystem.java:)

    at org.apache.hadoop.hdfs.server.namenode.NameNodeRpcServer.mkdirs(NameNodeRpcServer.java:)

    at org.apache.hadoop.hdfs.protocolPB.ClientNamenodeProtocolServerSideTranslatorPB.mkdirs(ClientNamenodeProtocolServerSideTranslatorPB.java:)

    at org.apache.hadoop.hdfs.protocol.proto.ClientNamenodeProtocolProtos$ClientNamenodeProtocol$.callBlockingMethod(ClientNamenodeProtocolProtos.java)

    at org.apache.hadoop.ipc.ProtobufRpcEngine$Server$ProtoBufRpcInvoker.call(ProtobufRpcEngine.java:)

    at org.apache.hadoop.ipc.RPC$Server.call(RPC.java:)

    at org.apache.hadoop.ipc.Server$Handler$.run(Server.java:)

    at org.apache.hadoop.ipc.Server$Handler$.run(Server.java:)

    at java.security.AccessController.doPrivileged(Native Method)

    at javax.security.auth.Subject.doAs(Subject.java:)

    at org.apache.hadoop.security.UserGroupInformation.doAs(UserGroupInformation.java:)

    at org.apache.hadoop.ipc.Server$Handler.run(Server.java:)

Caused by: org.apache.hadoop.hdfs.server.namenode.SafeModeException: Cannot create directory /user/hive/warehouse/tb_user. Name node is in safe mode.

The reported blocks  needs additional  blocks to reach the threshold 0.9990 of total blocks .

The number of live datanodes  has reached the minimum number . Safe mode will be turned off automatically once the thresholds have been reached.

    at org.apache.hadoop.hdfs.server.namenode.FSNamesystem.checkNameNodeSafeMode(FSNamesystem.java:)

    ...  more

)

hive>
然后一想,上篇博客自己记录过,哈哈哈哈,防火墙的原因,先关防火墙,先从这种解决问题的方向为入口,不然都是大问题了,然后七台机器的防火墙都关了:

防火墙一关闭,执行创建数据表命令一点也不卡了,哈哈哈哈,然后验证自己的mysql是否安装成功,退出hive,去其他目录运行hive,验证自己创建的数据表永久存在了:

OK,大功告成了;开森不开森,加油吧,骚年,努力的人还在努力。
一脸懵逼学习Hive的元数据库Mysql方式安装配置的更多相关文章
- 1 复习ha相关 + weekend110的hive的元数据库mysql方式安装配置(完全正确配法)(CentOS版本)(包含卸载系统自带的MySQL)
本博文的主要内容是: .复习HA相关 .MySQL数据库 .先在MySQL数据库中建立hive数据库 .hive的配置 以下是Apache Hadoop HA的总结.分为hdfs HA和yarn HA ...
- 一脸懵逼学习Hive的使用以及常用语法(Hive语法即Hql语法)
Hive官网(HQL)语法手册(英文版):https://cwiki.apache.org/confluence/display/Hive/LanguageManual Hive的数据存储 1.Hiv ...
- 一脸懵逼学习Hive的安装(将sql语句翻译成MapReduce程序的一个工具)
Hive只在一个节点上安装即可: 1.上传tar包:这个上传就不贴图了,贴一下上传后的,看一下虚拟机吧: 2.解压操作: [root@slaver3 hadoop]# tar -zxvf hive-0 ...
- 一脸懵逼学习Hive(数据仓库基础构架)
Hive是什么?其体系结构简介*Hive的安装与管理*HiveQL数据类型,表以及表的操作*HiveQL查询数据***Hive的Java客户端** Hive的自定义函数UDF* 1:什么是Hive(一 ...
- [mysql]brew 安装 配置 操作 mysql(中文问题)
mac 下卸载mysqldmg mac下mysql的DMG格式安装内有安装文件,却没有卸载文件--很郁闷的事. 网上搜了一下,发现给的方法原来得手动去删. 很多文章记述要删的文件不完整,后来在stac ...
- 阿里云服务器 ECS 部署lamp:centos+apache+mysql+php安装配置方法 (centos7)
阿里云服务器 ECS 部署lamp:centos+apache+mysql+php安装配置方法 (centos7) 1.效果图 1 2. 部署步骤 1 1. mysql安装附加(centos7) 7 ...
- Mysql主从安装配置
Mysql主从安装配置 环境: 主从服务器上的MySQL数据库版本同为5.1.34 主机IP:192.168.0.1 从机IP:192.168.0.2 一. MySQL主服务器配置 1.编辑配置 ...
- mysql主从复制安装配置
mysql主从复制安装配置 基础设置准备 #操作系统: centos6.5 #mysql版本: 5.7 #两台虚拟机: node1:192.168.182.111(主) node2:192.168.1 ...
- 记一次 mysql主从复制安装配置 过程
mysql主从复制安装配置 1.centos安装及准备 去centos官网下载相应source版本的镜像文件并在vmware中安装,安装中会遇到填写installation source,输入以下即可 ...
随机推荐
- 使用命令行解析php文件
使用命令行解析php文件,这样可以调用Log4PHP库中的一些demo,因为默认的输出使用命令行作为输出. 建一个bat文件: echo 以下是使用命令行解析php文件 C:\xampp\php\ph ...
- 题解-PKUWC2018 Slay the Spire
Problem loj2538 Solution 在考场上当然要学会写暴力,考虑如果手上已经有了\(a\)张攻击牌和\(b\)张强化牌: 首先强化牌会在攻击牌之前用(废话),其次要将两种牌分别从大往小 ...
- ORACLE IMPDP导入报表数据已存在
背景 搞了这么多年oracle,不论是开发和运维,自认为是都了解了,和dba差的只是熟练的问题,因为毕竟不是天天搞它.不过突然听说数据泵导入的功能,大吃一惊,好像有印象,以为是落后的,一查,竟然是先进 ...
- 032_nginx配置文件安全下载
一. server { listen 8866; server_name _; access_log /usr/local/etc/nginx/log/download.access.log main ...
- Linux i2c 读写程序
/* This software uses a BSD license. Copyright (c) 2010, Sean Cross / chumby industriesAll rights re ...
- Light OJ 1116
基础数学:.. #include<bits/stdc++.h> using namespace std; typedef unsigned long long ULL; int main( ...
- 使用layui框架做分页
第一步引用两个文件: <link href="layui-v2.2.5/layui-v2.2.5/layui/css/layui.css" rel="stylesh ...
- Confluence 6 配置一个 Confluence 环境
本部分对你 Confluence 的外部设置进行描述.包括有如何配置 Web 服务器,应用服务器,目录和文件等信息—— Confluence 运行所需要的所有环境.有关在服务器内部对配置进行修改的内容 ...
- js模块化编程之CommonJS和AMD/CMD
js模块化编程commonjs.AMD/CMD与ES6模块规范 一.CommonJS commonjs的require是运行时同步加载,es6的import是静态分析,是在编译时而不是在代码运行时.C ...
- Logcat命令详情
logcat是什么? Logcat 是一个命令行工具,用于转储系统消息日志,其中包括设备引发错误时的堆叠追踪以及从您的应用使用 Log类编写的消息. 格式:[adb] logcat [<opti ...