pytorch模型部署在MacOS或者IOS
pytorch训练出.pth模型如何在MacOS上或者IOS部署,这是个问题。
然而我们有了onnx,同样我们也有了coreML。
ONNX:
onnx是一种针对机器学习设计的开放式文件格式,用来存储训练好的模型,并进行多种框架模型间的转换。
coreML:
Apple在2017年 MacOS 10.13以及IOS11+系统上推出了coreML1.0,官网地址:https://developer.apple.com/documentation/coreml 。
2018年又推出MacOS 10.14以及IOS12系统上的coreML2.0 https://www.appcoda.com/coreml2/。
coreML框架可以方便的进行深度学习模型的部署,利用模型进行预测,让深度学习可以在apple的移动设备上发光发热。而开发者需要做的仅仅是将model.mlModel拖进xcode工程,xcode工程会自动生成以模型名称命名的object-c类以及多种进行预测所需的类接口。
pytorch -- ONNX -- coreML
没错,就是这个流程。我们有训练好的.pth模型,通过pytorch.onnx.export() 转化为 .onnx模型,然后利用 onnx_coreml.convert()将 .onnx转换为 .mlModel。将.mlModel拖进xcode工程编写预测代码就可以了。
1. pytorch -- ONNX
请先查看pytorch官网的onnx模块:https://pytorch.org/docs/stable/onnx.html 。 主要的代码就这一个API, 各个参数意义请查阅文档。
torch.onnx.export(model, dummy_input, "alexnet.onnx", verbose=True, input_names=input_names, output_names=output_names);

转换部分代码如下:
 batch_size=1

 onnx_model_path = "onnx_model.onnx"

 dummy_input = V(torch.randn(batch_size, 3, 224, 224), requires_grad=True)

 torch_out= torch.onnx.export(pytorch_model, dummy_input , onnx_model_path, verbose=True,input_names=['image'], output_names=['outTensor'], export_params=True, training=False )
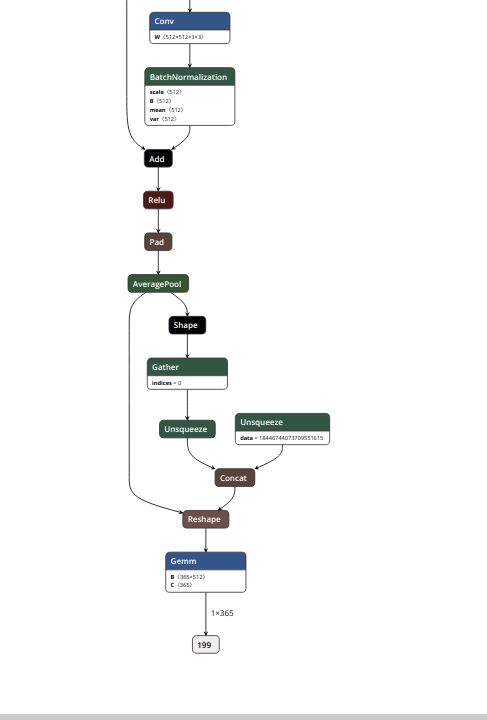
这里有一个需要注意的地方就是input_names和output_names的设置,如果不设置的情况,输入层和输出层pytorch会自动分配一个数字编号。比如下图(用netron工具查看,真是一个很好用的工具 https://pypi.org/project/netron/)。 自动分配的输入名称和输出名称是0 和 199。 这样转换成coreML模型后加载到xcode中会出现"initwith0"这样的编译错误,就是模型初始化的时候不能正确处理这个输入名称0。因此最好是在export的时候将其修改一个名称。

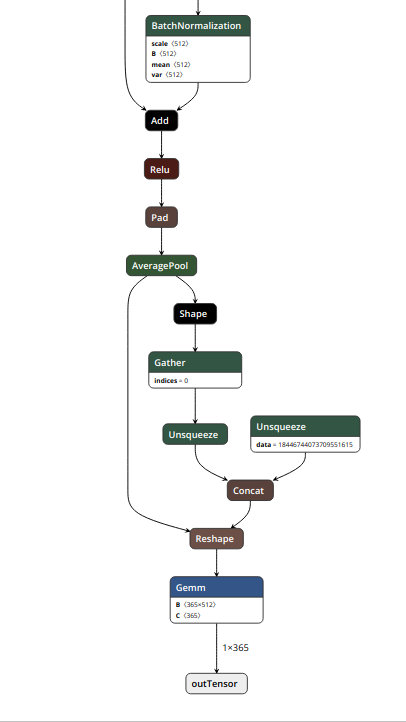
修改之后的模型是这样的,可以看到模型的输入和输出名称都发生的修改:

2. onnx -- mlModel
这一部分需要安装onnx, github地址: https://github.com/onnx/onnx 以及安装一个转换工具onnx_coreML,github地址:https://github.com/onnx/onnx-coreml 。里面用到了一个coremltools : https://pypi.org/project/coremltools/,这个tool目前仅支持python2.7环境下使用。
安装好后, import onnx , import onnx_coreML 就可以使用。转换代码如下:
onnx_model = onnx.load("onnx_model.onnx")

cml_model= onnx_coreml.convert(onnx_model)

cml_model.save("coreML_model.mlmodel")
当然, onnx_coreml.convert有很多参数,可以用来预处理,设置bgr顺序等,请参看github文档介绍。
现在将coreML_model.mlModel拖进xcode工程里,会自动生成一个coreML_model类,这个类有初始化模型,输入 预测 输出等API,编写预测代码即可。
3. 在最新的coreML2.0中,支持模型的量化. coreML1.0中处理模型是32位,而在coreML2.0中可以将模型量化为16bit, 8bit, 4bit甚至是2bit,并且可以设置量化的方法。 具体请看apple WWDC视频以及PPT。
模型量化仍然是使用coreMLtool2.0工具,具体代码请查阅这篇博客,写的很详细:https://www.jianshu.com/p/b6e3cb7338bf。 两句代码即可完成量化转换,代码如下:
import coremltools

from coremltools.models.neural_network.quantization_utils import *

model = coremltools.models.MLModel('Model.mlmodel')

lin_quant_model = quantize_weights(model, 8, "linear")

lin_quant_model.save('Model_8bit.mlmodel')
时间仓促,写的粗糙,随后更新。
———————————今天来更新————————————————
1. 将模型拖进xcode工程后,点击模型将在右侧页面看到这样的信息,包括模型的名称、尺寸、输入、输出等信息,并且会提示已经自动生成Objective-c的模型类文件:

点击Model右侧的箭头可以跳转到model类的头文件model.h。里面包含了模型初始化以及预测等接口。如下:
//

// Model.h

//

// This file was automatically generated and should not be edited.

//

#import <Foundation/Foundation.h>

#import <CoreML/CoreML.h>

#include <stdint.h>

NS_ASSUME_NONNULL_BEGIN

/// Model Prediction Input Type

API_AVAILABLE(macos(10.13), ios(11.0), watchos(4.0), tvos(11.0)) __attribute__((visibility("hidden")))

@interface ModelInput : NSObject<MLFeatureProvider>

/// image as color (kCVPixelFormatType_32BGRA) image buffer, 224 pixels wide by 224 pixels high

@property (readwrite, nonatomic) CVPixelBufferRef image;

- (instancetype)init NS_UNAVAILABLE;

- (instancetype)initWithImage:(CVPixelBufferRef)image;

@end

/// Model Prediction Output Type

API_AVAILABLE(macos(10.13), ios(11.0), watchos(4.0), tvos(11.0)) __attribute__((visibility("hidden")))

@interface ModelOutput : NSObject<MLFeatureProvider>

/// MultiArray of shape (1, 1, 10, 1, 1). The first and second dimensions correspond to sequence and batch size, respectively as multidimensional array of floats

@property (readwrite, nonatomic, strong) MLMultiArray * outTensor;

- (instancetype)init NS_UNAVAILABLE;

- (instancetype)initWithOutTensor:(MLMultiArray *)outTensor;

@end

/// Class for model loading and prediction

API_AVAILABLE(macos(10.13), ios(11.0), watchos(4.0), tvos(11.0)) __attribute__((visibility("hidden")))

@interface Model : NSObject

@property (readonly, nonatomic, nullable) MLModel * model;

- (nullable instancetype)init;

- (nullable instancetype)initWithContentsOfURL:(NSURL *)url error:(NSError * _Nullable * _Nullable)error;

- (nullable instancetype)initWithConfiguration:(MLModelConfiguration *)configuration error:(NSError * _Nullable * _Nullable)error API_AVAILABLE(macos(10.14), ios(12.0), watchos(5.0), tvos(12.0)) __attribute__((visibility("hidden")));

- (nullable instancetype)initWithContentsOfURL:(NSURL *)url configuration:(MLModelConfiguration *)configuration error:(NSError * _Nullable * _Nullable)error API_AVAILABLE(macos(10.14), ios(12.0), watchos(5.0), tvos(12.0)) __attribute__((visibility("hidden")));

/**

    Make a prediction using the standard interface

    @param input an instance of ModelInput to predict from

    @param error If an error occurs, upon return contains an NSError object that describes the problem. If you are not interested in possible errors, pass in NULL.

    @return the prediction as ModelOutput

*/

- (nullable ModelOutput *)predictionFromFeatures:(ModelInput *)input error:(NSError * _Nullable * _Nullable)error;

/**

    Make a prediction using the standard interface

    @param input an instance of ModelInput to predict from

    @param options prediction options

    @param error If an error occurs, upon return contains an NSError object that describes the problem. If you are not interested in possible errors, pass in NULL.

    @return the prediction as ModelOutput

*/

- (nullable ModelOutput *)predictionFromFeatures:(ModelInput *)input options:(MLPredictionOptions *)options error:(NSError * _Nullable * _Nullable)error;

/**

    Make a prediction using the convenience interface

    @param image as color (kCVPixelFormatType_32BGRA) image buffer, 224 pixels wide by 224 pixels high:

    @param error If an error occurs, upon return contains an NSError object that describes the problem. If you are not interested in possible errors, pass in NULL.

    @return the prediction as ModelOutput

*/

- (nullable ModelOutput *)predictionFromImage:(CVPixelBufferRef)image error:(NSError * _Nullable * _Nullable)error;

/**

    Batch prediction

    @param inputArray array of ModelInput instances to obtain predictions from

    @param options prediction options

    @param error If an error occurs, upon return contains an NSError object that describes the problem. If you are not interested in possible errors, pass in NULL.

    @return the predictions as NSArray<ModelOutput *>

*/

- (nullable NSArray<ModelOutput *> *)predictionsFromInputs:(NSArray<ModelInput*> *)inputArray options:(MLPredictionOptions *)options error:(NSError * _Nullable * _Nullable)error API_AVAILABLE(macos(10.14), ios(12.0), watchos(5.0), tvos(12.0)) __attribute__((visibility("hidden")));

@end

NS_ASSUME_NONNULL_END
其中带有这样标志的表示是coreML1.0版本的接口以及对应的系统版本:
API_AVAILABLE(macos(10.13), ios(11.0), watchos(4.0), tvos(11.0))
下面的是coreML2.0新增的接口以及对应的系统版本:
API_AVAILABLE(macos(10.14), ios(12.0), watchos(5.0), tvos(12.0))
2. 说一下几个常用API的使用:
① 首先是模型的初始化加载,初始化接口如下几个:
- (nullable instancetype)init;

- (nullable instancetype)initWithContentsOfURL:(NSURL *)url error:(NSError * _Nullable * _Nullable)error;

- (nullable instancetype)initWithConfiguration:(MLModelConfiguration *)configuration error:(NSError * _Nullable * _Nullable)error API_AVAILABLE(macos(10.14), ios(12.0), watchos(5.0), tvos(12.0)) __attribute__((visibility("hidden")));

- (nullable instancetype)initWithContentsOfURL:(NSURL *)url configuration:(MLModelConfiguration *)configuration error:(NSError * _Nullable * _Nullable)error API_AVAILABLE(macos(10.14), ios(12.0), watchos(5.0), tvos(12.0)) __attribute__((visibility("hidden")));
当然,最简单的初始化方法就是第一个:
model = [ [Model alloc] init ];
如果需要设置设备上计算单元的话,就去调用coreML2.0新增的initWithConfiguration接口,多的两个参数分别是(MLModelConfiguration *)configuration 以及 NSError *error。调用方法如下:
MLModelConfiguration *config = [ [MLModelConfiguration alloc] init];

config.computeUnits = MLComputeUnitsCpuOnly;//

NSError *error;

model = [ [nimaModel alloc] initWithConfiguration:config error:&error];
其中config值有三种情况可以选择,分别是
MLComputeUnitsCPUOnly ----仅仅使用CPU计算;
MLComputeUnitsCPUAndGPU ----使用CPU和GPU计算;
MLComputeUnitsAll  -----使用所有计算单元进行计算(主要指A11以及A12仿生芯片中的netrual engine)

具体见如下的MLModelConfiguration.h文件
#import <Foundation/Foundation.h>

#import <CoreML/MLExport.h>

NS_ASSUME_NONNULL_BEGIN

typedef NS_ENUM(NSInteger, MLComputeUnits) {

    MLComputeUnitsCPUOnly = ,

    MLComputeUnitsCPUAndGPU =

    ,

    MLComputeUnitsAll =

} API_AVAILABLE(macos(10.14), ios(12.0), watchos(5.0), tvos(12.0));

/*!

 * An object to hold options for loading a model.

 */

API_AVAILABLE(macos(10.14), ios(12.0), watchos(5.0), tvos(12.0))

ML_EXPORT

@interface MLModelConfiguration : NSObject <NSCopying>

@property (readwrite) MLComputeUnits computeUnits;

@end

NS_ASSUME_NONNULL_END
初始化的两个两个API用的不多,暂且按住不表。
② 模型的输入API。
/// Model Prediction Input Type

API_AVAILABLE(macos(10.13), ios(11.0), watchos(4.0), tvos(11.0)) __attribute__((visibility("hidden")))

@interface ModelInput : NSObject<MLFeatureProvider>

/// image as color (kCVPixelFormatType_32BGRA) image buffer, 224 pixels wide by 224 pixels high

@property (readwrite, nonatomic) CVPixelBufferRef image;

- (instancetype)init NS_UNAVAILABLE;

- (instancetype)initWithImage:(CVPixelBufferRef)image;

@end
ModelInput类的API很简单,就用一个initWithImage就可以了,多做的一步就是需要将UIImage或者OpenCV加载的图像转换为CVPixelBuffer。然后使用API创建ModelInput:
ModelInput *input = [[ModelInput alloc] initWithImage:buffer];
③ 模型的预测API。
/**

    Make a prediction using the standard interface

    @param input an instance of ModelInput to predict from

    @param error If an error occurs, upon return contains an NSError object that describes the problem. If you are not interested in possible errors, pass in NULL.

    @return the prediction as ModelOutput

*/

- (nullable ModelOutput *)predictionFromFeatures:(ModelInput *)input error:(NSError * _Nullable * _Nullable)error;

/**

    Make a prediction using the standard interface

    @param input an instance of ModelInput to predict from

    @param options prediction options

    @param error If an error occurs, upon return contains an NSError object that describes the problem. If you are not interested in possible errors, pass in NULL.

    @return the prediction as ModelOutput

*/

- (nullable ModelOutput *)predictionFromFeatures:(ModelInput *)input options:(MLPredictionOptions *)options error:(NSError * _Nullable * _Nullable)error;

/**

    Make a prediction using the convenience interface

    @param image as color (kCVPixelFormatType_32BGRA) image buffer, 224 pixels wide by 224 pixels high:

    @param error If an error occurs, upon return contains an NSError object that describes the problem. If you are not interested in possible errors, pass in NULL.

    @return the prediction as ModelOutput

*/

- (nullable ModelOutput *)predictionFromImage:(CVPixelBufferRef)image error:(NSError * _Nullable * _Nullable)error;

/**

    Batch prediction

    @param inputArray array of ModelInput instances to obtain predictions from

    @param options prediction options

    @param error If an error occurs, upon return contains an NSError object that describes the problem. If you are not interested in possible errors, pass in NULL.

    @return the predictions as NSArray<ModelOutput *>

*/

- (nullable NSArray<ModelOutput *> *)predictionsFromInputs:(NSArray<ModelInput*> *)inputArray options:(MLPredictionOptions *)options error:(NSError * _Nullable * _Nullable)error API_AVAILABLE(macos(10.14), ios(12.0), watchos(5.0), tvos(12.0)) __attribute__((visibility("hidden")));

@end
前面两个是标准的API。他俩的差异在于 Options: (MLPredictionOptions *)options 这个参数。第2个API中可以设置Options参数,这个是coreML1.0中就有的,具体见如下的MLPredictionOptions.h文件。
//

//  MLPredictionOptions.h

//  CoreML

//

//  Copyright © 2017 Apple Inc. All rights reserved.

//

#import <Foundation/Foundation.h>

#import <CoreML/MLExport.h>

NS_ASSUME_NONNULL_BEGIN

/*!

 * MLPredictionOptions

 *

 * An object to hold options / controls / parameters of how

 * model prediction is performed

 */

API_AVAILABLE(macos(10.13), ios(11.0), watchos(4.0), tvos(11.0))

ML_EXPORT

@interface MLPredictionOptions : NSObject

// Set to YES to force computation to be on the CPU only

@property (readwrite, nonatomic) BOOL usesCPUOnly;

@end

NS_ASSUME_NONNULL_END
Option值默认不设置则为No,也就是说默认使用GPU,如果想要只使用CPU,调用时将其值设置为Yes即可。
 MLPredictionOptions *option = [ [MLPredictionOptions alloc] init];

 option.usesCPUOnly = yes;
第三个API没有Options选项,但是可以直接将CVPixelBuffer作为输入,不用创建ModelInput。是一种更为简便的API接口。
而第四个API是coreML2.0新增的batchPrediction接口。前面三个API一次只能输入一幅图像预测。而这个接口可以将多个输入组织为NSArray,作为一个Batch一次性传入。并得到NSArray形式的输出。更加快速,不用再去写for循环。
以第三个形式的预测API为例,调用代码如下:
ModelOutput *output = [model predictionFromFeatures:input options:option error:&error];
④ 模型输出API:
/// Model Prediction Output Type

API_AVAILABLE(macos(10.13), ios(11.0), watchos(4.0), tvos(11.0)) __attribute__((visibility("hidden")))

@interface ModelOutput : NSObject<MLFeatureProvider>

/// MultiArray of shape (1, 1, 10, 1, 1). The first and second dimensions correspond to sequence and batch size, respectively as multidimensional array of floats

@property (readwrite, nonatomic, strong) MLMultiArray * outTensor;

- (instancetype)init NS_UNAVAILABLE;

- (instancetype)initWithOutTensor:(MLMultiArray *)outTensor;

@end
modelOutput默认是MLMultiArray类型,当模型有多个输出的时候,根据输出output.outTensor, outTensor.feature .... 等等 依次获取。示例模型只有一个输出,因此只有一个outTensor。
夜已深,就此打住。
pytorch模型部署在MacOS或者IOS的更多相关文章
- 使用C++调用并部署pytorch模型
1.背景(Background) 上图显示了目前深度学习模型在生产环境中的方法,本文仅探讨如何部署pytorch模型! 至于为什么要用C++调用pytorch模型,其目的在于:使用C++及多线程可以加 ...
- PyTorch专栏(六): 混合前端的seq2seq模型部署
欢迎关注磐创博客资源汇总站: http://docs.panchuang.net/ 欢迎关注PyTorch官方中文教程站: http://pytorch.panchuang.net/ 专栏目录: 第一 ...
- 使用C++调用pytorch模型(Linux)
前言 模型转换思路通常为: Pytorch -> ONNX -> TensorRT Pytorch -> ONNX -> TVM Pytorch -> 转换工具 -> ...
- Intel发布神经网络压缩库Distiller:快速利用前沿算法压缩PyTorch模型——AttributeError: module ‘tensorboard' has no attribute 'lazy'
转载自:CSDN Nine-days 近日,Intel 开源了一个用于神经网络压缩的开源 Python 软件包 Distiller,它可以减少深度神经网络的内存占用.加快推断速度及节省能耗.Dis ...
- 如何使用flask将模型部署为服务
在某些场景下,我们需要将机器学习或者深度学习模型部署为服务给其它地方调用,本文接下来就讲解使用python的flask部署服务的基本过程. 1. 加载保存好的模型 为了方便起见,这里我们就使用简单的分 ...
- 混合前端seq2seq模型部署
混合前端seq2seq模型部署 本文介绍,如何将seq2seq模型转换为PyTorch可用的前端混合Torch脚本.要转换的模型来自于聊天机器人教程Chatbot tutorial. 1.混合前端 在 ...
- 资源分享 | PyTea:不用运行代码,静态分析pytorch模型的错误
前言 本文介绍一个Pytorch模型的静态分析器 PyTea,它不需要运行代码,即可在几秒钟之内扫描分析出模型中的张量形状错误.文末附使用方法. 本文转载自机器之心 编辑:CV技 ...
- Pytorch模型量化
在深度学习中,量化指的是使用更少的bit来存储原本以浮点数存储的tensor,以及使用更少的bit来完成原本以浮点数完成的计算.这么做的好处主要有如下几点: 更少的模型体积,接近4倍的减少: 可以更快 ...
- 在MacOS和iOS系统中使用OpenCV
在MacOS和iOS系统中使用OpenCV 前言 OpenCV 是一个开源的跨平台计算机视觉库,实现了图像处理和计算机视觉方面的很多通用算法. 最近试着在 MacOS 和 iOS 上使用 OpenCV ...
随机推荐
- s6-9 TCP 定时器
TCP 定时器管理 重传定时器(retransmission timer,Positive ackn. with retransmit) 最重要的定时器 TCP 定时器管理 持续定时器(per ...
- Ubuntu18.04安装Guake下拉式终端
Guake的优势是方便,可以很迅速的唤起与隐藏,已经成为我所需终端的主力. 安装方式:sudo apt-get install guake bug修复:使用时输入exit命令会导致终端卡死系统报错,同 ...
- tab选项卡--jq
<!DOCTYPE html> <html> <head> <meta charset="UTF-8"> <title> ...
- 简述Oracle IOT(Index Organized Table)
转:http://blog.itpub.net/17203031/viewspace-744477 对关系型数据库产品(RDBMS)而言,一个重要特性就是:数据信息都被组织为二维数据表,信息的表达可以 ...
- 原生AJAX(包括Fetch)
一.INTRO AJAX即“Asynchronous Javascript And XML” 一.Ajax的原生初级 1.1 Ajax对象创建:var xhr= new XMLHttpRequest( ...
- EF学习笔记(八):更新关联数据
学习笔记主目录链接:ASP.NET MVC5 及 EF6 学习笔记 - (目录整理) 上一篇链接:EF学习笔记(七):读取关联数据 本篇原文链接:Updating Related Data 本篇主要考 ...
- ecshop自动确认收货(无其他商家)
1.创建文件 includes/modules/auto_order_confirm.php 代码:(思路:对已经发货和已经付款的订单检索,对比发货时间与当前时间的间隔,达到设定时间则自动收货) &l ...
- PowerBI
1.官方PowerBI实例:https://docs.microsoft.com/zh-cn/power-bi/sample-tutorial-connect-to-the-samples 2.配置计 ...
- MySQL--REPLACE INTO与自增
##=====================================================================##测试环境:MySQL版本:MySQL 5.7.19复制 ...
- 使用node自动生成html并调用cmd命令提交代码到仓库
生成html提交到git仓库 基于目前的express博客,写了一点代码,通过request模块来请求站点,将html保存到coding-pages目录,复制静态文件夹到coding-pages,最后 ...