最小化安装的centos7.5上编译安装git2.19
VMware Workstation已经采用最小化安装CentOS7,显示版本为CentOS7.5,准备采用yum安装git。
采用yum list git发现可安装的GIT软件包版本1.8.3.1,新的版本已经是2.19了,因此,我决定编译安装git2.19。
由于采用最小化安装系统,编译时出现一些问题,这里对处理过程作一下备忘:
1、首先在git官网上下载最新的版本,下载地址:https://mirrors.edge.kernel.org/pub/software/scm/git/git-2.19.0.tar.gz
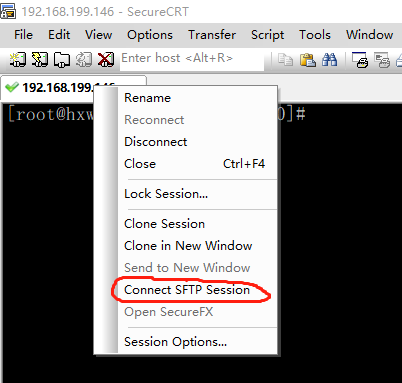
2、由于采用win10操作系统下载的文件,需要上传到CentOS7上,操作方式我一般通过SecureCRT采用SSH2协议登录,
上传文件也通过SecureCRT工具中的SFTP协议,具体方法如图:

注意:上传的文件会在登录用户的home目录下,可以通过lpwd查看本地目录,pwd查看远端目录

3、对文件解压:tar xzvf git-2.19.0.tar.gz
4、进入解压后的git目录后,安装方式参考:https://github.com/git/git/blob/master/INSTALL或目录下的INSTALL,这里采用建议步骤:
| # make configure ;# as yourself |
| # ./configure --prefix=/usr ;# as yourself |
| # make all doc ;# as yourself |
| # make install install-doc install-html;# as root |
5、首先执行make configure,开始就出错了,提示:
configure: Setting lib to 'lib' (the default)
configure: Will try -pthread then -lpthread to enable POSIX Threads.
configure: CHECKS for site configuration
checking for gcc... no
checking for cc... no
checking for cl.exe... no
configure: error: in `/opt/git-2.19.0':
configure: error: no acceptable C compiler found in $PATH
See `config.log' for more details
通过yum provides gcc和 yum provides cc查询到c编译器没有安装,yum -y install gcc安装gcc包及对应的依赖。
6、再次执行make configure,再次出现如下错误:
GIT_VERSION = 2.19.0
GEN configure
/bin/sh: autoconf: 未找到命令
make: *** [configure] 错误 127
通过yum provides autoconf查询到没有安装autoconf,yum -y install autoconf安装包及对应的依赖。
7、再一次执行make configure,正常了,接下来 ./configure很顺利。
8、执行make all doc,又出现错误:
* new build flags
CC credential-store.o
In file included from credential-store.c:1:0:
cache.h:20:18: 致命错误:zlib.h:没有那个文件或目录
#include <zlib.h>
^
编译中断。
make: *** [credential-store.o] 错误 1
错误指出没有zlib,yum -y install zlib安装,发现已经安装,zlib.h应该是对应的开发包没有,yum -y install zlib-devel安装开发包
9、再执行make all doc,再出现错误:
/bin/sh:行1: asciidoc: 未找到命令
make[1]: *** [git-init-db.html] 错误 127
make[1]: 离开目录“/opt/git-2.19.0/Documentation”
make: *** [doc] 错误 2
没有asciidoc命令,yum list asciidoc发现包没有安装,yum -y install asciidoc安装该包。
10、再一次执行make all doc,仍出现错误:
/bin/sh:行1: xmlto: 未找到命令
make[1]: *** [git-init-db.1] 错误 127
make[1]: 离开目录“/opt/git-2.19.0/Documentation”
make: *** [doc] 错误 2
思路一样,没有xmlto命令,yum list xmlto发现包没有安装, yum -y install xmlto安装该包,执行make all doc这下很顺利。
11、执行make install install-doc install-html,这下安装很顺利,没有再提示错误。
12、测试一下,执行git --version正常显示:
git version 2.19.0
终于安装成功了,可以正常使用。
13、按上面的库虽然安装成功了,但有一个问题,就是采用Https方式push到github上,或clone到本地的时候就出错了,主要错误提示是:
“fatal: 无法为 'https' 找到远程助手”
直接通过curl https://github.com了产生同样的错误,判断应该是编译时没有SSL这块的东西,查了一些贴子,各种说法都有,
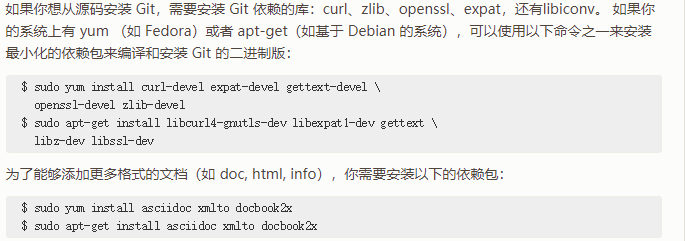
升级curl到最新版本也没用,最后认真看一下官方手册,参考:https://git-scm.com/book/zh/v2/%E8%B5%B7%E6%AD%A5-%E5%AE%89%E8%A3%85-Git

同时,对比一下安装上述库和没有安装时进行./configure --prefix=/usr后进结果发现:
| 没有全部安装上述GIT依赖的库 | 全部安装上述GIT依赖的库 |
|
configure: CHECKS for libraries |
configure: CHECKS for libraries |
总结一下:
没按要求安装 Git 依赖的库时,本地git功能使用没有问题,采用SSH方式push到github也没有问题,就是不能采用https方式。
要正常使用git的https方式push,必须安装下列库后再编译:
yum install gcc perl-ExtUtils-MakeMaker
yum install curl-devel expat-devel gettext-devel openssl-devel zlib-devel asciidoc xmlto
另外 ,curl命令访问https域名出问题时,可能的原因是nss版本有点旧了,yum -y update nss更新一下就可以正常使用。
最小化安装的centos7.5上编译安装git2.19的更多相关文章
- 尝试在CentOS7.2上编译安装Swift
苹果提供 Ubuntu上构建Swift 的教程,通过这个教程我尝试使用CentOS7.2上玩儿一把.目前已经成功在CentOS7.2上班成功安装 swift 4.0 https://github.co ...
- centos7.3上编译安装percona5.7.18
一,删除操作系统自带mariadb yum remove mariadb 二,下载需要的安装包 percona-toolkit-3.0.3-1.el7.x86_64.rpm boost_1_59_0. ...
- centos7源码编译安装lamp/lnmp
centos7源码编译安装lamp/lnmp 进程:是包工头(相当于是个门,只管开门关门,不管门内的事儿) 线程:是各种工种(cpu调度的是线程) 进程 是一件事情, 线程 是 同一个时间范围内 同时 ...
- centos7.2下编译安装&&使用-git代码库
centos7.2下编译安装git Git简介 Git是一个分布式版本控制系统 Git vs SVN SVN是典型的集中式版本控制起,版本库集中存放在服务器,当我们用自己的电脑干活儿的时候,需要先从中 ...
- CentOS-7.3.1611编译安装 Nginx-1.12.1+mysql-5.7.19+PHP-7.1.8+zabbix-3.4.1
CentOS-7.3.1611编译安装 Nginx-1.12.1+mysql-5.7.19+PHP-7.1.8+zabbix-3.4.1 下载软件 1.下载nginx http://nginx.org ...
- Linux上编译安装PHP
这篇文章主要介绍了关于Linux上编译安装PHP,有着一定的参考价值,现在分享给大家,有需要的朋友可以参考一下 之前在服务器上编译安装了PHP运行环境,但是安装完过了一段时间就差不多忘记了,只是零零星 ...
- 在centOS7.2上编译gcc4.4.7
1.前置 首先,可以参考我的上篇文章,在centOS7.2上编译gcc4.1.2,过程基本一致,这里只对可能遇到的错误情况进行说明. 2.安装texinfo4.8 我的centos7.2版本,自带的是 ...
- centos7.6环境下编译安装tengine-2.2.2的编译安装
centos7.6环境下编译安装tengine-2.2.2的编译安装 .获取tengine2..2的源码包 http://tengine.taobao.org/download/tengine-2.2 ...
- Kubernetes+Docker的云平台在CentOS7系统上的安装
Kubernetes+Docker的云平台在CentOS7系统上的安装 1.运行VirtualBox5. 2.安装CentOS7系统. 注意:选择Basic Server类型 安装过程略. 3.修改计 ...
随机推荐
- poj2182(线段树求序列第k小)
题目链接:https://vjudge.net/problem/POJ-2182 题意:有n头牛,从1..n编号,乱序排成一列,给出第2..n个牛其前面有多少比它编号小的个数,记为a[i],求该序列的 ...
- Unity3d项目入门之Rolling Ball
下面通过分析制作一个简单的收集特定物体的滚球游戏来入门unity,包括操作面板和C#脚本的编写导入,创建Game Object和给Object添加组件等等. 一 初始设置 在Assert下创建主场景M ...
- 验证当前启动APP的Package 和 Activity
1. 打开手机USB 调试开关 2. 执行: adb devices 3.启动你的测试APP (如手机QQ) 4.执行:adb shell dumpsys window |findstr mCurre ...
- 词根:sol = sun(太阳) 词根:sol = alone/single, whole/entire (单独的)
词根:sol = sun(太阳) sol 这个词根有的书上如刘毅字典,刘洪波英文字根词源精讲等上面说来自拉丁语的sol(=sun),有的书如赢在单词上面说sol 来自拉丁语的solari,但不管哪种说 ...
- 十二、针对单个工程来配置jdk版本
转载自:https://jingyan.baidu.com/article/9f63fb91427b06c8400f0e98.html 首先小编这里的eclipse工作空间默认的jdk版本是jdk1. ...
- jQuery on() 方法 为选定已存在元素和未来元素绑定标准事件和自定义事件
很有必要说说jQuery的on方法,这个方法存在大乾坤大奥秘,主要注意两点: 1.为已存在元素和未来元素(动态添加元素)绑定处理函数. 2.自定义一个非标准的事件并绑定处理函数. 定义和用法 on() ...
- Linux驱动之USB总线驱动程序框架简析
通用串行总线(USB)是主机和外围设备之间的一种连接.USB总线规范有1.1版和2.0版,当然现在已经有了3.0版本.USB1.1支持两种传输速度:低速为1.5Mbps,高速为12Mbps.USB2. ...
- sql server版本、组件和管理工具
以下信息由何问起收集,希望有帮助. SQL Server 版本 定义 Enterprise 作为高级版本, SQL Server Enterprise 版提供了全面的高端数据中心功能,性能极为快捷.虚 ...
- import os, glob, fnmatch--Python os/glob/fnmatch主要函数总结
auther: Lart date: 2019-01-17 update: 2019-01-18 09:55:36 --- import os, glob, fnmatch 针对某些操作, 官方推荐这 ...
- python第十八天 多态 和 私有
python的多态比较特别 多态, 字面意思,多种状态. 扩展下 -> 执行同样的操作,结果却不同. 对使用的操作者来说, 就是执行同一个方法, 得到了不同的结果. 在操作者看来,像是 具备 ...
