emacs org-mode文件转html文件
Table of Contents
1. 发布站点 by emacs org-mode
org-mode 写文档做笔记啥的很方便, 反应超快(因为是文本文件), 而且在emacs中可以显示出类似word的效果. 但是给没有emacs的人看时, 就不太方便.(没有高亮显示, 也无法在文本中跳转等等)
为了将继续使用 org-mode 带来的便利, 也为了方便别人查看自己的文档, 稍稍调查了一下org-mode导出html的功能.
1.1 org-mode 自带的导出方法
强大的org-mode其实自带了导出各种格式的功能. 导出html格式的快捷键很简单:
C-c C-e h
虽然方便, 但是导出的html格式不太好看, 而且不能批量导出, 这个命令只能导出一个org文件.
1.2 批量导出
org-mode虽然也有导出org project的命令, 但是需要在 .emacs中配置相关导出选项. 每次导出不同的项目时, 需要修改 .emacs, 修改 .emacs后要么重新导入, 要么重启 emacs. 总觉得很麻烦.
后来参考了博客园上[麦满屯]的一篇博客1, 用Makefile来简化 org 文件的导出和发布. Makefile如下:
EMACS=emacsclient   # 这里我用的emcasclient, 没有用emacs. 因为我的emacs是以server方式启动的

ORG_CONFIG_FILE=publish-config.el   # 导出org文件的配置

EMACS_OPTS=--eval "(load-file \"$(ORG_CONFIG_FILE)\")"

DEST_HOST='myhost.com:public_html/'

OUTPUT_DIR=~/tmp/output   # 导出的位置, 这个位置其实是在 public-config.el 中配置的,

                          # 这里的定义这个变量的作用是为了删除(make clean), 以及上传server(make upload)

all: html upload

html:

    @echo "Generating HTML..."

    @mkdir -p $(OUTPUT_DIR)

    @$(EMACS) $(EMACS_OPTS)

    @echo "HTML generation done"

upload:

    @cd $(OUTPUT_DIR) && scp -r . $(DEST_HOST) && cd ..

clean:

    @rm -rf $(OUTPUT_DIR)
仅仅导出html, 而不发布站点, 只要用:
make html
其中用的配置文件 publish-config.el 如下: 主要参考了[麦满屯]的一篇博客1
;; config for publish site from org files

(require 'org-publish)

(setq org-publish-project-alist

      '(

        ;; These are the main web files

        ("org-notes"

         :base-directory "~/tmp/www/" ;; Change this to your local dir

         :base-extension "org"

         :publishing-directory "~/tmp/output"

         :recursive t

         :publishing-function org-publish-org-to-html

         :headline-levels 4             ; Just the default for this project.

         :auto-preamble nil

         :auto-sitemap t

         :sitemap-filename "sitemap.org"

         :sitemap-title "sitemap"

         :section-numbers nil

         :table-of-contents t

         :style "<link rel='stylesheet' type='text/css' href='css/org-manual.css' />"

         :style-include-default nil

         )

        ;; These are static files (images, pdf, etc)

        ("org-static"

         :base-directory "~/tmp/www/" ;; Change this to your local dir

         :base-extension "css\\|js\\|png\\|jpg\\|gif\\|pdf\\|mp3\\|ogg\\|swf\\|txt\\|asc"

         :publishing-directory "~/tmp/output"

         :recursive t

         :publishing-function org-publish-attachment

         )

        ("org" :components ("org-notes" "org-static"))

        )

      )

(defun myweb-publish nil

  "Publish myweb."

  (interactive)

  (org-publish-all))

(myweb-publish)
注意上面的配置文件中引用了一个 css 文件 org-manual.css 这是因为默认导出的html文件格式实在是… …
1.3 css 美化
css的使用方法主要参考的了 HE QIN 同学的说明2, 说明的很详细, 我参照着她的说明简化了一下, 暂时只有css, 没有引入 javascript. 这个 org-manual.css 的样式是直接从 org-mode 的官方说明3 上直接下载下来的, 因为我觉得官方的使用说明的样式还挺简洁.(特别是右上角的内容导航很酷 ^_^) org-manual.css内容如下:
@import url(http://fonts.googleapis.com/css?family=Droid+Sans|Droid+Sans+Mono|Droid+Serif);

html {

    padding: 0;

}

body {

    font-family: "Droid Serif", "Lucida Grande", "Lucida Sans Unicode", "DejaVu Sans", Verdana, sans-serif;

    font-size: 11pt;

    line-height: 1.3;

    margin: 40pt;

    padding: 0;

}

#postamble {

    visibility:hidden;  /* 隐藏了postamble, 因为总是对不齐, css太菜...... */

    text-align: center;

    width: 75%;

    bottom:0;

    margin-left: auto;

    margin-right: auto;

    _position:absolute;

    _top:expression(document.documentElement.clientHeight + document.documentElement.scrollTop - this.offsetHeight);

}

.title {

    background: url(../images/logo.png) no-repeat 12px 5px;  /* 这个图片下载后被我替换了, 本来是org-mode自己的logo */

    position: fixed;

    display: inline;

    left: 0px;

    top: 0px;

    height: 54px;

    width: 100%;

    margin-top: 0px;

    background-color: #eee;

    padding: 0;

    z-index: 99;

}

#orgquote {

    position: fixed;

    display: block;

    top: 77px;

    padding: 5pt;

    text-align: center;

    background-color: black;

    width: 100%;

    color: #ccc;

    box-shadow: 0px 15px 10px #fff;

    font-size: 90%;

    font-family: Courier new;

    z-index: 98;

}

#paypal {

    position:fixed;

    right: 10px;

    top: 15px;

    z-index: 100;

}

#paypal button {

    font-family: Courier new;

    cursor: pointer;

    color: white;

    position:fixed;

    display: block;

    right: 14px;

    top: 15px;

    width: 90px;

    height: 40px;

    box-shadow: 5px 5px 5px #888;

    -webkit-box-shadow: 5px 5px 5px #888;

    -moz-box-shadow: 5px 5px 5px #888;

    -webkit-border-radius: 10px;

    -moz-border-radius: 10px;

    background-color: #53e1e3;

    font-weight: bold;

}

#paypal button:hover {

    position:fixed;

    display: block;

    right: 9px;

    top: 15px;

    width: 90px;

    height: 40px;

    margin-top: 5px;

    margin-left: 5px;

    box-shadow: 0px 0px 0px #888;

    -webkit-box-shadow: 0px 0px 0px #888;

    -moz-box-shadow: 0px 0px 0px #888;

    -webkit-border-radius: 10px;

    -moz-border-radius: 10px;

    background-color: #49f4f6;

    font-weight: bold;

}

h1.title {

    text-shadow: 2px 2px 4px #999;

    padding-top: 23px;

    padding-left: 70pt;

    font-size: 23pt;

    font-family: Courier New;

}

#linklist

{

    position: fixed;

    font-size: 13pt;

    font-family: Courier New;

    padding-top: 0px;

    padding-right: 0px;

    top: 107px;

    left: 0px;

    margin-top: 0px;

    width: 180px;

    background-color: #fff;

    color: black;

    box-shadow: 8px 8px 12px #ccc;

    -webkit-border-bottom-right-radius: 10px;

    -moz-border-radius-bottomright: 10px;

    z-index: 100;

}

#linklist a {

    color: black;

    font-weight: normal;

    text-decoration: none;

    display:block;

    padding: 7pt;

}

#linklist ul {

    margin: 0;

    padding: 0;

}

#linklist li {

    text-align: right;

    margin: 0;

}

.timestamp {

    font-family: Courier New;

    color: #888888;

}

#linklist li:hover {

    border-left: 7px solid #537d7b;

}

pre {

    background-color: #eee;

    font-family: "Droid Sans Mono";

    box-shadow: 5px 5px 5px #888;

    border: none;

    padding: 5pt;

    margin-bottom: 14pt;

    color: black;

    padding: 12pt;

    font-family: Courier New;

    font-size: 95%;

    overflow: auto;

}

#buttons {

    position: fixed;

    bottom: 10px;

    /* right: 20px; */

    left: 20px;

    z-index: 100;

    width: 100px;

}

.ok {

    -moz-opacity:.2;

    opacity: .2;

    filter:alpha(opacity=20);

}

.ok:hover {

    -moz-opacity:1;

    opacity: 1;

    filter:alpha(opacity=100);

}

.outline-2 {

    position: relative;

    left: 215px;

    top: 105px;

    width: 75%;

    padding-bottom: 5pt;

}

#twit {

    -moz-opacity:.2;

    opacity: .2;

    filter:alpha(opacity=20);

    position: fixed;

    top: 362px;

    box-shadow: 8px 8px 12px #ccc;

    -webkit-border-bottom-right-radius: 10px;

    -moz-border-radius-bottomright: 10px;

    z-index: 100;

}

#twit:hover {

    -moz-opacity:1;

    opacity: 1;

    filter:alpha(opacity=100);

    position: fixed;

    top: 362px;

    box-shadow: 8px 8px 12px #ccc;

    z-index: 100;

}

#outline-container-1 {

    padding-top: 3pt;

}

.outline-2 h2 {

    font-family: Courier New;

}

.outline-2 h3 {

    font-family: Courier New;

}

p {

    margin-top: 0;

    text-align: justify;

}

a:link {

    font-weight: normal;

    text-decoration: none;

    /* color: #1c3030; */

    /* color: #A34D32; */

}

a:visited {

    font-weight: normal;

    text-decoration: none;

    /* color: #5e251e; */

    /* color: #6E2432; */

}

a:hover, a:active {

    text-decoration: underline;

    /* color: #3d696a; */

    /* color: #537d7b; */

}

dd {

    text-align: justify;

    margin-bottom: 14pt;

}

dt {

    font-size: 110%;

    font-family: Courier New;

    color: #1c3030;

    /* color: #537d7b; */

    padding: 3px;

    margin-bottom: 3px;

}

li {

    margin: 10px;

    text-align: justify;

    list-style-image : url(../images/triangle.png);  /* 这个图片就是每个li 前面的小箭头 */

}

#table-of-contents {

    font-size: 9pt;

    position: fixed;

    right: 0em;

    top: 0em;

    background: white;

    -webkit-box-shadow: 0 0 1em #777777;

    -moz-box-shadow: 0 0 1em #777777;

    -webkit-border-bottom-left-radius: 5px;

    -moz-border-radius-bottomleft: 5px;

    text-align: right;

    /* ensure doesn't flow off the screen when expanded */

    max-height: 80%;

    overflow: auto;

    z-index: 200;

}

#table-of-contents h2 {

    font-size: 9pt;

    max-width: 8em;

    font-weight: normal;

    padding-left: 0.5em;

    padding-top: 0.05em;

    padding-bottom: 0.05em;

}

#table-of-contents ul {

    margin-left: 14pt;

    margin-bottom: 10pt;

    padding: 0

}

#table-of-contents li {

    padding: 0;

    margin: 1px;

    list-style: none;

}

#table-of-contents ul>:first-child {

    color: blue;

}

#table-of-contents #text-table-of-contents {

    display: none;

    text-align: left;

}

#table-of-contents:hover #text-table-of-contents {

    display: block;

    padding: 0.5em;

    margin-top: -1.5em;

}

img.random {

    max-width: 750px;

    max-height: 380px;

    margin-bottom: 10pt;

    border: 1px solid black;

}

@media screen

{

  #table-of-contents {

    float: right;

    border: 1px solid #CCC;

    max-width: 50%;

    overflow: auto;

  }

} /* END OF @media screen */
注: 上面的css中有2个图片是在线的, 我下载后放在 ../images 目录中了
1.4 导出html
最后整个导出工具的目录如下:
.

├── css

│   └── org-manual.css

├── images

│   ├── logo.png

│   └── triangle.png

├── Makefile

└── publish-config.el
把要导出的org文件放到上面配置的 ~/tmp/www 目录中, 然后运行命令 make html 就可以导出html到 目录 ~/tmp/output 中了.
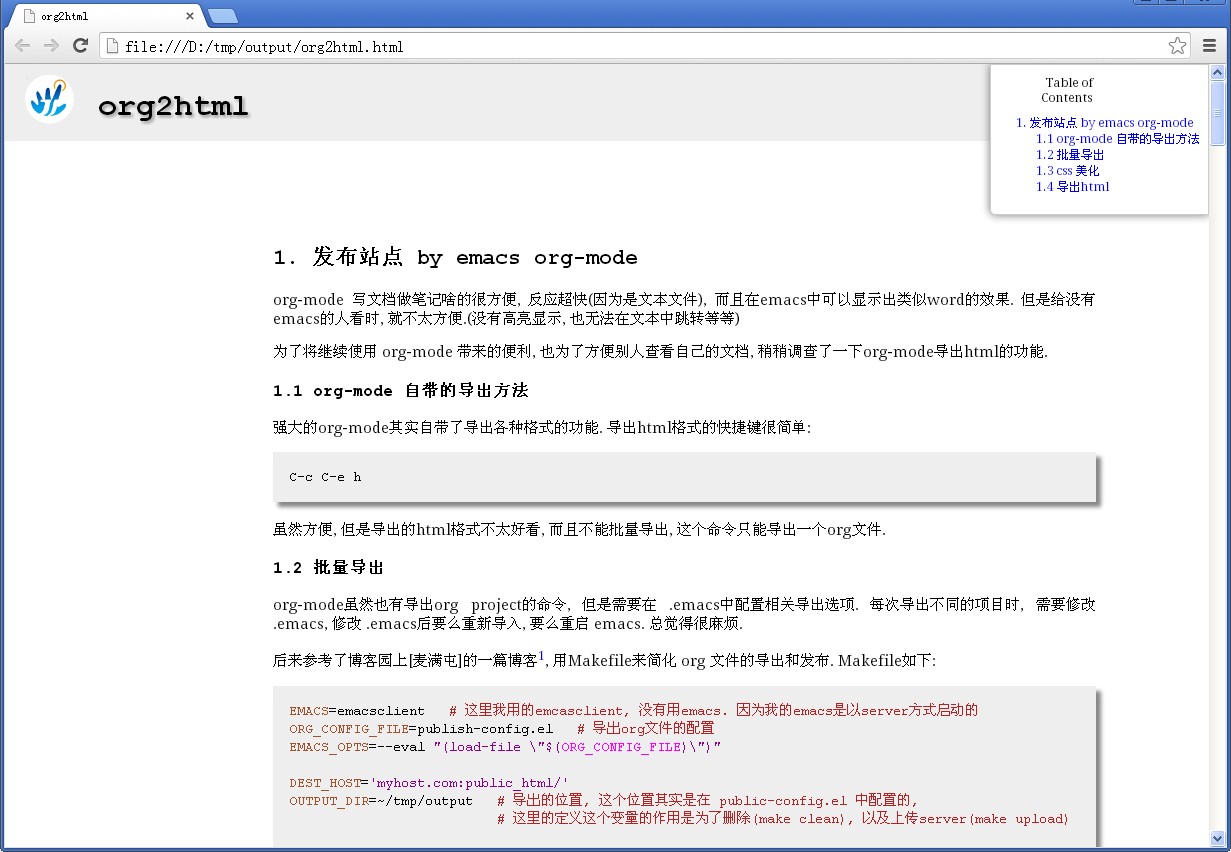
最后附一张这篇文章生成的html截图:
emacs org-mode文件转html文件的更多相关文章
- chmod a+w . 权限控制 su、sudo 修改文件所有者和文件所在组
对当前目录对所有用户开放读写权限 chmod a+r . $ sudo chmod -R a+w /usr/lib/python2.7 所有用户添加文件的写权限 [linux]su.sudo.sudo ...
- chmod a+w . 权限控制 su、sudo 修改文件所有者和文件所在组 添加用户到sudoer列表中 当前用户信息
对当前目录对所有用户开放读写权限 chmod a+r . $ sudo chmod -R a+w /usr/lib/python2.7 所有用户添加文件的写权限 [linux]su.sudo.sudo ...
- UWP开发之Template10实践:本地文件与照相机文件操作的MVVM实例(图文付原代码)
前面[UWP开发之Mvvmlight实践五:SuspensionManager中断挂起以及复原处理]章节已经提到过Template10,为了认识MvvmLight的区别特做了此实例. 原代码地址:ht ...
- 从java文件和CS文件里查询方法使用次数工具
前几天,领导让我找一下老系统(Java)里getRemoteUser方法都哪个文件用了,package是什么,方法被调用了多少次,当时因为着急,所以,直接人工找的,但是以后要是再出现,人工找就太讨厌了 ...
- java中的文件读取和文件写出:如何从一个文件中获取内容以及如何向一个文件中写入内容
import java.io.BufferedReader; import java.io.BufferedWriter; import java.io.File; import java.io.Fi ...
- C#的Process类调用第三方插件实现PDF文件转SWF文件
在项目开发过程中,有时会需要用到调用第三方程序实现本系统的某一些功能,例如本文中需要使用到的swftools插件,那么如何在程序中使用这个插件,并且该插件是如何将PDF文件转化为SWF文件的呢?接下来 ...
- Excel文件转plist文件出现的文件编码问题
今天在测试时遇到了需要将大量整理好的Excel数据转换为plist文件的情况.百度了一下教程,发现虽然别人也遇到过类似的情况,但是有些讲的还是不够细致.所以做如下整理. 百度到的内容中有使用Mes ...
- 使用java读取文件夹中文件的行数
使用java统计某文件夹下所有文件的行数 经理突然交代一个任务:要求统计某个文件夹下所有文件的行数.在网上查了一个多小时没有解决.后来心里不爽就决定自己写一个java类用来统计文件的行数,于是花了两个 ...
- 【Linux】Linux统计文件夹、文件数量的命令
# 查看当前目录下的文件数量(不包含子目录中的文件) ls -l|grep "^-"| wc -l # 查看当前目录下的文件数量(包含子目录中的文件) 注意:R,代表子目录 ls ...
- python 根据现有文件树创建文件树
# -*- coding: utf-8 -*- import os, errno def fileName(path):#获取文件夹 str = '' for i in range(1,len(pat ...
随机推荐
- salesforce lightning零基础学习(九) Aura Js 浅谈二: Event篇
上一篇介绍了Aura Framework中 Component类的部分方法,本篇将要介绍Event常用的方法. 1. setParam (String key , Object value):设置事件 ...
- salesforce lightning零基础学习(七) 列表展示数据时两种自定义编辑页面
上一篇Lightning内容描述的是LDS,通过LDS可以很方便的实例化一个对象的数据信息.当我们通过列表展示数据需要编辑时,我们常使用两种方式去处理编辑页面:Pop Up Window弹出修改详情以 ...
- Vue + Element UI 实现权限管理系统 前端篇(十六):系统备份还原
系统备份还原 在很多时候,我们需要系统数据进行备份还原.我们这里就使用MySql的备份还原命令实现系统备份还原的功能. 后台接口准备 系统备份还原是对数据库的备份还原,所以必须有后台接口的支持,我们准 ...
- vue.js的项目实战
欢迎大家前往腾讯云+社区,获取更多腾讯海量技术实践干货哦~ 本文由蔡述雄发表于云+社区专栏 需求背景 组件库是做UI和前端日常需求中经常用到的,把一个按钮,导航,列表之类的元素封装起来,方便日常使用, ...
- 实现text-detection-ctpn一路的坎坎坷坷
小编在学习文字检测,因为作者提供的caffe实现没有训练代码(不过训练代码可以参考faster-rcnn的训练代码),所以我打算先使用tensorflow实现,主要是复现前辈的代码,主要是对文字检测模 ...
- SpringBoot JPA + H2增删改查示例
下面的例子是基于SpringBoot JPA以及H2数据库来实现的,下面就开始搭建项目吧. 首先看下项目的整体结构: 具体操作步骤: 打开IDEA,创建一个新的Spring Initializr项目, ...
- Linux问题杂谈
1. 虚拟机 SSH 无法登录 1.1 问题1:未安装ssh服务端 ssh: connect to host 192.168.58.129 port 22: Connection refused 问题 ...
- RestTemplate发送HTTP、HTTPS请求
RestTemplate 使用总结 场景: 认证服务器需要有个 http client 把前端发来的请求转发到 backend service, 然后把 backend service 的结果再返 ...
- 如何将自定义的搜索参数便捷的添加到js方式的bootstrap table的参数中
页面: <div> <form id="exp_form"> 查询参数... <button type="button" oncl ...
- (2)Jquery1.8.3快速入门_checkbox全选取消部分选中
1. jquery示例功能: checkbox多选框 全选 .全不选. 选择部分. 源码 : <!DOCTYPE html> <html> <head> <m ...