MapServer Tutorial——MapServer7.2.1教程学习——第一节用例实践:Example 1.4 Labeling the Map
MapServer Tutorial——MapServer7.2.1教程学习——第一节用例实践:Example 1.4 Labeling the Map
一、前言
MapServer拥有非常灵活的标签标记系统。它支持bitmap以及truetype字体等。使用truetype字体同时还支持其缩放。标签的角度和位置是可以自定义的。
通过把标签的位置和角度以及其他参数的设置使用,你可以把你的地图装饰得更加美观,信息体现的更加丰富。
二、搭建Example1.4站点
所有的学习都要通过实践,还是从搭建站点开始。
在cmd中输入:cd /d E:\SvnWorkspace\LY_WEB_GIS\branches\Documents\ms4w-mapserver-for-wimdows\release-1911-x64-gdal-2-3-3-mapserver-7-2-1\apps
在cmd中输入:md Example1.4
在cmd中输入:cd Example1.4
在cmd中输入:md data
在cmd中输入:md logs
在cmd中输入:md fonts
在cmd中输入:cd.>web.config
在cmd中输入:cd.>example1_4.map
将states_ugl.dbf、states_ugl.shp、states_ugl.shx等三个文件放入到data文件夹下面。
将tutorial/fonts中的fonts.list、Vera.ttf(所有的.ttf字体文件)拷贝到Example1.4/fonts文件夹中。
(如果不清楚tutorial文件夹是怎么回事,请查看《MapServer Tutorial——MapServer7.2.1教程学习——教程背景》,里面有样例说明和应用数据下载地址:http://download.osgeo.org/mapserver/docs/mapserver-tutorial.zip)

在IIS中创建Example1.4站点,端口8014。web.config内容如下:
<?xml version="1.0" encoding="UTF-8"?>

<configuration>

    <system.webServer>

        <handlers>

            <add name="MapServerFastCgi" path="*" verb="*" type="" modules="FastCgiModule"
          scriptProcessor="E:\SvnWorkspace\LY_WEB_GIS\branches\Documents\ms4w-mapserver-for-wimdows\release-1911-x64-gdal-2-3-3-mapserver-7-2-1\bin\mapserv.exe"
          resourceType="Unspecified" requireAccess="Script" allowPathInfo="false" preCondition=""  />

        </handlers>

        <caching enabled="true" enableKernelCache="true" />

    </system.webServer>

</configuration>
给应用程序池添加对logs文件夹的读写权限。
在cmd中输入:icacls "E:\SvnWorkspace\LY_WEB_GIS\branches\Documents\ms4w-mapserver-for-wimdows\release-1911-x64-gdal-2-3-3-mapserver-7-2-1\apps\Example1.4\logs" /grant "IIS AppPool\Example1.4":(OI)(CI)RW
mapfile(example1_4.map)文件如下:
# The annotated map file (sort of)

# Created by Pericles S. Nacionales for the MapServer tutorial

# 20050408

#

# MapServer map file uses the pound sign (#) to denote the start of a line

# comment--each line that needs to be commented has to be prepended with a "#".

#

# Map files begin with MAP keyword to signify the start of the map object.

# Well, the entire map file is THE map object.  Enclosed between MAP and END

# at the very bottom of this map file, are keyword/value pairs and other

# objects.

MAP

  IMAGETYPE      PNG

  EXTENT         -97.238976 41.619778 -82.122902 49.385620

  SIZE           400 300

  SHAPEPATH      "./data"

  IMAGECOLOR     255 255 255

  FONTSET        "./fonts/fonts.list"

  # Layer objects are defined beneath the map object.  You need at least one

  # layer defined in your map file before you can display a map...  You can

  # define as many layers as you'd like although a limit is typically hard-coded

  # in map.h in the MapServer source.  The default limit is set at 100.  You'd

  # have to have a very specialized application to need more than 100 layers in

  # your application.

  # Start of LAYER DEFINITIONS ---------------------------------------------

  LAYER # States polygon layer begins here

    NAME         states_poly

    DATA         states_ugl

    STATUS       OFF

    TYPE         POLYGON

    # CLASSITEM defines the non-spatial attribute that you will be using to

    # separate a layer into classes.  This attribute will be in the DBF file

    # of your shapefile (it will be different for each data format).  In this

    # example the shapefile states_ugl has an associated database

    # (states_ugl.dbf) that contains an attribute called "CLASS".  You will be

    # using two values in the CLASS attribute to separate the classes (also

    # called themes) used in this layer--land and water.  CLASSITEM is used in

    # association with the EXPRESSION parameter in the CLASS object.  See below.

    CLASSITEM    "CLASS"

    # Just like CLASSITEM, LABELITEM defines the database attribute that you

    # will be using to draw labels.  In this case, the values of the attribute

    # "STATE" will be used to label the states polygons.

    LABELITEM    "STATE"

    # The class object is defined within the layer object.  You can define as

    # many classes as you need (well, there are limits as with layers, but it's

    # senseless to define more than ten on a "normal" layer.  There are

    # situations, however, where you might have to do it.)

    CLASS

      NAME 'States'

      EXPRESSION 'land'

      # There are styles in a class, just like there are classes in a layer,

      # just like there are layers in a map.  You can define multiple styles in

      # a class just as you can define multiple classes in a layer and multiple

      # layers in a map.

      STYLE

        COLOR      232 232 232

      END

      # There can be labels in a class, just like there are classes in a layer,

      # just like there are layers in a map.  You can define multiple labels in

      # a class just as you can define multiple classes in a layer and multiple

      # layers in a map.

      # MapServer has a very flexible labeling system.  With that flexibility

      # comes complexity, specially when using truetype fonts.  Please read

      # through the LABEL section of the MapServer map file documentation at

      # http://www.mapserver.org/mapfile for more information.

      LABEL

        COLOR 132 31 31

        TYPE TRUETYPE

        FONT arial-bold

        SIZE 12

        ANTIALIAS TRUE

        POSITION CL

        PARTIALS FALSE

        MINDISTANCE 300

        BUFFER 4

        # create a background shadow

        #  Note that the tutorial package has not been updated, so this has

        #  to be done manually!

        #SHADOWCOLOR 218 218 218  # prior to version 6

        #SHADOWSIZE 2 2  # prior to version 6

        STYLE    # since to version 6

          GEOMTRANSFORM 'labelpoly'

          COLOR 218 218 218

          OFFSET 2 2

        END # STYLE

      END # end of label

    END

    CLASS

      NAME 'Water'

      EXPRESSION 'water'

      STYLE

        COLOR      198 198 255

      END

    END

  END # States polygon layer ends here

  LAYER # States line layer begins here

    NAME         states_line

    DATA         states_ugl

    STATUS       OFF

    TYPE         LINE

    CLASSITEM    "CLASS"

    CLASS

      NAME 'State Boundary'

      EXPRESSION 'land'

      STYLE

        COLOR      64 64 64

      END

    END

  END # States line layer ends here

  # End of LAYER DEFINITIONS -------------------------------
END # All map files must come to an end just as all other things must come to...
在浏览器中输入:http://localhost:8014/mapserv?map=../apps/Example1.4/example1_4.map&layer=states_poly&layer=states_line&mode=map
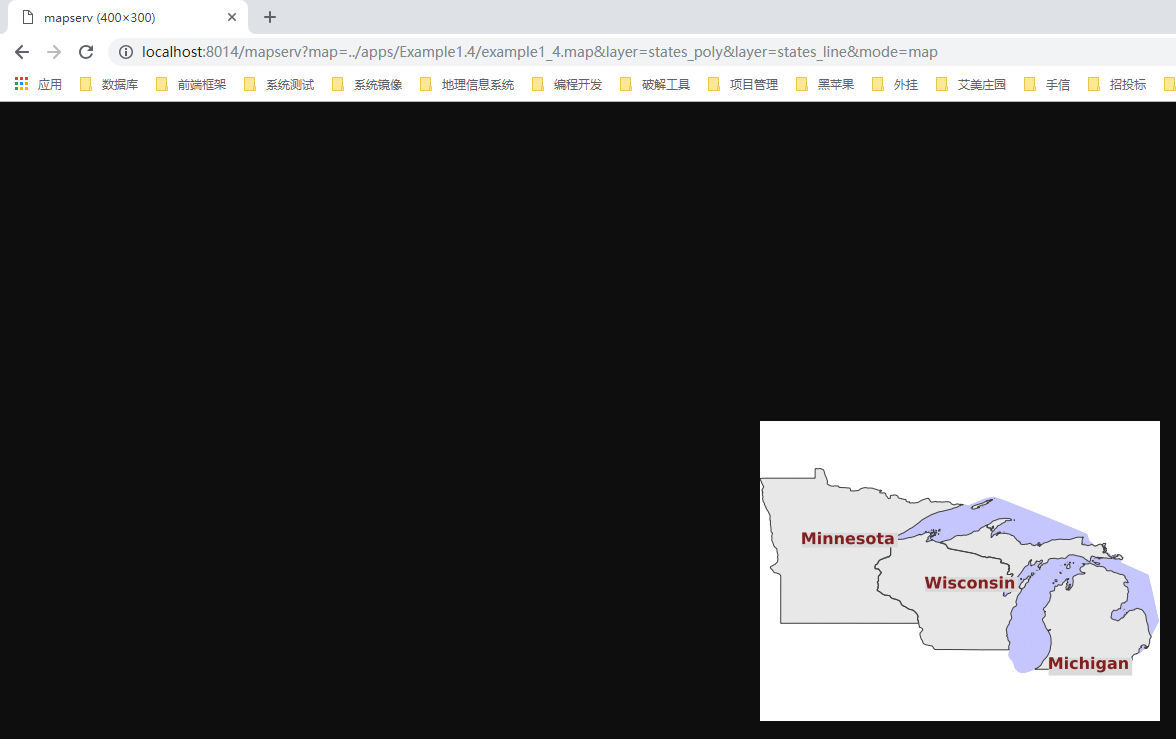
三、MapFIle文件(example1_4.map)讲解
MapFIle文件结构
                             MAP

 (states_poly) LAYER----------|---------LAYER (states_line)

(land) CLASS-----|-CLASS (water)         |-CLASS

  STYLE-|-LABEL     |-STYLE                 |-STYLE</pre>
LABEL 对象以及其中的关键词
FONTSET
指定字体文件清单文件的全路径或相对路径(如:./fonts/fonts.list 或 E:\SvnWorkspace\LY_WEB_GIS\branches\Documents\ms4w-mapserver-for-wimdows\release-1911-x64-gdal-2-3-3-mapserver-7-2-1\apps\Example1.4\fonts\fonts.list)
fonts.list 文件由两部分组成,名称和路径(相对路径或绝对路径)。
名称是路径所对应的字体集的实际名称(如:Vera.ttf 是当前文件,但是其字体的实际名称是arial)。
路径是Vera.ttf文件与fonts.list的相对路径或绝对路径。
当前案例中,fonts.list 文件与 ttf字体文件均在 fonts 文件夹下面。可查看 fonts.list 内容,此案例中采用的是相对路径。
# This be the fonts list

arial                           Vera.ttf

arial-bold                      VeraBd.ttf

arial-italic                    VeraIt.ttf

arial-bold-italic               VeraBI.ttf

times                           VeraSe.ttf

times-bold                      VeraSeBd.ttf

andale-mono                     VeraMono.ttf

vera_sans                       Vera.ttf

vera_sans-bold                  VeraBd.ttf

vera_sans-italic                VeraIt.ttf

vera_sans-bold-italic           VeraBI.ttf

vera_sans_mono                  VeraMono.ttf

vera_sans_mono-bold             VeraMoBd.ttf

vera_sans_mono-italic           VeraMoIt.ttf

vera_sans_mono-bold-italic      VeraMoBI.ttf

vera_serif                      VeraSe.ttf

vera_serif-bold                 VeraSeBd.ttf
如果我们采用绝对路径试试(顺便把mapfile文件中的LABEL对象里面的FONT修改为arial-italic):
# This be the fonts list

arial                           E:\SvnWorkspace\LY_WEB_GIS\branches\Documents\ms4w-mapserver-for-wimdows\release-1911-x64-gdal-2-3-3-mapserver-7-2-1\apps\Example1.4\fonts\Vera.ttf

arial-bold                      E:\SvnWorkspace\LY_WEB_GIS\branches\Documents\ms4w-mapserver-for-wimdows\release-1911-x64-gdal-2-3-3-mapserver-7-2-1\apps\Example1.4\fonts\VeraBd.ttf

arial-italic                    E:\SvnWorkspace\LY_WEB_GIS\branches\Documents\ms4w-mapserver-for-wimdows\release-1911-x64-gdal-2-3-3-mapserver-7-2-1\apps\Example1.4\fonts\VeraIt.ttf

arial-bold-italic               E:\SvnWorkspace\LY_WEB_GIS\branches\Documents\ms4w-mapserver-for-wimdows\release-1911-x64-gdal-2-3-3-mapserver-7-2-1\apps\Example1.4\fonts\VeraBI.ttf

times                           E:\SvnWorkspace\LY_WEB_GIS\branches\Documents\ms4w-mapserver-for-wimdows\release-1911-x64-gdal-2-3-3-mapserver-7-2-1\apps\Example1.4\fonts\VeraSe.ttf

times-bold                      E:\SvnWorkspace\LY_WEB_GIS\branches\Documents\ms4w-mapserver-for-wimdows\release-1911-x64-gdal-2-3-3-mapserver-7-2-1\apps\Example1.4\fonts\VeraSeBd.ttf

andale-mono                     E:\SvnWorkspace\LY_WEB_GIS\branches\Documents\ms4w-mapserver-for-wimdows\release-1911-x64-gdal-2-3-3-mapserver-7-2-1\apps\Example1.4\fonts\VeraMono.ttf

vera_sans                       E:\SvnWorkspace\LY_WEB_GIS\branches\Documents\ms4w-mapserver-for-wimdows\release-1911-x64-gdal-2-3-3-mapserver-7-2-1\apps\Example1.4\fonts\Vera.ttf

vera_sans-bold                  E:\SvnWorkspace\LY_WEB_GIS\branches\Documents\ms4w-mapserver-for-wimdows\release-1911-x64-gdal-2-3-3-mapserver-7-2-1\apps\Example1.4\fonts\VeraBd.ttf

vera_sans-italic                E:\SvnWorkspace\LY_WEB_GIS\branches\Documents\ms4w-mapserver-for-wimdows\release-1911-x64-gdal-2-3-3-mapserver-7-2-1\apps\Example1.4\fonts\VeraIt.ttf

vera_sans-bold-italic           E:\SvnWorkspace\LY_WEB_GIS\branches\Documents\ms4w-mapserver-for-wimdows\release-1911-x64-gdal-2-3-3-mapserver-7-2-1\apps\Example1.4\fonts\VeraBI.ttf

vera_sans_mono                  E:\SvnWorkspace\LY_WEB_GIS\branches\Documents\ms4w-mapserver-for-wimdows\release-1911-x64-gdal-2-3-3-mapserver-7-2-1\apps\Example1.4\fonts\VeraMono.ttf

vera_sans_mono-bold             E:\SvnWorkspace\LY_WEB_GIS\branches\Documents\ms4w-mapserver-for-wimdows\release-1911-x64-gdal-2-3-3-mapserver-7-2-1\apps\Example1.4\fonts\VeraMoBd.ttf

vera_sans_mono-italic           E:\SvnWorkspace\LY_WEB_GIS\branches\Documents\ms4w-mapserver-for-wimdows\release-1911-x64-gdal-2-3-3-mapserver-7-2-1\apps\Example1.4\fonts\VeraMoIt.ttf

vera_sans_mono-bold-italic      E:\SvnWorkspace\LY_WEB_GIS\branches\Documents\ms4w-mapserver-for-wimdows\release-1911-x64-gdal-2-3-3-mapserver-7-2-1\apps\Example1.4\fonts\VeraMoBI.ttf

vera_serif                      E:\SvnWorkspace\LY_WEB_GIS\branches\Documents\ms4w-mapserver-for-wimdows\release-1911-x64-gdal-2-3-3-mapserver-7-2-1\apps\Example1.4\fonts\VeraSe.ttf

vera_serif-bold                 E:\SvnWorkspace\LY_WEB_GIS\branches\Documents\ms4w-mapserver-for-wimdows\release-1911-x64-gdal-2-3-3-mapserver-7-2-1\apps\Example1.4\fonts\VeraSeBd.ttf
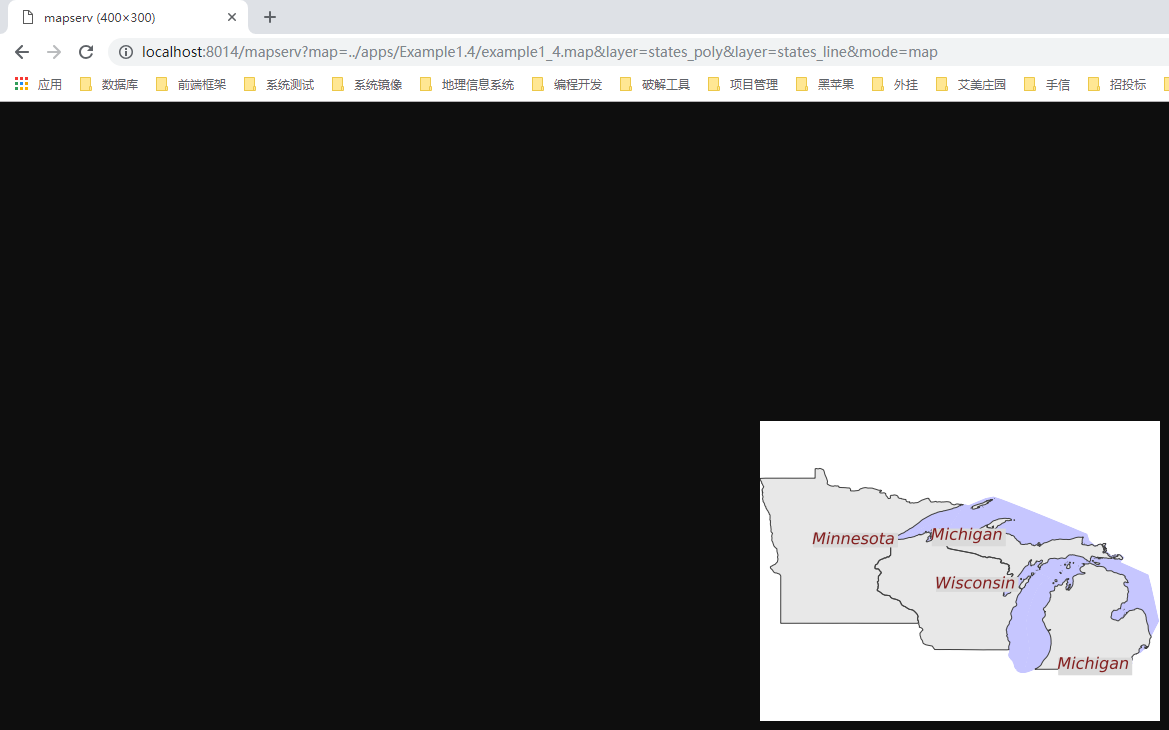
刷新页面,看到效果如下:

可以使用相对路径,也可以使用绝对路径,然后字体已经变为斜体。
字体相关数据信息网站:https://www.freetype.org/
LABELITEM
上一章学过CLASSITEM,LABELITEM与其有类似的理解。
但是其与CLASSITEM又不相同,LABELITEM是指定显示某个字段中的数据,当前案例中是“STATE”。
LABELITEM 在 LAYER 标签中,而 LABEL 在 CLASS 标签中。所以目前只显示三个标签的原因是:只有 CLASS 中 EXPRESSION 为 land 的 几个图形才会显示标签,同时MINDISTANCE决定了重叠的标签在执行像素内不显示。
可以在cmd中输入:cd /d E:\SvnWorkspace\LY_WEB_GIS\branches\Documents\ms4w-mapserver-for-wimdows\release-1911-x64-gdal-2-3-3-mapserver-7-2-1\apps\Example1.4\data
在cmd中输入:ogrinfo -al -ro states_ugl.shp 查看所有的数据。
在cmd中输入:ogrinfo -al -so -where CLASS='land' states_ugl.shp 查看 CLASS='land' 的概要数据。

如果将MINDISTANCE修改为100时,刷新浏览器,你会发现,又出来了一个标签。
LABEL
以LABEL标签开头。LABEL对象在其他对象中使用,当前案例是在CLASS对象中使用,也可以在其他标签中使用,如:SCALEBAR。
LABEL标签的详情见:https://www.mapserver.org/mapfile/label.html
COLOR
目前案例中位于LABEL中的COLOR是用来定义label中的文字颜色。
SHADOWCOLOR
文字的阴影颜色。(自MapServer 6开始,LABEL STYLE 被 GEOMTRANSFORM LABELPOLY 所替代。其实mapfile中已经更新,只是官网上面的说明没有更新。)
SHADOWSIZE
文字阴影的尺寸,由X,Y组成,2 2 表示2像素宽,2像素高。(自MapServer 6开始,LABEL STYLE 被 GEOMTRANSFORM LABELPOLY 所替代。其实mapfile中已经更新,只是官网上面的说明没有更新。)
其实看到此处,以及对照官网上面的相关文档,我又很多疑问。首先查看几处资料:
1.https://www.mapserver.org/mapfile/geomtransform.html#labels-label-style-only
其中“Labels (LABEL STYLE only)”中写道如下:
The following simple geometry transformations are available at the LABEL STYLE level: #在LABEL标签的STYLE标签中,使用GEOMTRANSFORM有两种类型,分别为:labelpnt 和 labelpoly

labelpnt

labelpoly

These are used for label styling (background colour, background shadow, background frame). #他们是为label的背景颜色,背景阴影,背景框架做样式设置的。

Note The result of using labelpnt is affected by the LAYER LABELCACHE setting. If LABELCACHE is ON (the default), the label will be shifted when a non-zero sized symbol is added using labelpnt.

labelpnt and labelpoly
- GEOMTRANSFORM labelpnt produces the geographic position the label is attached to. This corresponds to the center of the label text only if the label is in position CC.
GEOMTRANSFORM “labelpnt”
- GEOMTRANSFORM labelpoly produces a polygon that covers the label plus a 1 pixel padding.
GEOMTRANSFORM “labelpoly”
Note Only available for STYLE in the LABEL context.
These transformations can be used to make background rectangles for labels and add symbols to the label points.
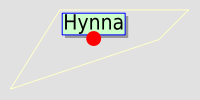
Class definitions for the example:
CLASS

  STYLE

    OUTLINECOLOR 255 255 204

  END # STYLE

  LABEL

    SIZE giant

    POSITION UC
   #好了,第一个的疑问就在此处,同样 LABEL 中 GEOMTRANSFORM 的值均为"labelpoly",是如何判断当前 设置的为:阴影、背景颜色、还是边线呢?
   #设置shadow难道是因为style标签中有 OFFSET 标签吗?
   #设置 backgground 是因为只有COLOR,没有其他标签吗?
   #设置outline是因为有OUTLINECOLOR标签,和WIDTH标签吗?
    #我实在是有点费解。

    STYLE # shadow

      GEOMTRANSFORM "labelpoly"

      COLOR 153 153 153

      OFFSET 3 3

    END # Style

    STYLE # background

      GEOMTRANSFORM "labelpoly"

      COLOR 204 255 204

    END # Style

    STYLE # outline

      GEOMTRANSFORM "labelpoly"

      OUTLINECOLOR 0 0 255

      WIDTH 1

    END # Style

    STYLE

      GEOMTRANSFORM "labelpnt"

      SYMBOL 'circlef' #此处是自定义符号,设置红色圆点的。

      COLOR 255 0 0

      SIZE 15

    END # Style

  END # Label

END # Class
Symbol definition for the circlef symbol:
SYMBOL

  NAME "circlef"

  TYPE ellipse

  FILLED true

  POINTS

    1 1

  END # POINTS

END # SYMBOL
2.https://www.mapserver.org/mapfile/style.html 中对GEOMTRANSFORM有段定义
GEOMTRANSFORM [bbox|centroid|end|labelpnt|labelpoly|start|vertices|<expression>]
  Used to indicate that the current feature will be transformed before the actual style is applied. Introduced in version 5.4.
- bbox: produces the bounding box of the current feature geometry.
- centroid: produces the centroid of the current feature geometry.
- end: produces the last point of the current feature geometry. When used with ANGLE AUTO, it can for instance be used to render arrowheads on line segments.
- labelpnt: used for LABEL styles. Draws a marker on the geographic position the label is attached to. This corresponds to the center of the label text only if the label is in position CC.
- labelpoly: used for LABEL styles. Produces a polygon that covers the label plus a 1 pixel padding.
- start: produces the first point of the current feature geometry. When used with ANGLE AUTO, it can for instance be used to render arrow tails on line segments.
- vertices: produces all the intermediate vertices (points) of the current feature geometry (the start and end are excluded). When used with ANGLE AUTO, the marker is oriented by the half angle formed by the two adjacent line segments.
- <expression>: Applies the given expression to the geometry. Supported expressions:
- (buffer([shape],dist)): Buffer the geometry ([shape]) using dist pixels as buffer distance. For polygons, a negative dist will produce a setback.
- (generalize([shape],tolerance)): simplifies a geometry ([shape]) in way comparable to FME’s ThinNoPoint algorithm. See http://trac.osgeo.org/gdal/ticket/966 for more information.
Note Depends on GEOS.
- (simplify([shape],tolerance)): simplifies a geometry ([shape]) using the standard Douglas-Peucker algorithm.
- (simplifypt([shape],tolerance)): simplifies a geometry ([shape]), ensuring that the result is a valid geometry having the same dimension and number of components as the input. tolerance must be non-negative.
- (smoothsia([shape], smoothing_size, smoothing_iteration, preprocessing)): will smooth a geometry ([shape]) using the SIA algorithm
Example (polygon data set) - draw a two pixel wide line 5 pixels inside the boundary of the polygon:
STYLE

  OUTLINECOLOR 255 0 0

  WIDTH 2

  GEOMTRANSFORM (buffer([shape],-5))

END
There is a difference between STYLE and LAYER GEOMTRANSFORM. LAYER-level will receive ground coordinates (meters, degrees, etc) and STYLE-level will receive pixel coordinates. The argument to methods such as simplify() must be in the same units as the coordinates of the shapes at that point of the rendering workflow, i.e. pixels at the STYLE-level and in ground units at the LAYER-level.
LAYER NAME "my_layer"

    TYPE LINE

    STATUS DEFAULT

    DATA "lines.shp"

    GEOMTRANSFORM (simplify([shape], 10))  ## 10 ground units

    CLASS

        STYLE

            GEOMTRANSFORM (buffer([shape], 5)  ## 5 pixels

            WIDTH 2

            COLOR 255 0 0

        END

    END

END
3.https://www.mapserver.org/mapfile/label.html 也有一段对STYLE的使用定义
STYLE

  The start of a STYLE object.
  Label specific mechanisms of the STYLE object are the GEOMTRANSFORM options: #此处也说明了,在STYLE对象中使用 GEOMTRANSFORM ,当然,前提是基于 LABEL 的使用 STYLE
    GEOMTRANSFORM [labelpnt|labelpoly]
    Creates a geometry that can be used for styling the label. Does not apply to ANGLE FOLLOW labels.
- labelpnt draws a marker on the geographic position the label is attached to. This corresponds to the center of the label text only if the label is in position CC.
- labelpoly generates the bounding rectangle for the text, with 1 pixel of padding added in all directions.
The resulting geometries can be styled using the mechanisms available in the STYLE object.
Example - draw a red background rectangle for the labels (i.e. billboard) with a “shadow” in gray:
STYLE

  GEOMTRANSFORM 'labelpoly'

  COLOR 153 153 153

  OFFSET 3 2

END # STYLE

STYLE

  GEOMTRANSFORM 'labelpoly'

  COLOR 255 0 0

END # STYLE
New in version 6.0.
TYPE
指定LABEL使用的字体类型。TRUETYPE 或 BITMAP。
FONT
指定使用哪种字体。如果指定TYPE为TRUETYPE,你需要指定使用哪种字体。
SIZE
指定字体的大小,TYPE为TRUETYPE时,使用像素;TYPE为BITMAP时,使用如:small、large。
ANTIALIAS
truetype类型字体的抗锯齿开关,值为:TRUE或FALSE。
POSITION
label标签中文字在label标签中的位置。其值由垂直位置和水平位置组成。
垂直位置的值由三个,分别为:C(中间,center)、U(上面,upper)、L(下面,lower)。
水平位置的值由三个,分别为:C(中间,center)、L(左边,left)、R(右边、right)。
缺省值:AUTO
PARTIALS
告诉MapServer是否生成完整的标签文本(个人认为是,如果标签中文本长度过程,则缺省显示),值为:TRUE或FALSE。
MINDISTANCE
设置重叠标签的最小距离,像素。(个人认为是按照两个标签的开始位置比对计算。)
BUFFER
设置标签填充外边距(像素)。用于增强可读性。(其实如果会前端CSS的应该比较容易理解padding,简单理解就是表示两个盒子之间的空白边距。)
四、后记
在做这个例子的过程中,遇到了一些尚未理解的位置。LABEL中的STYLE 下面 的 GEOMTRANSFORM 重点标记一下。
然后学会了更多的用命令查询shp数据。 -ro:只读打开文件。-al:列出所有数据。-rl:将所有数据重点关键数据进行展示。-where:像查询语句一样,根据条件过滤展示数据。
MapServer Tutorial——MapServer7.2.1教程学习——第一节用例实践:Example 1.4 Labeling the Map的更多相关文章
- MapServer Tutorial——MapServer7.2.1教程学习——第一节用例实践:Example1.7 Adding a wms layer
MapServer Tutorial——MapServer7.2.1教程学习——第一节用例实践:Example1.7 Adding a wms layer 前言 Add OGC WMS Layers( ...
- MapServer Tutorial——MapServer7.2.1教程学习——第一节用例实践:Example1.6 Defining Projections and Extents
MapServer Tutorial——MapServer7.2.1教程学习——第一节用例实践:Example1.6 Defining Projections and Extents 一.前言 当在m ...
- MapServer Tutorial——MapServer7.2.1教程学习——第一节用例实践:Example1.5 Adding a raster layer
MapServer Tutorial——MapServer7.2.1教程学习——第一节用例实践:Example1.5 Adding a raster layer 一.前言 MapServer不仅支持 ...
- MapServer Tutorial——MapServer7.2.1教程学习——第一节用例实践:Example1.3 Displaying Classes in a Layer
MapServer Tutorial——MapServer7.2.1教程学习——第一节用例实践:Example1.3 Displaying Classes in a Layer 一.前言 关于第一节的 ...
- MapServer Tutorial——MapServer7.2.1教程学习——第一节用例实践:Example1.2 Static Map with Two Layers
MapServer Tutorial——MapServer7.2.1教程学习——第一节用例实践:Example1.2 Static Map with Two Layers 一.前言 上一篇博客< ...
- MapServer Tutorial——MapServer7.2.1教程学习——第一节用例实践:Example1.1 A map with single layer
MapServer Tutorial——MapServer7.2.1教程学习——第一节用例实践:Example1.1 A map with single layer 一.前言 开始MapServer用 ...
- MapServer Tutorial——MapServer7.2.1教程学习——第一节:MapServer的基本配置管理,静态地图应用以及MapFile文件
MapServer Tutorial——MapServer7.2.1教程学习——第一节:MapServer的基本配置管理,静态地图应用以及MapFile文件 前言 万事开头难,有了<MapSer ...
- MapServer Tutorial——MapServer7.2.1教程学习(大纲)
MapServer Tutorial——MapServer7.2.1教程学习(大纲) 前言 最近在学习Gis方面的知识,因为电脑硬件配置偏低,顾选择MapServer入手.网上搜索MapServer系 ...
- MapServer Tutorial——MapServer7.2.1教程学习——教程背景
MapServer Tutorial——MapServer7.2.1教程学习——教程背景 一.前言 目前处于MapServer学习入门阶段,所以每一步都需要打下扎实基础.尽自己最大的努力,去学习知识的 ...
随机推荐
- Monte Carlo simulated annealing
蒙特·卡罗分子模拟计算 使用蒙特·卡罗方法进行分子模拟计算是按照以下步骤进行的: 1. 使用随机数发生器产生一个随机的分子构型. 2. 对此分子构型的其中粒子坐标做无规则的改变,产生一个新的分子构型. ...
- 《linux就该这么学》第七节课:文件的各种权限以及linux分区命名规则
笔记 (借鉴请改动) 5.3:文件特殊权限 SUID 临时拥有文件所有者的权限(基本上只是执行权限) SGID 临时拥有文件所有组的权限,在目录中创建文件自动继承该目录的用户组. SBIT 粘滞 ...
- .NET 4.5 中新提供的压缩类(转载)
Windows8 的开发已经如火如荼开始了,在 Windows8 中提供的 .NET Framework 已经更新到了 4.5 版,其中又增加了一些新的特性,对压缩文件的支持就是其中之一. 在 4.5 ...
- shell 三剑客
grep 过滤来自一个文件或标准输入匹配模式内容. 除了grep外,还有egrep.fgrep.egrep是grep的扩展,相当于grep -E.fgrep相当于grep -f,用的少. Usage: ...
- 实现Runnable接口创建多线程及其优势
实现Runnable接口创建多线程: 创建一个Runnable接口的实现类RunnableImpl: 主线程中: 其中,链式编程的Thread类的静态方法currentThread方法点getName ...
- 牛客网 完数VS盈数
题目链接:https://www.nowcoder.com/practice/ccc3d1e78014486fb7eed3c50e05c99d?tpId=40&tqId=21351&t ...
- Missing library: xdoclet-1.2.1.jar.如何解决?
去这里下载xdoclet-bin-1.2.1.zip http://sourceforge.net/projects/xdoclet/files/xdoclet/1.2.1/ 解压出来,比如解压到C: ...
- js 计算后样式封装
function getStyle(obj,attr){ // 需要获取的元素 属性 if(obj.currentStyle){ return obj.currentStyle[attr]; }els ...
- poj2142 The Balance
poj2142 The Balance exgcd 应分为2种情况分类讨论 显然我们可以列出方程 ax-by=±d 当方程右侧为-d时,可得 by-ax=d 于是我们就得到了2个方程: ax-by=d ...
- pageUtil分页工具
分页工具: https://www.cnblogs.com/ggq-insist-qiang/articles/10095603.html