NG-ZORRO + angular-cli11 表格横纵向单元格合并,按需设置背景色,解决动态合并单元格动态colspan情况下,nzLeft固定列失效问题,也适用VUE,REACT
NG-ZORRO + angular-cli11 实现表格横纵向单元格合并,按需设置背景色,并解决动态合并单元格动态colspan情况下,nzLeft固定列失效问题
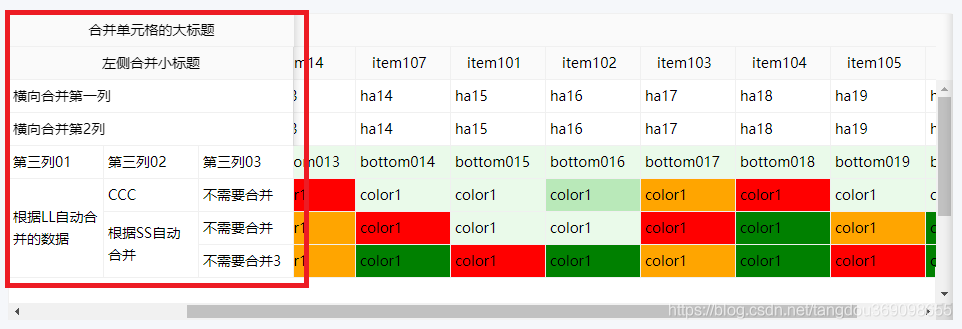

HTML代码
<!--

  1.发现只要colspan只要是动态的,nzleft就不正常了,无法起作用

  2.合并单元格且固定列位置方案1:比如标题,可以固定一部分,然后另外一部分不固定

  3.合并单元格且固定列位置方案2:可以动态设置其样式

-->

<div class="my-table">

  <nz-table #colSpanTable  nzBordered

  [nzScroll]="{ x: (tableObj.arr.length+3)*95+'px', y: '240px' }" [nzFrontPagination]="false">

  <thead>

    <tr nzLeft>

      <!-- 方案1 -->

      <th colspan="3" nzLeft style="border-right: 0px">{{tableObj.ss}}</th>

      <th [colspan]="tableObj.arr.length"></th>

      <!-- 方案1 -->

    </tr>

    <tr>

      <th [colspan]="3" nzLeft id="my_hr_table_title">左侧合并小标题</th>

      <th *ngFor="let item of tableObj.arr; index as i">{{item}}</th>

    </tr>

  </thead>

  <tbody>

    <tr *ngFor="let item of tableData;">

      <td colspan="3" nzLeft>{{ item.type }}</td>

      <td *ngFor="let innerItem of item.Content;">{{innerItem.name}}</td>

    </tr>

    <tr *ngFor="let item of table02">

      <ng-container *ngFor="let t of mergeColumns; index as i">

        <ng-container *ngIf="item[t]!==undefined">

          <!-- 方案2 -->

          <td [attr.rowspan]="item[mergeFix+t]" class="ant-table-cell-fix-left" [style]="getStyle(i)">{{ item[t] }}

          </td>

          <!-- 方案2 -->

        </ng-container>

      </ng-container>

      <td class="ant-table-cell-fix-left" [style]="getStyle(2)">{{item.key03}}</td>

      <td *ngFor="let innerItem of item.Content" [ngClass]="getClass(innerItem.color)">{{innerItem.name}}</td>

    </tr>

  </tbody>

</nz-table>

</div>
TS 代码
import { Component, OnInit } from '@angular/core'

@Component({

  selector: 'table-report',

  templateUrl: './table.component.html',

  styleUrls: ['./table.component.less'],

})

export class MyTableComponent implements OnInit {

  constructor() {}

  tableObj = {

    ss: '合并单元格的大标题',

    arr: ['item1', 'item13', 'item14', 'item107', 'item101', 'item102', 'item103', 'item104', 'item105', 'item106']

  }

  tableData = [

    {

      type: '横向合并第一列',

      Content: [

        {

          name: 'ha11'

        },

        {

          name: 'ha12'

        },

        {

          name: 'ha13'

        },

        {

          name: 'ha14'

        },

        {

          name: 'ha15'

        },

        {

          name: 'ha16'

        },

        {

          name: 'ha17'

        },

        {

          name: 'ha18'

        },

        {

          name: 'ha19'

        },

        {

          name: 'ha20'

        },

      ]

    },

    {

      type: '横向合并第2列',

      Content: [

        {

          name: 'ha11'

        },

        {

          name: 'ha12'

        },

        {

          name: 'ha13'

        },

        {

          name: 'ha14'

        },

        {

          name: 'ha15'

        },

        {

          name: 'ha16'

        },

        {

          name: 'ha17'

        },

        {

          name: 'ha18'

        },

        {

          name: 'ha19'

        },

        {

          name: 'ha20'

        }

      ]

    }

  ]

  table02: any = [];

  tableData2 = [

    {

      // 需要加上这一个东西

      key: '0',

      ll: '第三列01',

      LineMergerRow: 12,

      ss: '第三列02', // 需要加上这一个东西

      StationMergerRow: 3,

      key03: '第三列03', // 需要加上这一个东西

      ClassOrder: 1,

      Content: [

        {

          name: 'bottom01',

        },

        {

          name: 'bottom012',

        },

        {

          name: 'bottom013',

        },

        {

          name: 'bottom014',

        },

        {

          name: 'bottom015',

        },

        {

          name: 'bottom016',

        },

        {

          name: 'bottom017',

        },

        {

          name: 'bottom018',

        },

        {

          name: 'bottom019',

        },

        {

          name: 'bottom0120',

        },

      ],

    },

    {

      key: '2',

      ll: '根据LL自动合并的数据',

      LineMergerRow: 12,

      ss: 'CCC',

      StationMergerRow: 3,

      key03: '不需要合并',

      ClassOrder: 1,

      Content: [

        {

          name: 'color1',

          color: 1,

        },

        {

          name: 'color1',

          color: 2,

        },

        {

          name: 'color1',

          color: 3,

        },

        {

          name: 'color1',

          color: 4,

        },

        {

          name: 'color1',

          color: 4,

        },

        {

          name: 'color1',

          color: 1,

        },

        {

          name: 'color1',

          color: 2,

        },

        {

          name: 'color1',

          color: 3,

        },

        {

          name: 'color1',

          color: 4,

        },

        {

          name: 'color1',

          color: 4,

        },

      ],

    },

    {

      key: '3',

      ll: '根据LL自动合并的数据',

      LineMergerRow: 12,

      ss: '根据SS自动合并',

      StationMergerRow: 3,

      key03: '不需要合并',

      ClassOrder: 2,

      Content: [

        {

          name: 'color1',

          color: 0,

        },

        {

          name: 'color1',

          color: 1,

        },

        {

          name: 'color1',

          color: 2,

        },

        {

          name: 'color1',

          color: 3,

        },

        {

          name: 'color1',

          color: 4,

        },

        {

          name: 'color1',

          color: 4,

        },

        {

          name: 'color1',

          color: 3,

        },

        {

          name: 'color1',

          color: 0,

        },

        {

          name: 'color1',

          color: 2,

        },

        {

          name: 'color1',

          color: 0,

        },

      ],

    },

    {

      key: '4',

      ll: '根据LL自动合并的数据',

      LineMergerRow: 12,

      ss: '根据SS自动合并',

      StationMergerRow: 3,

      key03: '不需要合并3',

      ClassOrder: 3,

      Content: [

        {

          name: 'color1',

          color: 3,

        },

        {

          name: 'color1',

          color: 0,

        },

        {

          name: 'color1',

          color: 2,

        },

        {

          name: 'color1',

          color: 0,

        },

        {

          name: 'color1',

          color: 3,

        },

        {

          name: 'color1',

          color: 0,

        },

        {

          name: 'color1',

          color: 2,

        },

        {

          name: 'color1',

          color: 0,

        },

        {

          name: 'color1',

          color: 3,

        },

        {

          name: 'color1',

          color: 0,

        },

      ],

    },

  ];

  mergeFix = 'mergeFlag'

  mergeColumns = ['ll', 'ss']; // 合并列的键值

  ngOnInit(): void {

    this.table02 = this.sortAndMerge(this.tableData2);

  }

  /**

   * 自动合并单元格的方法

   * @param rawDataList 需要合并数据的数组

   */

  private sortAndMerge(rawDataList): any[] {

    const rowspan = this.mergeFix,

      mergeColumns = this.mergeColumns;

    if (rawDataList.length > 1) {

      //长度大于1才有资格进一步处理

      const sortColumn = Object.keys(rawDataList[0]),

        keySort = (raw) => {

          for (let i = raw.length - 1; i > 0; i--) {

            let newObj = {},

              tmpObj = raw[i];

            sortColumn.forEach((s) => (newObj[s] = tmpObj[s]));

            raw[i] = newObj;

          }

          return raw;

        },

        compare = (a, b, c = sortColumn[0], i = 0) => {

          if (a[c] === b[c]) {

            //等于的话进行判断是否还有后续字段需要排序,没有则返回0;有则递归进行后续字段排序处理。

            if (i === sortColumn.length - 1) {

              //没有后续字段

              return (i = 0);

            }

            i++;

            return compare(a, b, sortColumn[i], i); //递归排序后续字段

          } else if (a[c] > b[c]) {

            //大于返回1

            return 1;

          } else {

            //小于返回-1

            return -1;

          }

        },

        arr = keySort(JSON.parse(JSON.stringify(rawDataList))).sort(compare),

        aLen = arr.length;

      for (let i = mergeColumns.length - 1; i >= 0; i--) {

        //先迭代待合并列

        let index = 0;

        let title = mergeColumns[i];

        let span = 1; //合并列属性默认为1

        for (let j = 0; j < aLen; j++) {

          let comp = arr[index][title];

          if (arr[j][title] === comp) {

            j !== index && (delete arr[j][title], span++);

            console.log(rowspan);

            j === aLen - 1 && (arr[index][rowspan + title] = span);

          } else {

            span > 1 && ((arr[index][rowspan + title] = span), (span = 1));

            index = j;

          }

        }

      }

      return arr;

    }

    return rawDataList;

  }

  getClass(e) {

    return { 0: 'col-green', 1: 'col-light-green', 2: 'col-orange', 3: 'col-red' }[e] || 'col-beautiful-green'

  }

  getStyle(e) {

    return (

      { 0: 'position: sticky; left: 0px;', 1: 'position: sticky; left: 95px;', 2: 'position: sticky; left: 190px;' }[e] ||

      'position: sticky; left: 0px;'

    );

  }

}
less 代码
// 僅供測試階段使用

::ng-deep .alain-default__fixed .alain-default__aside {

  display: none;

}

::ng-deep .alain-default__content {

  margin-left: 20px;

}

// 僅供測試階段使用

.my-table {

  margin-top: 30px;

  color: rgb(0, 0, 0);

  // 减小间距

  /deep/.ant-table-thead > tr > th {

    padding-bottom: 5px;

    padding-top: 5px;

    color: rgb(0, 0, 0);

  }

  /deep/.ant-table-tbody > tr > td {

    padding: 5px 4px;

    color: rgb(0, 0, 0);

  }

  // 减小间距

  /deep/.ant-table {

    color: rgb(0, 0, 0);

}

  .col-green {

    background: green;

  }

  .col-light-green {

    background: rgb(185, 233, 185);

  }

  .col-orange {

    background: orange;

  }

  .col-red {

    background: red;

  }

  .col-beautiful-green {

    background: rgb(234, 250, 234);

  }

  .my_item {

    min-width: 600px;

    padding: 0 10px 0 10px;

    width: 50%;

    display: inline-block;

  }

}
NG-ZORRO + angular-cli11 表格横纵向单元格合并,按需设置背景色,解决动态合并单元格动态colspan情况下,nzLeft固定列失效问题,也适用VUE,REACT的更多相关文章
- 【表格设置】HTML中合并单元格,对列组合应用样式,适应各浏览器的内容换行
1.常用表格标签 普通 <table> | <tr> | | <th ...
- 观察者模式在ng(Angular)中的应用
在这个前端框架满天飞的天下,angular MVVM 的模式确实火了一把,所以最近一直在学习ng,感悟颇多,填坑无数,今天终静下心来打算更新自己久未变动的博客,做一做总结. 1.在ng中的观察者模式: ...
- Jquery实战——横纵向的菜单
横纵向的菜单效果,点击纵向菜单显示其子菜单.鼠标指向横菜单的时候.显示其子菜单,鼠标离开,子菜单隐藏. HTML代码: <span style="font-size:18px;&quo ...
- angular实现表格的全选、单选、部分删除以及全部删除
昨天自己写了一小段js,在全选的时候有点儿小坑,然后,整理了一下.今天把它贴出来,希望以后还记得. 大家也可以去github上查看或下载:https://github.com/dreamITGirl/ ...
- angular实现表格的分页显示
最近项目中用到了一个功能,就是表格的分页显示.以前没整过,今天学会了,把它整理一下,下次可以直接用. 实例代码:https://github.com/dreamITGirl/projectStudy ...
- 利用jQuery设计横/纵向菜单
在网页中,菜单扮演着"指路者"的角色.怎样设计一个人性化的菜单呢.以下小编带着大家一起做. 效果图: watermark/2/text/aHR0cDovL2Jsb2cuY3Nkbi ...
- Qt实现表格控件-支持多级列表头、多级行表头、单元格合并、字体设置等
目录 一.概述 二.效果展示 三.定制表头 1.重写数据源 2.重写QHeaderView 四.设置属性 五.相关文章 原文链接:Qt实现表格控件-支持多级列表头.多级行表头.单元格合并.字体设置等 ...
- c# WinForm开发 DataGridView控件的各种操作总结(单元格操作,属性设置)
一.单元格内容的操作 *****// 取得当前单元格内容 Console.WriteLine(DataGridView1.CurrentCell.Value); // 取得当前单元格的列 Index ...
- FineReport单元格扩展与父子格设置
1.描述 在讲述报表设计之前,首先介绍一下FineReport报表制作的几个基本概念,本章节介绍FineReport报表赖以生存的单元格扩展. 扩展,顾名思义,就是由一变多,那么单元格扩展就是指在we ...
- 转:c# WinForm开发 DataGridView控件的各种操作总结(单元格操作,属性设置)
一.单元格内容的操作 *****// 取得当前单元格内容 Console.WriteLine(DataGridView1.CurrentCell.Value); // 取得当前单元格的列 Index ...
随机推荐
- 探究Presto SQL引擎(4)-统计计数
作者:vivo互联网用户运营开发团队 - Shuai Guangying 本篇文章介绍了统计计数的基本原理以及Presto的实现思路,精确统计和近似统计的细节及各种优缺点,并给出了统计计数在具体业务 ...
- ES6学习笔记(十四)module的简单使用
1.前言 module模块机制是es6新引入的,它解决了作用域的问题,使代码更加规范和结构化. 下面简单的使用一下. 2.基本使用 2.1 模块和脚本的区别 模块代码运行在严格模式下,并且没有任何办法 ...
- Burpsuite(科学版)安装教程
前言 BurpSuite是一款用于攻击web 应用程序的集成平台,在安全圈被称作"抓包神器".本文主要讲解 BurpSuite破解版的安装教程. 配置环境变量 BurpSuite是 ...
- Xmake v2.7.3 发布,包组件和 C++ 模块增量构建支持
Xmake 是一个基于 Lua 的轻量级跨平台构建工具. 它非常的轻量,没有任何依赖,因为它内置了 Lua 运行时. 它使用 xmake.lua 维护项目构建,相比 makefile/CMakeLis ...
- BERT模型源码解析
BERT模型源码解析 modeling.py 目录 属性 类 class BertConfig(object) BERT模型配置参数类 class BertModel(object) BERT ...
- <四>构造函数初始化列表
示例代码1 点击查看代码 class CDate{ public: CDate(int _year,int _month, int _day){ this->year=_year; this-& ...
- 2022-11-09 Acwing每日一题
本系列所有题目均为Acwing课的内容,发表博客既是为了学习总结,加深自己的印象,同时也是为了以后回过头来看时,不会感叹虚度光阴罢了,因此如果出现错误,欢迎大家能够指出错误,我会认真改正的.同时也希望 ...
- 01-Docker实战,搭建NodeJs环境
目的 实现简单的docker的nodejs容器,使用Dockerfile构建我们的使用nodejs开发的系统 技术栈 Docker Nodejs Express Linux step1 下拉nodej ...
- mysql查询结果拼接树结构(树节点的移动)
mysql查询结果拼接树结构(树节点的移动) 思路:单表内查询全部数据,在业务层内递归拼接树结构. 前端用的是element的Tree 树形控件: 树结构实体: @Data @AllArgsConst ...
- 【SQL】DML语句-SQL更新与删除:单表更新删除与连表更新删除语法
〇.概述 1.资料 sql连表删除:http://www.lanxinbase.com/?tag=sql%E8%BF%9E%E8%A1%A8%E5%88%A0%E9%99%A4 sql实现两表关联更新 ...