SSM框架——Spring
Spring
- 轻量级、非侵入式的框架
- 支持控制反转(IOC)、面向切面编程(AOP)
- 支持事务的处理和声明、框架整合
1.HelloSpring(入门)
1.1导入依赖
<!-- https://mvnrepository.com/artifact/org.springframework/spring-webmvc --><dependency><groupId>org.springframework</groupId><artifactId>spring-webmvc</artifactId><version>5.3.3</version></dependency>
1.2xml配置
<?xml version="1.0" encoding="UTF-8"?><beans xmlns="http://www.springframework.org/schema/beans"xmlns:xsi="http://www.w3.org/2001/XMLSchema-instance"xsi:schemaLocation="http://www.springframework.org/schema/beanshttp://www.springframework.org/schema/beans/spring-beans.xsd"><!--导入需要spring初始化的类-->...</beans>
1.3导入类
@Datapublic class Student {private int id;private String name;}//新建一个类接口
<!--向spring声明需要实例化的类及其初始化属性--><!--通过无参构造和set函数实例化--><bean id="Student" class="Student"><property name="id" value="2018117"></property><property name="name" value="LIHONG"></property></bean>
1.4获得该类对象
public class MyTest {public static void main(String[] args) {//ApplicationContext context = new ClassPathXmlApplicationContext("beans.xml");//获取spring上下文Student student = (Student)context.getBean("Student");//用bean的id获取该实例System.out.println(student.toString());}}
2.基本配置
2.1 别名 alias
<!--为一个bean对象起个别名--><alias name="Student1" alias="ss1"></alias>
2.2 实例对象 bean
<bean id="bean对象的名称" class="bean对象的实体类" name="别名 别名,别名;别名" ></bean>
3.依赖注入
3.1 set注入
<bean id="" class=""><property name="普通类型注入" value="普通类型值"/><property name="Bean类型注入" ref="bean类型的id"/><property name="数组类型注入" ><array><value>...</value><value>...</value></array></property><property name="List类型注入" ><list><value>...</value><value>...</value></list></property><property name="Map类型注入" ><map><entry key="" value=""/><entry key="" value=""/></map></property><property name="properties类型注入" ><props><entry key="">value</entry><entry key="">value</entry></props></property></bean>
3.2 构造器注入
<!--通过有参构造的参数下标实例化--><bean id="Student2" class="Student"><constructor-arg index="0" value="2018118"></constructor-arg><constructor-arg index="1" value="qinjiang"></constructor-arg></bean><!--通过有参构造的参数类型实例化--><bean id="Student3" class="Student"><constructor-arg type="int" value="2018118"></constructor-arg><constructor-arg type="java.lang.String" value="tianle"></constructor-arg></bean><!--通过有参构造的参数名称实例化--><bean id="Student4" class="Student"><constructor-arg name="id" value="2018118"></constructor-arg><constructor-arg name="name" value="tianle"></constructor-arg></bean>
3.3 其他注入
3.3.1 p命名空间注入
使用前需要加入p命名空间的配置依赖
xmlns:p="http://www.springframework.org/schema/p"
<!--可以在bean的属性列注入对象属性,实质上通过无参构造和setter--><bean id="Student2" class="Student" p:id="" p:name=""/>
3.3.1 c命名空间注入
使用前需要加c命名空间的配置依赖
xmlns:c="http://www.springframework.org/schema/c"
<!--可以在bean的属性列注入对象属性,实质上通过有参构造--><bean id="Student2" class="Student" c:id="" c:name=""/>
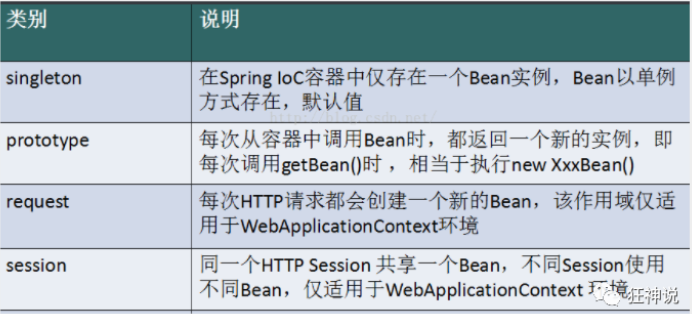
4.Bean的作用域和自动装配
4.1Spring中Bean的几种装配方式
- XML显式装配
- Java显式装配
- 隐式自动装配
4.2 ByName自动装配
当一个bean节点带有 autowire byName的属性时。
- 将查找其类中所有的set方法名,例如setCat,获得将set去掉并且首字母小写的字符串,即cat。
- 去spring容器中寻找是否有此字符串名称id的对象。
- 如果有,就取出注入;如果没有,就报空指针异常。
<bean id="student" class="Student" autowire="byName"><property name="name" value="lihong"/></bean>
4.3 ByTpye自动装配
使用autowire byType首先需要保证:同一类型的对象,在spring容器中唯一。如果不唯一,会报不唯一的异常。
<bean id="user" class="com.kuang.pojo.User" autowire="byType"><property name="str" value="qinjiang"/></bean>
4.4 注解实现自动装配
使用前需要加注解的配置依赖
xmlns:context="http://www.springframework.org/schema/context"<!--添加到schemaLocation目录中-->http://www.springframework.org/schema/contexthttp://www.springframework.org/schema/context/spring-context.xsd<!--开启属性注解支持--><context:annotation-config/>
4.4.1 @Autowired
@Autowired默认按类型自动转配,不支持id匹配
需要导入 spring-aop的包
xmlns:aop="http://www.springframework.org/schema/aop"<!--添加到schemaLocation目录中-->http://www.springframework.org/schema/aophttp://www.springframework.org/schema/aop/spring-aop.xsd
如果允许对象为null,设置required = false,默认为true
@Autowired(required = false)
4.4.2 @Qualifier
@Autowired是根据类型自动装配的,加上@Qualifier则可以根据byName的方式自动装配
@Qualifier不能单独使用。
@Autowired@Qualifier(value = "beanId")
4.4.3 @Resource
- @Resource在指定name属性的情况下,先按该属性进行name方式查找装配 @Resource(name = "beanId")
- 其次再进行默认的name方式进行装配;
- 其次按type的方式自动装配。
- 都不成功,则报异常
5.注解开发和纯Java方式实现Xml配置
5.1注解开发
使用注解开发需要提前做两件预备工作
- 导入aop包(Spring4之后)
- 在xml配置中指定扫描包
<context:component-scan base-package="包路径"/>
注解开发方式
@Component("user")// 相当于配置文件中 <bean id="user" class="当前注解的类"/>@Scope("XXX")//配置Bean的作用域public class User {@Value("姬如千泷")//属性注入public String name;//@Value("姬如千泷")也可以在构造方法上注入属性public void setName(String name) {this.name = name;}}
5.2 java方式实现xml配置
JavaConfig 原来是 Spring 的一个子项目,它通过 Java 类的方式提供 Bean 的定义信息,在 Spring4 的版本, JavaConfig 已正式成为 Spring4 的核心功能 。
- 实体类加组件注解
@Component //将这个类标注为Spring的一个组件,放到容器中!public class Dog {@Value("小黄")public String name;}
- 编写配置类
@Configuration //代表这是一个配置类@Import(MyConfig2.class) //导入合并其他配置类,类似于配置文件中的 inculde 标签public class MyConfig {@Bean //等价于注册一个bean,这里的返回值类型就是Bean的类型,方法名等价于bean的idpublic Dog dog(){return new Dog();}}
6.代理模式
6.1静态代理
- 抽象角色 : 一般使用接口或者抽象类来实现
- 真实角色 : 被代理的角色
- 代理角色 : 代理真实角色 ; 代理真实角色后 , 一般会做一些附属的操作
- 客户 : 使用代理角色来进行一些操作
静态代理有诸多好处,比如使真实角色的功能更加纯粹,业务分工明显,可扩展性增强等等。但当面对具有大量真实角色的项目时,对每个真实角色都要维护一个代理类,实属麻烦,为此,产生了动态代理。
6.2动态代理
动态代理的代理类是动态生成的 . 静态代理的代理类是我们提前写好的,因此,一个动态代理可以代理多个接口
动态代理分为两类 : 一类是基于接口动态代理 , 一类是基于类的动态代理
- 基于接口的动态代理----JDK动态代理
- 基于类的动态代理--cglib
- 现在用的比较多的是 javasist 来生成动态代理 . 百度一下javasist
- 我们这里使用JDK的原生代码来实现,其余的道理都是一样的
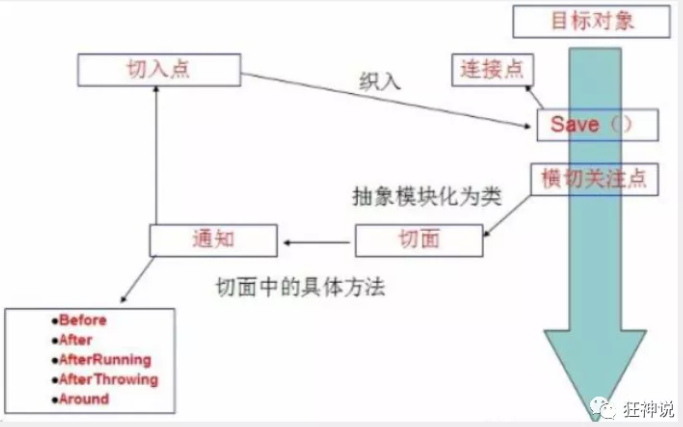
7.Spring实现AOP(面向切面编程)
使用AOP织入,首先需要导入一个依赖包
<!-- https://mvnrepository.com/artifact/org.aspectj/aspectjweaver --><dependency><groupId>org.aspectj</groupId><artifactId>aspectjweaver</artifactId><version>1.9.4</version></dependency>
7.1使用Spring默认api实现
- 编写一个扩展服务类,前置增强
//实现前置接口public class BeforeService implements MethodBeforeAdvice {//method : 要执行的目标对象的方法//objects : 被调用的方法的参数//Object : 要通知的目标对象@Overridepublic void before(Method method, Object[] objects, Object o) throws Throwable {System.out.println( o.getClass().getName() + "的" + method.getName() + "方法被执行了");}}
- 在xml中注册服务类和配置aop
<beans><bean id="beforeService" class="BeforeService"/><!--aop的配置--><aop:config><!--切入点 expression:表达式匹配要执行的方法,.*(..)代表所有字方法任意参数--><aop:pointcut id="pointcut" expression="execution(* 实体类的路径.*(..))"/><!--执行环绕; advice-ref执行方法 . pointcut-ref切入点--><aop:advisor advice-ref="beforeService" pointcut-ref="pointcut"/></aop:config></beans>
7.2 自定义类实现
- 编写一个自己的服务类
public class DiyPointcut {//自己编写的服务类可以一次性集成多个服务public void before(){System.out.println("---------方法执行前---------");}public void after(){System.out.println("---------方法执行后---------");}}
- 在xml中配置服务类和aop
<!--注册bean--><bean id="diy" class="com.kuang.config.DiyPointcut"/><!--aop的配置--><aop:config><aop:aspect ref="diy"><aop:pointcut id="diyPonitcut" expression="execution(* 实体类路径.*(..))"/><aop:before pointcut-ref="diyPonitcut" method="before"/><aop:after pointcut-ref="diyPonitcut" method="after"/></aop:aspect></aop:config>
7.3 使用注解实现
- 编写使用注解的服务类
@Aspectpublic class AnnotationPointcut {@Before("execution(* 实体类路径.*(..))")public void before(){System.out.println("---------方法执行前---------");}
- 在xml中注册bean,并增加支持注解的配置
<bean id="annotationPointcut" class="AnnotationPointcut"/><aop:aspectj-autoproxy/>
8.Spring整合Mybatis
除了mybatis(mybatis、mysql-connector-java)和spring(spring-webmvc、spring-jdbc、aspectjweaver)的相关依赖包外,还需导入mybatis-spring依赖包
<dependency><groupId>org.mybatis</groupId><artifactId>mybatis-spring</artifactId><version>2.0.2</version></dependency>
- 使用spring配置mybatis的数据源
<!--配置数据源:数据源有非常多,可以使用第三方的,也可使使用Spring的--><bean id="dataSource" class="org.springframework.jdbc.datasource.DriverManagerDataSource"><property name="driverClassName" value="com.mysql.jdbc.Driver"/><property name="url" value="jdbc:mysql://localhost:3306/mybatis?useSSL=true&useUnicode=true&characterEncoding=utf8"/><property name="username" value="root"/><property name="password" value="123456"/></bean>
- 使用spring配置mybatis的SqlSessionFactory
<bean id="sqlSessionFactory" class="org.mybatis.spring.SqlSessionFactoryBean"><property name="dataSource" ref="dataSource" /></bean>
- 使用spring创建mybatis的SqlSession对象(使用构造器注入),在Spring中称作一个模板对象SqlSessionTemplate
<bean id="sqlSession" class="org.mybatis.spring.SqlSessionTemplate"><constructor-arg index="0" ref="sqlSessionFactory" /></bean>
- 与Mybatis不同的是,spring整合需要有一个实现了业务接口的实体类
- 方式一(自主配置SqlSessionTemplate)
public class UserDaoImpl implements UserDao {//将SqlSessionTemplate设置为私有属性private SqlSessionTemplate sqlSession;public void setSqlSession(SqlSessionTemplate sqlSession) {this.sqlSession = sqlSession;}public User getUser(String userId) {return sqlSession.getMapper(UserMapper.class).}
<!--注册实体类,将注册的SqlSessionTemplate对象丢进去--><bean id="userDao" class="com.kuang.dao.UserDaoImpl"><property name="sqlSession" ref="sqlSession"/></bean>
- 方式二(使用spring提供的方法类SqlSessionDaoSupport)
//该方法类可直接获取到public class UserDaoImpl extends SqlSessionDaoSupport implements UserMapper {public List<User> getUser() {return getSqlSession().getMapper(UserMapper.class).getUser();}}
<!--注册实体类,注意这里注入的是sqlSessionFactory对象--><bean id="userDao" class="com.kuang.dao.UserDaoImpl"><property name="sqlSessionFactory" ref="sqlSessionFactory" /></bean>
9.spring事务管理
9.1 编程式事务
一般使用try-catch捕捉并处理,但会修改源代码,不建议使用
9.2声明式事务
将事务管理代码从业务方法中分离出来,以声明的方式来实现事务管理
使用spring管理事务前,需要导入配置约束
xmlns:tx="http://www.springframework.org/schema/tx"http://www.springframework.org/schema/txhttp://www.springframework.org/schema/tx/spring-tx.xsd">
- 注册事务
<bean id="transactionManager" class="org.springframework.jdbc.datasource.DataSourceTransactionManager"><property name="dataSource" ref="dataSource" /></bean>
- 配置事务
<!--配置事务通知--><tx:advice id="txAdvice" transaction-manager="transactionManager"><tx:attributes><!--配置哪些方法使用什么样的事务,配置事务的传播特性--><tx:method name="add" propagation="REQUIRED"/><tx:method name="delete" propagation="REQUIRED"/><tx:method name="update" propagation="REQUIRED"/><tx:method name="search*" propagation="REQUIRED"/><tx:method name="get" read-only="true"/><tx:method name="*" propagation="REQUIRED"/></tx:attributes></tx:advice>
- aop织入事务
<!--配置aop织入事务--><aop:config><aop:pointcut id="txPointcut" expression="execution(* 事务实体类包路径.*.*(..))"/><aop:advisor advice-ref="txAdvice" pointcut-ref="txPointcut"/></aop:config>
SSM框架——Spring的更多相关文章
- 详解intellij idea搭建SSM框架(spring+maven+mybatis+mysql+junit)(下)
在上一篇(详解intellij idea 搭建SSM框架(spring+maven+mybatis+mysql+junit)(上))博文中已经介绍了关于SSM框架的各种基础配置,(对于SSM配置不熟悉 ...
- Maven+SSM框架(Spring+SpringMVC+MyBatis) - Hello World(转发)
[JSP]Maven+SSM框架(Spring+SpringMVC+MyBatis) - Hello World 来源:http://blog.csdn.net/zhshulin/article/de ...
- [JSP]Maven+SSM框架(Spring+SpringMVC+MyBatis) - Hello World
来源:http://blog.csdn.net/zhshulin/article/details/37956105?utm_source=tuicool&utm_medium=referral ...
- SSM框架——Spring+SpringMVC+Mybatis的搭建教程
一:概述 SSM框架在项目开发中经常使用到,相比于SSH框架,它在仅几年的开发中运用的更加广泛. Spring作为一个轻量级的框架,有很多的拓展功能,最主要的我们一般项目使用的就是IOC和AOP. S ...
- 详解intellij idea搭建SSM框架(spring+maven+mybatis+mysql+junit)(上)
SSM(Spring+SpringMVC+MyBatis)框架集由Spring.SpringMVC.MyBatis三个开源框架整合而成,常作为数据源较简单的web项目的框架. 其中spring是一个轻 ...
- Maven 搭建 SSM框架——Spring+SpringMVC+Mybatis的搭建教程
一:概述 SSM框架在项目开发中经常使用到,相比于SSH框架,它在仅几年的开发中运用的更加广泛. Spring作为一个轻量级的框架,有很多的拓展功能,最主要的我们一般项目使用的就是IOC和AOP.Sp ...
- SSM框架——Spring+SpringMVC+Mybatis的搭建
1.基本概念 1.1.Spring Spring是一个开源框架,Spring是于2003 年兴起的一个轻量级的Java 开发框架,由Rod Johnson 在其著作Expert One-On-One ...
- ssm框架 spring的主配置文件 spring-mvc主配置文件 web.xml配置文件(基础的配置文件)
1.spring主配置文件 <?xml version="1.0" encoding="UTF-8"?> <beans xmlns=" ...
- SSM框架—Spring+SpringMVC+MyBatis
1.环境搭建 1.1概念 Spring是一个Java应用的开源框架,Bean/Context/Core/IOC/AOP/MVC等是其重要组件,IOC控制反转,AOP面向切面编程,各种注入方式,实现方式 ...
- SSM框架--Spring+SpringMVC+Mybatis (IDEA)搭建
使用idea创建一个maven项目( 这里演示 的是 web项目) 点击 Finish 然后开始配置 pom.xml文件(添加各种依赖jar包) 先去找 spring 所需的 jar包 jar包中心仓 ...
随机推荐
- 搭建MyBatis
一.引入依赖 <dependencies> <!-- Mybatis核心 --> <dependency> <groupId>org.mybatis&l ...
- html点击a标签弹窗QQ聊天界面
以为很难.以为要第三方.谁知道不用.一句话的事情. 1 <a hfer="tencent://message/?uin=12345&Site=&Menu-=yes&qu ...
- 齐博x1细节优化,自定义二、三、四维字段支持自定描述
如下图所示,之前自定义字估中的二.三.四维字段,不支持自定义描述,导致用户输入的时候,不知道该输入什么信息内容.只有站长自己才知道. 现在支持自定义描述,及设置文本或数字.方便引导用户输入相应的信息内 ...
- 字符串匹配(BF算法和KMP算法及改进KMP算法)
#include <stdio.h> #include <string.h> #include <stdlib.h> #include<cstring> ...
- JMETER与它的组件们
JSON提取器与Debug Sampler 我们平时会遇到很多JSON格式的接口返回,我们需要提取参数可以用JSON提取器,同时配合自带的调试器来进行调试. JSON提取器 Name of crea ...
- 支持向量机(SVM)公式整理
支持向量机可以分为三类: 线性可分的情况 ==> 硬间隔最大化 ==> 硬间隔SVM 近似线性可分的情况 ==> 软间隔最大化 ==> 线性支持向量机 线性不可分的情况 ==& ...
- C#怎么在生成解决方案的过程中执行perl脚本(C#早期绑定)
转载 怎么在生成解决方案的过程中执行perl脚本 早期绑定在编译期间识别并检查方法.属性.函数,并在应用程序执行之前执行其他优化.在这个绑定中,编译器已经知道它是什么类型的对象以及它拥有的方法或属性. ...
- Go语言核心36讲53
你好,我是郝林. 在2019年的春节来临之际,我恰好也更新完了专栏所有的配图和思考题答案.希望这些可以帮助到你,在新的一年中,祝你新年快乐,Go语言学习之路更加顺利. 基础概念篇 1. Go语言在多个 ...
- KafkaOffsetMonitor:监控消费者和延迟的队列
个人名片: 因为云计算成为了监控工程师 个人博客:念舒_C.ying CSDN主页️:念舒_C.ying 目录 消费者组列表 消费组的topic列表 图中参数含义解释如下: topic的历史位置 O ...
- [排序算法] 简单选择排序 (C++)
简单选择排序原理 简单选择排序 SelectSort 是一种十分直观地排序方法.其原理是每次从未排序的元素中找到当前最小的元素,放在当前未排序序列的首位.一直重复操作直至最后未排序的元素个数为 0,即 ...