resin服务之二----整合resin+Apache服务
整合resin+Apache服务
1.为什么要整合Apache和resin?
a. 早期的resin,tomcat对httpd服务支持不好。
b. tomcat,resin对rewrite,expires,gzip功能支持不是很好。
c. 动静分离。
开始安装Apache服务
|
yum -y install zlib libxml libjpeg freetype libpng gd curl libiconv zlib-devel libxml2-devel libjpeg-devel freetype-devel libpng-devel gd-devel curl-devel
cd /home/peng/tools/ wget http://archive.apache.org/dist/httpd/httpd-2.2.23.tar.gz tar -zxf httpd-2.2.23.tar.gz cd httpd-2.2.23 ./configure --prefix=/application/apache2.2.23 --enable-deflate --enable-headers --enable-modules=so --enable-so --with-mpm=worker --enable-rewrite
make && make install cd ../ ln -s /application/apache2.2.23/ /application/apache |
为Apache编译resin mod_caucho模块
|
cd /application/resin-3.1.13/ ./configure --with-apxs=/application/apache2.2.23/bin/apxs cd /application/resin/modules/c/src/ make make install
查看多出了mod_caucho.so模块: [root@data-1-1 src]# ll /application/apache/modules/ total 180 -rw-r--r-- 1 root root 9084 Nov 29 07:00 httpd.exp -rwxr-xr-x 1 root root 170939 Nov 29 07:05 mod_caucho.so 提示:这个模块很类似Apache+php结合的PHP模块一样,Apache就是通过这个mod_caucho.so模块调用resin解析Java程序的。 |
在Apache配置文件中查看resin的配置信息
|
root@data-1-1 src]# tail -9 /application/apache/conf/httpd.conf # # mod_caucho Resin Configuration #
LoadModule caucho_module /application/apache2.2.23/modules/mod_caucho.so
ResinConfigServer localhost 6800 CauchoConfigCacheDirectory /tmp CauchoStatus yes 提示:本段内容是编译后嵌入到httpd.conf中的resin相关配置。 |
启动Apache服务测试
|
[root@data-1-1 src]# /application/apache/bin/apachectl start [root@data-1-1 src]# lsof -i :80 COMMAND PID USER FD TYPE DEVICE SIZE/OFF NODE NAME clock-app 2712 root 21u IPv4 2827507 0t0 TCP www.pp.org:48706->165.254.27.91:http (CLOSE_WAIT) httpd 22824 root 4u IPv6 2840404 0t0 TCP *:http (LISTEN) httpd 22826 daemon 4u IPv6 2840404 0t0 TCP *:http (LISTEN) httpd 22828 daemon 4u IPv6 2840404 0t0 TCP *:http (LISTEN) httpd 22829 daemon 4u IPv6 2840404 0t0 TCP *:http (LISTEN) |
浏览器上输入地址:http://192.168.1.140/查看结果

出现上述的错误!!
提示:出现这个问题的原因是Apache把请求都转发给了ResinConfigServer local 6800,而默认的6800端口在resin中未生效,所以报了503错误。
解决办法:
修改Apache的配置内容
|
[root@data-1-1 src]# tail -9 /application/apache/conf/httpd.conf # # mod_caucho Resin Configuration #
LoadModule caucho_module /application/apache2.2.23/modules/mod_caucho.so
ResinConfigServer 192.168.1.140 6911 CauchoConfigCacheDirectory /tmp CauchoStatus yes
重启服务: [root@data-1-1 src]# /application/apache/bin/apachectl graceful |
再次刷新页面查看显示结果OK了:
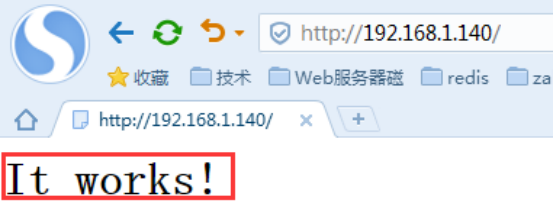
在Apache中配置通过resin解析Java程序
可以在httpd.conf配置Apache全部向后转发,也可以通过标签匹配配置部分转发,或者在http-vhost.conf中配置虚拟主机 实现部分向后转发。
在httpd.conf配置Apache全部向后转发
|
[root@data-1-1 ~]# tail -9 /application/apache/conf/httpd.conf # mod_caucho Resin Configuration #
LoadModule caucho_module /application/apache2.2.23/modules/mod_caucho.so
ResinConfigServer 192.168.1.140 6911 SetHandler caucho-request CauchoConfigCacheDirectory /tmp CauchoStatus yes |
SetHandler caucho-request是转发的作用,就是由Apache代理的,然后把业务转发给resin,全部都往后抛,如果不加此参数,用户访问会走Apache。如果增加了,当用户访问所有的请求都会有Apache转给resin来处理。因此,当未加参数时默认浏览器内容应为Apache服务的默认也It Works!,增加了SetHandler,出来的结果就是resin的默认页面了。
重启Apache服务测试,查看的内容是resin的默认页面:
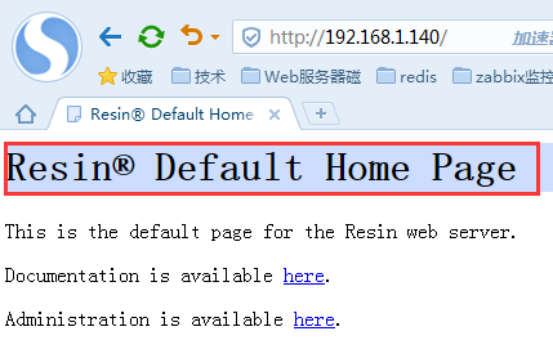
当把resin服务停掉后再次查看,所有的请求都丢给resin处理了:
|
[root@data-1-1 ~]# killall java |
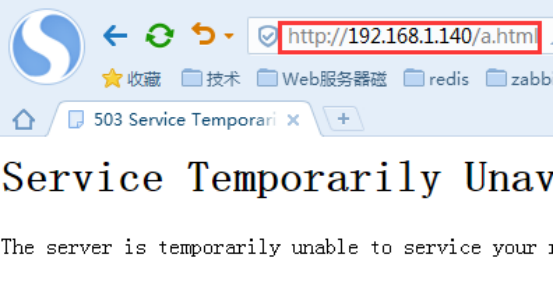
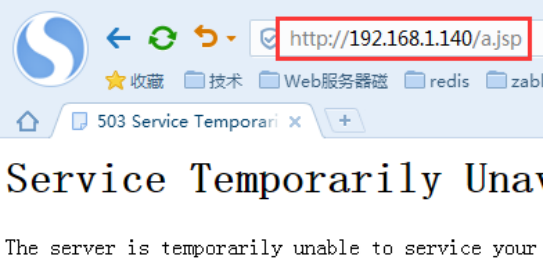
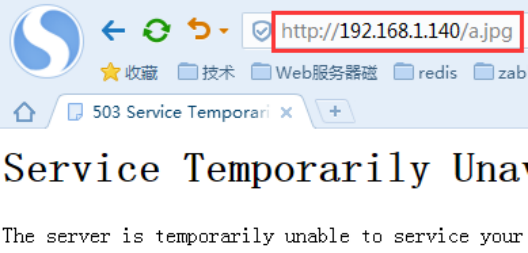
再次启动resin服务浏览器上查看又OK了!!!
在Apache中配置虚拟主机转发resin解析
#也可以根据域名虚拟主机只让后端resin处理一部分请求转发
|
[root@data-1-1 ~]# cd /application/apache/conf/extra/ [root@data-1-1 extra]# cp httpd-vhosts.conf httpd-vhosts.conf_$(date +%F) [root@data-1-1 extra]# cat httpd-vhosts.conf NameVirtualHost *:80 <VirtualHost *:80> ServerAdmin 835221922@qq.com DocumentRoot "/var/www" DirectoryIndex index.html index.htm index.jsp ServerName www.peng.cc ErrorLog "logs/peng-error_log" CustomLog "logs/peng-access_log" common
<Directory "/var/www"> Options -Indexes FollowSymLinks AllowOverride None Order allow,deny Allow from all </Directory> #Resin Configuration ResinConfigServer 192.168.1.140 6911 #SetHandler caucho-request </VirtualHost>
修改Apache主配置文件内容: 395 # Virtual hosts 396 Include conf/extra/httpd-vhosts.conf ---》此行注释要打开 [root@data-1-1 ~]# tail -9 /application/apache/conf/httpd.conf # mod_caucho Resin Configuration #
LoadModule caucho_module /application/apache2.2.23/modules/mod_caucho.so
#ResinConfigServer 192.168.1.140 6911 ---》虚拟主机已配置,这里注释掉! #SetHandler caucho-request CauchoConfigCacheDirectory /tmp CauchoStatus yes |
|
[root@data-1-1 www]# mkdir -p /var/www/ [root@data-1-1 www]# echo "www.peng.cc" >/var/www/index.html [root@data-1-1 www]# echo '<%=99+1%>' > /var/www/index.jsp
[root@data-1-1 extra]# /application/apache/bin/apachectl graceful
默认实现了动静分离: [root@data-1-1 extra]# curl 192.168.1.140/index.html [root@data-1-1 ~]# cat /var/www/index.html www.peng.cc
[root@data-1-1 extra]# curl 192.168.1.140/index.jsp <html> <head><title>Resin Default Home Page</title></head> <body> <h1 style="background: #ccddff">Resin Default Home Page</h1> This is the default page for the Resin web server. <p> Documentation is available <a href="/resin-doc">here</a>. <p> Administration is available <a href="/resin-admin">here</a>. </body> </html>
[root@data-1-1 extra]# curl 192.168.1.140/test.jsp 99+1=100 [root@data-1-1 ~]# cat /application/resin/webapps/ROOT/test.jsp 99+1=<%=99+1%>
再次测试: [root@data-1-1 ~]# cp /var/www/index.jsp /var/www/peng.jsp [root@data-1-1 ~]# cat /var/www/peng.jsp <%=99+1%> [root@data-1-1 ~]# curl 192.168.1.140/peng.jsp <html> <head><title>404 Not Found</title></head> <body> <h1>404 Not Found</h1> /peng.jsp was not found on this server. <p /><hr /> <small> Resin/3.1.13 </small> </body></html> 注意:如果是Apache解析的话,会解析出来结果;而如果是resin解析的话,会报404的错误,所以解析的结果是404,即是resin做了解析。
把jsp文件拷贝到resin默认目录下,又可以解析了: [root@data-1-1 ~]# cp /var/www/peng.jsp /application/resin/webapps/ROOT/ [root@data-1-1 ~]# curl 192.168.1.140/peng.jsp 100 |
在apache中配置虚拟主机转发resin解析
配置内容
|
[root@data-1-1 ~]# cat /application/apache/conf/extra/httpd-vhosts.conf NameVirtualHost *:80 <VirtualHost *:80> DocumentRoot "/var/www" DirectoryIndex index.html index.htm index.jsp ServerName www.peng.cc ErrorLog "logs/peng-error_log" CustomLog "logs/peng-access_log" common
<Directory "/var/www"> Options -Indexes FollowSymLinks AllowOverride None Order allow,deny Allow from all </Directory> #Resin Configuration ResinConfigServer 192.168.1.140 6911 SetHandler caucho-request </VirtualHost> |
启动服务
|
[root@data-1-1 ~]# /application/apache/bin/apachectl graceful |
测试
|
[root@data-1-1 ~]# curl 192.168.1.140/d.html <html> <head><title>404 Not Found</title></head> <body> <h1>404 Not Found</h1> /d.html was not found on this server. <p /><hr /> <small> Resin/3.1.13 </small> </body></html> 提示:访问请求先到Apache服务,之后抛给后端的resin,后端没有d.html文件,则报了404错误;若停掉resin服务,则会报503错误。 [root@data-1-1 ~]# killall java [root@data-1-1 ~]# killall java java: no process killed [root@data-1-1 ~]# curl 192.168.1.140/d.html <!DOCTYPE HTML PUBLIC "-//IETF//DTD HTML 2.0//EN"> <html><head> <title>503 Service Temporarily Unavailable</title> </head><body> <h1>Service Temporarily Unavailable</h1> <p>The server is temporarily unable to service your request due to maintenance downtime or capacity problems. Please try again later.</p> </body></html> |
调整resin配置支持多vhost主机
resin主配置文件添加如下内容
|
102 <!-- resin Configure at 2016-1-11 --> 103 <server id='peng01' address='192.168.1.140' port='6912' watchdog-port="6922"> 104 <http address="*" port="8081"/> 105 <jvm-arg>-Xmx256m</jvm-arg> 106 <jvm-arg>-Xss1m</jvm-arg> 107 <jvm-arg>-Xdebug</jvm-arg> 108 <jvm-arg>-Dcom.sun.management.jmxremote</jvm-arg> 109 <memory-free-min>1M</memory-free-min> 110 <thread-max>256</thread-max> 111 <socket-timeout>65s</socket-timeout> 112 <keepalive-max>128</keepalive-max> 113 <keepalive-timeout>15s</keepalive-timeout> 114 </server> |
启动脚本修改如下
|
[root@data-1-1 conf]# cat /etc/init.d/resin-peng #!/bin/bash #author at 20160111 #linux startup script for Resin # chkconfig: 345 85 15 # description: Resin is a Java Web server. # #To install,configure this file as needed and copy init.resin #to /etc/rc.d/init.d as resin. Then use "# /sbin/chkconfig resin reset" # . /etc/init.d/functions StartPath='/application/resin/bin/httpd.sh' ResinLog=/app/logs/resinlog [ ! -d $ResinLog ] && mkdir -p $ResinLog resind () { #如果是多进程增加上面的配置段即可。 for id in peng peng01 do $StartPath -server $id $1 >>$ResinLog/resin_startup.log if [ $? -eq 0 ];then action "$1 $id resin..." /bin/true else action "$1 $id resin..." /bin/false fi done } case "$1" in start) resind $1 echo "--------checking------" sleep 10 netstat -lnt |egrep "80|69" echo "--------checkover-----" ;; stop) resind $1 ;; restart) resind stop resind start ;; *) echo "Usage: $0 {start|stop|restart}" exit 1 esac exit 0 |
启动服务
|
[root@data-1-1 conf]# /etc/init.d/resin-peng restart stop peng resin... [FAILED] stop peng01 resin... [FAILED] start peng resin... [ OK ] start peng01 resin... [ OK ] 查看端口 [root@data-1-1 ~]# netstat -lnt |egrep "80|69" tcp 0 0 ::ffff:192.168.1.140:6911 :::* LISTEN tcp 0 0 ::ffff:192.168.1.140:6912 :::* LISTEN tcp 0 0 ::ffff:127.0.0.1:6921 :::* LISTEN tcp 0 0 ::ffff:127.0.0.1:6922 :::* LISTEN tcp 0 0 :::8080 :::* LISTEN tcp 0 0 :::80 :::* LISTEN tcp 0 0 :::8081 :::* LISTEN |
在apache中配置多个虚拟主机实现不同resin解析
|
[root@data-1-1 ~]# cat /application/apache/conf/extra/httpd-vhosts.conf NameVirtualHost *:80 <VirtualHost *:80> DocumentRoot "/var/www" DirectoryIndex index.html index.htm index.jsp ServerName www.peng.cc ErrorLog "logs/peng-error_log" CustomLog "logs/peng-access_log" common
<Directory "/var/www"> Options -Indexes FollowSymLinks AllowOverride None Order allow,deny Allow from all </Directory> #Resin Configuration ResinConfigServer 192.168.1.140 6911 SetHandler caucho-request </VirtualHost> <VirtualHost *:80> DocumentRoot "/var/blog" DirectoryIndex index.html index.htm index.jsp ServerName www.peng.org ErrorLog "logs/peng01-error_log" CustomLog "logs/peng01-access_log" common
<Directory "/var/blog"> Options -Indexes FollowSymLinks AllowOverride None Order allow,deny Allow from all </Directory> #Resin Configuration ResinConfigServer 192.168.1.140 6912 #SetHandler caucho-request </VirtualHost>
测试语法并启动服务: [root@data-1-1 ~]# /application/apache/bin/apachectl -t Warning: DocumentRoot [/var/blog] does not exist httpd: Could not reliably determine the server's fully qualified domain name, using 192.168.10.140 for ServerName Syntax OK [root@data-1-1 ~]# mkdir -p /var/blog [root@data-1-1 ~]# /application/apache/bin/apachectl graceful
查看hosts文件: [root@data-1-1 ~]# cat /etc/hosts 127.0.0.1 localhost localhost.localdomain localhost4 localhost4.localdomain4 ::1 localhost localhost.localdomain localhost6 localhost6.localdomain6 192.168.10.140 data-1-1 192.168.1.140 www.pp.org
测试: [root@data-1-1 ~]# echo www.pp.org >/var/blog/index.html [root@data-1-1 ~]# curl www.pp.org [root@data-1-1 ~]# curl www.pp.org/peng.jsp 100 提示:此时查看的结果都是后端resin的6912给的结果,那么我们想后端resin有不同的站点目录。该怎么解决呢? |
修改resin主配置文件
|
删除如下内容: 227 <!-- 228 - Default host configuration applied to all virtual hosts. 229 --> 230 <host-default> 231 <!-- 232 - With another web server, like Apache, this can be commented out 233 - because the web server will log this information. 234 --> 235 <access-log path="logs/access.log" 236 format='%h %l %u %t "%r" %s %b "%{Referer}i" "%{User-Agent}i"' 237 rollover-period="1W"/> 238 239 <!-- creates the webapps directory for .war expansion --> 240 <web-app-deploy path="webapps"/> 241 242 <!-- creates the deploy directory for .ear expansion --> 243 <ear-deploy path="deploy"> 244 <ear-default> 245 <ejb-server> 246 <config-directory>WEB-INF</config-directory> 247 </ejb-server> 248 </ear-default> 249 </ear-deploy> 250 251 <!-- creates the deploy directory for .rar expansion --> 252 <resource-deploy path="deploy"/> 253 </host-default> 254 255 <!-- configures a deployment directory for virtual hosts --> 256 <host-deploy path="hosts"> 257 <host-default> 258 <resin:import path="host.xml" optional="true"/> 259 </host-default> 260 </host-deploy> 261 262 <!-- configures the default host, matching any host name --> 263 <host id="" root-directory="."> 264 <!-- 265 - configures an explicit root web-app matching the 266 - webapp's ROOT 267 --> 268 <web-app id="/" root-directory="webapps/ROOT"/> 269 270 <web-app id="/resin-admin" root-directory="${resin.home}/php/admin"> 271 <!-- 272 - Administration application /resin-admin 273 --> 274 <prologue> 275 <resin:set var="resin_admin_external" value="false"/> 276 <resin:set var="resin_admin_insecure" value="true"/> 277 </prologue> 278 </web-app> 279 </host>
代替的添加如下内容: <!--Create first virtual hosts at 20160112.--> <host id="www.peng.cc" root-directory="/application/resin/webapps"> <host-alias>blog.peng.cc</host-alias>
<!-- - configures an explicit root web-app matching the - webapp's ROOT --> <web-app id="/" root-directory="/application/resin/webapps/ROOT"> <session-config cookie-domain="pp.org" reuse-session-id="true"> <session-timeout>5</session-timeout> <session-max>12000</session-max> </session-config> <servlet-mapping servlet-class='com.caucho.servlets.ResinStatusServlet'> <url-pattern>/resin-status-peng.org</url-pattern> <init enable="read"/> </servlet-mapping> <error-page error-code='404' location='/tips/404.html'/>
</web-app> <web-app id="/resin-admin-peng.org" root-directory="${resin.home}/php/admin"> <character-encoding>utf8</character-encoding> <prologue> <resin:set var="resin_admin_external" value="true"/> <resin:set var="resin_admin_insecure" value="true"/> </prologue> <security-constraint> <web-resource-collection> <url-pattern>/*</url-pattern> </web-resource-collection> </security-constraint> </web-app> <stderr-log path='/app/log/resinlog/www_stderr.log' rollover-period='1W'/> <stdout-log path='/app/log/resinlog/www_stdout.log' rollover-period='1W'/> </host>
<!--Create first virtual hosts at 20160112.--> <host id="www.peng.org" root-directory="/application/resin/webapps"> <host-alias>blog.peng.org</host-alias>
<!-- - configures an explicit root web-app matching the - webapp's ROOT --> <web-app id="/" root-directory="/application/resin/webapps/peng"> <session-config cookie-domain="pp.org" reuse-session-id="true"> <session-timeout>5</session-timeout> <session-max>12000</session-max> </session-config> <servlet-mapping servlet-class='com.caucho.servlets.ResinStatusServlet'> <url-pattern>/resin-status-peng.org</url-pattern> <init enable="read"/> </servlet-mapping> <error-page error-code='404' location='/tips/404.html'/>
</web-app> <web-app id="/resin-admin-peng.org" root-directory="${resin.home}/php/admin"> <character-encoding>utf8</character-encoding> <prologue> <resin:set var="resin_admin_external" value="true"/> <resin:set var="resin_admin_insecure" value="true"/> </prologue> <security-constraint> <web-resource-collection> <url-pattern>/*</url-pattern> </web-resource-collection> </security-constraint> </web-app> <stderr-log path='/app/log/resinlog/blog_stderr.log' rollover-period='1W'/> <stdout-log path='/app/log/resinlog/blog_stdout.log' rollover-period='1W'/> </host>
注释掉resin主配置中虚拟主机中的http端口内容: 90 <!-- <http address="*" port="8080"/> --> 104 <!-- <http address="*" port="8081"/> --> |
启动服务
|
[root@data-1-1 ~]# killall java [root@data-1-1 ~]# /application/resin/bin/httpd.sh -server peng start [root@data-1-1 ~]# /application/resin/bin/httpd.sh -server peng01 start
站点目录下会生成peng的目录: [root@data-1-1 ~]# ll /application/resin/webapps/ drwxr-xr-x 3 root root 4096 Nov 29 16:29 peng |
测试
|
[root@data-1-1 ~]# cat /application/resin/webapps/peng/test.jsp 1+1=<%=1+1%> [root@data-1-1 ~]# cat /application/resin/webapps/ROOT/test.jsp 99+1=<%=99+1%>
修改hosts文件: [root@data-1-1 ~]# cat /etc/hosts 192.168.1.140 www.peng.cc www.peng.org blog.peng.cc blog.peng.org
开始测试: [root@data-1-1 ~]# curl http://www.peng.cc/test.jsp 99+1=100 [root@data-1-1 ~]# curl http://blog.peng.cc/test.jsp 99+1=100 [root@data-1-1 ~]# curl http://blog.peng.org/test.jsp 1+1=2 [root@data-1-1 ~]# curl http://www.peng.org/test.jsp 1+1=2
因为resin主配置文件关掉了8080和8081端口,所以带端口查看会报错: [root@data-1-1 ~]# curl http://blog.peng.org:8080/test.jsp curl: (7) couldn't connect to host [root@data-1-1 ~]# curl http://blog.peng.org:8081/test.jsp curl: (7) couldn't connect to host [root@data-1-1 ~]# curl http://www.peng.org:8081/test.jsp curl: (7) couldn't connect to host [root@data-1-1 ~]# curl http://www.peng.org:8080/test.jsp curl: (7) couldn't connect to host |
理解结构图:

resin服务之二----整合resin+Apache服务的更多相关文章
- web服务的简单介绍及apache服务的安装
一,web服务的作用: 是指驻留于因特网上某种类型计算机的程序,可以向浏览器等Web客户端提供文档.可以放置网站文件,让全世界浏览: 可以放置数据让全世界下载.目前最主流的三个Web服务器是Ap ...
- 【Apache】Apache服务的基本概念(二)
Apache服务的基本概念 Apache安装请参照:[Apache]Apache服务的安装(一) 1.端口 apache默认监听TCP协议端口80端口 2.apache服务 apache服务默认会启动 ...
- Apache服务安全加固
一.账号设置 以专门的用户帐号和用户组运行 Apache 服务. 根据需要,为 Apache 服务创建用户及用户组.如果没有设置用户和组,则新建用户,并在 Apache 配置文件中进行指定. 创建 A ...
- WampServer Apache 服务无法启动解决办法
问题:WampServer 安装后mysql服务可以启动,但Apache服务启动不了(前提是已经安装Apache Server) 解决办法: 1.端口冲突,改Apache里httpd.conf中的端口 ...
- ubuntu 下关闭apache服务自动启动
最近在自己的ubuntu安装了apache服务器,每次开机的时候通过: ps -A 命令发现apache服务总是自动启动,如下: 本来自己的电脑内存就小,现在也不用这个服务,所以想让apa ...
- C#创建windows服务(一:初识windows服务)
一 . 服务简介 Microsoft Windows 服务(过去称为 NT 服务)允许用户创建可在其自身的 Windows 会话中长时间运行的可执行应用程序. 这些服务可在计算机启动时自动启动,可以暂 ...
- 基于jersey和Apache Tomcat构建Restful Web服务(二)
基于jersey和Apache Tomcat构建Restful Web服务(二) 上篇博客介绍了REST以及Jersey并使用其搭建了一个简单的“Hello World”,那么本次呢,再来点有趣的东西 ...
- Spring Cloud & Alibaba 实战 | 第十二篇: 微服务整合Sentinel的流控、熔断降级,赋能拥有降级功能的Feign新技能熔断,实现熔断降级双剑合璧(JMeter模拟测试)
目录 一. Sentinel概念 1. 什么是Sentinel? 2. Sentinel功能特性 3. Sentinel VS Hystrix 二. Docker部署Sentinel Dashboar ...
- Apache OFBiz 学习笔记 之 服务引擎 二
加载服务定义文件 ofbiz-component.xml:所有的服务定义文件在每个组件的ofbi-component.xml文件中 加载服务定义 例:framework/common/ofbi ...
随机推荐
- 思迈特软件Smartbi:利用大数据为产业赋能,且看这家风电巨头的实践之路!
随着大数据技术成为各行各业转型升级的"新动能",数字化风电.智慧风电场也成为风电行业的高频词,大数据已经逐渐被用于风场从测风到运维的各个环节. Smartbi的某客户是国内风电装备 ...
- 简单的html js node 前端直接使用反向代理软件
先放上已经打包好的地址 https://gitee.com/Amengxiaoya/node-proxy.git 切记 proxyConfig.json 设置代理 ip为自己的ipv4地址 (cmd ...
- SpringBoot 实现 excel 全自由导入导出,性能强的离谱,用起来还特优雅
一.简介 在实际的业务系统开发过程中,操作 Excel 实现数据的导入导出基本上是个非常常见的需求. 之前,我们有介绍一款非常好用的工具:EasyPoi,有读者提出在数据量大的情况下,EasyPoi ...
- WPF中RichTextBox中添加文字的两种方法
RichTextBox控件不同于TextBox控件,后者可以直接通过其Text属性绑定或者在后台动态添加文字. (一)使用数据绑定 <RichTextBox FontSize="12& ...
- Iptables 防火墙常用配置
转至:https://blog.csdn.net/lswzw/article/details/87971259 Iptables 防火墙常用配置 概念 命令行模式 查看 & 命令 -n:直接显 ...
- _IO_2_1_stdin_ 任意写及对 _IO_2_1_stdout_ 任意读的补充
之前写过一篇 IO_FILE--leak 任意读,但是在学习的时候偷懒了,没有深入去看,这次碰到 winmt 师傅出的题,就傻眼了,故再写一篇博客来记录一下. 例题 ctfshow Incomplet ...
- Spring Cloud Gateway actuator组建对外暴露RCE问题漏洞分析
Spring Cloud gateway是什么? Spring Cloud Gateway是Spring Cloud官方推出的第二代网关框架,取代Zuul网关.网关作为流量的,在微服务系统中有着非常作 ...
- Linux 磁盘inode字节数占满的问题
查看ext系列文件系统的信息 #dumpe2fs /dev/sdc1 Inode count: 65536 inode号数量 Block count: 262144 块数量 Reserved bloc ...
- jq计算总时长
1: <style> .item { width: 500px; height: 50px; margin: 0 auto; text-align: center; font-size: ...
- MySQL启动报错Failed to open log (file 'D:\phpStudy\PHPTutorial\MySQL\data\mysql_bin.000045', errno 2)
MySQL报错 191105 9:39:07 [Note] Plugin 'FEDERATED' is disabled. 191105 9:39:07 InnoDB: The InnoDB memo ...
