2流高手速成记(之四):SpringBoot整合redis及mongodb
最近很忙,好不容易才抽出了时间,咱们接上回
上次我们主要讲了如何通过SpringBoot快速集成mybatis/mybatis-plus,以实现业务交互中的数据持久化,而这一切都是基于关系型数据库(SQL)实现的
本节我们来把关注点转向NoSQL
NoSQL的概念:
NoSQL,泛指非关系型的数据库。随着互联网web2.0网站的兴起,传统的关系数据库在处理web2.0网站,特别是超大规模和高并发的SNS类型的web2.0纯动态网站已经显得力不从心,出现了很多难以克服的问题,而非关系型的数据库则由于其本身的特点得到了非常迅速的发展。NoSQL数据库的产生就是为了解决大规模数据集合多重数据种类带来的挑战,特别是大数据应用难题。(——来自百度百科)
得益于其直接基于内存的存储方式,NoSQL的访问速度可以用“飞快”两个字来形容
在生产环境中,NoSQL常常配合传统关系型数据库来使用,比如构建一层数据缓存来极大的提升数据的读取速度
NoSQL在日常业务的驱动之下,逐渐发展出几个主要的类别:键值对数据库、文档型数据库、列存储数据库以及图形化数据库
这4类NoSQL数据库之中最具代表性的,当属键值对数据库类别下的Redis,以及文档型数据库的Mongodb,本节我们重点关注这两个产品在SpringBoot下的整合及使用
照惯例先上项目结构:
一、先看Redis的使用:
1. 在pom.xml中添加Redis相关依赖项
        <!-- 引入redis依赖(基于lettuce) -->

        <dependency>

            <groupId>org.springframework.boot</groupId>

            <artifactId>spring-boot-starter-data-redis</artifactId>

        </dependency>

        <dependency>

            <groupId>org.apache.commons</groupId>

            <artifactId>commons-pool2</artifactId>

        </dependency>
2. 在application.properties中添加Redis的相关配置
# redis相关设置

spring.redis.database=0

spring.redis.host=127.0.0.1

spring.redis.port=6379

spring.redis.password=

# redis默认基于lettuce内核

spring.redis.lettuce.pool.max-active=8

spring.redis.lettuce.pool.max-idle=8

spring.redis.lettuce.pool.max-wait=-1ms

spring.redis.lettuce.pool.min-idle=0
这里关于lettuce内核有必要给大家解释一下:
在SpringBoot2.x版本之前,其集成的默认Redis库是Jedis,而在2.x版本之后才改为默认基于Lettuce
Jedis默认和Redis直连,为非线程安全模型,并发环境下需要池化使用
而Lettuce则是线程安全的,并发环境下可以通过一个实例搞定
当然,你也可以在SpringBoot2.x环境下依然使用Jedis,只需要把 spring.redis.lettuce 相关配置替换为 spring.redis.jedis 即可
更多内容大家感兴趣可以从网上查阅相关资料,这里推荐一篇:https://blog.csdn.net/kenkao/article/details/127085687
3. 新建 service/RedisService 接口及其实现类 service/impl/RedisServiceImpl
package com.example.hellospringboot.service;

public interface RedisService {

    void set(String key, String val);

    String get(String key);

}
package com.example.hellospringboot.service.impl;

import com.example.hellospringboot.service.RedisService;

import org.springframework.beans.factory.annotation.Autowired;

import org.springframework.data.redis.core.StringRedisTemplate;

import org.springframework.data.redis.core.ValueOperations;

import org.springframework.stereotype.Service;

@Service

public class RedisServiceImpl implements RedisService {

    @Autowired

    StringRedisTemplate redis;

    public void set(String key, String val){

        ValueOperations<String,String> ops = redis.opsForValue();

        ops.set(key, val);

    }

    public String get(String key){

        ValueOperations<String,String> ops = redis.opsForValue();

        return ops.get(key);

    }

}
我们在Service中自动装载一个StringRedisTemplate实例,而后通过其创建Operation对象,进行可以进行各种Redis读写操作
4. 新建 controller/RedisController
package com.example.hellospringboot.controller;

import com.example.hellospringboot.service.RedisService;

import org.springframework.beans.factory.annotation.Autowired;

import org.springframework.web.bind.annotation.GetMapping;

import org.springframework.web.bind.annotation.PostMapping;

import org.springframework.web.bind.annotation.RequestMapping;

import org.springframework.web.bind.annotation.RestController;

import javax.servlet.http.HttpSession;

@RestController

@RequestMapping("/redis")

public class RedisController {

    @Autowired

    RedisService service;

    @PostMapping("/set")

    public void set(String key, String val){

        service.set(key, val);

    }

    @GetMapping("/get")

    public String get(String key){

        return service.get(key);

    }

}
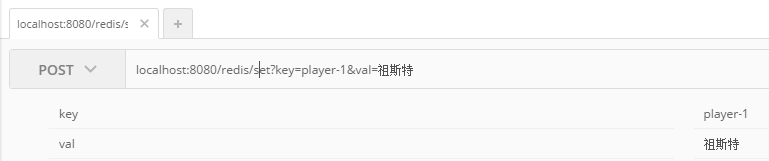
5. 通过Postman进行结果验证
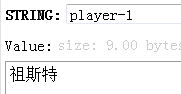
通过RDM查看写入redis的数据:
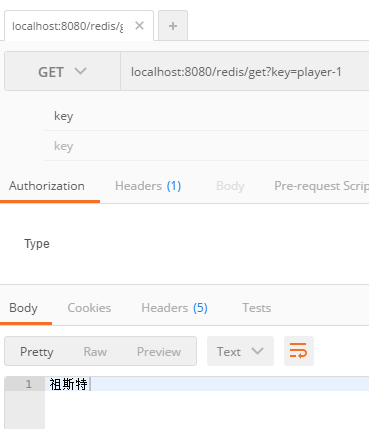
之后是读操作:
至此我们便完成了SpringBoot中集成Redis的操作
二、MongoDB的使用
1. 首先还是先添加MongoDB相关依赖项
        <!-- 引入mongodb依赖 -->

        <dependency>

            <groupId>org.springframework.boot</groupId>

            <artifactId>spring-boot-starter-data-mongodb</artifactId>

        </dependency>
2. 然后是添加MongoDB相关配置
# mongodb相关设置

spring.data.mongodb.authentication-database=admin

spring.data.mongodb.database=local

spring.data.mongodb.host=127.0.0.1

spring.data.mongodb.port=27017

#spring.data.mongodb.username=admin

#spring.data.mongodb.password=admin
各注释项内容依次是:身份验证库、目标数据库、主机地址、端口以及用户名和口令
由于我没有设置用户名和口令,所以直接注释掉这两项
3. 新建 repository/PersonRepository
package com.example.hellospringboot.repository;

import com.example.hellospringboot.model.Person;

import org.springframework.data.mongodb.repository.MongoRepository;

import org.springframework.stereotype.Repository;

@Repository

public interface PersonRepository extends MongoRepository<Person, Integer> {

    Person findByNameIs(String name);

    Person findByIdIs(int id);

    Person findByIdAndName(int id, String name);

    Person findByIdOrName(int id, String name);

}
这里出现了非常神奇的一幕:
我们仅需要提供一个接口,而不用提供具体实现!
仅凭方法的命名规范,spring.data.mongodb就能自行分析开发者的意图,进行补全内部的业务逻辑!
而同样具备这种智能化能力的还有spring.jpa,后者也是一种非常便捷高效数据库驱动,与mybatis属于同类产品
顺便也给大家提供一份方法命名规范清单,请各位在方法命名时务必遵循以下规则:
| 关键字 | 方法命名 | sql where字句 |
| And | findByNameAndPwd | where name= ? and pwd =? |
| Or | findByNameOrSex | where name= ? or sex=? |
| Is,Equals | findById,findByIdEquals | where id= ? |
| Between | findByIdBetween | where id between ? and ? |
| LessThan | findByIdLessThan | where id < ? |
| LessThanEqual | findByIdLessThanEqual | where id <= ? |
| GreaterThan | findByIdGreaterThan | where id > ? |
| GreaterThanEqual | findByIdGreaterThanEqual | where id > = ? |
| After | findByIdAfter | where id > ? |
| Before | findByIdBefore | where id < ? |
| IsNull | findByNameIsNull | where name is null |
| isNotNull,NotNull | findByNameNotNull | where name is not null |
| Like | findByNameLike | where name like ? |
| NotLike | findByNameNotLike | where name not like ? |
|
StartingWith |
findByNameStartingWith | where name like '?%' |
| EndingWith | findByNameEndingWith | where name like '%?' |
| Containing | findByNameContaining | where name like '%?%' |
| OrderBy | findByIdOrderByXDesc | where id=? order by x desc |
| Not | findByNameNot | where name <> ? |
| In | findByIdIn(Collection<?> c) | where id in (?) |
| NotIn | findByIdNotIn(Collection<?> c) | where id not in (?) |
| True |
findByAaaTue |
where aaa = true |
| False | findByAaaFalse | where aaa = false |
| IgnoreCase | findByNameIgnoreCase | where UPPER(name)=UPPER(?) |
4. Service接口定义及实现
package com.example.hellospringboot.service;

import com.example.hellospringboot.model.Person;

public interface MongoService {

    public void insert(Person person);

    public Person findByName(String name);

    public Person findById(int id);

    public Person findByIdAndName(int id, String name);

    public Person findByIdOrName(int id, String name);

}
package com.example.hellospringboot.service.impl;

import com.example.hellospringboot.model.Person;

import com.example.hellospringboot.repository.PersonRepository;

import com.example.hellospringboot.service.MongoService;

import org.springframework.beans.factory.annotation.Autowired;

import org.springframework.stereotype.Service;

@Service

public class MongoServiceImpl implements MongoService {

    @Autowired

    PersonRepository repository;

    public void insert(Person person){

        repository.insert(person);

    }

    public Person findByName(String name){

        return repository.findByNameIs(name);

    }

    public Person findById(int id){

        return repository.findByIdIs(id);

    }

    public Person findByIdAndName(int id, String name){

        return repository.findByIdAndName(id, name);

    }

    public Person findByIdOrName(int id, String name){

        return repository.findByIdOrName(id, name);

    }

}
5. Controller实现
package com.example.hellospringboot.controller;

import com.example.hellospringboot.model.Person;

import com.example.hellospringboot.service.MongoService;

import org.springframework.beans.factory.annotation.Autowired;

import org.springframework.web.bind.annotation.GetMapping;

import org.springframework.web.bind.annotation.PostMapping;

import org.springframework.web.bind.annotation.RequestMapping;

import org.springframework.web.bind.annotation.RestController;

@RestController

@RequestMapping("/mongo")

public class MongoController {

    @Autowired

    MongoService service;

    @PostMapping("/insert")

    public void insert(Person person){

        service.insert(person);

    }

    @GetMapping("/findByName")

    public Person findByName(String name){

        return service.findByName(name);

    }

    @GetMapping("/findById")

    public Person findById(int id){

        return service.findById(id);

    }

    @GetMapping("/findByIdAndName")

    public Person findByIdAndName(int id, String name){

        return service.findByIdAndName(id, name);

    }

    @GetMapping("/findByIdOrName")

    public Person findByIdOrName(int id, String name) {

        return service.findByIdOrName(id, name);

    }

}
Service及Controller的实现不再做过多赘述,还是老一套
6. Postman验证结果
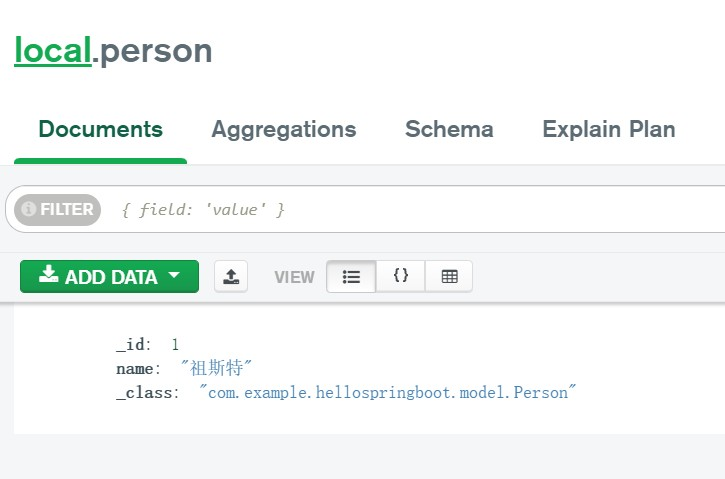
向mongodb中写入一条数据

之后是几种读取操作:

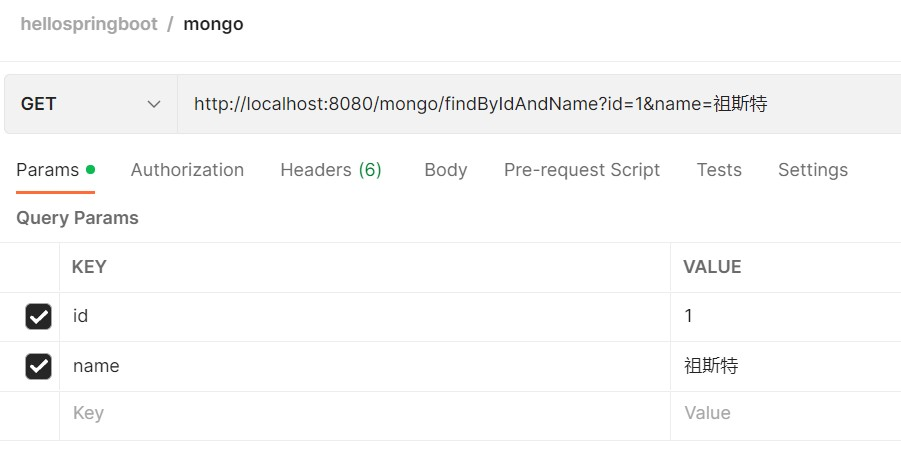
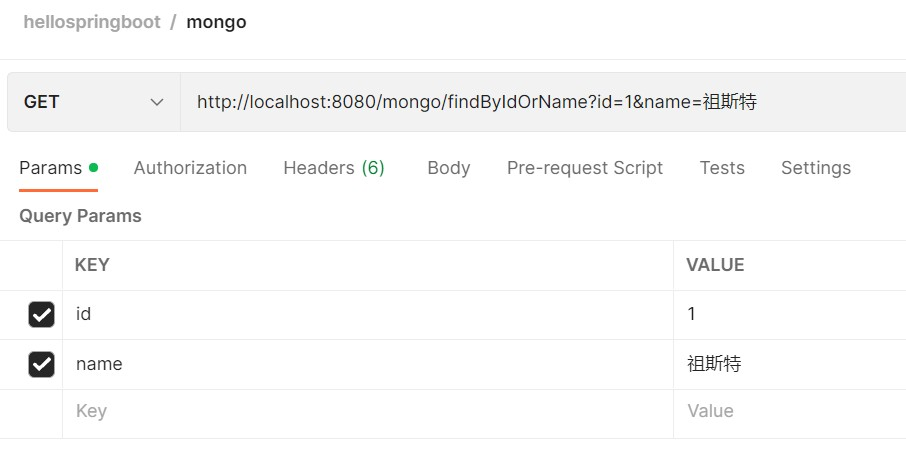
不论是与或操作,我们都可以得到正确的结果
到这里,mongodb的集成就完成了
三、基于Redis实现Session配置共享
这部分纯属附送内容 ^ ^
前边我们已经完成了对Redis的集成操作,而基于Redis我们可以非常便捷的实现服务端Session配置的跨节点共享
服务端Session默认存储在本地,而当我们需要多台服务器共享一套Session配置时,本地化Session便不再满足我们的要求
而基于SpringSession,我们可以完全透明化的替换掉默认的Session容器,直接改为基于Redis存储
1. 添加相关依赖
        <!-- 引入spring session无缝替换原有的session系统 -->

        <dependency>

            <groupId>org.springframework.session</groupId>

            <artifactId>spring-session-data-redis</artifactId>

        </dependency>
2. 新增两个RedisController方法
    @PostMapping("/setSession")

    public void setSession(String key, String val, HttpSession session){

        session.setAttribute(key, val);

    }

    @GetMapping("/getSession")

    public Object getSession(String key, HttpSession session){

        return session.getAttribute(key);

    }
就完事儿了?对!就完事儿了 ^ ^,超级简单是吧?
到此,我们就完成了SpringBoot对于Redis以及MongoDB的集成和使用
非常感慨于SpringBoot框架设计的智能化及人性化,就像身边有一哥们说的:这年头,框架都能直接听懂人话了!哈哈
下一节我们讨论一个生产环境下常常面临的实际问题——安全管理
Shiro框架要来咯!敬请期待——
2流高手速成记(之四):SpringBoot整合redis及mongodb的更多相关文章
- 2流高手速成记(之三):SpringBoot整合mybatis/mybatis-plus实现数据持久化
接上回 上一篇我们简单介绍了基于SpringBoot实现简单的Web开发,本节来看Web开发中必不可少的内容--数据持久化 先看项目结构: 1. 创建数据表 打开mysql,打开数据库 test (没 ...
- 2流高手速成记(之六):从SpringBoot到SpringCloudAlibaba
咱们接上回 2流高手速成记(之五):Springboot整合Shiro实现安全管理 - 14号程序员 - 博客园 (cnblogs.com) 身边常有朋友说:小项目用PHP.大项目用Java(这里绝无 ...
- 2流高手速成记(之七):基于Dubbo&Nacos的微服务简要实现
本节内容会用到之前给大家讲过的这两篇: 2流高手速成记(之六):从SpringBoot到SpringCloudAlibaba 2流高手速成记(之三):SpringBoot整合mybatis/mybat ...
- 2流高手速成记(之五):Springboot整合Shiro实现安全管理
废话不多说,咱们直接接上回 上一篇我们讲了如何使用Springboot框架整合Nosql,并于文章最后部分引入了服务端Session的概念 而早在上上一篇中,我们则已经讲到了如何使用Springboo ...
- 2流高手速成记(之八):基于Sentinel实现微服务体系下的限流与熔断
我们接上回 上一篇中,我们进行了简要的微服务实现,也体会到了SpringCloudAlibaba的强大和神奇之处 我们仅改动了两个注释,其他全篇代码不变,原来的独立服务就被我们分为了provider和 ...
- SpringBoot整合Redis及Redis工具类撰写
SpringBoot整合Redis的博客很多,但是很多都不是我想要的结果.因为我只需要整合完成后,可以操作Redis就可以了,并不需要配合缓存相关的注解使用(如@Cacheable). ...
- SpringBoot整合Redis并完成工具类
SpringBoot整合Redis的资料很多,但是我只需要整合完成后,可以操作Redis就可以了,所以不需要配合缓存相关的注解使用(如@Cacheable),而且我的系统框架用的日志是log4j,不是 ...
- SpringBoot整合Redis实现常用功能
SpringBoot整合Redis实现常用功能 建议大小伙们,在写业务的时候,提前画好流程图,思路会清晰很多. 文末有解决缓存穿透和击穿的通用工具类. 1 登陆功能 我想,登陆功能是每个项目必备的功能 ...
- SpringBoot整合Redis、ApachSolr和SpringSession
SpringBoot整合Redis.ApachSolr和SpringSession 一.简介 SpringBoot自从问世以来,以其方便的配置受到了广大开发者的青睐.它提供了各种starter简化很多 ...
随机推荐
- Git学习与码云实战
Git学习与码云实战 一.Git安装 概述: Git是一个开源的分布式版本控制系统,可以有效.高速的处理从很小到非常大的项目版本管理,是目前使用范围最广的版本管理工具. 下载安装: 下载地址:http ...
- 彻底弄懂JS中的this
首先,用一句话解释this,就是:指向执行当前函数的对象. 当前执行,理解一下,也就是说this的指向在函数定义的时候是确定不了的,只有函数执行的时候才能确定.this到底指向谁?this的最终指向的 ...
- DTSE Tech Talk丨第3期:解密数据隔离方案,让SaaS应用开发更轻松
摘要:解读云上前沿技术,畅聊开发应用实践.专家团队授课,答疑解惑,助力开发者使用华为云开放能力进行应用构建.技术创新. 围绕当下许多企业青睐的SaaS应用开发,华为云DTSE技术布道师李良龙为大家带来 ...
- Dart 异步编程(一):初步认识
由于 Dart 是单线程编程语言,对于进行网络请求和I/O操作,线程将发生阻塞,严重影响依赖于此任务的下一步操作. 通常,在一个阻塞任务之后还有许许多多的任务等待被执行.下一步任务需要上一步任务的结果 ...
- 使用MindSpore计算旋转矩阵
技术背景 坐标变换.旋转矩阵,是在线性空间常用的操作,在分子动力学模拟领域有非常广泛的应用.比如在一个体系中切换坐标,或者对整体分子进行旋转平移等.如果直接使用Numpy,是很容易可以实现的,只要把相 ...
- Python自学教程2:大牛们怎么写注释
在还没开始学代码前,就要先学会写注释.不会写注释的程序员会遭到鄙视和唾弃,甚至在工作中会被人穿小鞋.注释也不是随便写一下就行,用好注释还是有点讲究的. 注释有什么用? 注释(Comments)主要是向 ...
- 我用开天平台做了一个字符串检查API,hin 简单~~
摘要:本文使用了工作台的API全生命周期管理和函数管理功能,编写字符串检查的函数,实现了API的快速创建和发布. 本文分享自华为云社区<[我用开天平台做了一个字符串检查API>,作者:人类 ...
- OpenDrop 这样的应用程序以及与当今流行的替代品的比较
由安全移动网络实验室 OpenDrop 创建的用 Python 编写的开放 Apple AirDrop 实现是一个命令行工具,允许直接通过 Wi-Fi 在设备之间共享文件.它的独特之处在于它与 App ...
- KingbaseES 中实现mysql的from_days和to_days
mysql中两个函数的说明: TO_DAYS(date)给出一个日期date,返回一个天数. FROM_DAYS(N)给出一个天数N,返回一个DATE值. 两个函数比较计算的日期都是 0000-01- ...
- Sentinel源码分析-滑动窗口统计原理
滑动窗口技术是Sentinel比较关键的核心技术,主要用于数据统计 通过分析StatisticSlot来慢慢引出这个概念 @Override public void entry(Context con ...