走进springboot
SpringBoot基础
核心思想---自动装配---约定大于配置
开发环境:jdk1.8、maven、springboot、idea
一、快速构建一个springboot项目
1.1、进入springboot官网
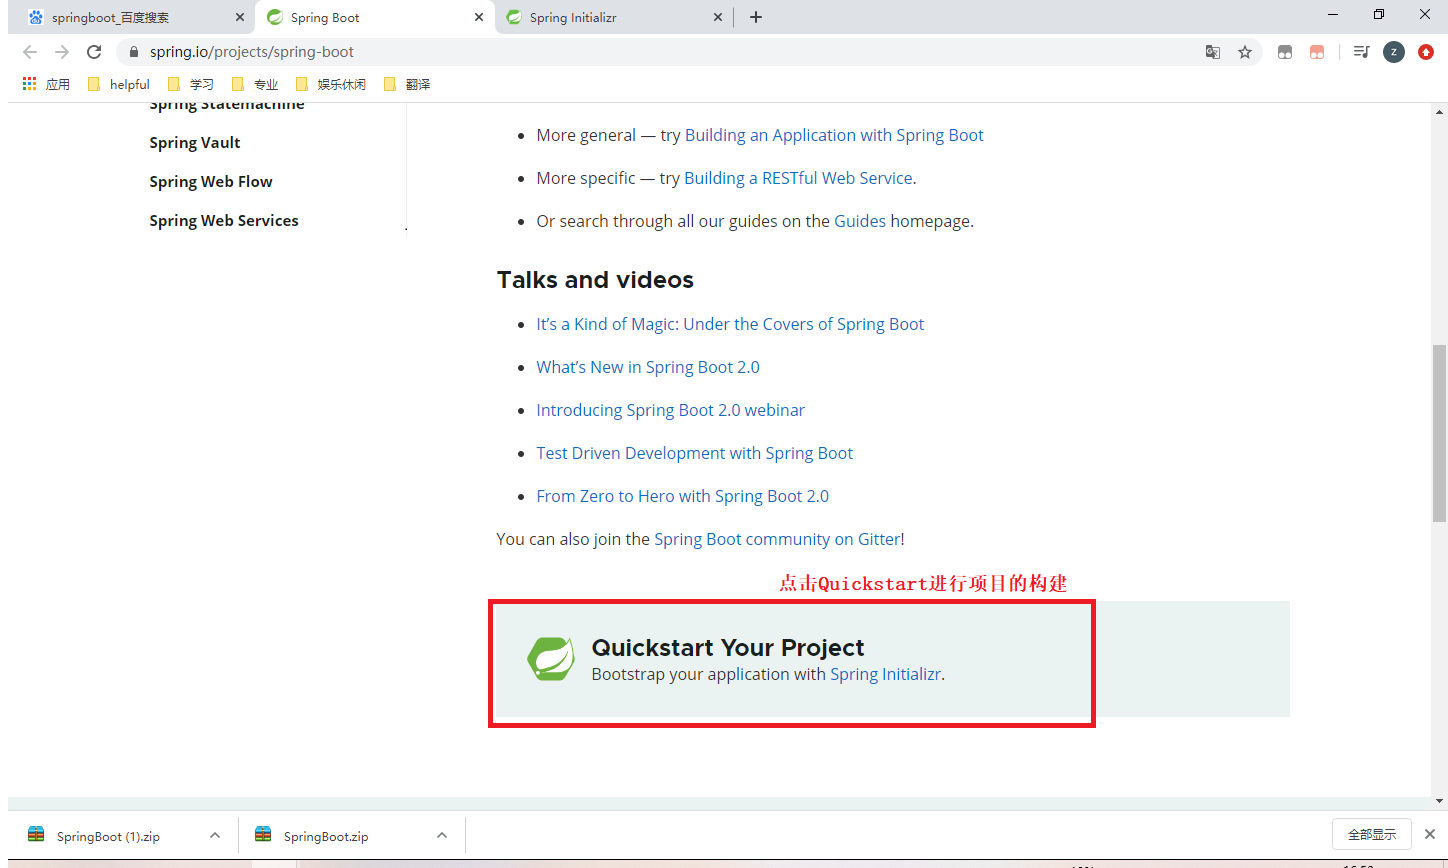
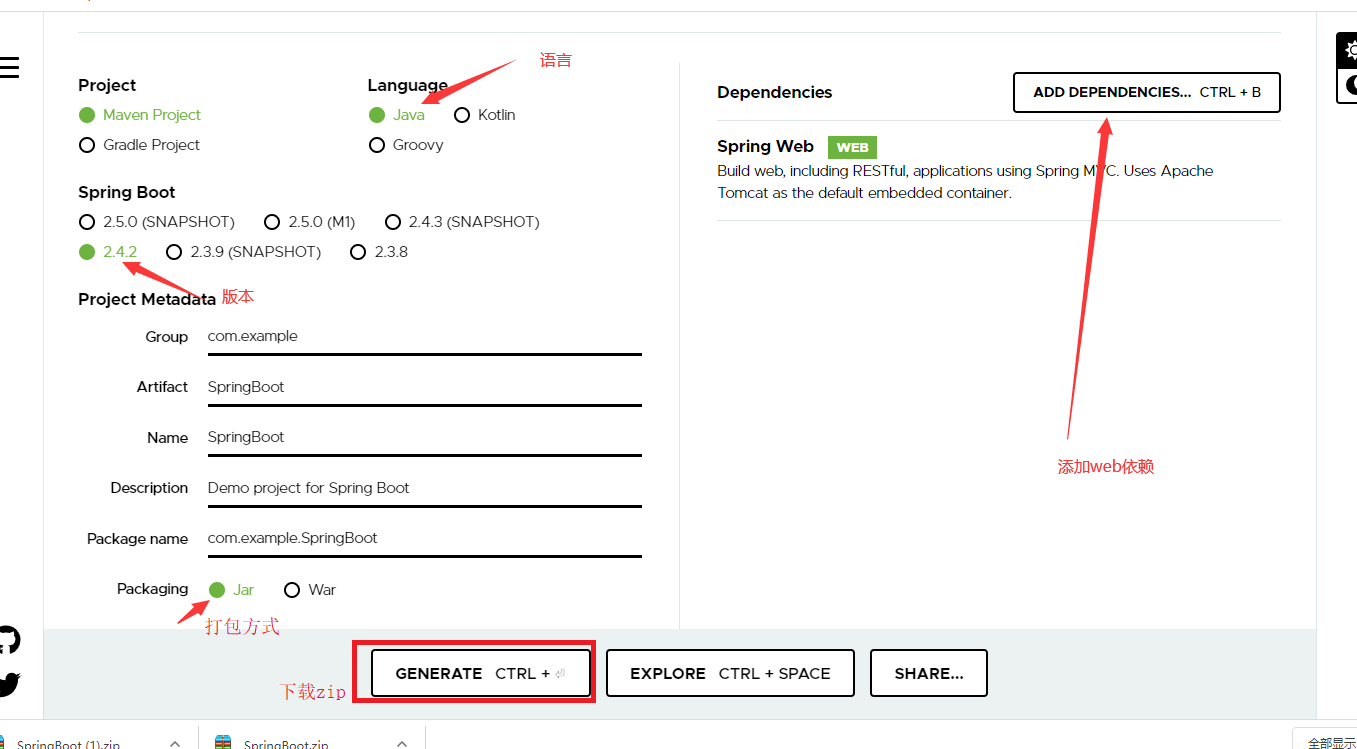
1.2、选择配置并下载
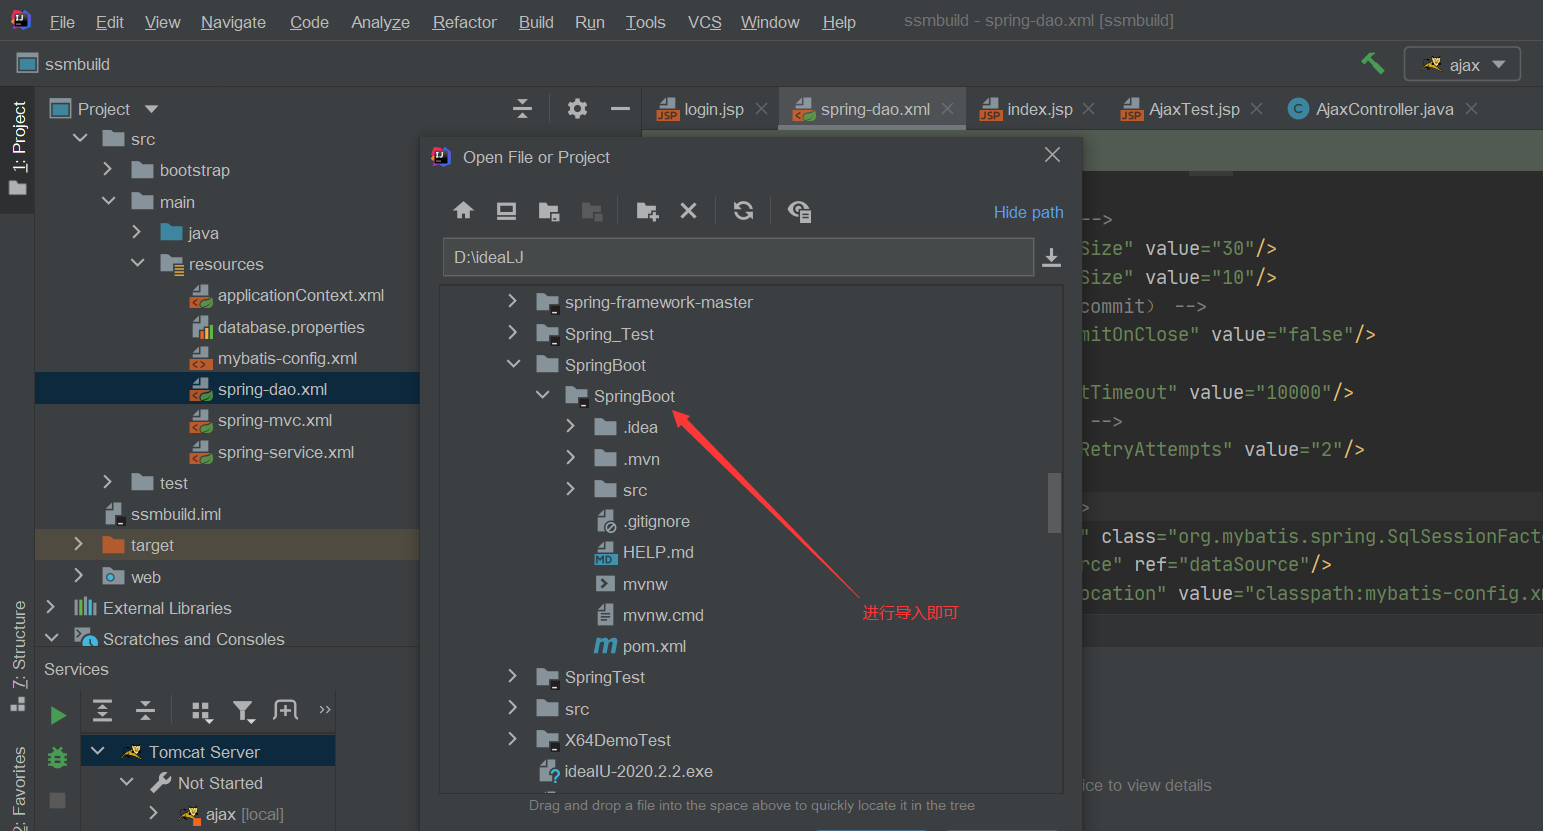
1.3、项目的导入
二、自动装配原理
pom.xml
<?xml version="1.0" encoding="UTF-8"?>

<project xmlns="http://maven.apache.org/POM/4.0.0" xmlns:xsi="http://www.w3.org/2001/XMLSchema-instance"

         xsi:schemaLocation="http://maven.apache.org/POM/4.0.0 https://maven.apache.org/xsd/maven-4.0.0.xsd">

    <modelVersion>4.0.0</modelVersion>

    <parent>

        <groupId>org.springframework.boot</groupId>

        <artifactId>spring-boot-starter-parent</artifactId>

        <version>2.4.2</version>

        <relativePath/> <!-- lookup parent from repository -->

    </parent>

    <groupId>com.example</groupId>

    <artifactId>springboot</artifactId>

    <version>0.0.1-SNAPSHOT</version>

    <name>springboot</name>

    <description>Demo project for Spring Boot</description>

    <properties>

        <java.version>1.8</java.version>

    </properties>

    <dependencies>

        <!-- 启动器 -->

        <dependency>

            <groupId>org.springframework.boot</groupId>

            <artifactId>spring-boot-starter</artifactId>

            <version>2.4.2</version>

        </dependency>

        <!-- jsr303校验  后台校验数据的格式,配合@Validated  //数据校验 ,使用!-->

        <dependency>

            <groupId>javax.validation</groupId>

            <artifactId>validation-api</artifactId>

            <version>2.0.1.Final</version>

        </dependency>

        <!-- 自动导入web使用的所有依赖 -->

        <dependency>

            <groupId>org.springframework.boot</groupId>

            <artifactId>spring-boot-starter-web</artifactId>

        </dependency>

        <dependency>

            <groupId>org.springframework.boot</groupId>

            <artifactId>spring-boot-starter-test</artifactId>

            <scope>test</scope>

        </dependency>

        <!-- springboot使用yml注入数据必备! -->

        <dependency>

            <groupId>org.springframework.boot</groupId>

            <artifactId>spring-boot-configuration-processor</artifactId>

            <optional>true</optional>

        </dependency>

    </dependencies>

    <!-- 打包插件 -->

    <build>

        <plugins>

<!--            <plugin>-->

<!--                <groupId>org.springframework.boot</groupId>-->

<!--                <artifactId>spring-boot-maven-plugin</artifactId>-->

<!--            </plugin>-->

            <plugin>

                <groupId>org.apache.maven.plugins</groupId>

                <artifactId>maven-surefire-plugin</artifactId>

                <version>2.22.1</version>

                <configuration>

                    <skipTests>true</skipTests>

                </configuration>

            </plugin>

            <plugin>

                <groupId>org.springframework.boot</groupId>

                <artifactId>spring-boot-maven-plugin</artifactId>

                <version>2.2.6.RELEASE</version>

                <executions>

                    <execution>

                        <goals>

                            <goal>repackage</goal>

                        </goals>

                    </execution>

                </executions>

            </plugin>

        </plugins>

    </build>

</project>
2.1、怎么进行自动装配?
spring boot的自动装配:
1、spring boot启动时会加载大量的自动配置类
2、在开发中看需要实现的功能是否存在springboot写好的配置类,如果没有就需要手动配置
3、在yml中修改springboot属性值时(也就是配置),当它提示时,也就相当于你在修改springboot配置好的配置类中的属性
4、springboot配置好的配置类可以在spring.factories中进行查找出来,它会有一个xxxAutoConfiguration(自动配置类:给容器中添加组件),它上面的xxxProperties配置的类属性就是yml中可以进行修改的属性,以此来达到想要配置的功能!!!
结论:主启动器@SpringBootApplication通过扫描依赖中导入的Spring-boot-autoconfigure下的jar包下的META-INF下的spring.factories中的配置进行装配,但是不一定生效,如果没有相应的启动器,就不会生效,需要导入相应的启动器才能自动装配,springboot的自动装配的东西(以前需要自己写的包或者配置文件xml。。。)现在只需要在sprint-boot-autoconfigure-xxx.xx.RELEASE.jar包下都存在,不需要自己配置,只需要调用即可。。
三、yml写法
yml对空格的要求严格
#对象存储

Dog:

  name: "lucky"

  age: "7"

Person:

  name: "阿辉"

  age : 22

  happy: true

  birth: 2021/2/23

  maps: {k1: v1, k2: v2}

  lists: [code,basketball,girl]

  dog:

    name: Lucky

    age: 22
通过@Component和@ConfigurationProperties(prefix = "dog")将实体类的属性与yml中的配置进行绑定
ConfigurationProperties(prefix = "dog")必须导入spring-boot-configuration-processor依赖还需要使用prefix进行绑定!
package com.example.springboot.pojo;

import lombok.AllArgsConstructor;

import lombok.Data;

import lombok.NoArgsConstructor;

import org.springframework.beans.factory.annotation.Value;

import org.springframework.boot.context.properties.ConfigurationProperties;

import org.springframework.stereotype.Component;

@Data

@NoArgsConstructor

@AllArgsConstructor

@Component

@ConfigurationProperties(prefix = "dog")

public class Dog {

    private String name;

    private Integer age;

    @Override

    public String toString() {

        return "Dog{" +

                "name='" + name + '\'' +

                ", age=" + age +

                '}';

    }

}
package com.example.springboot.pojo;

import lombok.AllArgsConstructor;

import lombok.Data;

import lombok.NoArgsConstructor;

import org.springframework.boot.context.properties.ConfigurationProperties;

import org.springframework.stereotype.Component;

import java.util.Date;

import java.util.List;

import java.util.Map;

@Data

@NoArgsConstructor

@AllArgsConstructor

@Component

@ConfigurationProperties(prefix = "person")

@Validated  //数据校验

public class Person {

    private String name;

    private Integer age;

    private Boolean happy;

    private Date birth;

    private Map<String,Object> maps;

    private List<Object> lists;

    private Dog dog;

    @Override

    public String toString() {

        return "Person{" +

                "name='" + name + '\'' +

                ", age=" + age +

                ", happy=" + happy +

                ", birth=" + birth +

                ", maps=" + maps +

                ", lists=" + lists +

                ", dog=" + dog +

                '}';

    }

}
通过@Autowired的自动装配原理将实体类中的数据进行输出
package com.example.springboot;

import com.example.springboot.pojo.Dog;

import com.example.springboot.pojo.Person;

import org.junit.jupiter.api.Test;

import org.springframework.beans.factory.annotation.Autowired;

import org.springframework.boot.test.context.SpringBootTest;

@SpringBootTest

class SpringbootApplicationTests {

    @Autowired

    private Dog dog;

    @Autowired

    private Person person;

    @Test

    void contextLoads() {

        System.out.println(dog);

        System.out.println("--------------");

        System.out.println(person);

    }

}
四、多环境切换测试
application.properties 环境切换(需要三个环境,application.properties、application-test.properties、application-dev.properties)
server.port=8080

# SpringBoot的多环境配置:自主选择激活配合文件(test/dev)

spring.profiles.active=dev
application.yml方式实现多环境的切换
# 选择激活哪个环境(test/dev)  各个配置之间拿---分隔

spring:

  profiles:

    active: test

---

spring:

  profiles: test

server:

  port: 8082

---

spring:

  profiles: dev

server:

  port: 8089
五、静态资源
1、在springboot中,可以使用以下方式处理静态资源:
webjars:
localhost:8080/webjars/public、static、/**、resources 可以使用:``localhost:8080/文件名.后缀名
2、优先级(如果文件相同则)
resources > static(默认)>public
六、扩展mvc
package com.example.springboot.config;

import org.springframework.context.annotation.Bean;

import org.springframework.context.annotation.Configuration;

import org.springframework.web.servlet.View;

import org.springframework.web.servlet.ViewResolver;

import org.springframework.web.servlet.config.annotation.EnableWebMvc;

import org.springframework.web.servlet.config.annotation.InterceptorRegistry;

import org.springframework.web.servlet.config.annotation.ViewControllerRegistry;

import org.springframework.web.servlet.config.annotation.WebMvcConfigurer;

import java.util.Locale;

//

//@EnableWebMvc就是添加了@Import({DelegatingWebMvcConfiguration.class})这个类,意思就是从容器中获取所有的webmvcconfig

// 分析:WebMvcAutoConfig类有个@ConditionalOnMissingBean({WebMvcConfigurationSupport.class})

//      如果有这个类,那么MyConfig就不会自动装配,

//      又因为上面DelegatingWebMvcConfiguration这个类继承了WebMvcConfigurationSupport

//      所以不能加@EnableWebMvc这个注解,不然就会失去自动装配的功能!

// 扩展SpringMVC

@Configuration

public class MyConfig  implements WebMvcConfigurer {

    // ViewResolver 实现了视图解析器接口的类  就相当于是个视图解析器

    // 如果想要自定义的功能,只需要把它注入到bean中,交由Springboot,Springboot会帮我们自动装配!

    @Bean // 自定义功能!!!

    public ViewResolver myViewResolver(){

        return new MyViewResolver();

    }

    public static class MyViewResolver implements ViewResolver{

        @Override

        public View resolveViewName(String s, Locale locale) throws Exception {

            return null;

        }

    }

    // 视图跳转

    @Override

    public void addViewControllers(ViewControllerRegistry registry) {

        // addViewController("/springboot")相当于用localhost:8080/springboot这个跳转到localhost:8080/test

        // 相当于更名!!

        registry.addViewController("/springboot").setViewName("test");

    }

}
七、thymeleaf(模板引擎)的应用
7.1、 作用域的导入
<html xmlns="http://www.w3.org/1999/xhtml" xmlns:th="http://www.thymeleaf.org">
7.2、thymeleaf的th的应用
(格式:th: href/ img / src="@{xxx}**")
<!DOCTYPE html>

<html xmlns="http://www.w3.org/1999/xhtml" xmlns:th="http://www.thymeleaf.org">

   <head>

      <meta charset="utf-8">

      <meta name="viewport" content="width=device-width, initial-scale=1, shrink-to-fit=no">

      <meta name="description" content="Gurdeep singh osahan">

      <meta name="author" content="Gurdeep singh osahan">

      <title>Miver</title>

      <!-- Favicon Icon -->

      <link rel="icon" type="image/png" th:href="@{images/fav.svg}">

      <!-- Bootstrap core CSS -->

      <link th:href="@{vendor/bootstrap/css/bootstrap.min.css}" rel="stylesheet">

      <!-- Font Awesome-->

      <link th:href="@{vendor/fontawesome/css/font-awesome.min.css}" rel="stylesheet">

      <!-- Material Design Icons -->

      <link th:href="@{vendor/icons/css/materialdesignicons.min.css}" media="all" rel="stylesheet" type="text/css">

      <!-- Slick -->

      <link th:href="@{vendor/slick-master/slick/slick.css}" rel="stylesheet" type="text/css">

      <!-- Lightgallery -->

      <link th:href="@{vendor/lightgallery-master/dist/css/lightgallery.min.css}" rel="stylesheet">

      <!-- Select2 CSS -->

      <link th:href="@{vendor/select2/css/select2-bootstrap.css}" />

      <link th:href="@{vendor/select2/css/select2.min.css}" rel="stylesheet">

      <!-- Custom styles for this template -->

      <link th:href="@{css/style.css}" rel="stylesheet">

   </head>

    <body>

     <div class="copyright">

     	<div class="logo">

          <a href="index.html">

            <img th:src="@{images/logo.svg}">

          </a>

      	</div>

       </div>

      <script th:src="@{vendor/jquery/jquery.min.js}"></script>

      <script th:src="@{vendor/bootstrap/js/bootstrap.bundle.min.js}"></script>

      <!-- Contact form JavaScript -->

      <!-- Do not edit these files! In order to set the email address and subject line for the contact form 		go to the bin/contact_me.php file. -->

      <script th:src="@{js/jqBootstrapValidation.js}"></script>

      <script th:src="@{js/contact_me.js"></script>

      <!-- Slick -->

      <script th:src="@{vendor/slick-master/slick/slick.js}" type="text/javascript" charset="utf-8">		</script>

      <!-- lightgallery -->

      <script th:src="@{vendor/lightgallery-master/dist/js/lightgallery-all.min.js}"></script>

      <!-- select2 Js -->

      <script th:src="@{vendor/select2/js/select2.min.js}"></script>

      <!-- Custom -->

      <script th:src="@{js/custom.js}"></script>

   </body>

</html>
八、整合Druid(阿里巴巴的数据库连接池)
8.1、更改yml中数据库连接type为Druid
spring:

  datasource:

    username: root

    password: root

    url: jdbc:mysql://localhost:3306/curry?usrUnicode=true&characterEncoding=utf-8

    driver-class-name: com.mysql.cj.jdbc.Driver

    type: com.alibaba.druid.pool.DruidDataSource

  thymeleaf:

    cache: false #关闭缓存

    mode: HTML5 #设置模板类型

    encoding: utf-8  #设置编码

# 打印自动生成的sql语句

mybatis-plus:

  configuration:

    log-impl: org.apache.ibatis.logging.stdout.StdOutImpl
8.2、实现Druid绑定到yml中
并实现一个后台监控功能
package com.example.springboot_data.config;

import com.alibaba.druid.pool.DruidDataSource;

import com.alibaba.druid.support.http.StatViewServlet;

import org.springframework.boot.context.properties.ConfigurationProperties;

import org.springframework.boot.web.servlet.ServletRegistrationBean;

import org.springframework.context.annotation.Bean;

import org.springframework.context.annotation.Configuration;

import javax.sql.DataSource;

import java.util.HashMap;

@Configuration

public class DruidConfig {

    //绑定到yml中

    @ConfigurationProperties(prefix = "spring.datasource")

    @Bean

    public DataSource druidDataSource(){

        return new DruidDataSource();

    }

    @Bean

    //后台监控功能 :spring可以在增加web功能下的web.xml中配置 但是springboot就通过ServletRegistrationBean配置

    public ServletRegistrationBean statViewServlet(){

        ServletRegistrationBean<StatViewServlet> bean = new ServletRegistrationBean<>(new StatViewServlet(),"/druid/*");

        //后台登录  账户密码配置

        HashMap<String,String> initParameters = new HashMap<>();

        //账户密码设置

        initParameters.put("loginUsername","admin");

        initParameters.put("loginPassword","admin");

        // 禁止谁访问!

        initParameters.put("ahui","192.168.11.12");

        bean.setInitParameters(initParameters);

        System.out.println(bean.getInitParameters()+"this is getInit");

        return bean;

    }

}
8.3、实现filter过滤器
import org.springframework.context.annotation.Configuration;

import javax.servlet.Filter;

import javax.sql.DataSource;

import java.util.HashMap;

@Configuration

public class DruidConfig {

@Bean

    public FilterRegistrationBean webStatFilter(){

        FilterRegistrationBean<Filter> bean = new FilterRegistrationBean<>();

        bean.setFilter(new WebStatFilter());

        // 过滤请求

        HashMap<String, String> initParameters = new HashMap<>();

        //过滤这些东西

        initParameters.put("exclusions","*.js,*.css,/druid/*");

        bean.setInitParameters(initParameters);

        return bean;

    }

}
九、springboot整合mybatis
9.1、UserController实现跳转
package com.example.springboot_mybatis.controller;

import com.example.springboot_mybatis.mapper.UserMapper;

import com.example.springboot_mybatis.pojo.User;

import org.springframework.beans.factory.annotation.Autowired;

import org.springframework.web.bind.annotation.GetMapping;

import org.springframework.web.bind.annotation.PathVariable;

import org.springframework.web.bind.annotation.RestController;

import java.util.List;

@RestController

public class UserController {

    @Autowired(required = false)

    private UserMapper userMapper;

    @GetMapping("/queryUserList")

    public List<User>  queryUserList(){

        List<User> users = userMapper.queryUserList();

        users.forEach(System.out::println);

        return users;

    }

    // 使用restful风格取值id 并查询

    @GetMapping("/queryById/{id}")

    public User queryById( @PathVariable Integer id){

        return userMapper.queryById(id);

    }

}
9.2、UserMapper接口实现查询功能
package com.example.springboot_mybatis.mapper;

import com.example.springboot_mybatis.pojo.User;

import org.apache.ibatis.annotations.Mapper;

import org.apache.ibatis.annotations.Param;

import org.apache.ibatis.annotations.Select;

import org.springframework.stereotype.Repository;

import java.util.List;

@Mapper // @Mapper表示这是一个mybatis的mapper类

// 也可以在主程序入口使用@MapperScan("com.example.springboot_mybatis.mapper"))

@Repository

//@Component

public interface UserMapper {

    @Select("select * from user")

    List<User> queryUserList();

    @Select("select * from user where id = #{id}")

    User queryById(@Param("id") int id);

    int addUser(@Param("User")User user);

    int updateUser(@Param("User")User user);

    int deleteUserById(@Param("id")int id);

}
9.3、User实体类
package com.example.springboot_mybatis.pojo;

import lombok.AllArgsConstructor;

import lombok.Data;

import lombok.NoArgsConstructor;

@Data

@NoArgsConstructor

@AllArgsConstructor

public class User {

    private Integer id;

    private String name;

    private Integer age;

    private String email;

    private Integer version;

    private String gmt_create;

    private String gmt_modified;

}
9.4、yml配置连接数据库及绑定mybatis
spring:

  datasource:

    type: org.springframework.jdbc.datasource.DriverManagerDataSource

    username: root

    password: root

    url: jdbc:mysql://localhost:3306/curry?serverTimezone=UTC&useUnicode=true&characterEncoding=utf-8

    driver-class-name: com.mysql.cj.jdbc.Driver

#整合mybatis

mybatis:

  type-aliases-package: com.example.springboot_mybaits.pojo

#  mapper-locations: classpath:mybatis/mapper/*.xml 用注解就直接省去xml配置
十、SpringSecurity安全机制
安全框架:shiro、springsecurity
安全框架的作用:认证、授权
- 功能权限
- 访问权限
- 菜单权限
重要security类:
webSecurityConfiguration: 自定义 security 策略AuthenticationManagerBuilder: 自定义认真策略@EnableWebSecurity: 开启 WebSecurity 模式
配置类:SecurityConfig.java
package com.example.spring_security.config;

import com.example.spring_security.controller.RouterController;

import org.springframework.security.config.annotation.authentication.builders.AuthenticationManagerBuilder;

import org.springframework.security.config.annotation.web.builders.HttpSecurity;

import org.springframework.security.config.annotation.web.builders.WebSecurity;

import org.springframework.security.config.annotation.web.configuration.EnableWebSecurity;

import org.springframework.security.config.annotation.web.configuration.WebSecurityConfigurerAdapter;

import org.springframework.security.crypto.bcrypt.BCryptPasswordEncoder;

// Aop式编程

@EnableWebSecurity

public class SecurityConfig  extends WebSecurityConfigurerAdapter {

    @Override

    protected void configure(HttpSecurity http) throws Exception {

        // 首页所有人可以访问,功能页只有对应有权限的人可以访问

        //它是链式编程

        // 授权

        http.authorizeRequests().antMatchers("/").permitAll()

        .antMatchers("/level1/**").hasRole("vip1")

        .antMatchers("/level2/**").hasRole("vip2")

        .antMatchers("/level3/**").hasRole("vip3"); //认证请求

        // 没有权限,进入就需要登录

        http.formLogin();

        //开启注销功能 并跳转到首页

        http.logout().logoutSuccessUrl("/");

        // springSecurity为了防止网站攻击 默认开启了csrf功能

//        http.csrf().disable();

    }

    // 认证 springboot 2.1.x 可以直接使用

    // 密码编码: PasswordEncoder 没有编码的错误~!

    // 如果没有密码编码服务器会报500错误 :.withUser("guest").password("guest").roles("vip1");

    // 对他进行加密之后:new BCryptPasswordEncoder().encode("curry")

    @Override

    protected void configure(AuthenticationManagerBuilder auth) throws Exception {

        auth.inMemoryAuthentication().passwordEncoder(new BCryptPasswordEncoder())

                .withUser("ahui").password(new BCryptPasswordEncoder().encode("curry")).roles("vip2","vip3")

                .and()

                .withUser("admin").password(new BCryptPasswordEncoder().encode("admin")).roles("vip2","vip3","vip1")

                .and()

                .withUser("guest").password(new BCryptPasswordEncoder().encode("guest")).roles("vip1");

    }

}
controller类:RouterController.java
package com.example.spring_security.controller;

import org.springframework.stereotype.Controller;

import org.springframework.ui.Model;

import org.springframework.web.bind.annotation.*;

import org.thymeleaf.util.StringUtils;

import javax.servlet.http.HttpSession;

@Controller

public class RouterController {

    @RequestMapping("/index")

    public String toIndex(){

        return "index";

    }

    @RequestMapping("/login")

    public String toLogin(){

        return "/views/login";

    }

    @PostMapping("/user/login")

    public String redirectLogin(Model model, HttpSession httpSession, @RequestParam("username") String userName, @RequestParam("password") String passWord){

        if (!StringUtils.isEmpty(userName) && "admin".equals(passWord))

        {

//            httpSession.setAttribute("loginUser",userName);

            return "redirect:/index.html";

        }

        else

        {

            model.addAttribute("msg","用户名或密码错误");

            return "views/login";

        }

    }

    @RequestMapping("/level1/{id}")

    public String toLevel1(@PathVariable("id") int id){

        return "views/level1/"+id;

    }

    @RequestMapping("/level2/{id}")

    public String toLevel2(@PathVariable("id") int id){

        return "views/level2/"+id;

    }

    @RequestMapping("/level3/{id}")

    public String toLevel3(@PathVariable("id") int id){

        return "views/level3/"+id;

    }

}
十一、shiro安全机制
shiro需要一个config类来实现过滤 和一个realm对象来实现认证与授权
application.yml
#连接数据库的配置,以及使用druid数据源进行连接

spring:

  thymeleaf:

    cache: false

  datasource:

    url: jdbc:mysql://localhost:3306/curry?serverTimezone=UTC&useUnicode=true&characterEncoding=utf-8

    driver-class-name: com.mysql.cj.jdbc.Driver

    username: root

    password: root

    type: com.alibaba.druid.pool.DruidDataSource

mybatis:

#  mapper-locations: classpath:mapper/*.xml //使用mybatis注解实现,不需要使用xml方式

  type-aliases-package: com.example.shiro_springboot.pojo
shiroconfig.java
package com.example.shiro_springboot.config;

import org.apache.shiro.spring.web.ShiroFilterFactoryBean;

import org.apache.shiro.web.mgt.DefaultWebSecurityManager;

import org.springframework.beans.factory.annotation.Qualifier;

import org.springframework.context.annotation.Bean;

import org.springframework.context.annotation.Configuration;

import java.util.LinkedHashMap;

import java.util.Map;

@Configuration

public class ShiroConfig {

    // shiroFilterFactoryBean 过滤器

    @Bean // 通过@Qualifier("defaultWebSecurityManager")与下面的@Bean(name = "defaultWebSecurityManager")的方法绑定

    public ShiroFilterFactoryBean getShiroFilterFactoryBean(@Qualifier("defaultWebSecurityManager") DefaultWebSecurityManager defaultWebSecurityManager){

        ShiroFilterFactoryBean bean = new ShiroFilterFactoryBean();

        // 设置安全管理器

        bean.setSecurityManager(defaultWebSecurityManager);

        //添加shiro的内置过滤器!

        /*

        * anon : 无需认证就可以访问

        * authc : 必须认证了才能访问

        * user : 必须拥有记住我功能才能访问

        * perms : 拥有对某个资源的权限才能访问

        * role : 拥有某个角色权限才能访问

        *  */

        Map<String, String> filterChainDefinitionMap = new LinkedHashMap<>();

        bean.setFilterChainDefinitionMap(filterChainDefinitionMap);

//        filterChainDefinitionMap.put("/user/add","authc");

//        filterChainDefinitionMap.put("/user/update","authc");

        //权限设置 没有add权限

        filterChainDefinitionMap.put("/user/update","perms[user:update]");

        filterChainDefinitionMap.put("/user/add","perms[user:add]");

        filterChainDefinitionMap.put("/user/*","authc");

        // 授权跳转

        bean.setUnauthorizedUrl("/noauth");

        bean.setLoginUrl("/toLogin");

        // 设置拦截器

        bean.setFilterChainDefinitionMap(filterChainDefinitionMap);

        return bean;

    }

    // DefaultWebSecurityManager

    @Bean(name = "defaultWebSecurityManager")

    public DefaultWebSecurityManager getDefaultWebSecurityManager(@Qualifier("userRealm") UserRealm userRealm){

        // 通过@Qualifier("userRealm")与下面的UserRealm的方法绑定

        DefaultWebSecurityManager securityManager = new DefaultWebSecurityManager();

        // 关联UserRealm

        securityManager.setRealm(userRealm);

        return securityManager;

    }

    //创建realm 对象

    @Bean

    public UserRealm userRealm(){

        return new UserRealm();

    }

}
Userrealm.java
package com.example.shiro_springboot.config;

import com.example.shiro_springboot.pojo.User;

import com.example.shiro_springboot.service.UserService;

import org.apache.shiro.SecurityUtils;

import org.apache.shiro.authc.*;

import org.apache.shiro.authz.AuthorizationInfo;

import org.apache.shiro.authz.SimpleAuthorizationInfo;

import org.apache.shiro.realm.AuthorizingRealm;

import org.apache.shiro.subject.PrincipalCollection;

import org.apache.shiro.subject.Subject;

import org.springframework.beans.factory.annotation.Autowired;

public class UserRealm extends AuthorizingRealm {

    @Autowired

    UserService userService;

    // 授权

    @Override

    protected AuthorizationInfo doGetAuthorizationInfo(PrincipalCollection principalCollection) {

        System.out.println("执行了授权方法");

        SimpleAuthorizationInfo info = new SimpleAuthorizationInfo();

        info.addStringPermission("user:add");

        //拿到当前登录的用户 的对象

        Subject subject = SecurityUtils.getSubject();

        User currentUser = (User) subject.getPrincipal(); //拿到User对象

        //

        info.addStringPermission(currentUser.getPerms());

        return info;

    }

    // 认证

    @Override

    protected AuthenticationInfo doGetAuthenticationInfo(AuthenticationToken authenticationToken) throws AuthenticationException {

        System.out.println("执行了"+authenticationToken+"方法!!!");

        //获取当前的用户

        Subject subject = SecurityUtils.getSubject();

        //伪造的数据库信息

//        String name = "admin";

//        String password = "admin";

        UsernamePasswordToken userToken = (UsernamePasswordToken) authenticationToken;

        //连接真实数据库

        User user = userService.queryUserByName(userToken.getUsername());

        if(user == null) // 如果等于null  表示没有这个人

            return null;

        //Shiro 做密码加密方式,Md5   md5盐支加密

        // shiro做的密码认证  直接交给shiro

        return new SimpleAuthenticationInfo("",user.getPwd(),"");

    }

}
跳转视图
ShiroController.java
package com.example.shiro_springboot.controller;

import com.example.shiro_springboot.mapper.UserMapper;

import org.apache.shiro.SecurityUtils;

import org.apache.shiro.authc.IncorrectCredentialsException;

import org.apache.shiro.authc.UnknownAccountException;

import org.apache.shiro.authc.UsernamePasswordToken;

import org.apache.shiro.subject.Subject;

import org.springframework.beans.factory.annotation.Autowired;

import org.springframework.stereotype.Controller;

import org.springframework.ui.Model;

import org.springframework.web.bind.annotation.GetMapping;

import org.springframework.web.bind.annotation.RequestMapping;

import org.springframework.web.bind.annotation.ResponseBody;

@Controller

public class ShiroController {

    @Autowired(required = false)

    private UserMapper userMapper;

    @GetMapping({"/","/index"})

    public String sayShiro(Model model){

        model.addAttribute("msg","hello shiro!!!");

        return "index";

    }

//    @GetMapping("/userList")

//    public String userList(Model model){

//        List<User> users = userMapper.queryUserByName();

//        model.addAttribute("msg",users);

//

//        users.forEach(System.out::println);

//        return "user/showUsers";

//    }

    @GetMapping("/user/add")

    public String add(){

        return "user/add";

    }

    @GetMapping("/user/update")

    public String update(){

        return "user/update";

    }

    @GetMapping("/toLogin")

    public String toLogin(){

        return "user/login";

    }

    @RequestMapping("/noauth")

    @ResponseBody

    public String noAuth(){

        return "未经授权无法登陆!";

    }

    @RequestMapping("/login")

    public String login(String username, String password, Model model){

        // 获取当前用户

        Subject subject = SecurityUtils.getSubject();

        // 封装用户的登录数据

        UsernamePasswordToken token = new UsernamePasswordToken(username, password);

        try {

            subject.login(token); // 执行登录的方法,如果没有异常,就登录成功!

            return "index";

        }catch (UnknownAccountException e){

            model.addAttribute("msg","用户名错误!");

            return "user/login";

        }

        catch (IncorrectCredentialsException e){

            model.addAttribute("msg","密码错误!");

            return "user/login";

        }

    }

}
UserMapper.java 查询数据库
package com.example.shiro_springboot.mapper;

import com.example.shiro_springboot.pojo.User;

import org.apache.ibatis.annotations.Mapper;

import org.apache.ibatis.annotations.Select;

import org.springframework.stereotype.Repository;

@Repository

@Mapper

//@Component

public interface UserMapper {

    @Select("select * from user where name = #{name}")

    public User queryUserByName(String name);

}
实体类pojo/User.java
package com.example.shiro_springboot.pojo;

import lombok.AllArgsConstructor;

import lombok.Data;

import lombok.NoArgsConstructor;

import java.util.Date;

@Data

@NoArgsConstructor

@AllArgsConstructor

public class User {

    private Integer id;

    private String perms;

    private String name;

    private String pwd;

    private Integer age;

    private String email;

    private Integer version;

    private Date gmt_create;

    private Date gmt_modified;

}
十二、Swagger
前后端分离——技术栈 (Vue + Springboot)
- Swagger版本3.0.x 就不支持 访问localhost:8080/swagger-ui.html接口访问到
- 而Swagger的2.9.x则支持
swagger依赖
<!--        swagger依赖-->

        <!-- https://mvnrepository.com/artifact/io.springfox/springfox-swagger2 -->

        <dependency>

            <groupId>io.springfox</groupId>

            <artifactId>springfox-swagger2</artifactId>

            <version>2.9.1</version>

        </dependency>

        <!-- https://mvnrepository.com/artifact/io.springfox/springfox-swagger-ui -->

        <dependency>

            <groupId>io.springfox</groupId>

            <artifactId>springfox-swagger-ui</artifactId>

            <version>2.9.1</version>

        </dependency>
SwaggerConfig配置
package com.example.springboot_swagger.config;

import io.swagger.annotations.Api;

import org.springframework.context.annotation.Bean;

import org.springframework.context.annotation.Configuration;

import springfox.documentation.builders.PathSelectors;

import springfox.documentation.builders.RequestHandlerSelectors;

import springfox.documentation.service.ApiInfo;

import springfox.documentation.service.Contact;

import springfox.documentation.spi.DocumentationType;

import springfox.documentation.spring.web.plugins.Docket;

import springfox.documentation.swagger2.annotations.EnableSwagger2;

import java.util.ArrayList;

@Configuration

@EnableSwagger2  //开启Swagger

public class SwaggerConfig {

    //配置了Swagger的Bean实例

    @Bean

    public Docket docket(){

        return new Docket(DocumentationType.SWAGGER_2)

                .apiInfo(apiInfo())

            	// .enable(true)   true表示启动swagger  false表示不启动swagger

                .select()

                // basePackage 表示指定扫描哪个包

                .paths(PathSelectors.ant("/example")) // 过滤路径!

                .build(); // build工厂模式

    }

    // 配置Swagger信息  ApiInfo类

    private ApiInfo apiInfo(){

        return new ApiInfo("阿辉的Swagger",

                "Api Documentation",

                "v1.0",

                "urn:tos",

                new Contact("阿辉", "https://www.baidu.com", "1917523457@qq.com"),

                "Apache 2.0",

                "http://www.apache.org/licenses/LICENSE-2.0",

                new ArrayList());

    }

}
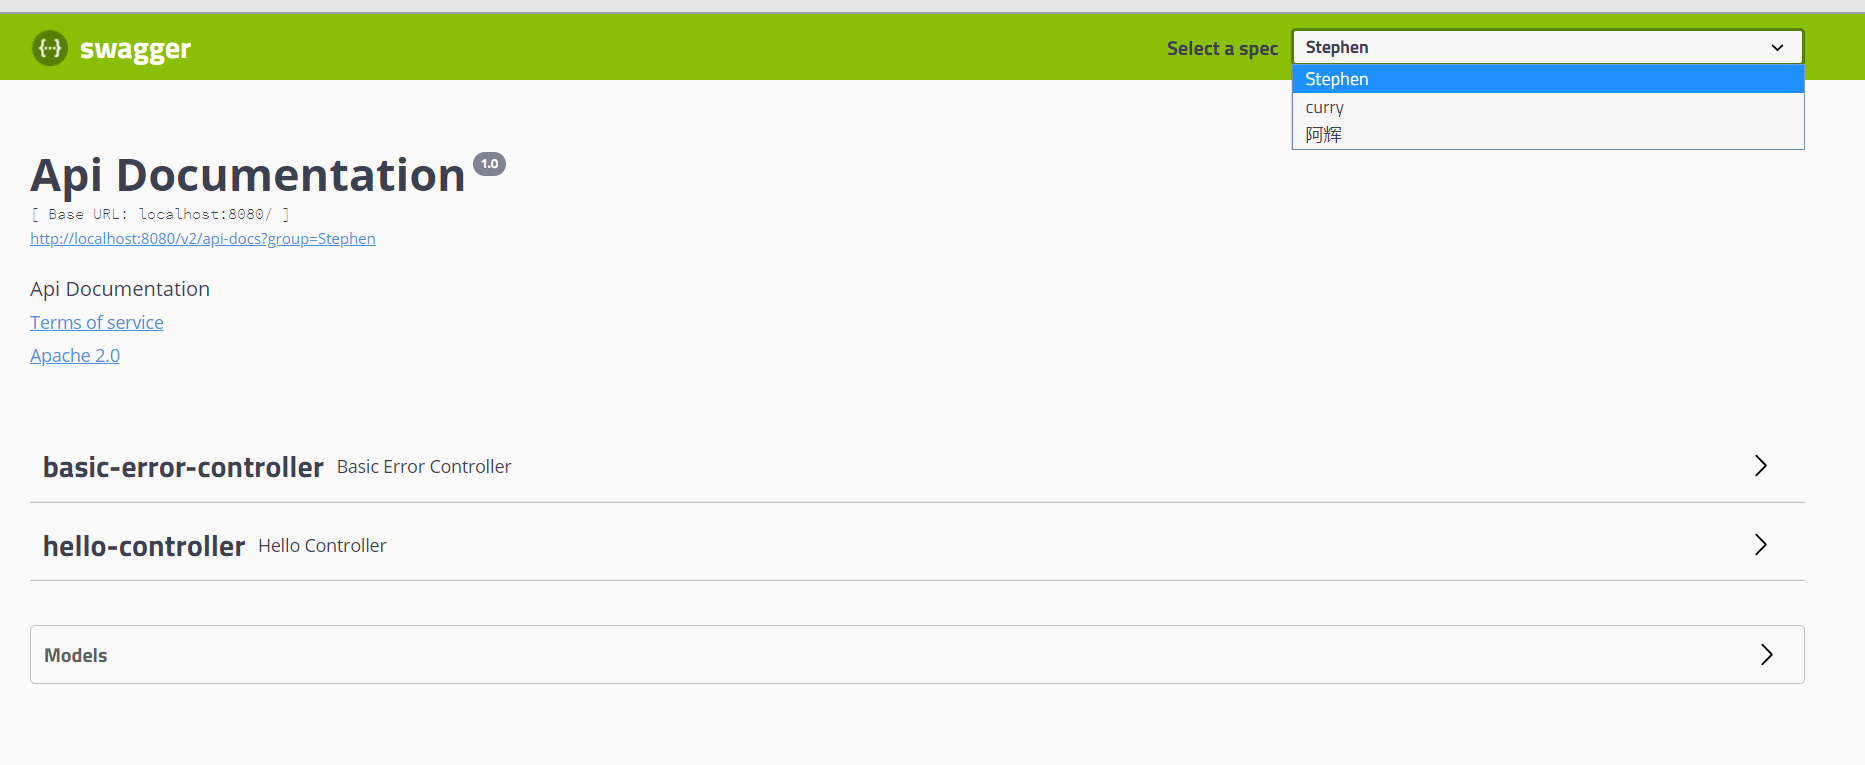
swagger 实现顶部分组功能!
- 不同分组实现不同环境的接口
    @Bean

    public Docket docket(){

        // 显示swagger环境

        Profiles profiles = Profiles.of("dev","test");

        System.out.println(profiles+"dasdas");

        return new Docket(DocumentationType.SWAGGER_2)

                .apiInfo(apiInfo())

                // 如何做到多个分组  多个docket实例就可以做到多个分组 及多个docket方法!方法名不同即可

                .groupName("阿辉")

                .select()

                // basePackage 表示指定扫描哪个包

                .paths(PathSelectors.ant("/example")) // 过滤路径!

                .build(); // build工厂模式

    }

    @Bean

    public Docket docket2(){

        return new Docket(DocumentationType.SWAGGER_2).groupName("Stephen");

    }

    @Bean

    public Docket docket3(){

        return new Docket(DocumentationType.SWAGGER_2).groupName("curry");

    }
十三、异步任务实现
service层实现多线程模拟
package com.example.demo.service;

import org.springframework.scheduling.annotation.Async;

import org.springframework.stereotype.Service;

@Service

public class TaskService {

    @Async // 表示为异步锁!

    public void ok() throws InterruptedException {

        Thread.sleep(3000);

        System.out.println("数据正在处理中……");

    }

}
controller层实现
- Controller调用service层
package com.example.demo.controller;

import com.example.demo.service.TaskService;

import org.springframework.beans.factory.annotation.Autowired;

import org.springframework.stereotype.Controller;

import org.springframework.web.bind.annotation.RequestMapping;

import org.springframework.web.bind.annotation.ResponseBody;

@Controller

public class TaskController {

    @Autowired

    TaskService taskService;

    @RequestMapping("/hello")

    @ResponseBody

    public String sayHello() throws InterruptedException {

        taskService.ok();

        return "OK";

    }

}
实现异步任务调度 还需要在主类上开启异步
@EnableAsync
定时任务的执行
corn表达式的执行
需要在主类上加入定时任务执行的注解
@EnableScheduling //开启定时任务
需要在被执行的方法的上面加上
@Scheduled(cron = "0/5 * * * * ?")
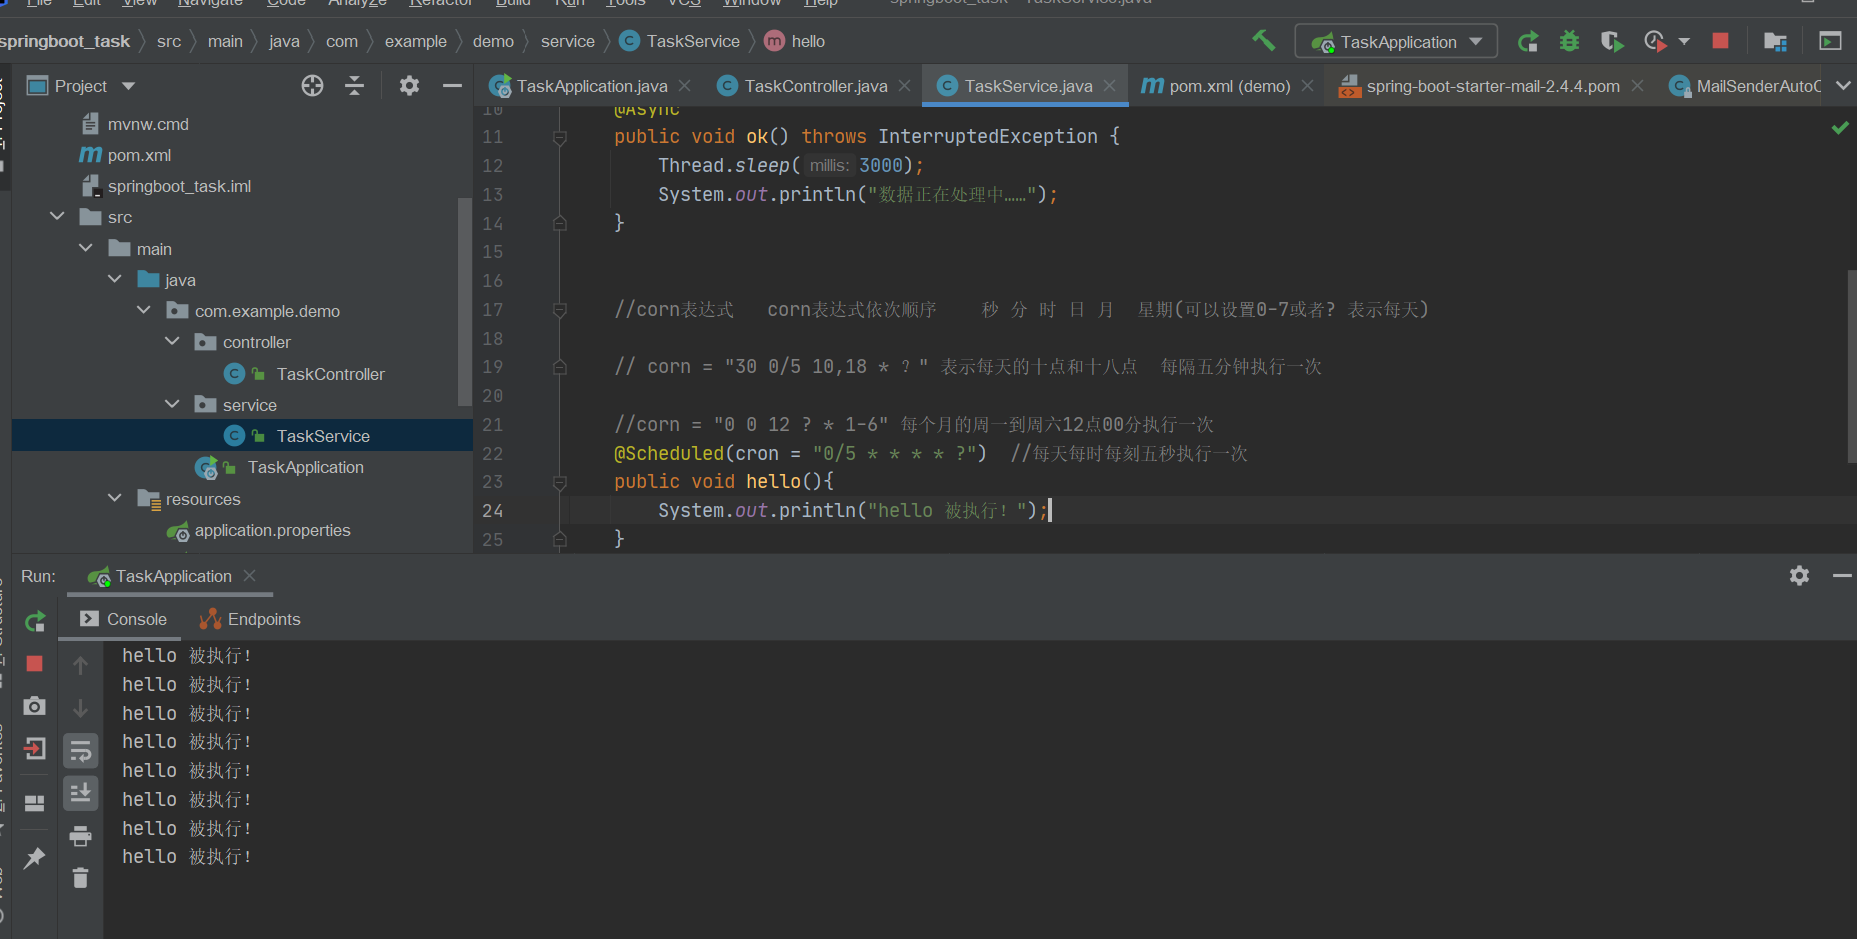
package com.example.demo.service;

import org.springframework.scheduling.annotation.Async;

import org.springframework.scheduling.annotation.Scheduled;

import org.springframework.stereotype.Service;

@Service

public class TaskService {

    //corn表达式   corn表达式依次顺序    秒 分 时 日 月  星期(可以设置0-7或者? 表示每天)

    // corn = "30 0/5 10,18 * ?" 表示每天的十点和十八点  每隔五分钟执行一次

    //corn = "0 0 12 ? * 1-6" 每个月的周一到周六12点00分执行一次

    @Scheduled(cron = "0/5 * * * * ?")  //每天每时每刻五秒执行一次

    public void hello(){

        System.out.println("hello 被执行!");

    }

}
十四、序列化的实现
springboot集成redis ,redis存储对象需要使用到序列化方式去传递!
package com.example.config;

import com.fasterxml.jackson.annotation.JsonAutoDetect;

import com.fasterxml.jackson.annotation.PropertyAccessor;

import com.fasterxml.jackson.databind.ObjectMapper;

import org.springframework.context.annotation.Bean;

import org.springframework.context.annotation.Configuration;

import org.springframework.data.redis.connection.RedisConnectionFactory;

import org.springframework.data.redis.core.RedisTemplate;

import org.springframework.data.redis.serializer.Jackson2JsonRedisSerializer;

import org.springframework.data.redis.serializer.StringRedisSerializer;

@Configuration

public class RedisConfig {

    @Bean

    @SuppressWarnings("all") // 消除所有的警告问题

    public RedisTemplate<String, Object> redisTemplate(RedisConnectionFactory redisConnectionFactory) {

        // 公司序列化的模板!!!!

        // 为了开发方便,一般使用<String, Object>

        RedisTemplate<String, Object> template = new RedisTemplate<>();

        template.setConnectionFactory(redisConnectionFactory);

        //Json序列化配置

        Jackson2JsonRedisSerializer jackson2JsonRedisSerializer = new Jackson2JsonRedisSerializer(Object.class);

        ObjectMapper om = new ObjectMapper();

        om.setVisibility(PropertyAccessor.ALL, JsonAutoDetect.Visibility.ANY);

        om.enableDefaultTyping(ObjectMapper.DefaultTyping.NON_FINAL);

        jackson2JsonRedisSerializer.setObjectMapper(om);

        //String的序列化

        StringRedisSerializer stringRedisSerializer = new StringRedisSerializer();

        //Key采用String的序列化方式

        template.setKeySerializer(stringRedisSerializer);

        //hash的key也采用String的序列化方式

        template.setHashKeySerializer(stringRedisSerializer);

        //value序列化方式采用jackson

        template.setValueSerializer(jackson2JsonRedisSerializer);

        //hash的value序列化方式采用Jackson

        template.setHashKeySerializer(jackson2JsonRedisSerializer);

        template.afterPropertiesSet();

        return template;

    }

}
把redis常用操作集中一起 定义成一个组件
- RedisUtil
package com.example.utils;

import org.springframework.beans.factory.annotation.Autowired;

import org.springframework.data.redis.core.RedisTemplate;

import org.springframework.stereotype.Component;

import org.springframework.util.CollectionUtils;

import java.util.Collection;

import java.util.List;

import java.util.Map;

import java.util.Set;

import java.util.concurrent.TimeUnit;

@Component

public class RedisUtil {

    @Autowired //自动装配我们上面所配置的序列化方式

    private RedisTemplate<String, Object> redisTemplate;

    // =============================common============================

    /**

     * 指定缓存失效时间

     * @param key  键

     * @param time 时间(秒)

     */

    public boolean expire(String key, long time) {

        try {

            if (time > 0) {

                redisTemplate.expire(key, time, TimeUnit.SECONDS);

            }

            return true;

        } catch (Exception e) {

            e.printStackTrace();

            return false;

        }

    }

    /**

     * 根据key 获取过期时间

     * @param key 键 不能为null

     * @return 时间(秒) 返回0代表为永久有效

     */

    public long getExpire(String key) {

        return redisTemplate.getExpire(key, TimeUnit.SECONDS);

    }

    /**

     * 判断key是否存在

     * @param key 键

     * @return true 存在 false不存在

     */

    public boolean hasKey(String key) {

        try {

            return redisTemplate.hasKey(key);

        } catch (Exception e) {

            e.printStackTrace();

            return false;

        }

    }

    /**

     * 删除缓存

     * @param key 可以传一个值 或多个

     */

    @SuppressWarnings("unchecked")

    public void del(String... key) {

        if (key != null && key.length > 0) {

            if (key.length == 1) {

                redisTemplate.delete(key[0]);

            } else {

                redisTemplate.delete((Collection<String>) CollectionUtils.arrayToList(key));

            }

        }

    }

    // ============================String=============================

    /**

     * 普通缓存获取

     * @param key 键

     * @return 值

     */

    public Object get(String key) {

        return key == null ? null : redisTemplate.opsForValue().get(key);

    }

    /**

     * 普通缓存放入

     * @param key   键

     * @param value 值

     * @return true成功 false失败

     */

    public boolean set(String key, Object value) {

        try {

            redisTemplate.opsForValue().set(key, value);

            return true;

        } catch (Exception e) {

            e.printStackTrace();

            return false;

        }

    }

    /**

     * 普通缓存放入并设置时间

     * @param key   键

     * @param value 值

     * @param time  时间(秒) time要大于0 如果time小于等于0 将设置无限期

     * @return true成功 false 失败

     */

    public boolean set(String key, Object value, long time) {

        try {

            if (time > 0) {

                redisTemplate.opsForValue().set(key, value, time, TimeUnit.SECONDS);

            } else {

                set(key, value);

            }

            return true;

        } catch (Exception e) {

            e.printStackTrace();

            return false;

        }

    }

    /**

     * 递增

     * @param key   键

     * @param delta 要增加几(大于0)

     */

    public long incr(String key, long delta) {

        if (delta < 0) {

            throw new RuntimeException("递增因子必须大于0");

        }

        return redisTemplate.opsForValue().increment(key, delta);

    }

    /**

     * 递减

     * @param key   键

     * @param delta 要减少几(小于0)

     */

    public long decr(String key, long delta) {

        if (delta < 0) {

            throw new RuntimeException("递减因子必须大于0");

        }

        return redisTemplate.opsForValue().increment(key, -delta);

    }

    // ================================Map=================================

    /**

     * HashGet

     * @param key  键 不能为null

     * @param item 项 不能为null

     */

    public Object hget(String key, String item) {

        return redisTemplate.opsForHash().get(key, item);

    }

    /**

     * 获取hashKey对应的所有键值

     * @param key 键

     * @return 对应的多个键值

     */

    public Map<Object, Object> hmget(String key) {

        return redisTemplate.opsForHash().entries(key);

    }

    /**

     * HashSet

     * @param key 键

     * @param map 对应多个键值

     */

    public boolean hmset(String key, Map<String, Object> map) {

        try {

            redisTemplate.opsForHash().putAll(key, map);

            return true;

        } catch (Exception e) {

            e.printStackTrace();

            return false;

        }

    }

    /**

     * HashSet 并设置时间

     * @param key  键

     * @param map  对应多个键值

     * @param time 时间(秒)

     * @return true成功 false失败

     */

    public boolean hmset(String key, Map<String, Object> map, long time) {

        try {

            redisTemplate.opsForHash().putAll(key, map);

            if (time > 0) {

                expire(key, time);

            }

            return true;

        } catch (Exception e) {

            e.printStackTrace();

            return false;

        }

    }

    /**

     * 向一张hash表中放入数据,如果不存在将创建

     *

     * @param key   键

     * @param item  项

     * @param value 值

     * @return true 成功 false失败

     */

    public boolean hset(String key, String item, Object value) {

        try {

            redisTemplate.opsForHash().put(key, item, value);

            return true;

        } catch (Exception e) {

            e.printStackTrace();

            return false;

        }

    }

    /**

     * 向一张hash表中放入数据,如果不存在将创建

     *

     * @param key   键

     * @param item  项

     * @param value 值

     * @param time  时间(秒) 注意:如果已存在的hash表有时间,这里将会替换原有的时间

     * @return true 成功 false失败

     */

    public boolean hset(String key, String item, Object value, long time) {

        try {

            redisTemplate.opsForHash().put(key, item, value);

            if (time > 0) {

                expire(key, time);

            }

            return true;

        } catch (Exception e) {

            e.printStackTrace();

            return false;

        }

    }

    /**

     * 删除hash表中的值

     *

     * @param key  键 不能为null

     * @param item 项 可以使多个 不能为null

     */

    public void hdel(String key, Object... item) {

        redisTemplate.opsForHash().delete(key, item);

    }

    /**

     * 判断hash表中是否有该项的值

     *

     * @param key  键 不能为null

     * @param item 项 不能为null

     * @return true 存在 false不存在

     */

    public boolean hHasKey(String key, String item) {

        return redisTemplate.opsForHash().hasKey(key, item);

    }

    /**

     * hash递增 如果不存在,就会创建一个 并把新增后的值返回

     *

     * @param key  键

     * @param item 项

     * @param by   要增加几(大于0)

     */

    public double hincr(String key, String item, double by) {

        return redisTemplate.opsForHash().increment(key, item, by);

    }

    /**

     * hash递减

     *

     * @param key  键

     * @param item 项

     * @param by   要减少记(小于0)

     */

    public double hdecr(String key, String item, double by) {

        return redisTemplate.opsForHash().increment(key, item, -by);

    }

    // ============================set=============================

    /**

     * 根据key获取Set中的所有值

     * @param key 键

     * @return

     */

    public Set<Object> sGet(String key) {

        try {

            return redisTemplate.opsForSet().members(key);

        } catch (Exception e) {

            e.printStackTrace();

            return null;

        }

    }

    /**

     * 根据value从一个set中查询,是否存在

     *

     * @param key   键

     * @param value 值

     * @return true 存在 false不存在

     */

    public boolean sHasKey(String key, Object value) {

        try {

            return redisTemplate.opsForSet().isMember(key, value);

        } catch (Exception e) {

            e.printStackTrace();

            return false;

        }

    }

    /**

     * 将数据放入set缓存

     *

     * @param key    键

     * @param values 值 可以是多个

     * @return 成功个数

     */

    public long sSet(String key, Object... values) {

        try {

            return redisTemplate.opsForSet().add(key, values);

        } catch (Exception e) {

            e.printStackTrace();

            return 0;

        }

    }

    /**

     * 将set数据放入缓存

     *

     * @param key    键

     * @param time   时间(秒)

     * @param values 值 可以是多个

     * @return 成功个数

     */

    public long sSetAndTime(String key, long time, Object... values) {

        try {

            Long count = redisTemplate.opsForSet().add(key, values);

            if (time > 0)

                expire(key, time);

            return count;

        } catch (Exception e) {

            e.printStackTrace();

            return 0;

        }

    }

    /**

     * 获取set缓存的长度

     *

     * @param key 键

     */

    public long sGetSetSize(String key) {

        try {

            return redisTemplate.opsForSet().size(key);

        } catch (Exception e) {

            e.printStackTrace();

            return 0;

        }

    }

    /**

     * 移除值为value的

     *

     * @param key    键

     * @param values 值 可以是多个

     * @return 移除的个数

     */

    public long setRemove(String key, Object... values) {

        try {

            Long count = redisTemplate.opsForSet().remove(key, values);

            return count;

        } catch (Exception e) {

            e.printStackTrace();

            return 0;

        }

    }

    // ===============================list=================================

    /**

     * 获取list缓存的内容

     *  @param key   键

     * @param start 开始

     * @param end   结束 0 到 -1代表所有值

     * @return

     */

    public List<Object> lGet(String key, long start, long end) {

        try {

            return redisTemplate.opsForList().range(key, start, end);

        } catch (Exception e) {

            e.printStackTrace();

            return null;

        }

    }

    /**

     * 获取list缓存的长度

     *

     * @param key 键

     */

    public long lGetListSize(String key) {

        try {

            return redisTemplate.opsForList().size(key);

        } catch (Exception e) {

            e.printStackTrace();

            return 0;

        }

    }

    /**

     * 通过索引 获取list中的值

     *

     * @param key   键

     * @param index 索引 index>=0时, 0 表头,1 第二个元素,依次类推;index<0时,-1,表尾,-2倒数第二个元素,依次类推

     */

    public Object lGetIndex(String key, long index) {

        try {

            return redisTemplate.opsForList().index(key, index);

        } catch (Exception e) {

            e.printStackTrace();

            return null;

        }

    }

    /**

     * 将list放入缓存

     *

     * @param key   键

     * @param value 值

     */

    public boolean lSet(String key, Object value) {

        try {

            redisTemplate.opsForList().rightPush(key, value);

            return true;

        } catch (Exception e) {

            e.printStackTrace();

            return false;

        }

    }

    /**

     * 将list放入缓存

     * @param key   键

     * @param value 值

     * @param time  时间(秒)

     */

    public boolean lSet(String key, Object value, long time) {

        try {

            redisTemplate.opsForList().rightPush(key, value);

            if (time > 0)

                expire(key, time);

            return true;

        } catch (Exception e) {

            e.printStackTrace();

            return false;

        }

    }

    /**

     * 将list放入缓存

     *

     * @param key   键

     * @param value 值

     * @return

     */

    public boolean lSet(String key, List<Object> value) {

        try {

            redisTemplate.opsForList().rightPushAll(key, value);

            return true;

        } catch (Exception e) {

            e.printStackTrace();

            return false;

        }

    }

    /**

     * 将list放入缓存

     *

     * @param key   键

     * @param value 值

     * @param time  时间(秒)

     * @return

     */

    public boolean lSet(String key, List<Object> value, long time) {

        try {

            redisTemplate.opsForList().rightPushAll(key, value);

            if (time > 0)

                expire(key, time);

            return true;

        } catch (Exception e) {

            e.printStackTrace();

            return false;

        }

    }

    /**

     * 根据索引修改list中的某条数据

     *

     * @param key   键

     * @param index 索引

     * @param value 值

     * @return

     */

    public boolean lUpdateIndex(String key, long index, Object value) {

        try {

            redisTemplate.opsForList().set(key, index, value);

            return true;

        } catch (Exception e) {

            e.printStackTrace();

            return false;

        }

    }

    /**

     * 移除N个值为value

     *

     * @param key   键

     * @param count 移除多少个

     * @param value 值

     * @return 移除的个数

     */

    public long lRemove(String key, long count, Object value) {

        try {

            Long remove = redisTemplate.opsForList().remove(key, count, value);

            return remove;

        } catch (Exception e) {

            e.printStackTrace();

            return 0;

        }

    }

}
走进springboot的更多相关文章
- SpringBoot(一)走进Springboot的世界
什么是spring boot Spring Boot是由Pivotal团队提供的全新框架,其设计目的是用来简化新Spring应用的初始搭建以及开发过程.该框架使用了特定的方式来进行配置,从而使开发人员 ...
- SpringBoot从入门到精通教程(一)
写在前面的话: 在很早之前,记笔记时候,我就一直在思考一个问题,我记笔记是为了什么,我一直想不明白 ,后面发现技术跟新迭代的速度实在太快了,笔记刚纪完,技术又跟新了,于是我想了想干脆边写博客,边记笔记 ...
- SpringBoot-总结
SpringBoot一站式开发 官网:https://spring.io/projects/spring-boot Spring Boot可以轻松创建独立的.基于Spring的生产级应用程序,它可以让 ...
- 走进JavaWeb技术世界16:极简配置的SpringBoot
一位阿里 Java 工程师的技术小站.作者黄小斜,专注 Java 相关技术:SSM.SpringBoot.MySQL.分布式.中间件.集群.Linux.网络.多线程,偶尔讲点Docker.ELK,同时 ...
- 基于SpringBoot+SSM实现的Dota2资料库智能管理平台
Dota2资料库智能管理平台的设计与实现 摘 要 当今社会,游戏产业蓬勃发展,如PC端的绝地求生.坦克世界.英雄联盟,再到移动端的王者荣耀.荒野行动的火爆.都离不开科学的游戏管理系统,游戏管理系 ...
- 使用IDEA创建SpringBoot自定义注解
创建SpringBoot项目 添加组织名 选择web 输入项目名称 创建后目录结构为 使用Spring的AOP先加入Maven依赖 <dependency> <groupId> ...
- 走进JavaWeb技术世界1:JavaWeb的由来和基础知识
本系列文章将整理到我在GitHub上的<Java面试指南>仓库,更多精彩内容请到我的仓库里查看 https://github.com/h2pl/Java-Tutorial 喜欢的话麻烦点下 ...
- 走进JavaWeb技术世界14:Mybatis入门
本系列文章将整理到我在GitHub上的<Java面试指南>仓库,更多精彩内容请到我的仓库里查看 https://github.com/h2pl/Java-Tutorial 喜欢的话麻烦点下 ...
- 走进JavaWeb技术世界7:Tomcat和其他WEB容器的区别
本系列文章将整理到我在GitHub上的<Java面试指南>仓库,更多精彩内容请到我的仓库里查看 https://github.com/h2pl/Java-Tutorial 喜欢的话麻烦点下 ...
随机推荐
- console.warn All In One
console.warn All In One ️ FBI 警告 // console 简介 // consoleCtt: function () { // if (window.console &a ...
- how to config custom process.env in node.js
how to config custom process.env in node.js process.env APP_ENV NODE_ENV https://nodejs.org/api/proc ...
- vue SSR & asyncData & nuxt.js
vue SSR & asyncData & nuxt.js https://zh.nuxtjs.org/api/ https://www.cnblogs.com/xgqfrms/p/1 ...
- DAPHNE PATEL:有主见的人,才能活出精彩人生
有主见的人,会活出什么样子呢?近日,NGK灵石团队技术副总裁DAPHNE 女士给出了答案. DAPHNE PATEL表示,有主见的人,才能活出精彩的人生.为什么这么说呢? DAPHNE PATEL用自 ...
- JUC并发集合类CopyOnWriteList
CopyOnWriteList简介 ArrayList是线程不安全的,于是JDK新增加了一个线程并发安全的List--CopyOnWriteList,中心思想就是copy-on-write,简单来说是 ...
- Dapr 知多少 | 分布式应用运行时
Intro Dapr 官方团队已于最近(2021.1.17)正式发布Dapr v1.0,Dapr已正式生产可用,可以部署到自托管环境或 Kubernetes 集群.对于绝大多数开发者来说,想必对Dap ...
- Golang 实现 Redis(9): 使用GeoHash 搜索附近的人
本文是使用 golang 实现 redis 系列的第九篇,主要介绍如何使用 GeoHash 实现搜索附近的人. 搜索附近的POI是一个非常常见的功能,它的技术难点在于地理位置是二维的(经纬度)而我们常 ...
- Kubernetes中分布式存储Rook-Ceph的使用:一个ASP.NET Core MVC的案例
在<Kubernetes中分布式存储Rook-Ceph部署快速演练>文章中,我快速介绍了Kubernetes中分布式存储Rook-Ceph的部署过程,这里介绍如何在部署于Kubernete ...
- Static Proxy
0.静态代理 静态代理的实现比较简单,代理类通过实现与目标对象相同的接口,并在类中维护代理对象.通过构造器塞入目标对象,赋值给代理对象,进而执行代理对象实现的接口方法,并实现前拦截,后拦截等所需的业务 ...
- 如何掌握 C 语言的一大利器——指针?
一览:初学 C 语言时,大家肯定都被指针这个概念折磨过,一会指向这里.一会指向那里,最后把自己给指晕了.本文从一些基本的概念开始介绍指针的基本使用. 内存 考虑到初学 C 语言时,大家可能对计算机的组 ...
