Caffe源码解析5:Conv_Layer
转载请注明出处,楼燚(yì)航的blog,http://home.cnblogs.com/louyihang-loves-baiyan/
Vision_layer里面主要是包括了一些关于一些视觉上的操作,比如卷积、反卷积、池化等等。这里的类跟data layer一样好很多种继承关系。主要包括了这几个类,其中CuDNN分别是CUDA版本,这里先不讨论,在这里先讨论ConvolutionLayer
- BaseConvolutionLayer
- ConvolutionLaye
- DeconvolutionLayer
- CuDNNConvolutionLayer
- Im2colLayer
- LRNLayer
- CuDNNLRNLayer
- CuDNNLCNLayer
- PoolingLayer
- CuDNNPoolingLayer
- SPPLayer
这里我画了一个类图,将关系梳理了一下:

BaseConvolutionLayer
其继承自Layer,是一个卷积以及反卷积操作的基类,首先我们来看BaseConvolutionLayer的LayerSetUp函数
void BaseConvolutionLayer<Dtype>::LayerSetUp(const vector<Blob<Dtype>*>& bottom,

      const vector<Blob<Dtype>*>& top)

  //首先这里主要是在配置卷积kernel 的size,padding,stride以及inputs

  ConvolutionParameter conv_param = this->layer_param_.convolution_param();

  force_nd_im2col_ = conv_param.force_nd_im2col();

  channel_axis_ = bottom[0]->CanonicalAxisIndex(conv_param.axis());

  const int first_spatial_axis = channel_axis_ + 1;

  const int num_axes = bottom[0]->num_axes();

  num_spatial_axes_ = num_axes - first_spatial_axis;

  CHECK_GE(num_spatial_axes_, 0);

  vector<int> bottom_dim_blob_shape(1, num_spatial_axes_ + 1);

  vector<int> spatial_dim_blob_shape(1, std::max(num_spatial_axes_, 1));

  // 设置kernel的dimensions

  kernel_shape_.Reshape(spatial_dim_blob_shape);

  int* kernel_shape_data = kernel_shape_.mutable_cpu_data();
接着是设置相应的stride dimensions,对于2D,设置在h和w方向上的stride,代码太长列出简要的
pad_.Reshape(spatial_dim_blob_shape);

int* pad_data = pad_.mutable_cpu_data();

pad_data[0] = conv_param.pad_h();

pad_data[1] = conv_param.pad_w();

......一堆if else判断
对于kernel的pad也做相应设置
pad_.Reshape(spatial_dim_blob_shape);

int* pad_data = pad_.mutable_cpu_data();

pad_data[0] = conv_param.pad_h();

pad_data[1] = conv_param.pad_w();
接下来是对widhts 和bias左设置和填充,其中blob[0]里面存放的是filter weights,而blob[1]里面存放的是biases,当然biases是可选的,也可以没有
//设置相应的shape,并检查

vector<int> weight_shape(2);

weight_shape[0] = conv_out_channels_;

weight_shape[1] = conv_in_channels_ / group_;

bias_term_ = this->layer_param_.convolution_param().bias_term();

vector<int> bias_shape(bias_term_, num_output_);

//填充权重

this->blobs_[0].reset(new Blob<Dtype>(weight_shape));

shared_ptr<Filler<Dtype> > weight_filler(GetFiller<Dtype>(

    this->layer_param_.convolution_param().weight_filler()));

weight_filler->Fill(this->blobs_[0].get());

//填充偏置项

if (bias_term_) {

  this->blobs_[1].reset(new Blob<Dtype>(bias_shape));

  shared_ptr<Filler<Dtype> > bias_filler(GetFiller<Dtype>(

      this->layer_param_.convolution_param().bias_filler()));

  bias_filler->Fill(this->blobs_[1].get());

}
ConvolutionLayer
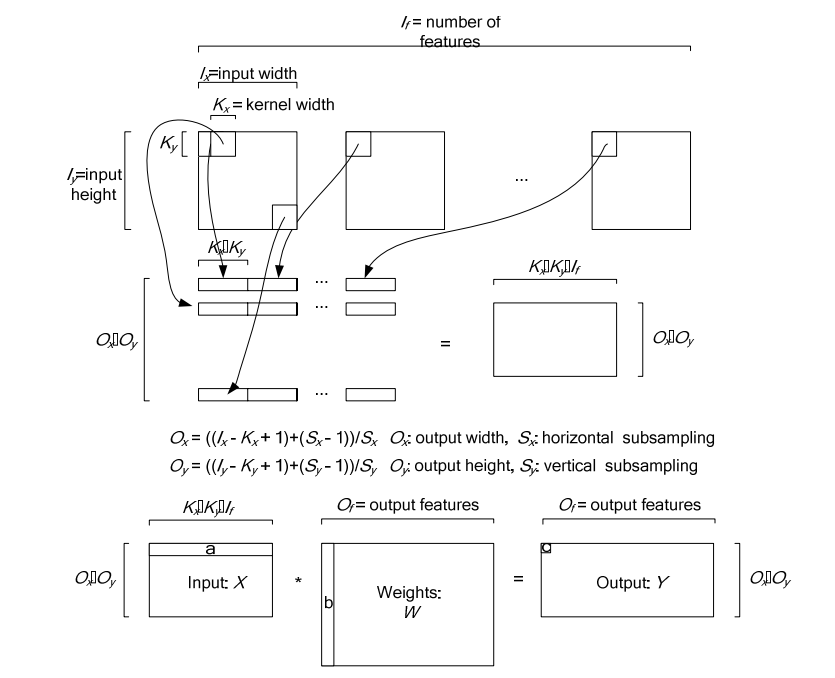
ConvolutionLayer继承了BaseConvolutionLayer,主要作用就是将一副image做卷积操作,使用学到的filter的参数和biaes。同时在Caffe里面,卷积操作做了优化,变成了一个矩阵相乘的操作。其中有两个比较主要的函数是im2col以及col2im。
图中上半部分是一个传统卷积,下图是一个矩阵相乘的版本

下图是在一个卷积层中将卷积操作展开的具体操作过程,他里面按照卷积核的大小取数据然后展开,在同一张图里的不同卷积核选取的逐行摆放,不同N的话,就在同一行后面继续拼接,不同个可以是多个通道,但是需要注意的是同一行里面每一段都应该对应的是原图中中一个位置的卷积窗口。
对于卷积层中的卷积操作,还有一个group的概念要说明一下,groups是代表filter 组的个数。引入gruop主要是为了选择性的连接卷基层的输入端和输出端的channels,否则参数会太多。每一个group 和1/ group的input 通道和 1/group 的output通道进行卷积操作。比如有4个input, 8个output,那么1-4属于第一组,5-8属于第二个gruop
ConvolutionLayer里面,主要重写了Forward_cpu和Backward_cpu
void ConvolutionLayer<Dtype>::Forward_cpu(const vector<Blob<Dtype>*>& bottom,

      const vector<Blob<Dtype>*>& top) {

  const Dtype* weight = this->blobs_[0]->cpu_data();

  for (int i = 0; i < bottom.size(); ++i) {

    const Dtype* bottom_data = bottom[i]->cpu_data();

    Dtype* top_data = top[i]->mutable_cpu_data();

    for (int n = 0; n < this->num_; ++n) {

      this->forward_cpu_gemm(bottom_data + n * this->bottom_dim_, weight,

          top_data + n * this->top_dim_);

      if (this->bias_term_) {

        const Dtype* bias = this->blobs_[1]->cpu_data();

        this->forward_cpu_bias(top_data + n * this->top_dim_, bias);

      }

    }

  }

}
可以看到其实这里面他调用了forward_cpu_gemm,而这个函数内部又调用了math_function里面的caffe_cpu_gemm的通用矩阵相乘接口,GEMM的全称是General Matrix Matrix Multiply。其基本形式如下:
\]
template <typename Dtype>

void ConvolutionLayer<Dtype>::Backward_cpu(const vector<Blob<Dtype>*>& top,

      const vector<bool>& propagate_down, const vector<Blob<Dtype>*>& bottom) {

   //反向传播梯度误差

  const Dtype* weight = this->blobs_[0]->cpu_data();

  Dtype* weight_diff = this->blobs_[0]->mutable_cpu_diff();

  for (int i = 0; i < top.size(); ++i) {

    const Dtype* top_diff = top[i]->cpu_diff();

    const Dtype* bottom_data = bottom[i]->cpu_data();

    Dtype* bottom_diff = bottom[i]->mutable_cpu_diff();

	//如果有bias项,计算Bias导数

    if (this->bias_term_ && this->param_propagate_down_[1]) {

      Dtype* bias_diff = this->blobs_[1]->mutable_cpu_diff();

      for (int n = 0; n < this->num_; ++n) {

        this->backward_cpu_bias(bias_diff, top_diff + n * this->top_dim_);

      }

    }

	//计算weight

    if (this->param_propagate_down_[0] || propagate_down[i]) {

      for (int n = 0; n < this->num_; ++n) {

        // 计算weights权重的梯度

        if (this->param_propagate_down_[0]) {

          this->weight_cpu_gemm(bottom_data + n * this->bottom_dim_,

              top_diff + n * this->top_dim_, weight_diff);

        }

        //计算botttom数据的梯度,下后传递

        if (propagate_down[i]) {

          this->backward_cpu_gemm(top_diff + n * this->top_dim_, weight,

              bottom_diff + n * this->bottom_dim_);

        }

      }

    }

  }

}
Caffe源码解析5:Conv_Layer的更多相关文章
- Caffe源码解析7:Pooling_Layer
转载请注明出处,楼燚(yì)航的blog,http://home.cnblogs.com/louyihang-loves-baiyan/ Pooling 层一般在网络中是跟在Conv卷积层之后,做采样 ...
- Caffe源码解析6:Neuron_Layer
转载请注明出处,楼燚(yì)航的blog,http://home.cnblogs.com/louyihang-loves-baiyan/ NeuronLayer,顾名思义这里就是神经元,激活函数的相应 ...
- Caffe源码解析4: Data_layer
转载请注明出处,楼燚(yì)航的blog,http://home.cnblogs.com/louyihang-loves-baiyan/ data_layer应该是网络的最底层,主要是将数据送给blo ...
- Caffe源码解析3:Layer
转载请注明出处,楼燚(yì)航的blog,http://home.cnblogs.com/louyihang-loves-baiyan/ layer这个类可以说是里面最终的一个基本类了,深度网络呢就是 ...
- Caffe源码解析2:SycedMem
转载请注明出处,楼燚(yì)航的blog,http://www.cnblogs.com/louyihang loves baiyan/ 看到SyncedMem就知道,这是在做内存同步的操作.这类个类的 ...
- Caffe源码解析1:Blob
转载请注明出处,楼燚(yì)航的blog,http://www.cnblogs.com/louyihang-loves-baiyan/ 首先看到的是Blob这个类,Blob是作为Caffe中数据流通的 ...
- caffe源码解析
http://blog.csdn.net/lanxuecc/article/details/53186613
- caffe源码阅读
参考网址:https://www.cnblogs.com/louyihang-loves-baiyan/p/5149628.html 1.caffe代码层次熟悉blob,layer,net,solve ...
- 【Caffe】源码解析----caffe.proto (转载)
分析caffe源码,看首先看caffe.proto,是明智的选择.好吧,我不是创造者,只是搬运工. 原文地址:http://blog.csdn.net/qq_16055159/article/deta ...
随机推荐
- 重温Bootstrap
预热 ★ 学习要点 1. 理解其GridSystem(栅格排版): 2. 熟悉其所提供的各种CSS样式及显示效果: 3. 知道提供了哪些直接可用的UI组件,以及如何使用JavaScript去调整其交互 ...
- log4Net(写入日志文件)
这里就简单介绍下log4Net对写入日志文件的一些了解,写入数据库类似,就不在一一介绍了. 首先去log4net下载. 然后我们新建一个控制台应用程序,并引入log4net.dll程序集,log4ne ...
- mysql数据库权限及编码
CREATE DATABASE IF NOT EXISTS yourdbname DEFAULT CHARSET utf8 COLLATE utf8_general_ci; 在tigase中,发送消息 ...
- 使用MyEclipse中servlet对SQL Server 2008的CRUD
1.在MyEclipse下建立Web Project,找到根目录建立Database文件夹和Doc文件夹,Database用于保存数据库信息,Doc用于保存数据库表信息. 2.打开SQL Server ...
- SQL SERVER 2008 R2数据库出现“远程过程调用失败”(0x800706be)错误,怎么办!!
以前SQL Server 2008 不能登陆的时候,总是通过“计算机管理”→“SQL Server服务”更改一下,"SQL Server(MSSQLSERVER)". 可是现在出现 ...
- 天津政府应急系统之GIS一张图(arcgis api for flex)讲解(九)地图定位模块
config.xml文件的配置如下: <widget label="地图定位" config="widgets/esri/Location/LocationWidg ...
- ArcGIS Server的Tile的松散型存储(Exploded)
protected override void GetTileSource(int level, int row, int col, Action<System.Windows.Media.Im ...
- SharePoint 2013 Excel Services ECMAScript 示例之明日限行
前言:最近遇到一个“明日限行”的功能,北京的交通啊,这个不在今天讨论范围内,暂不吐槽,想想代码开发,还要写WebPart部署,很麻烦,而且部署服务器,需要领导审批,想绕过这个麻烦事儿,就想到客户端了, ...
- Googlehack之Github hack
site:aircrk.com smtpsite:aircrk.com smtp @mail.comsite:aircrk.com root passwordsite:aircrk.com smtp ...
- JDBC的操作
package com.liuxianglin.demo.util; import java.sql.Connection; import java.sql.DriverManager; import ...