002.Nginx安装及启动
一 Nginx yum安装
1.1 前置准备
  1 [root@nginx01 ~]# systemctl status firewalld.service	#检查防火墙

  2 [root@nginx01 ~]# getenforce				#检查SELinux

  3 Disabled
提示:建议关闭防火墙,或通过如下方式放通相关80或443端口:
  1 firewall-cmd --permanent --add-port=80/tcp

  2 firewall-cmd --permanent --add-port=443/tcp
1.2 配置yum源
  1 [root@nginx01 ~]# cat > /etc/yum.repos.d/nginx.repo <<EOF

  2 [nginx-stable]

  3 name=nginx stable repo

  4 baseurl=http://nginx.org/packages/centos/\$releasever/\$basearch/

  5 gpgcheck=1

  6 enabled=1

  7 gpgkey=https://nginx.org/keys/nginx_signing.key

  8 module_hotfixes=true

  9

 10 [nginx-mainline]

 11 name=nginx mainline repo

 12 baseurl=http://nginx.org/packages/mainline/centos/\$releasever/\$basearch/

 13 gpgcheck=1

 14 enabled=0

 15 gpgkey=https://nginx.org/keys/nginx_signing.key

 16 module_hotfixes=true

 17 EOF
1.3 安装Nginx
  1 [root@nginx01 ~]# yum -y install nginx

  2 [root@nginx01 ~]# nginx -v

  3 nginx version: nginx/1.18.0
提示:如上安装默认安装为当前最新稳定版,若需要安装开发版,可执行yum-config-manager --enable nginx-mainline,然后yum安装,不建议安装开发版。
参考:https://nginx.org/en/linux_packages.html。
  1 [root@nginx01 ~]# systemctl start nginx

  2 [root@nginx01 ~]# systemctl enable nginx			#启动服务
1.4 测试访问
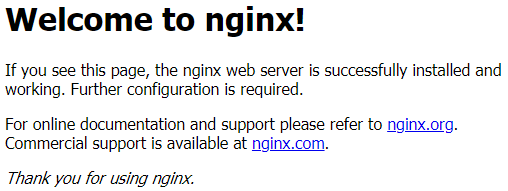
浏览器访问:http://172.24.8.71/
1.5 其他信息
  1 [root@nginx01 ~]# nginx -V			#查看yum安装所编译的模块及参数

  2 nginx version: nginx/1.18.0

  3 built by gcc 4.8.5 20150623 (Red Hat 4.8.5-39) (GCC)

  4 built with OpenSSL 1.0.2k-fips  26 Jan 2017

  5 TLS SNI support enabled

  6 configure arguments: --prefix=/etc/nginx --sbin-path=/usr/sbin/nginx --modules-path=/usr/lib64/nginx/modules --conf-path=/etc/nginx/nginx.conf --error-log-path=/var/log/nginx/error.log --http-log-path=/var/log/nginx/access.log --pid-path=/var/run/nginx.pid --lock-path=/var/run/nginx.lock --http-client-body-temp-path=/var/cache/nginx/client_temp --http-proxy-temp-path=/var/cache/nginx/proxy_temp --http-fastcgi-temp-path=/var/cache/nginx/fastcgi_temp --http-uwsgi-temp-path=/var/cache/nginx/uwsgi_temp --http-scgi-temp-path=/var/cache/nginx/scgi_temp --user=nginx --group=nginx --with-compat --with-file-aio --with-threads --with-http_addition_module --with-http_auth_request_module --with-http_dav_module --with-http_flv_module --with-http_gunzip_module --with-http_gzip_static_module --with-http_mp4_module --with-http_random_index_module --with-http_realip_module --with-http_secure_link_module --with-http_slice_module --with-http_ssl_module --with-http_stub_status_module --with-http_sub_module --with-http_v2_module --with-mail --with-mail_ssl_module --with-stream --with-stream_realip_module --with-stream_ssl_module --with-stream_ssl_preread_module --with-cc-opt='-O2 -g -pipe -Wall -Wp,-D_FORTIFY_SOURCE=2 -fexceptions -fstack-protector-strong --param=ssp-buffer-size=4 -grecord-gcc-switches -m64 -mtune=generic -fPIC' --with-ld-opt='-Wl,-z,relro -Wl,-z,now -pie'

  7 [root@nginx01 ~]# rpm -ql nginx			#查看所安装的文件

  8 [root@nginx01 ~]# rpm -qc nginx 		        #查看相关的配置文件
二 Nginx源码编译安装
2.1 依赖组件
1 [root@nginx01 ~]# yum -y install gcc gcc-c++ wget autoconf pcre pcre-devel openssl openssl-devel openssh-clients net-tools vim ntp screen lrzsz bash-completion bash-completion-extras lvm2 make automake epel-release tree zlib zlib-devel libtool
2.2 编译安装
  1 [root@nginx01 ~]# useradd -s /sbin/nologin -M nginx	#提前创建用户及用户组

  2 [root@nginx01 ~]# wget http://nginx.org/download/nginx-1.17.8.tar.gz

  3 [root@nginx01 ~]# tar -xvf nginx-1.17.8.tar.gz

  4 [root@nginx01 ~]# cd nginx-1.17.8/

  5 [root@nginx01 nginx-1.17.8]# ./configure \

  6 --conf-path=/usr/local/nginx/conf/nginx.conf \

  7 --error-log-path=/var/log/nginx/error.log \

  8 --group=nginx \

  9 --http-client-body-temp-path=/var/cache/nginx/client_temp \

 10 --http-fastcgi-temp-path=/var/cache/nginx/fastcgi_temp \

 11 --http-log-path=/var/log/nginx/access.log \

 12 --http-proxy-temp-path=/var/cache/nginx/proxy_temp \

 13 --http-scgi-temp-path=/var/cache/nginx/scgi_temp \

 14 --http-uwsgi-temp-path=/var/cache/nginx/uwsgi_temp \

 15 --lock-path=/var/run/nginx.lock \

 16 --pid-path=/var/run/nginx.pid \

 17 --prefix=/usr/local/nginx \

 18 --sbin-path=/usr/local/bin/nginx \

 19 --user=nginx \

 20 --with-http_gzip_static_module \

 21 --with-http_realip_module \

 22 --with-http_ssl_module \

 23 --with-http_stub_status_module \

 24 --with-http_sub_module \

 25 --with-http_v2_module \

 26 --with-stream \

 27 --with-stream_realip_module \

 28 --with-stream_ssl_module

 29 [root@nginx01 nginx-1.17.8]# make && make install

 30 [root@nginx01 ~]# nginx -V			        #查看安装版本

 31 [root@nginx01 ~]# tree /usr/local/nginx/		#查看目录结构
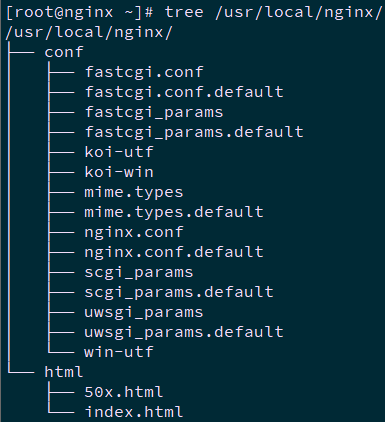
目录
|
作用
|
|
conf
|
用于存储nginx配置文件
|
|
html
|
用于存放静态网页
|
|
logs
|
存放日志
|
|
sbin
|
用于存放 nginx 执行命令
|
2.3 服务管理
  1 [root@nginx01 ~]# echo $PATH

  2 /usr/local/sbin:/usr/local/bin:/usr/sbin:/usr/bin:/root/bin

  3 [root@nginx01 ~]# mkdir -p /var/cache/nginx/

  4 [root@nginx01 ~]# ll /usr/local/bin/

  5 total 7.5M

  6 -rwxr-xr-x 1 root root 7.5M Mar  5 01:09 nginx
  1 [root@nginx01 ~]# nginx			#服务启动

  2 [root@nginx01 ~]# nginx -s stop		#服务关闭

  3 [root@nginx01 ~]# nginx -s reload	        #重载配置文件

  4 [root@nginx01 ~]# nginx -s reopen	        #重启Nginx

  5 [root@nginx01 ~]# nginx -s quit		#关闭Nginx

  6 [root@nginx01 ~]# nginx -t		        #测试配置文件

  7 [root@nginx01 ~]# nginx -t -c 【file】	#使用额外的配置文件测试

  8 [root@nginx01 ~]# ps aux | grep nginx	#查看进程

  9 [root@nginx01 ~]# netstat -ano | grep 80	#查看端口
2.4 开机启动
  1 [root@nginx01 ~]# vi /usr/lib/systemd/system/nginx.service

  2 [Unit]

  3 Description=nginx - high performance web server

  4 Documentation=http://nginx.org/en/docs/

  5 After=network-online.target remote-fs.target nss-lookup.target

  6 Wants=network-online.target

  7

  8 [Service]

  9 Type=forking

 10 PIDFile=/var/run/nginx.pid

 11 ExecStart=/usr/local/bin/nginx -c /usr/local/nginx/conf/nginx.conf

 12 ExecReload=/bin/kill -s HUP $MAINPID

 13 ExecStop=/bin/kill -s TERM $MAINPID

 14

 15 [Install]

 16 WantedBy=multi-user.target

 17 [root@nginx01 ~]# systemctl daemon-reload

 18 [root@nginx01 ~]# systemctl start nginx.service		#启动服务

 19 [root@nginx01 ~]# systemctl enable nginx.service	#开机启动
2.5 测试访问
浏览器访问:http://172.24.8.71/
2.6 编译选项
1 [root@nginx01 nginx-1.17.8]# ./configure --help #查看编译选项
如下为常见编译选项及其释义:
|
编译选项
|
作用
|
|
--prefix=/etc/nginx
|
程序安装目录和路径
|
|
--sbin-path=/usr/sbin/nginx
|
Nginx启动停止名
|
|
--modules-path=/usr/lib64/nginx/modules
|
Nginx模块路径
|
|
--conf-path=/etc/nginx/nginx.conf
|
Nginx主配置文件路径
|
|
--error-log-path=/var/log/nginx/error.log
|
Nginx错误日志路径
|
|
--http-log-path=/var/log/nginx/access.log
|
Nginx访问日志路径
|
|
--pid-path=/var/run/nginx.pid
|
Nginx Pid路径
|
|
--lock-path=/var/run/nginx.lock
|
Nginx锁路径
|
|
--http-client-body-temp-path=/var/cache/nginx/client_temp
|
client头部临时缓存文件
|
|
--http-proxy-temp-path=/var/cache/nginx/proxy_temp
|
proxy临时缓存文件
|
|
--http-fastcgi-temp-path=/var/cache/nginx/proxy_temp
|
fastcgi临时缓存文件
|
|
--http-uwsgi-temp-path=/var/cache/nginx/uwsgi_temp
|
uwsgi临时缓存文件
|
|
--http-scgi-temp-path=/var/cache/nginx/scgi_temp
|
scgi临时缓存文件
|
|
--user=nginx
|
设置Nginx进程启动用户
|
|
--group=nginx
|
设置Nginx进程启动用户组
|
|
--with-cc-opt
|
设置额外的参数将被添加到CFLACS变量
|
|
--with-id-opt
|
设置额外的参数,链接系统库
|
三 Nginx目录及模块
3.1 相关目录
如下以Nginx yum安装后的目录为例:
|
路径
|
类型
|
作用
|
|
/etc/nginx
/etc/nginx/nginx.conf
/etc/nginx/conf.d
/etc/nginx/conf.d/default.conf
|
配置文件
|
Nginx主配置文件
|
|
/etc/nginx/fastcgi_params
/etc/nginx/scgi_params
/etc/nginx/uwsgi_params
|
配置文件
|
Cgi、Fastcgi、Uwsgi配置文件
|
|
/etc/nginx/win-utf
/etc/nginx/koi-utf
/etc/nginx/koi-win
|
配置文件
|
Nginx编码转换映射文件
|
|
/etc/nginx/mime.types
|
配置文件
|
http协议的Content-Type
|
|
/etc/rc.d/init.d/nginx
/etc/rc.d/init.d/nginx-debug
/etc/sysconfig/nginx
/etc/sysconfig/nginx-debug
|
配置文件
|
配置系统守护进程管理器
|
|
/etc/logrotate.d/nginx
|
配置文件
|
Nginx日志轮询、日志切割
|
|
/usr/sbin/nginx
/usr/sbin/nginx-debug
|
命令
|
Nginx终端管理器命令
|
|
/usr/share/doc/nginx-1.xx.x
/usr/share/man/man8/nginx.8.gz
|
目录
|
Nginx的帮助手册
|
|
/var/cache/nginx
|
目录
|
Nginx的缓存目录
|
|
/var/log/nginx
|
目录
|
Nginx的日志目录
|
|
/etc/nginx/modules
/etc/lib64/nginx
/etc/lib64/nginx/modules
|
目录
|
Nginx的模块目录
|
|
/usr/share/nginx
/usr/share/nginx/html
/usr/share/nginx/html/50x.html
/usr/share/nginx/html/index.html
|
目录
|
Nginx默认站点目录
|
3.2 Nginx模块
Nginx模块分为Nginx官方模块和Nginx第三方模块。
|
Nginx编译选项
|
模块作用
|
|
ngx_http_core_module
|
包含一些核心的http参数配置,对应Nginx的配置区块部分。
|
|
ngx_http_access_module
|
访问控制模块,用来控制网站用户对Nginx的访问。
|
|
ngx_http_gzip_module
|
压缩模块,对Nginx返回的数据压缩,属于性能优化模块。
|
|
ngx_http_fastcgi_module
|
fastcgi模块,和动态应用相关的模块,例如PHP。
|
|
ngx_http_proxy_module
|
proxy代理模块。
|
|
ngx_http_upstream_module
|
负载均衡模块,实现网站的负载均衡功能机健康检查。
|
|
ngx_http_rewrite_module
|
URL地址重写模块。
|
|
ngx_http_limit_conn_module
|
限制用户并发连接数及请求连接数。
|
|
ngx_http_limit_req_module
|
限制Nginx request processing rate根据定义的key。
|
|
ngx_http_log_module
|
访问日志模块,以指定的格式记录Nginx客户访问日志等信息。
|
|
ngx_http_auth_basic_module
|
Web认证模块,设置Web用户通过账号密码访问Nginx。
|
|
ngx_http_ssl_module
|
ssl模块,用于加密的http连接,如https。
|
四 Nginx变量及状态码
4.1 Nginx变量
4.2 http状态码
http状态码是用以表示网页服务器HTTP响应状态的3位数字代码。可通过查看HTTP状态码来判断服务器状态,常见的有404、502等。
- 301:永久移动,被请求的资源已被永久移动位置;
- 302:请求的资源限制临时从不同的URI响应请求;
- 305:使用代理,被请求的资源必须通过指定的代理才能访问;
- 307:临时跳转,被请求的资源在临时从不同的URL响应请求;
- 400:错误请求;
- 402:需要付款,预留状态码,用于将来一些数字货币或者微支付;
- 403:禁止访问,服务器已理解请求,但拒绝执行它;
- 404:找不到对象,请求失败,资源不存在;
- 406:不可接受的,请求的资源内容特性无法满足请求头部中的条件,因而无法生成响应实体;
- 408:请求超时;
- 409:冲突,由于和被请求的资源的当前状态之间存在冲突,请求无法完成;
- 410:遗失的,被请求的资源在服务器上已经不再可用,而且没有任何已知的转发地址;
- 413:响应实体太大,服务器拒绝处理当前请求,请求超过服务器所能处理和允许的最大值;
- 417:期望失败。在请求头 Expect 中指定的预期内容无法被服务器满足;
- 418:我是一个茶壶。超文本咖啡罐控制协议,但是并没有被实际的HTTP服务器实现;
- 420:方法失效;
- 422:不可处理的实体。请求格式正确,但是由于含有语义错误,无法响应;
- 500:服务器内部错误。服务器遇到了一个未曾预料的状况,导致了它无法完成对请求的处理;
- 502:请求后端失败;
- 504:请求成功,但是响应超时。
002.Nginx安装及启动的更多相关文章
- nginx 安装、启动、重启、关闭 (linux系统命令行)
前言: 最近在部署我的hexo静态博客到腾讯云服务器上,用到了很多nginx的知识,在此做下总结: 刚接触的linux服务器上,nginx配置乱的有点令人发指,就把老的卸载了重新装一下. 1.卸载 y ...
- Nginx 安装与启动
安装 第一种安装方式:CentOS 7下配置 yum 安装 Nginx. 按照官方的安装实例:https://www.nginx.com/resources/admin-guide/ 第一步,在/et ...
- Nginx - 安装并启动Nginx
1 - 安装Nginx 官网步骤:http://nginx.org/en/linux_packages.html#RHEL-CentOS [Anliven@h202 ~]$ sudo vim /etc ...
- 附002.Nginx全系列大总结
Nginx全系列总结如下,后期不定期更新. 欢迎基于学习.交流目的的转载和分享,禁止任何商业盗用,同时希望能带上原文出处,尊重ITer的成果,也是尊重知识. 若发现任何错误或纰漏,留言反馈或右侧添加本 ...
- (Nginx学习一)安装和启动及对应文件夹介绍
nginx 安装和启动及对应文件夹介绍 1 安装 官网下载nginx文件 http://nginx.org/en/download.html 解压即可 2 文件夹介绍 在解压后nginx压缩包后发现 ...
- Nginx下载和安装与启动
nginx是什么 nginx是一个开源的,支持高性能,高并发的www服务和代理服务软件.它是一个俄罗斯人lgor sysoev开发的,作者将源代码开源出来供全球使用. nginx比它大哥apache性 ...
- CentOS7.3编译安装Nginx设置开机启动
起因 最近想玩nginx了,本来用yum -y install nginx安装也启动好了,但是买了本<Nginx高性能Web服务器详解>,我咋能辜负我的书费呢?于是我就直接ps -ef | ...
- VMware Linux 下 Nginx 安装配置 - nginx.conf 配置 [负载两个 Tomcat] (三)
首先启动Nginx 1. 相关浏览 两个 Tomcat 配置: VMware Linux 下 Nginx 安装配置 - Tomcat 配置 (二) Nginx 安装配置启动: VMware Linu ...
- linux下安装nginx后开机启动篇
众所周知nginx安装后需要手动去启动,每次开机之后都要执行nginx的启动命令很蛋疼.那么我们来让nginx开机启动吧 1.先創建一個nginx文件把 [root@localhost ~]# vi ...
随机推荐
- 本地配置gitee
一 下载工具 Git-2.62.0-64-bit.exe 以上工具版本号不需要一样,安装完前两个后重新启动系统,再安装第3个. 二 码云网站注册 https://gitee.com/ 使用邮箱注册 注 ...
- rgb格式颜色与#000000格式颜色的转换
首先,#000000格式的颜色被成为十六进制颜色码: 6位数分为三组,每两位数一组,依次是红.黄.蓝颜色的强度: 而与此对应的,rgb(39,137,202)依次是十进制的红黄蓝颜色: 因此将rgb格 ...
- Sublime Text 3.1 注册码
加入到hosts文件: 127.0.0.1 www.sublimetext.com 127.0.0.1 license.sublimehq.com hosts 文件的位置: Windows : c:/ ...
- git新手入门问题总结
git新手入门问题总结 前言 本人为2019年6月份刚刚毕业,大三暑假中旬来到上海,实习时间大致为十个月,在这十个月里面学到了许多关于git使用方面的知识 经常会逛开源中国水水动态,看看技术帖子学习知 ...
- 最后一面挂在volatile关键字上,面试官:重新学学Java吧!
最后一面挂在volatile关键字上,面试官:重新学学Java吧! 为什么会有volatile关键字? volatile: 易变的; 无定性的; 无常性的; 可能急剧波动的; 不稳定的; 易恶化的; ...
- 关于时间格式 GMT,UTC,CST,ISO
GMT: 格林尼治所在地的标准时间 UTC: 协调世界时,又称世界统一时间.世界标准时间.国际协调时间.由于英文(CUT)和法文(TUC)的缩写不同,作为妥协,简称UTC. 协调世界时是以原子时秒长为 ...
- 基于flask框架的高校舆情分析系统
系统分析: 高校舆情分析拟实现如下功能,采集微博.贴吧.学校官网的舆情信息,对这些舆情进行数据分析.情感分析,提取关键词,生成词云分析,情感分析图,实时监测舆情动态. 系统设计: 前端:采用layui ...
- Day8-微信小程序实战-交友小程序-首页用户列表渲染及多账号调试及其点赞功能的实现
在这之前已经把编辑个人的所有信息的功能已经完成了 之后先对首页的列表搞动态的,之前都是写死的静态 1.之前都是把好友写死的,现在就在js里面定义一个数组,用循环来动态的绑定 在onReady中定义,取 ...
- ASP.NET WebAPI框架解析第一篇
ASP.NET WebAPI有两种寄宿模式,一种是WebHost,一种是SelfHost,为什么可以有两种模式的原因在于WebAPI有一个相对独立的消息处理管道,只要给这个消息管道传递一个封装好的对象 ...
- Meteva——让预报检验不再重复造轮子
更多精彩,请点击上方蓝字关注我们! 检验是什么?****预报准确率的客观表达 说到天气预报,你最先会想到什么? 早上听了预报,带了一天伞却没下一滴雨的调侃? 还是 "蓝天白云晴空万里突然暴风 ...