Spring Boot GraphQL 实战 01_快速入门
hello,大家好,我是小黑,又和大家见面啦~
新开一个专题是关于 GraphQL 的相关内容,主要是通过 Spring Boot 来快速开发 GraphQL 应用,希望对刚接触 GraphQL 的同学有所帮助。
项目 github 地址:https://github.com/shenjianeng/graphql-spring-boot-example
什么是 GraphQL
先看一下官网的解释:
GraphQL is a query language for APIs and a runtime for fulfilling those queries with your existing data. GraphQL provides a complete and understandable description of the data in your API, gives clients the power to ask for exactly what they need and nothing more, makes it easier to evolve APIs over time, and enables powerful developer tools.
GraphQL 既是一种用于 API 的查询语言也是一个满足你数据查询的运行时。 GraphQL 对你的 API 中的数据提供了一套易于理解的完整描述,使得客户端能够准确地获得它需要的数据,而且没有任何冗余,也让 API 更容易地随着时间推移而演进,还能用于构建强大的开发者工具。
再看一下维基百科的解释:
https://en.wikipedia.org/wiki/GraphQL
GraphQL is an open-source data query and manipulation language for APIs, and a runtime for fulfilling queries with existing data.GraphQL was developed internally by Facebook in 2012 before being publicly released in 2015.
It allows clients to define the structure of the data required, and the same structure of the data is returned from the server.
GraphQL 是一种用于 api 的开源数据查询和操作语言,也是一种用于实现现有数据查询的运行时。GraphQL 于2012年由 Facebook内部开发,2015年公开发布。
它允许客户端定义所需数据的结构,并从服务器返回相同的数据结构。
从字面上理解:GraphQL = Graph + QL = 图表化、可视化的查询语言。它允许客户端定义所需数据的结构,并从服务器返回相同的数据结构。
Hello world
GraphQL 是一种规范,已有多种编程语言支持。
在本系列文章中,我们使用 graphql-spring-boot-starter 来完成 GraphQL 相关开发讲解。
github 地址:https://github.com/graphql-java-kickstart/graphql-spring-boot
引入相关依赖
构建一个基础的 Spring Boot Web 项目工程,引入最新的 graphql-spring-boot-starter:
  <dependency>

    <groupId>org.springframework.boot</groupId>

    <artifactId>spring-boot-starter-web</artifactId>

  </dependency>

  <dependency>

    <groupId>org.projectlombok</groupId>

    <artifactId>lombok</artifactId>

    <optional>true</optional>

  </dependency>

  <dependency>

    <groupId>com.graphql-java-kickstart</groupId>

    <artifactId>graphql-spring-boot-starter</artifactId>

    <version>8.0.0</version>

  </dependency>
通过 maven 我们可以很清楚的看到 graphql-spring-boot-starter 引入了哪些依赖包:
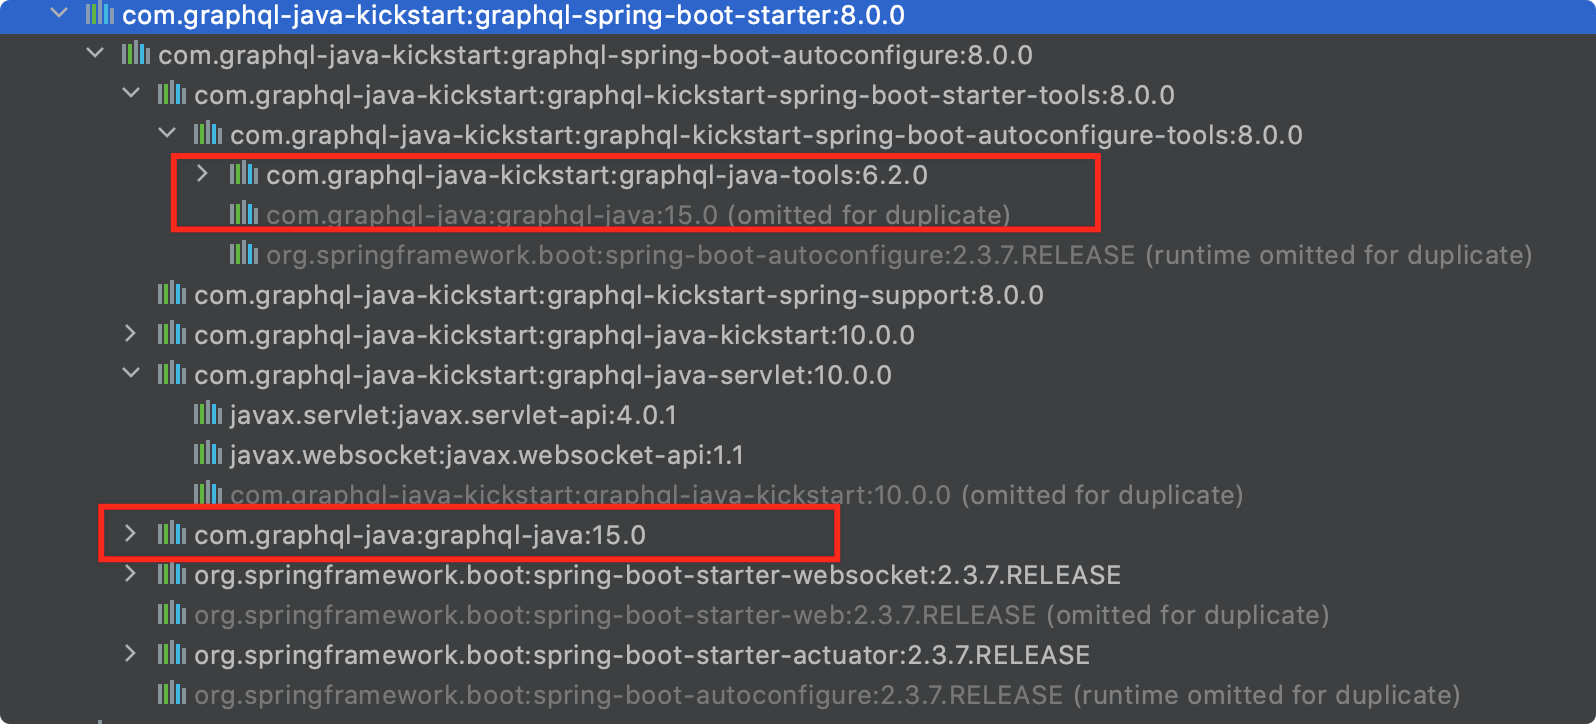
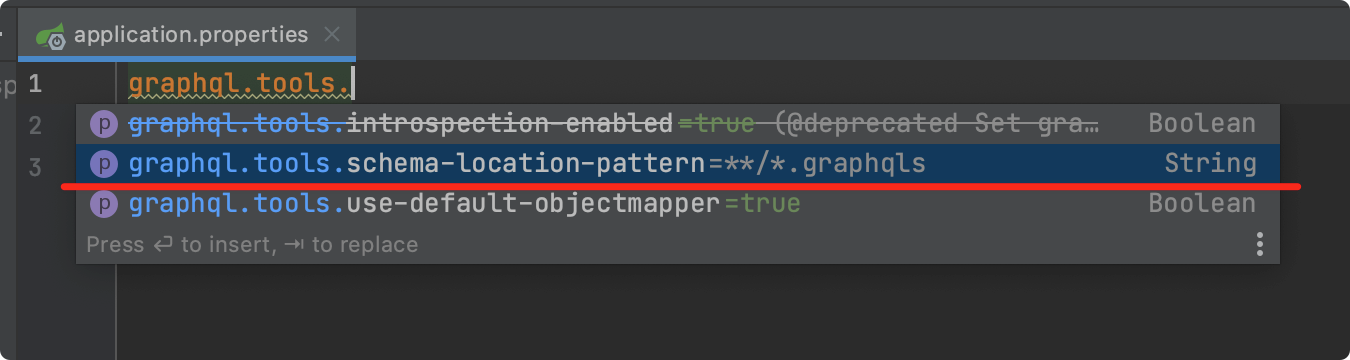
graphql-spring-boot-starter 默认情况下会扫描 classpath 下所有的 graphqls 后缀文件。
当然,我们也可以通过 application.properties 来配置修改相关属性,本案例中,我们使用默认配置即可。
编写第一个 graphqls 文件
在 resources 文件夹下新建 schema.graphqls 文件。
如果你在使用 idea 的话,可以安装 https://plugins.jetbrains.com/plugin/8097-js-graphql 插件来帮助你编写 graphqls 文件。
# 表示构建一个 user 数据结构

type User{

    # id,类型就是 ID ,! 表示是必填字段

    id:ID!

    # username 字段,String 类型

    username:String!

    nickname:String!

    # city 字段,类型是 City 枚举

    city:City

}

# City 枚举值

enum City{

    hangzhou

    shanghai

}

# 查询相关接口

type Query{

    # 获取用户列表,返回 user 数组

    userList:[User!]

}
上述 schema.graphqls 文件中定义了 User 和 City 这两种数据类型。同时,我们生成两个 Java Bean 来与之相对应。
public enum City {

    hangzhou,

    shanghai,

}

@Data

public class User {

    private UUID id;

    private String username;

    private String nickname;

    private City city;

}
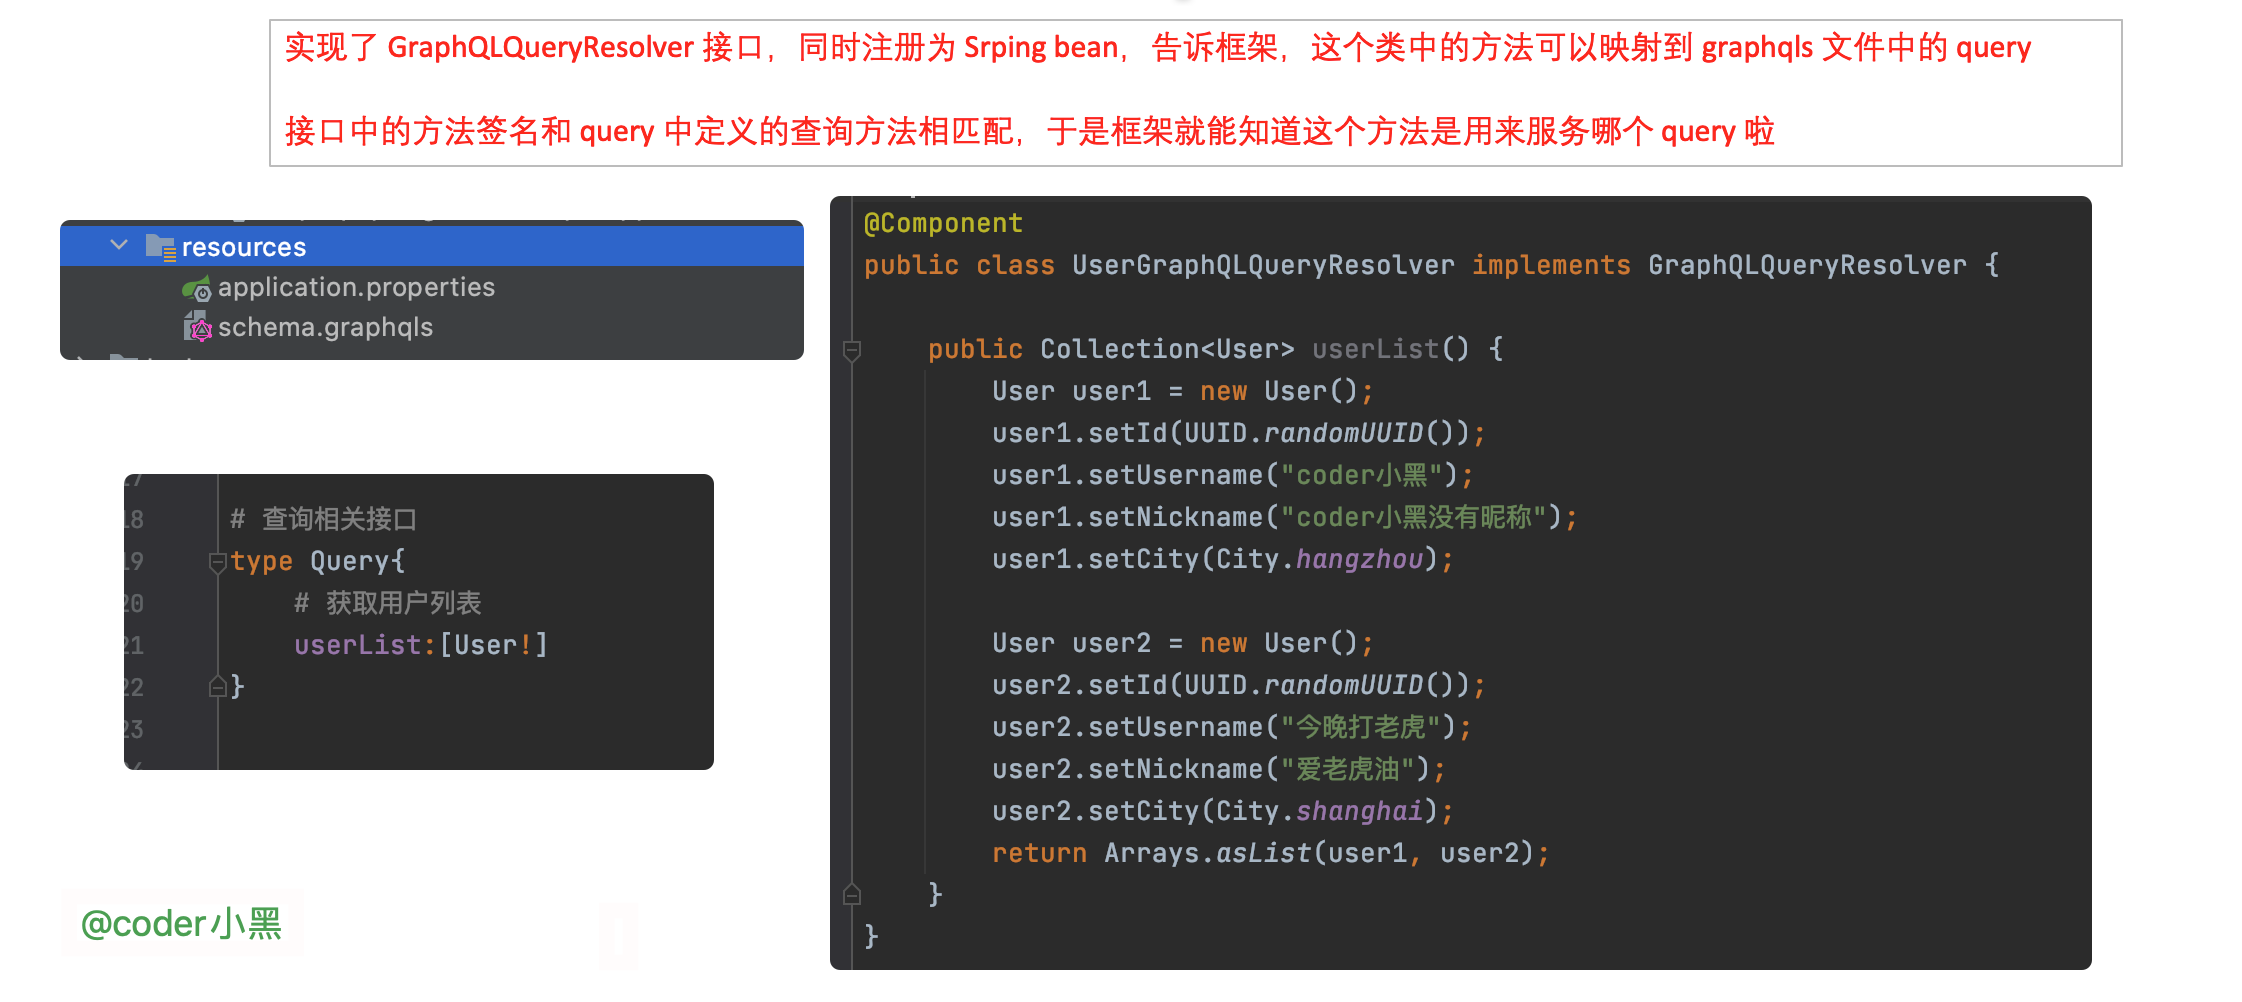
定义 GraphQLQueryResolver
@Component

public class UserGraphQLQueryResolver implements GraphQLQueryResolver {

    public Collection<User> userList() {

        User user1 = new User();

        user1.setId(UUID.randomUUID());

        user1.setUsername("coder小黑");

        user1.setNickname("coder小黑没有昵称");

        user1.setCity(City.hangzhou);

        User user2 = new User();

        user2.setId(UUID.randomUUID());

        user2.setUsername("今晚打老虎");

        user2.setNickname("爱老虎油");

        user2.setCity(City.shanghai);

        return Arrays.asList(user1, user2);

    }

}
- 定义了一个 Spring Beran
UserGraphQLQueryResolver,实现了graphql.kickstart.tools.GraphQLQueryResolver接口 - 有一个名为
userList的方法,方法不需要入参,返回Collection<User>
没错,聪明的读者同学是不是已经发现了:
UserGraphQLQueryResolver#userList 就是用来匹配 schema.graphqls 文件中定义的获取用户列表查询。
使用 graphiql 请求服务器
graphiql 可以帮助我们方便的向 graphql 服务端发起请求,使用也十分简单,引入相关依赖即可。
  <dependency>

    <groupId>com.graphql-java-kickstart</groupId>

    <artifactId>graphiql-spring-boot-starter</artifactId>

    <version>8.0.0</version>

    <scope>runtime</scope>

  </dependency>
好,让我们启动 Spring Boot 应用,访问 http://localhost:8080/graphiql
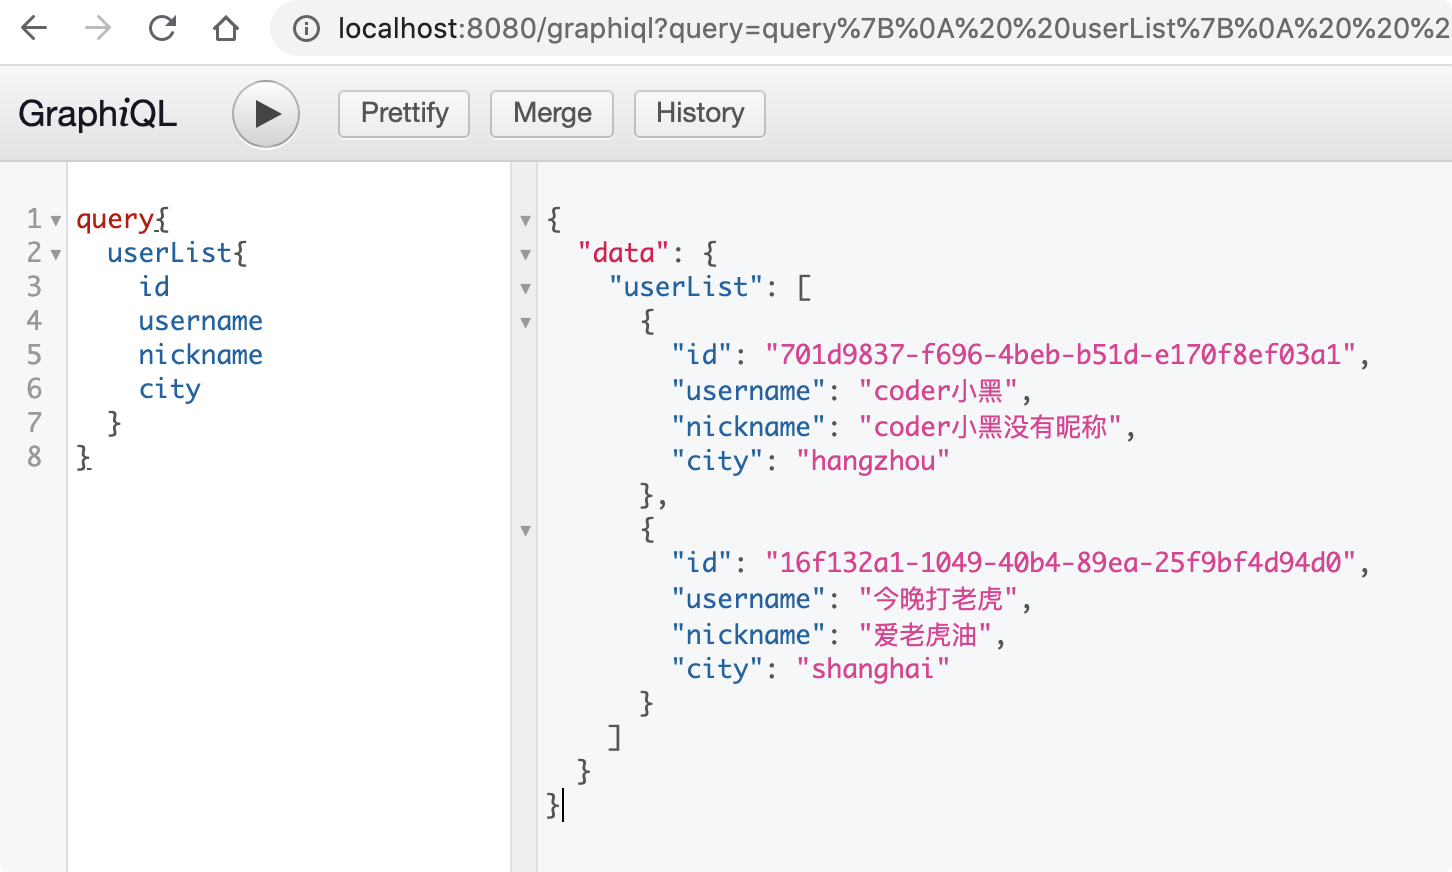
在 https://github.com/graphql-java-kickstart/graphql-spring-boot 的帮助下,实现一个 graphql 服务就是这么的简单。
自定义 Servlet Mapping 地址
我们来看看客户端发出的请求长什么样子:

同时,我们可以通过 application.properties 文件来修改服务端的请求接收路径:
graphql.servlet.mapping=/coder-xiao-hei
使用原生 GraphQL 实现
下面,我们再使用 GraphQL 的原生 api 来实现一下上述的案例。
public class HelloWorld {
static Collection<User> userList() {
User user1 = new User();
user1.setId(UUID.randomUUID());
user1.setUsername("coder小黑");
user1.setNickname("coder小黑没有昵称");
user1.setCity(City.hangzhou);
return Collections.singletonList(user1);
}
public static void main(String[] args) throws IOException {
Resource resource = new DefaultResourceLoader().getResource("classpath:schema.graphqls");
String schema = StreamUtils.copyToString(resource.getInputStream(), StandardCharsets.UTF_8);
SchemaParser schemaParser = new SchemaParser();
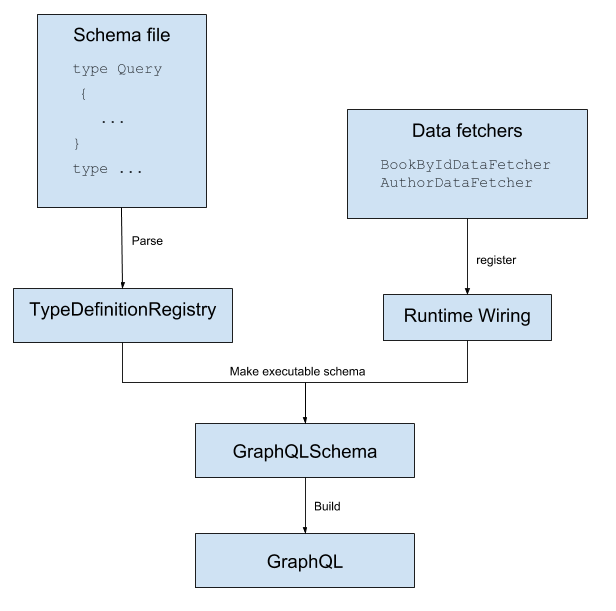
TypeDefinitionRegistry typeDefinitionRegistry = schemaParser.parse(schema);
RuntimeWiring runtimeWiring =
RuntimeWiring.newRuntimeWiring()
.type(TypeRuntimeWiring
.newTypeWiring("Query")
.dataFetcher("userList",
(DataFetcher<Collection<User>>) environment -> userList()))
.build();
SchemaGenerator schemaGenerator = new SchemaGenerator();
GraphQLSchema graphQLSchema = schemaGenerator.makeExecutableSchema(typeDefinitionRegistry, runtimeWiring);
GraphQL build = GraphQL.newGraphQL(graphQLSchema).build();
ExecutionResult executionResult = build.execute("query{\n" +
" userList{\n" +
" id\n" +
" username\n" +
" }\n" +
"}");
// {userList=[{id=486a181e-eec7-4001-a9d9-65e94a004f8c, username=coder小黑}]}
System.out.println(executionResult.getData().toString());
}
}
下图清晰的描述了上述程序中相关组件的关系:
下期预告
下期我们将使用 graphQL 来实现简单的增删改查和自定义标量类型。感谢大家的关注和阅读~~
参考资料:
https://github.com/graphql-java-kickstart/graphql-spring-boot
https://www.graphql-java.com/tutorials/getting-started-with-spring-boot/
https://graphql.org/code/#java-kotlin
Spring Boot GraphQL 实战 01_快速入门的更多相关文章
- Spring Boot 2.0 的快速入门(图文教程)
摘要: 原创出处 https://www.bysocket.com 「公众号:泥瓦匠BYSocket 」欢迎关注和转载,保留摘要,谢谢! Spring Boot 2.0 的快速入门(图文教程) 大家都 ...
- Spring Boot GraphQL 实战 02_增删改查和自定义标量
hello,大叫好,我是小黑,又和大家见面啦~ 今天我们来继续学习 Spring Boot GraphQL 实战,我们使用的框架是 https://github.com/graphql-java-ki ...
- Spring Boot GraphQL 实战 03_分页、全局异常处理和异步加载
hello,大家好,我是小黑,又和大家见面啦~ 今天我们来继续学习 Spring Boot GraphQL 实战,我们使用的框架是 https://github.com/graphql-java-ki ...
- Spring Boot (一)快速入门
一.关于Spring Boot 在开始了解Spring Boot之前,我们需要先了解一下Spring,因为Spring Boot的诞生和Spring是息息相关的,Spring Boot是Spring发 ...
- Spring Boot(一):入门篇
Spring Boot(一):入门篇 一.Spring Boot介绍 Spring Boot是由Pivotal团队提供的全新框架,其设计目的是用来简化新Spring应用的初始搭建以及开发过程. 该框架 ...
- Spring Boot 2.X(一):入门篇
什么是 Spring Boot Spring Boot 是由 Pivotal 团队提供的全新框架,其设计目的是用来简化新 Spring 应用的初始搭建以及开发过程.该框架遵循"约定优于配置& ...
- “Spring Boot+Marklogic实战应用(1)”
版权声明:本文为博主原创文章,遵循 CC 4.0 BY-SA 版权协议.本文链接:http://www.blbk.info Spring Boot+Marklogic应用 摘要: 在前一节的介绍,相信 ...
- 【建议收藏】缺少 Vue3 和 Spring Boot 的实战项目经验?我这儿有啊!
缺少 Vue3 和 Spring Boot 的实战项目经验?缺少学习项目和练手项目?我这儿有啊! 从 2019 年到 2021 年,空闲时间里陆陆续续做了一些开源项目,推荐给大家啊!记得点赞和收藏噢! ...
- Spring Boot 项目实战(五)集成 Dubbo
一.前言 上篇介绍了 Redis 的集成过程,可用于解决热点数据访问的性能问题.随着业务复杂度的提高,单体应用越来越庞大,就好比一个类的代码行数越来越多,分而治之,切成多个类应该是更好的解决方法,所以 ...
随机推荐
- 【性能测试】【locust】场景性能测试步骤
场景设计 实现登陆基本功能,输出相应结果,脚本通 多用户实现随机登陆 添加初始化方法on_start: 每个用户只运行一次 添加检查点: catch_responses = True 脚本设计 # 导 ...
- 4 种高可用 RocketMQ 集群搭建方案!
背景 笔者所在的业务线,最初化分为三个服务,由于业务初期业务复杂度相对简单,三个业务服务都能很好的独立完成业务功能. 随着产品迭代,业务功能越来越多后慢慢也要面对高并发.业务解耦.分布式事务等问题,所 ...
- 在windows环境下 nginx + .net core 3.1 实现反向代理和负载均衡
一.创建.net core web 应用 1.首先打开vs2019创建好.net core web应用,简单的注入IConfiguration 便于打印端口号展示效果. 1 private reado ...
- flink:StreamExecutionEnvironment、DataStream和Transformation与StreamOperator
1.StreamExecutionEnvironment: StreamExecutionEnvironment是构建执行任务环境以及任务的启动的入口,主要具备以下几方面的职责: a.存储全局相关的参 ...
- eNSP VLAN划分基础配置及Access接口
交换机内实现VLAN通信拓扑图: 一.修改主机名并保存 1.进入系统视图模式(配置模式) <Huawei>system-view 2.sysname命令修改主机名为yanyuda [Hua ...
- java并发编程实战《五》死锁
一不小心就死锁了,怎么办? 在上一篇文章中,我们用 Account.class 作为互斥锁,来解决银行业务里面的转账问题,虽然这个方案不存在并发问题,但是所有账户的转账操作都是串行的,性能太差. 向现 ...
- moviepy音视频剪辑:使用concatenate_videoclips和clips_array将多个视频合成一个顺序播放或同屏播放的视频
专栏:Python基础教程目录 专栏:使用PyQt开发图形界面Python应用 专栏:PyQt入门学习 老猿Python博文目录 老猿学5G博文目录 一.视频合成概述 视频合成,也称为非线性编辑,实际 ...
- PyQt(Python+Qt)学习随笔:QToolBox工具箱的currentItemName和tabSpacing属性
老猿Python博文目录 专栏:使用PyQt开发图形界面Python应用 老猿Python博客地址 在Designer中,toolBox的属性中有currentItemName和tabSpacing属 ...
- 第15.21节 PyQt(Python+Qt)入门学习:QListView的作用及属性详解
老猿Python博文目录 专栏:使用PyQt开发图形界面Python应用 老猿Python博客地址 一.概述 QListView是从QAbstractItemView 派生的类,实现了QAbstrac ...
- 【.Net Core】 使用 Nginx 发布 .Net Core 3.1 项目至LInux(Centos7)。
前置博客(博客中使用的项目来自于此): [Docker] .Net Core 3.1 webapi 集成EF Code First,使用MySql进行业务操作 .配置swagger (三) 环境:.N ...