Saltstack_使用指南01_部署
1. 主机规划
|
服务器名称 |
操作系统版本 |
内网IP |
外网IP(模拟) |
Hostname |
部署模块 |
|
salt100 |
CentOS7.5 |
172.16.1.100 |
10.0.0.100 |
salt100 |
salt-master、salt-minion |
|
salt01 |
CentOS7.5 |
172.16.1.11 |
10.0.0.11 |
salt01 |
salt-minion |
|
salt02 |
CentOS7.5 |
172.16.1.12 |
10.0.0.12 |
salt02 |
salt-minion |
|
salt03 |
CentOS7.5 |
172.16.1.13 |
10.0.0.13 |
salt03 |
salt-minion |
Saltstack文档
https://docs.saltstack.com/en/latest/contents.html
1.1. 机器hosts文件修改
salt100、salt01、salt02、salt03的hosts文件都追加如下信息。
这样主机名相互之间可以解析。
 [root@salt100 ~]# cat /etc/hosts

 127.0.0.1   localhost localhost.localdomain localhost4 localhost4.localdomain4

 ::         localhost localhost.localdomain localhost6 localhost6.localdomain6

 172.16.1.11    salt01

 172.16.1.12    salt02

 172.16.1.13    salt03

 172.16.1.14    salt04

 172.16.1.15    salt05

 172.16.1.100   salt100
2. 添加用户账号
说明:
1、 运维人员使用的登录账号;
2、 所有的业务都放在 /app/ 下「yun用户的家目录」,避免业务数据乱放;
3、 该用户也可用于后期salt-ssh使用,因为几乎所有的生产环境都是禁止root远程登录的(因此进行了 sudo 提权)。
 # 使用一个专门的用户,避免直接使用root用户

 # 添加用户、指定家目录并指定用户密码

 useradd -u  -d /app yun && echo '' | /usr/bin/passwd --stdin yun

 # sudo提权

 echo "yun  ALL=(ALL)       NOPASSWD: ALL" >>  /etc/sudoers

 # 让其它普通用户可以进入该目录查看信息

 chmod  /app/
运维三板斧
监控
执行
配置管理
Saltstack四种运行方式
Local
Minion/Master C/S
Syndic 代理方式
Salt SSH
3. SaltStack部署
3.1. 镜像源安装
官方镜像源查询
https://repo.saltstack.com/
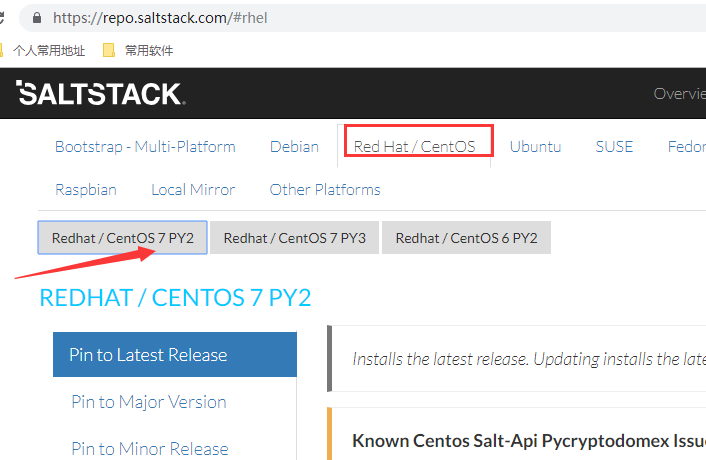
安装镜像源
在salt100、salt01、salt02、salt03机器上执行
yum install -y https://repo.saltstack.com/yum/redhat/salt-repo-latest-2.el7.noarch.rpm
3.2. saltstack安装
根据规划在salt100安装salt的master和minion,在其他机器安装salt的minion。
在salt100上操作
yum install -y salt-master salt-minion
在salt01、salt02、salt03上操作
yum install -y salt-minion
版本查看
 [root@salt100 ~]# salt --version   # master版本查看

 salt 2018.3. (Oxygen)

 [root@salt100 ~]# salt-minion --version   # minion版本查看

 salt-minion 2018.3. (Oxygen)
4. 服务端启动
在salt100上执行,无需任务配置修改
[root@salt100 ~]# systemctl start salt-master.service
5. 客户端启动
在salt100、salt01、salt02、salt03上操作
5.1. 修改minion配置文件
配置修改原因:
1、 minion端指向的master是哪个
2、 minion端的ID是什么
 [root@salt100 salt]# pwd

 /etc/salt

 [root@salt100 salt]# vim minion

 ………………

 # 可以是IP或者hostname

 # 如果是hostname那么必须能够解析【最佳实践配置为 主机名】

 master: salt100

 ………………

 # Explicitly declare the id for this minion to use, if left commented the id

 # will be the hostname as returned by the python call: socket.getfqdn()

 # Since salt uses detached ids it is possible to run multiple minions on the

 # same machine but with different ids, this can be useful for salt compute

 # clusters.

 # 如果id不配置,那么默认为hostname

 # 如果下次要更改该配置,那么要把 /etc/salt/minion_id 也给删除掉,并重启客户端【会生成一个新的minion_id】

 #id:

 ………………
5.2. 启动minion服务
[root@salt100 ~]# systemctl start salt-minion.service
6. 加入开机自启动
master开机自启动
systemctl enable salt-master.service
minion开机自启动
systemctl enable salt-minion.service
7. master接受minion
7.1. master和minion启动后生成的pki信息
salt100上的信息
 [root@salt100 salt]# pwd

 /etc/salt

 [root@salt100 salt]# ll

 total

 -rw-r-----  root root   Oct   : cloud

 drwxr-xr-x  root root      Oct   : cloud.conf.d

 drwxr-xr-x  root root      Oct   : cloud.deploy.d

 drwxr-xr-x  root root      Oct   : cloud.maps.d

 drwxr-xr-x  root root      Oct   : cloud.profiles.d

 drwxr-xr-x  root root      Oct   : cloud.providers.d

 -rw-r-----  root root  Oct   : master

 drwxr-xr-x  root root      Oct   : master.d

 -rw-r-----  root root  Nov  : minion

 drwxr-xr-x  root root      Oct   : minion.d

 -rw-r--r--  root root      Nov  : minion_id

 drwxr-xr-x  root root     Nov  : pki

 -rw-r-----  root root  Oct   : proxy

 drwxr-xr-x  root root      Oct   : proxy.d

 -rw-r-----  root root    Oct   : roster

 [root@salt100 salt]# tree pki/

 pki/

 ├── master

 │   ├── master.pem

 │   ├── master.pub

 │   ├── minions

 │   ├── minions_autosign

 │   ├── minions_denied

 │   ├── minions_pre   # master还未进一步认证【接受或拒绝】,minion的公钥都先放在这里

 │   │   ├── salt01

 │   │   ├── salt02

 │   │   ├── salt03

 │   │   └── salt100

 │   └── minions_rejected

 └── minion

     ├── minion.pem

     └── minion.pub

  directories,  files
salt03上的信息
 [root@salt03 salt]# pwd

 /etc/salt

 [root@salt03 salt]# ll

 total

 -rw-r-----  root root   Oct   : cloud

 drwxr-xr-x  root root      Oct   : cloud.conf.d

 drwxr-xr-x  root root      Oct   : cloud.deploy.d

 drwxr-xr-x  root root      Oct   : cloud.maps.d

 drwxr-xr-x  root root      Oct   : cloud.profiles.d

 drwxr-xr-x  root root      Oct   : cloud.providers.d

 -rw-r-----  root root  Oct   : master

 drwxr-xr-x  root root      Oct   : master.d

 -rw-r-----  root root  Nov  : minion

 drwxr-xr-x  root root      Oct   : minion.d

 -rw-r--r--  root root      Nov  : minion_id

 drwxr-xr-x  root root     Nov  : pki

 -rw-r-----  root root  Oct   : proxy

 drwxr-xr-x  root root      Oct   : proxy.d

 -rw-r-----  root root    Oct   : roster

 [root@salt03 salt]# tree pki/

 pki/

 ├── master

 └── minion

     ├── minion.pem

     └── minion.pub

  directories,  files
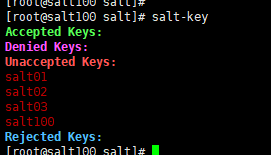
salt100上的salt-key信息
 [root@salt100 salt]# salt-key

 Accepted Keys:

 Denied Keys:

 Unaccepted Keys:

 salt01

 salt02

 salt03

 salt100

 Rejected Keys:
7.2. master接受minion
7.2.1. 单个接受
 [root@salt100 salt]# salt-key -a salt01  # 单个接受

 The following keys are going to be accepted:

 Unaccepted Keys:

 salt01

 Proceed? [n/Y] y

 Key for minion salt01 accepted.

 [root@salt100 salt]# salt-key

 Accepted Keys:

 salt01

 Denied Keys:

 Unaccepted Keys:

 salt02

 salt03

 salt100

 Rejected Keys:

7.2.2. 通配符接受
 [root@salt100 salt]# salt-key -a salt0*

 The following keys are going to be accepted:

 Unaccepted Keys:

 salt02

 salt03

 Proceed? [n/Y] y

 Key for minion salt02 accepted.

 Key for minion salt03 accepted.

 [root@salt100 salt]# salt-key

 Accepted Keys:

 salt01

 salt02

 salt03

 Denied Keys:

 Unaccepted Keys:

 salt100

 Rejected Keys:

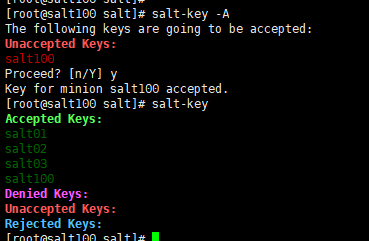
7.2.3. 接受所有minion
 [root@salt100 salt]# salt-key -A

 The following keys are going to be accepted:

 Unaccepted Keys:

 salt100

 Proceed? [n/Y] y

 Key for minion salt100 accepted.

 [root@salt100 salt]# salt-key

 Accepted Keys:

 salt01

 salt02

 salt03

 salt100

 Denied Keys:

 Unaccepted Keys:

 Rejected Keys:
7.3. master接受minion之后的pki信息
salt100上的信息
 [root@salt100 salt]# pwd

 /etc/salt

 [root@salt100 salt]# tree pki/

 pki/

 ├── master

 │   ├── master.pem

 │   ├── master.pub

 │   ├── minions   # minion的公钥从minions_pre 移到了此目录

 │   │   ├── salt01

 │   │   ├── salt02

 │   │   ├── salt03

 │   │   └── salt100

 │   ├── minions_autosign

 │   ├── minions_denied

 │   ├── minions_pre

 │   └── minions_rejected

 └── minion

     ├── minion_master.pub  # 接受了来自master的公钥

     ├── minion.pem

     └── minion.pub

  directories,  files
salt03上的信息
 [root@salt03 salt]# tree pki/

 pki/

 ├── master

 └── minion

     ├── minion_master.pub  # 接受了来自master的公钥

     ├── minion.pem

     └── minion.pub

  directories,  files
8. 测试结果
 [root@salt100 salt]# salt '*' test.ping  # 看master可以控制哪些minion

 salt02:

     True

 salt03:

     True

 salt01:

     True

 salt100:

     True
完毕!
Saltstack_使用指南01_部署的更多相关文章
- Saltstack_实战指南01_系统规划
1. 实战项目GitHub地址 之前<Saltstack_使用指南>详细讲解了saltstack的使用.那么从这节开始实战讲解,当然不会再像之前那样详细说明了.只是讲一些系统规划之类的信息 ...
- Saltstack_使用指南17_salt-ssh
1. 主机规划 salt 版本 [root@salt100 ~]# salt --version salt (Oxygen) [root@salt100 ~]# salt-minion --versi ...
- Saltstack_使用指南16_syndic
1. 主机规划 salt 版本 [root@salt100 ~]# salt --version salt (Oxygen) [root@salt100 ~]# salt-minion --versi ...
- Saltstack_使用指南12_配置管理-jinja模板
1. 说明 下文的案例是根据上一篇文章进行的修改.因此请优先读取上一章博文内容<Saltstack_使用指南11_配置管理-状态之间依赖关系> 2. 主机规划 salt 版本 [root@ ...
- Saltstack_实战指南02_各主机Pillar信息指定
1. 实战项目GitHub地址 该项目已经放在了GitHub上,地址如下: https://github.com/zhanglianghhh/salt-example-lnmp 2. 主机规划 3. ...
- Saltstack_使用指南03_配置管理
1. 主机规划 注意事项 修改了master或者minion的配置文件,那么必须重启对应的服务. 2. 了解YAML 具体地址 https://docs.saltstack.com/en/latest ...
- Saltstack_使用指南18_API
1. 主机规划 salt 版本 [root@salt100 ~]# salt --version salt (Oxygen) [root@salt100 ~]# salt-minion --versi ...
- Saltstack_使用指南11_配置管理-状态之间依赖关系
1. 说明 下文的案例是根据上一篇文章进行的修改.因此请优先读取上一篇文章内容<Saltstack_10_配置管理-状态模块> 并且目录进行了变化,从 /srv/salt/lamp 变为了 ...
- Saltstack_使用指南10_配置管理-状态模块
1. 主机规划 salt 版本 [root@salt100 ~]# salt --version salt (Oxygen) [root@salt100 ~]# salt-minion --versi ...
随机推荐
- 不懂这些高并发分布式架构、分布式系统的数据一致性解决方案,你如何能找到高新互联网工作呢?强势解析eBay BASE模式、去哪儿及蘑菇街分布式架构
互联网行业是大势所趋,从招聘工资水平即可看出,那么如何提升自我技能,满足互联网行业技能要求?需要以目标为导向,进行技能提升,本文主要针对高并发分布式系统设计.架构(数据一致性)做了分析,祝各位早日走上 ...
- Android--SurfaceView播放视频
前言 本篇博客讲解一下如何在Android下,使用SurfaceView播放一个视频流媒体.之前有讲到如何使用MediaPlayer播放音频流媒体,其实MediaPlayer还可以播放视频,只需需要S ...
- 最快的进程间通信方式你get了么
前言:天下武功为快不破!在信息爆炸.快速发展的新时代...,扯远了....进程间通信方式有很多,但最快的方式你知道么?由我娓娓道来... 一.共享内存方式 主角闪亮登场了,噔噔瞪...,最快的方式就是 ...
- jaeger 使用初探
导读:有一天我们接到这样一条客诉“你们的收银软件最近特别慢,严重影响我们的收银效率,再不解决我们就不用了”,我相信大家应该都遇到过这种问题,即使现在没遇到,将来一定会遇到的,那遇到了怎么办呢?就这个话 ...
- leetcode — populating-next-right-pointers-in-each-node
/** * * Source : https://oj.leetcode.com/problems/populating-next-right-pointers-in-each-node/ * Sou ...
- 补习系列(10)-springboot 之配置读取
目录 简介 一.配置样例 二.如何注入配置 1. 缺省配置文件 2. 使用注解 3. 启动参数 还有.. 三.如何读取配置 @Value 注解 Environment 接口 @Configuratio ...
- Linux 文件权限于目录配置
用户与用户组 我們以王三毛為例,王三毛這個『檔案』的擁有者為王三毛,他屬於王大毛這個群組, 而張小豬相對於王三毛,則只是一個『其他人(others)』而已. 不過,這裡有個特殊的人物要來介紹的,那就是 ...
- Java开发笔记(十)一元运算符的技巧
前面讲到赋值运算符的时候,提到“x = x+7”可以被“x += 7”所取代,当然Java编程中给某个变量自加7并不常见,常见的是给某变量自加1,就像走台阶,一般都是一级一级台阶地走,犯不着一下子跳上 ...
- Java开发笔记(五十五)关键字static的用法
前面介绍嵌套类的时候讲到了关键字static,用static修饰类,该类就变成了嵌套类.从嵌套类的用法可知,其它地方访问嵌套类之时,无需动态创建外层类的实例,直接创建嵌套类的实例就行.其实static ...
- php将表单中数据传入到数据库
<html> <head> <meta http-equiv="Content-Type" content="text/html; char ...