Ubuntu下使用Git_4
在这个第四个文章中,我将练习GIT的高级阶段了,由于高级阶段的内容转的比较多,我自己的代码除了我自己可以看懂意外,大家可能看不懂,所以我将会按照
http://git.wiki.navisec.it/stepup/stepup2_1.html这里教程里面的内容进行一次截图演示
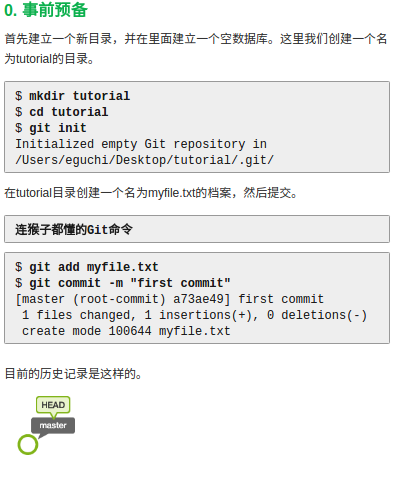
按照教程,我讲先新建一个文件夹,作为本地数据库
$ mkdir tutorial

$ cd tutorial

$ git init

本地数据初始化完毕
下一步就是新建一个文件

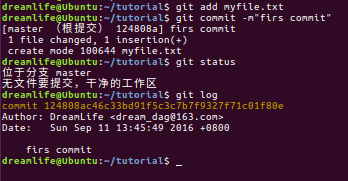
剩下步骤就是吧这个文件添加到git的索引下,并且提交
下一步就是建立分支
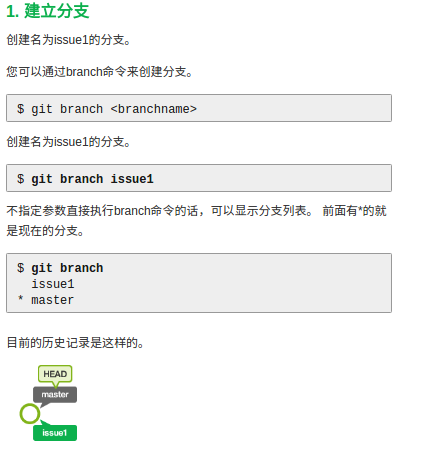
按照教程来
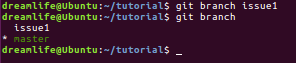
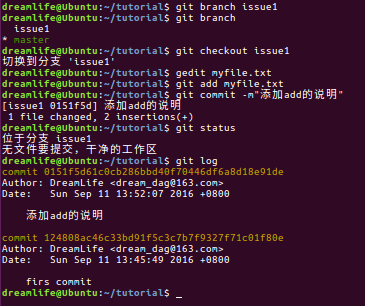
$ git branch issue1

$ git branch
下一步,切换分支
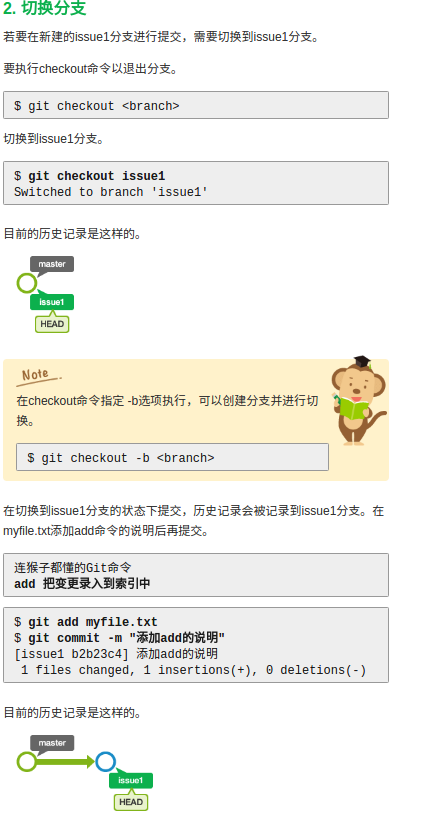
$ git branch issue1

$ git branch
$ git checkout issue1
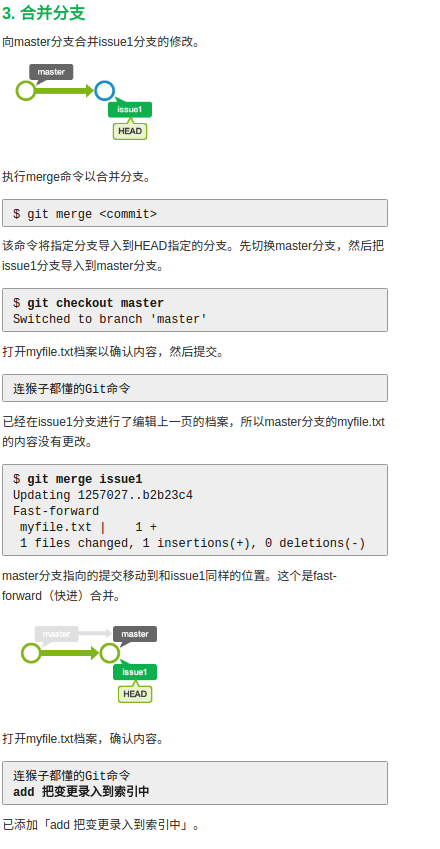
下一步合并分支
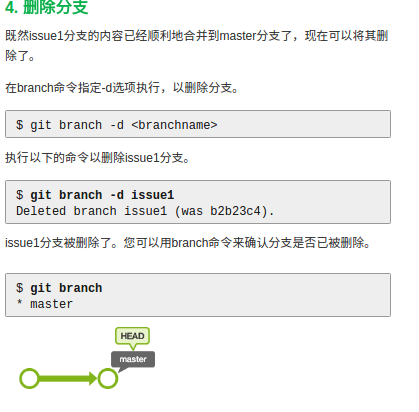
删除分支

下面是最重要的了,就是两个人同时开发的时候,在合并分支的时候,出现合并冲突怎么解决了
和前面的差不多了
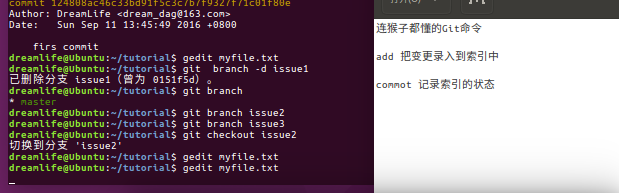
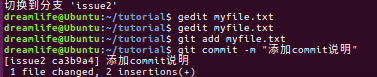
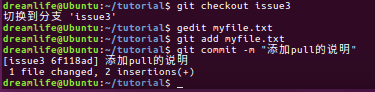
现在在issue2中编辑文件,切换到issue3中编辑文件
下面就是切换到 master分支下合并文件
可以看到,我们可以顺利合并issue2,但是在合并issue3的时候提示内容冲突
这里我们只需要打开文件,手动除了一下冲突就好

完成合并
还有一种合并方式,这里实践一下
还原issue3的合并

切换到issue3下面
合并的时候,会发现有冲突
下面直接打开就好
下面贴上我的所有操作记录
dreamlife@Ubuntu:~$ mkdir tutorial
dreamlife@Ubuntu:~$ cd tutorial
dreamlife@Ubuntu:~/tutorial$ git init
初始化空的 Git 仓库于 /home/dreamlife/tutorial/.git/
dreamlife@Ubuntu:~/tutorial$ gedit myfile.txt
dreamlife@Ubuntu:~/tutorial$ gedit myfile.txt
dreamlife@Ubuntu:~/tutorial$
dreamlife@Ubuntu:~/tutorial$
dreamlife@Ubuntu:~/tutorial$
dreamlife@Ubuntu:~/tutorial$ git add myfile.txt
dreamlife@Ubuntu:~/tutorial$ git commit -m"firs commit"
[master (根提交) 124808a] firs commit
1 file changed, 1 insertion(+)
create mode 100644 myfile.txt
dreamlife@Ubuntu:~/tutorial$ git status
位于分支 master
无文件要提交,干净的工作区
dreamlife@Ubuntu:~/tutorial$ git log
commit 124808ac46c33bd91f5c3c7b7f9327f71c01f80e
Author: DreamLife <dream_dag@163.com>
Date: Sun Sep 11 13:45:49 2016 +0800 firs commit
dreamlife@Ubuntu:~/tutorial$ git branch issue1
dreamlife@Ubuntu:~/tutorial$ git branch
issue1
* master
dreamlife@Ubuntu:~/tutorial$ git checkout issue1
切换到分支 'issue1'
dreamlife@Ubuntu:~/tutorial$ gedit myfile.txt
dreamlife@Ubuntu:~/tutorial$ git add myfile.txt
dreamlife@Ubuntu:~/tutorial$ git commit -m"添加add的说明"
[issue1 0151f5d] 添加add的说明
1 file changed, 2 insertions(+)
dreamlife@Ubuntu:~/tutorial$ git status
位于分支 issue1
无文件要提交,干净的工作区
dreamlife@Ubuntu:~/tutorial$ git log
commit 0151f5d61c0cb286bbd40f70446df6a8d18e91de
Author: DreamLife <dream_dag@163.com>
Date: Sun Sep 11 13:52:07 2016 +0800 添加add的说明 commit 124808ac46c33bd91f5c3c7b7f9327f71c01f80e
Author: DreamLife <dream_dag@163.com>
Date: Sun Sep 11 13:45:49 2016 +0800 firs commit
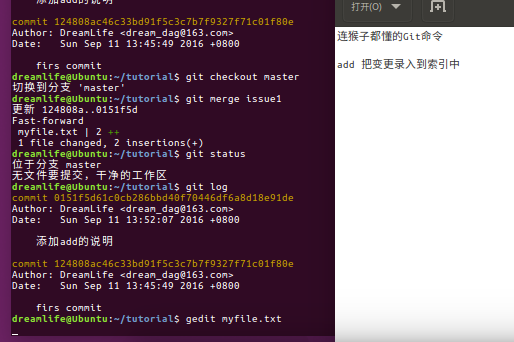
dreamlife@Ubuntu:~/tutorial$ git checkout master
切换到分支 'master'
dreamlife@Ubuntu:~/tutorial$ git merge issue1
更新 124808a..0151f5d
Fast-forward
myfile.txt | 2 ++
1 file changed, 2 insertions(+)
dreamlife@Ubuntu:~/tutorial$ git status
位于分支 master
无文件要提交,干净的工作区
dreamlife@Ubuntu:~/tutorial$ git log
commit 0151f5d61c0cb286bbd40f70446df6a8d18e91de
Author: DreamLife <dream_dag@163.com>
Date: Sun Sep 11 13:52:07 2016 +0800 添加add的说明 commit 124808ac46c33bd91f5c3c7b7f9327f71c01f80e
Author: DreamLife <dream_dag@163.com>
Date: Sun Sep 11 13:45:49 2016 +0800 firs commit
dreamlife@Ubuntu:~/tutorial$ gedit myfile.txt
dreamlife@Ubuntu:~/tutorial$ git branch -d issue1
已删除分支 issue1(曾为 0151f5d)。
dreamlife@Ubuntu:~/tutorial$ git branch
* master
dreamlife@Ubuntu:~/tutorial$ git branch issue2
dreamlife@Ubuntu:~/tutorial$ git branch issue3
dreamlife@Ubuntu:~/tutorial$ git checkout issue2
切换到分支 'issue2'
dreamlife@Ubuntu:~/tutorial$ gedit myfile.txt
dreamlife@Ubuntu:~/tutorial$ gedit myfile.txt
dreamlife@Ubuntu:~/tutorial$ git add myfile.txt
dreamlife@Ubuntu:~/tutorial$ git commit -m "添加commit说明"
[issue2 ca3b9a4] 添加commit说明
1 file changed, 2 insertions(+)
dreamlife@Ubuntu:~/tutorial$ git checkout issue3
切换到分支 'issue3'
dreamlife@Ubuntu:~/tutorial$ gedit myfile.txt
dreamlife@Ubuntu:~/tutorial$ git add myfile.txt
dreamlife@Ubuntu:~/tutorial$ git commit -m "添加pull的说明"
[issue3 6f118ad] 添加pull的说明
1 file changed, 2 insertions(+)
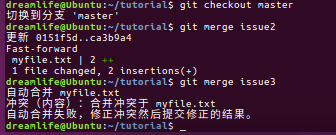
dreamlife@Ubuntu:~/tutorial$ git checkout master
切换到分支 'master'
dreamlife@Ubuntu:~/tutorial$ git merge issue2
更新 0151f5d..ca3b9a4
Fast-forward
myfile.txt | 2 ++
1 file changed, 2 insertions(+)
dreamlife@Ubuntu:~/tutorial$ git merge issue3
自动合并 myfile.txt
冲突(内容):合并冲突于 myfile.txt
自动合并失败,修正冲突然后提交修正的结果。
dreamlife@Ubuntu:~/tutorial$ gedit myfile.txt
dreamlife@Ubuntu:~/tutorial$ git add myfile.txt
dreamlife@Ubuntu:~/tutorial$ git commit -m "合并issue3分支"
[master c42c43a] 合并issue3分支
dreamlife@Ubuntu:~/tutorial$ git reset --hard HEAD`
> ^C
dreamlife@Ubuntu:~/tutorial$ git reset --hard HEAD~
HEAD 现在位于 ca3b9a4 添加commit说明
dreamlife@Ubuntu:~/tutorial$ gedit myfile.txt
dreamlife@Ubuntu:~/tutorial$ git che
checkout cherry cherry-pick
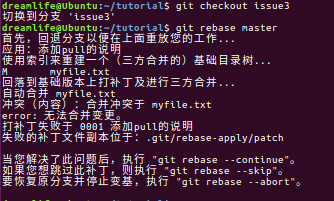
dreamlife@Ubuntu:~/tutorial$ git checkout issue3
切换到分支 'issue3'
dreamlife@Ubuntu:~/tutorial$ git rebase master
首先,回退分支以便在上面重放您的工作...
应用:添加pull的说明
使用索引来重建一个(三方合并的)基础目录树...
M myfile.txt
回落到基础版本上打补丁及进行三方合并...
自动合并 myfile.txt
冲突(内容):合并冲突于 myfile.txt
error: 无法合并变更。
打补丁失败于 0001 添加pull的说明
失败的补丁文件副本位于:.git/rebase-apply/patch 当您解决了此问题后,执行 "git rebase --continue"。
如果您想跳过此补丁,则执行 "git rebase --skip"。
要恢复原分支并停止变基,执行 "git rebase --abort"。 dreamlife@Ubuntu:~/tutorial$ gedit myfile.txt
dreamlife@Ubuntu:~/tutorial$ git add myfile.txt
dreamlife@Ubuntu:~/tutorial$ git rebase --continue
应用:添加pull的说明
dreamlife@Ubuntu:~/tutorial$ git checkout master
切换到分支 'master'
dreamlife@Ubuntu:~/tutorial$ git merge issue3
更新 ca3b9a4..15c5986
Fast-forward
myfile.txt | 4 ++++
1 file changed, 4 insertions(+)
dreamlife@Ubuntu:~/tutorial$
dreamlife@Ubuntu:~/tutorial$
在合并冲突这个地方,我联系了好多次,大家也可以多联系几次,这里还是希望大家看下链接中内容,真的写的很好
http://git.wiki.navisec.it/stepup/stepup2_8.html

Ubuntu下使用Git_4的更多相关文章
- 在Ubuntu下搭建ASP.NET 5开发环境
在Ubuntu下搭建ASP.NET 5开发环境 0x00 写在前面的废话 年底这段时间实在太忙了,各种事情都凑在这个时候,没时间去学习自己感兴趣的东西,所以博客也好就没写了.最近工作上有个小功能要做成 ...
- 在Ubuntu下搭建Spark群集
在前一篇文章中,我们已经搭建好了Hadoop的群集,接下来,我们就是需要基于这个Hadoop群集,搭建Spark的群集.由于前面已经做了大量的工作,所以接下来搭建Spark会简单很多. 首先打开三个虚 ...
- Ubuntu下开启php调试模式,显示报错信息
在Ubuntu下php的缺省设置是不显示错误信息的,如果程序出错会显示“无法处理此请求的错误提示”,这在开发环境下非常不方便. 其实我们只要编辑下apache的配置文件就好 1.我的apache 配置 ...
- 在Ubuntu下安装ovs-dpdk
在Ubuntu下安装ovs-dpdk 参考资料:https://software.intel.com/zh-cn/articles/using-open-vswitch-with-dpdk-on-ub ...
- Ubuntu 下安装QT
Ubuntu 下安装QT 本文使用的环境 QT Library: qt-everywhere-opensource-src-4.7.4.tar.gz QT Creator: qt-creator-li ...
- Torch7在Ubuntu下的安装与配置
Torch7的本系列教程的主要目的是介绍Torch的入门使用.今天首先分享一下Torch7的安装.(在Ubuntu14.04安装torch7) 为什么选择Torch Torch的目标是在建立科学算法的 ...
- Ubuntu 下ibus拼音输入法启用 (ubuntu 16.04
Ubuntu 下ibus拼音输入法启用 我安装的是英文版的ubuntu 16.04,打开只带英文,并没有中文. 设置输入法为iBus 从system settings 进入language suppo ...
- Ubuntu下git的安装与使用
Ubuntu下git的安装与使用 Ubuntu下git的安装与使用与Windows下的大致相同,只不过个人感觉在Ubuntu下使用git更方便. 首先,确认你的系统是否已安装git,可以通过git指令 ...
- 在ubuntu下安装google chrome
由于手上有两台电脑,再加上我那个选择困难症加上纠结劲.所以果断把其中一台电脑只装linux系统,另一台电脑只装windows了.免得我老纠结!于是linux便选择了ubuntu. 由于浏览器一直用的是 ...
随机推荐
- 使用intellij idea创建JSP和引入Tomecat包
首先我们需要按照好intellij idea 如果没有安装好,这里有下载按照教程:https://www.cnblogs.com/weibanggang/p/9395702.html 首先我们创建一个 ...
- PAT1067. Sort with Swap(0, *) (25) 并查集
PAT1067. Sort with Swap(0, *) (25) 并查集 题目大意 给定一个序列, 只能进行一种操作: 任一元素与 0 交换位置, 问最少需要多少次交换. 思路 最优解就是每次 0 ...
- 【OJ-UVa227】
耗时一周.哭. 本题重在输入输出.所以对英文题目的理解非常重要.看清楚题目,省时省力. 题目要点: 1.开始有5×5的数据,每行仅有5个字符.注意:样例输入中的尾部空格是无法复制的(UVa官网上),其 ...
- Tomcat 启动速度优化
创建一个web项目 选择发布到 汤姆猫 的下面 deploy path: 表示发布到的文件名称 把项目添加到 tomcat 里,运行,我们可以在 tomcat里找到我们发布的项目: 现在启动时间: 现 ...
- c的三个内存分配函数(malloc,realloc,calloc)
//内存分配_malloc int main(){ int *p; char *p1; p=(int *)malloc(sizeof(*p)*size);//size为需要存储的数量 p1=();// ...
- vue源码解读1
前言 vue是一个非常典型的MVVM框架,它的核心功能一是双向数据绑定系统,二是组件化开发系统.那么本文是以一种通俗易懂的的角度来实现一个简单 的双向数据绑定系统,如果你用过vue却对vue的实现原理 ...
- UITableView的plain样式下,取消区头停滞效果
核心代码 - (void)scrollViewDidScroll:(UIScrollView *)scrollView { CGFloat sectionHeaderHeight = sectionH ...
- js的事件流你真的弄明白了吗?
当浏览器发展到第四代时候,浏览器开发团队遇到了一个有意思的问题:页面的哪一部分会拥有某个特地的事件?要明白这个问题问的是什么,可以想象画在纸上的一组同心圆,如果你把手指放在圆心上,那么你的手指指向的不 ...
- WebGL学习笔记(4)
本篇笔记加强了上篇笔记示例代码的程序,实现了使用nodejs-websocket来广播每个玩家的坐标数据并在同一个世界模型中进行多人在线交互. websocket服务端: 安装nodejs与npm,创 ...
- 洛谷P1196 [NOI2002]银河英雄传说(带权并查集)
题目描述 公元五八○一年,地球居民迁至金牛座α第二行星,在那里发表银河联邦创立宣言,同年改元为宇宙历元年,并开始向银河系深处拓展. 宇宙历七九九年,银河系的两大军事集团在巴米利恩星域爆发战争.泰山压顶 ...