vue webpack多页面构建
项目示例地址: https://github.com/ccyinghua/webpack-multipage
项目运行:
下载项目之后

# 下载依赖

npm install

# 运行

npm run dev

http://localhost:3000/login.html

http://localhost:3000/index.html
一、开发环境
node v6.11.0
二、安装vue-cli脚手架
npm install vue-cli@2.8.2 -g
三、初始化项目
vue init webpack webpack-multipage  // 创建项目

cd webpack-multipage  // 进入webpack-multipage目录

npm install  // 下载依赖

npm run dev // 运行

http://localhost:8080
四、修改配置支持多页面
将项目根目录index.html,src下的文件删除,重新调整的src结构目录:
|-- src

    |-- assets

    |-- components

    |-- entry

        |-- index    // index模块

            |-- components

                |-- Hello.vue

            |-- router

                |-- index.js

            |-- index.html

            |-- index.js

            |-- index.vue

        |-- login    // login模块

            |-- login.html

            |-- login.js

            |-- login.vue
(1) 修改build/util.js,在文件最后添加
# 先下载glob组件

npm install glob -D
将目录映射成配置。如./src/entry/login/login.js变成映射{login: './src/entry/login/login.js'}
var glob = require('glob');

exports.getEntries = function (globPath) {

  var entries = {}

  glob.sync(globPath).forEach(function (entry) {

    var basename = path.basename(entry, path.extname(entry), 'router.js');

    entries[basename] = entry

  });

  return entries;

}
(2) 修改build/webpack.base.conf.js,找到entry属性,使用了uitls.js文件中新添加的方法getEntries,将entry中的js都映射成程序的入口
module.exports = {

  entry: utils.getEntries('./src/entry/*/*.js'),

  ...

}
(3) 修改build/webpack.dev.conf.js
删除文件内原有的HtmlWebpackPlugin相关内容
...

// https://github.com/ampedandwired/html-webpack-plugin

new HtmlWebpackPlugin({

  filename: 'index.html',

  template: 'index.html',

  inject: true

}),

...
在文件最后添加
var pages = utils.getEntries('./src/entry/*/*.html')

for(var page in pages) {

  // 配置生成的html文件,定义路径等

  var conf = {

    filename: page + '.html',

    template: pages[page], //模板路径

    inject: true,

    // excludeChunks 允许跳过某些chunks, 而chunks告诉插件要引用entry里面的哪几个入口

    // 如何更好的理解这块呢?举个例子:比如本demo中包含两个模块(index和about),最好的当然是各个模块引入自己所需的js,

    // 而不是每个页面都引入所有的js,你可以把下面这个excludeChunks去掉,然后npm run build,然后看编译出来的index.html和about.html就知道了

    // filter:将数据过滤,然后返回符合要求的数据,Object.keys是获取JSON对象中的每个key

    excludeChunks: Object.keys(pages).filter(item => {

      return (item != page)

    })

  }

  // 需要生成几个html文件,就配置几个HtmlWebpackPlugin对象

  devWebpackConfig.plugins.push(new HtmlWebpackPlugin(conf))

}
(4) 修改build/webpack.prod.conf.js
删除文件内原有的HtmlWebpackPlugin相关内容
...

// generate dist index.html with correct asset hash for caching.

// you can customize output by editing /index.html

// see https://github.com/ampedandwired/html-webpack-plugin

new HtmlWebpackPlugin({

    filename: config.build.index,

    template: 'index.html',

    inject: true,

    minify: {

        removeComments: true,

        collapseWhitespace: true,

        removeAttributeQuotes: true

        // more options:

        // https://github.com/kangax/html-minifier#options-quick-reference

    },

    // necessary to consistently work with multiple chunks via CommonsChunkPlugin

    chunksSortMode: 'dependency'

}),

...
在文件最后添加
var pages = utils.getEntries('./src/entry/*/*.html')

for(var page in pages) {

  // 配置生成的html文件,定义路径等

  var conf = {

    filename: page + '.html',

    template: pages[page], //模板路径

    inject: true,

    // excludeChunks 允许跳过某些chunks, 而chunks告诉插件要引用entry里面的哪几个入口

    // 如何更好的理解这块呢?举个例子:比如本demo中包含两个模块(index和about),最好的当然是各个模块引入自己所需的js,

    // 而不是每个页面都引入所有的js,你可以把下面这个excludeChunks去掉,然后npm run build,然后看编译出来的index.html和about.html就知道了

    // filter:将数据过滤,然后返回符合要求的数据,Object.keys是获取JSON对象中的每个key

    excludeChunks: Object.keys(pages).filter(item => {

      return (item != page)

    }),

    minify: {

        removeComments: true,

        collapseWhitespace: true,

        removeAttributeQuotes: true

        // more options:

        // https://github.com/kangax/html-minifier#options-quick-reference

      },

      // necessary to consistently work with multiple chunks via CommonsChunkPlugin

      chunksSortMode: 'dependency'

  }

  // 需要生成几个html文件,就配置几个HtmlWebpackPlugin对象

  module.exports.plugins.push(new HtmlWebpackPlugin(conf))

}
(5)修改config/index.js
'use strict'

// Template version: 1.3.1

// see http://vuejs-templates.github.io/webpack for documentation.

const path = require('path')

module.exports = {

  dev: {

    env: require('./dev.env'),  // 引入当前目录下的dev.env.js,用来指明开发环境

    port: 3000,  // dev-server的端口号,可以自行更改

    autoOpenBrowser: true,  // 是否自定代开浏览器

    // Paths

    assetsSubDirectory: 'static',

    assetsPublicPath: '/',

    // 下面是代理表,作用是用来,建一个虚拟api服务器用来代理本机的请求,只能用于开发模式

    proxyTable: {

        "/demo/api":"http://localhost:8080"

    },

    // Various Dev Server settings

    host: 'localhost', // can be overwritten by process.env.HOST

    autoOpenBrowser: false,

    errorOverlay: true,

    notifyOnErrors: true,

    poll: false, // https://webpack.js.org/configuration/dev-server/#devserver-watchoptions-

    /**

     * Source Maps

     */

    // https://webpack.js.org/configuration/devtool/#development

    devtool: 'cheap-module-eval-source-map',

    // If you have problems debugging vue-files in devtools,

    // set this to false - it *may* help

    // https://vue-loader.vuejs.org/en/options.html#cachebusting

    cacheBusting: true,

    // CSS Sourcemaps off by default because relative paths are "buggy"

    // with this option, according to the CSS-Loader README

    // (https://github.com/webpack/css-loader#sourcemaps)

    // In our experience, they generally work as expected,

    // just be aware of this issue when enabling this option.

    // 是否生成css,map文件,上面这段英文就是说使用这个cssmap可能存在问题,但是按照经验,问题不大,可以使用

    cssSourceMap: false

  },

  build: {

    env: require('./prod.env'),  // 导入prod.env.js配置文件,只要用来指定当前环境

    // Template for index.html

    index: path.resolve(__dirname, '../dist/index.html'),  // 相对路径的拼接

    // Paths

    assetsRoot: path.resolve(__dirname, '../dist'),  // 静态资源的根目录 也就是dist目录

    assetsSubDirectory: 'static',  // 静态资源根目录的子目录static,也就是dist目录下面的static

    assetsPublicPath: '/',   // 静态资源的公开路径,也就是真正的引用路径

    /**

     * Source Maps

     */

    productionSourceMap: true,   // 改成false运行时不会出现map调试文件。;是否生成生产环境的sourcmap,sourcmap是用来debug编译后文件的,通过映射到编译前文件来实现

    // https://webpack.js.org/configuration/devtool/#production

    devtool: '#source-map',

    // Gzip off by default as many popular static hosts such as

    // Surge or Netlify already gzip all static assets for you.

    // Before setting to `true`, make sure to:

    // npm install --save-dev compression-webpack-plugin

    productionGzip: false,  // 是否在生产环境中压缩代码,如果要压缩必须安装compression-webpack-plugin

    productionGzipExtensions: ['js', 'css'],  // 定义要压缩哪些类型的文件

    // Run the build command with an extra argument to

    // View the bundle analyzer report after build finishes:

    // `npm run build --report`

    // Set to `true` or `false` to always turn it on or off

    // 下面是用来开启编译完成后的报告,可以通过设置值为true和false来开启或关闭

    // 下面的process.env.npm_config_report表示定义的一个npm_config_report环境变量,可以自行设置

    bundleAnalyzerReport: process.env.npm_config_report

  }

}
assetsRoot:执行npm run build之后,项目生成的文件放到哪个目录中。vue生成的文件都是静态文件,可以放在nginx中,也可以放到Spring Boot项目的resources/static目录中。

assetsPublicPath:项目的根路径。注意,这个属性在build、dev两个环境都有,修改时,应该同时修改两处。

port:这里改成3000,这个是在开发时,webpack-dev-server运行的端口。

proxyTable:这个属性用于将请求转发到指定地址去。这里的配置意思是将所有以/demo/api开头的请求,都转发到http://localhost:8080地址。
五、建立页面
index/index.html
<!DOCTYPE html>

<html>

<head>

  <meta charset="utf-8">

  <title>index</title>

</head>

<body>

  <div id="app"></div>

</body>

</html>
index/index.js
import Vue from 'vue'

import IndexView from './index.vue'

import router from './router'

// import VueResource from 'vue-resource';  // 使用前先npm install vue-resource --save下载vue-resource

// Vue.use(VueResource);

new Vue({

  el: '#app',

  router,

  render: h => h(IndexView)

});
index/index.vue
<template>

  <div>

    <router-view></router-view>

  </div>

</template>

<script>

  export default {

  }

</script>

<style>

</style>
index/router/index.js
import Vue from 'vue'

import Router from 'vue-router'

import Hello from '../components/Hello.vue'

Vue.use(Router);

export default new Router({

  routes: [

    {

      path: '/',

      name: 'Hello',

      component: Hello

    }

  ]

})
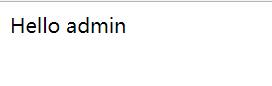
index/components/Hello.vue
<template>

  <div>

    Hello {{ name }}

  </div>

</template>

<script>

  export default {

    data(){

      return {

        name: "admin"

      }

    },

    mounted(){

      //this.$http.get("/demo/api/userinfo").then(resp =>{

      //  this.name = resp.data.data;

      //});

    }

  }

</script>

<style>

</style>
login/login.html
<!DOCTYPE html>

<html>

<head>

  <meta charset="utf-8">

  <title>login</title>

</head>

<body>

  <div id="app"></div>

</body>

</html>
login/login.js
import Vue from 'vue'

import LoginView from './login.vue'

// import VueResource from 'vue-resource';

// Vue.use(VueResource);

new Vue({

  el: '#app',

  render: h => h(LoginView)

})
login/login.vue
<template>

  <div>

    <form id="login-form">

      <label for="username">用户名:</label>

      <input type="text" id="username" name="username">

      <br>

      <label for="password">密码:</label>

      <input type="password" id="password" name="password"><br>

      <br>

      <button @click.prevent="submit">登录</button>

    </form>

  </div>

</template>

<script>

  export default {

    methods:{

      submit(){

        window.location = "/demo/index.html";

        //let formData = new FormData(document.getElementById("login-form"));

        //this.$http.post("/demo/api/login", formData).then(resp => {

        //  if (resp.data.status === 200){

        //    window.location = "/index.html";

        //  }else {

        //    alert(resp.data.desc);

        //  }

        //})

      }

    }

  }

</script>

<style>

</style>
六、运行
http://localhost:3000/login.html

http://localhost:3000/index.html
vue webpack多页面构建的更多相关文章
- webpack 多页面构建
目标: 基于webpack支持react多页面构建(不用gulp,gulp-webpack 构建速度太慢[3]), generator-react-webpack 对单页面支持很好,但对多页面,需要改 ...
- [转] vue&webpack多页面配置
前言 最近由于项目需求,选择使用vue框架,webpack打包直接使用的vue-cli,因为需要多页面而vue-cli只有单页面,所以就决定修改vue-cli的配置文件来满足开发需求. html-we ...
- vue&webpack多页面配置
前言 最近由于项目需求,选择使用vue框架,webpack打包直接使用的vue-cli,因为需要多页面而vue-cli只有单页面,所以就决定修改vue-cli的配置文件来满足开发需求. html-we ...
- 【原创】从零开始搭建Electron+Vue+Webpack项目框架,一套代码,同时构建客户端、web端(二)
摘要:上篇文章说到了如何新建工程,并启动一个最简单的Electron应用.“跑起来”了Electron,那就接着把Vue“跑起来”吧.有一点需要说明的是,webpack是贯穿这个系列始终的,我也是本着 ...
- 使用Vue和djangoframwork完成登录页面构建 001
使用Vue和djangoframwork完成登录页面构建 001 环境的搭建 首先,我在我的电脑的F盘创建了一个文件夹 forNote,进入到这个文件夹中 F:\forNote> vue环境的搭 ...
- Vue实战Vue-cli项目构建(Vue+webpack系列之一)
用Vue比较长一段时间了,大大小小做了一些项目,最近想总结一下知识点,出一个Vue+webpack系列,先从项目构建说起--vue-cli. 由于是Vue+webpack这里就不赘述git那些东西,默 ...
- 高性能流媒体服务器EasyDSS前端重构(一)-从零开始搭建 webpack + vue + AdminLTE 多页面脚手架
本文围绕着实现EasyDSS高性能流媒体服务器的前端框架来展开的,具体EasyDSS的相关信息可在:www.easydss.com 找到! EasyDSS 高性能流媒体服务器前端架构概述 EasyDS ...
- 高性能流媒体服务器EasyDSS前端重构(三)- webpack + vue + AdminLTE 多页面引入 element-ui
接上篇 接上篇<高性能流媒体服务器EasyDSS前端重构(二) webpack + vue + AdminLTE 多页面提取共用文件, 优化编译时间> 本文围绕着实现EasyDSS高性能流 ...
- 高性能流媒体服务器EasyDSS前端重构(二) webpack + vue + AdminLTE 多页面提取共用文件, 优化编译时间
本文围绕着实现EasyDSS高性能流媒体服务器的前端框架来展开的,具体EasyDSS的相关信息可在:www.easydss.com 找到! 接上回 <高性能流媒体服务器EasyDSS前端重构(一 ...
随机推荐
- artDialog组件应用学习(五)
一.artDialog事件应用 对话框编写代码 function DialogEvent() { seajs.use(['jquery', '/Scripts/arale/artDialog/src/ ...
- spring集成JPA的三种方法配置
JPA是Java EE5规范之一,是一个orm规范,由厂商来实现该规范.目前有hibernate,OpenJPA,TopLink和EclipseJPA等实现 spring提供三种方法集成JPA:1.L ...
- Spring Cloud Ribbon负载均衡配置类放在Spring boot主类同级增加Exclude过滤后报Field config in com.cloud.web.controller.RibbonConfiguration required a bean of type 'com.netflix.client.config.IClientConfig' that could not b
环境: Spring Cloud:Finchley.M8 Spring Boot:2.0.0.RELEASE 目录结构: 可以看到代码第13行的注释,我已经在@ComponentScan注解中添加了E ...
- scss-@mixin传参
混合器一个很重要特性就是可以传递参数,可以根据不同场景来定制css代码的复用.极大提高了混合器的适用性,看如下scss代码实例: @mixin makeradius($radius) { border ...
- overflow:hidden的用法
overflow:hidden是大家常用到的CSS样式,但是大多数人对这个样式的理解仅仅局限于隐藏溢出,而对于清除浮动这个含义不是很了解. <%@ Page Language="C#& ...
- iOS 在Host App 与 App Extension 之间发送通知
如何从你的一个App发送通知给另一个App? (例:搜狗输入法下载皮肤完成后使用皮肤) 注:搜狗输入法是App.而键盘是Extension 当你为你的App 添加 App Extension时,如果想 ...
- Java & COM
- cordova 开发 ios app 简要流程
1 安装node.js环境 官网: http://nodejs.org/ 点击[install],会下载mac的安装包.正常安装即可 2 安装cordova:npm install -g cordo ...
- Python单元测试框架unittest使用方法讲解
这篇文章主要介绍了Python单元测试框架unittest使用方法讲解,本文讲解了unittest概述.命令行接口.测试案例自动搜索.创建测试代码.构建测试套件方法等内容,需要的朋友可以参考下 概 ...
- file中mkdirs和mkdir的区别-文件上传
mkdirs()可以建立多级文件夹, mkdir()只会建立一级的文件夹, 如下: new File("/tmp/one/two/three").mkdirs(); 执行后, 会建 ...