Android 手机卫士--自定义组合控件构件布局结构
由于设置中心条目中的布局都很类似,所以可以考虑使用自定义组合控件来简化实现
本文地址:http://www.cnblogs.com/wuyudong/p/5909043.html,转载请注明源地址。
自定义组合控件
1.将已经编写好的布局文件,抽取到一个类中去做管理,下次还需要使用此布局结构的时候,直接使用组合控件对应的对象.
2.将组合控件的布局,抽取到单独的一个xml中
新建布局文件:setting_item_view.xml,将上篇文章中布局文件中的代码放进去
<?xml version="1.0" encoding="utf-8"?>

<RelativeLayout xmlns:android="http://schemas.android.com/apk/res/android"

    android:layout_width="match_parent"

    android:layout_height="wrap_content" >

    <RelativeLayout

        android:layout_width="match_parent"

        android:layout_height="wrap_content"

        android:padding="5dp" >

        <TextView

            android:id="@+id/tv_title"

            android:layout_width="wrap_content"

            android:layout_height="wrap_content"

            android:text="自动更新设置"

            android:textColor="#000"

            android:textSize="18sp" />

        <TextView

            android:id="@+id/tv_des"

            android:layout_width="wrap_content"

            android:layout_height="wrap_content"

            android:layout_below="@id/tv_title"

            android:text="自动更新已关闭"

            android:textColor="#000"

            android:textSize="18sp" />

        <CheckBox

            android:id="@+id/cb_box"

            android:layout_width="wrap_content"

            android:layout_height="wrap_content"

            android:layout_alignParentRight="true"

            android:layout_centerVertical="true" />

        <View

            android:layout_width="match_parent"

            android:layout_height="1dp"

            android:layout_below="@id/tv_des"

            android:background="#000" />

    </RelativeLayout>

</RelativeLayout>
3.通过一个单独的类SettingItemView.java,去加载此段布局文件.
package com.wuyudong.mobilesafe.view;

import com.wuyudong.mobilesafe.R;

import android.content.Context;

import android.util.AttributeSet;

import android.view.View;

import android.widget.CheckBox;

import android.widget.RelativeLayout;

import android.widget.TextView;

public class SettingItemView extends RelativeLayout {

    private TextView tv_des;

    private CheckBox cb_box;

    public SettingItemView(Context context) {

        this(context, null);

    }

    public SettingItemView(Context context, AttributeSet attrs) {

        this(context, attrs, 0);

    }

    public SettingItemView(Context context, AttributeSet attrs, int defStyle) {

        super(context, attrs, defStyle);

        // xml-->view 将设置界面的条目转换成view对象

        View.inflate(context, R.layout.setting_item_view, this);

        // 等同于以下两行代码

        /*

         * View view = View.inflate(context, R.layout.setting_item_view, null);

         * this.addView(view);

         */

        //自定义组合控件中的标题描述

        TextView tv_title = (TextView) findViewById(R.id.tv_title);

        tv_des = (TextView) findViewById(R.id.tv_des);

        cb_box = (CheckBox) findViewById(R.id.cb_box);

    }

}
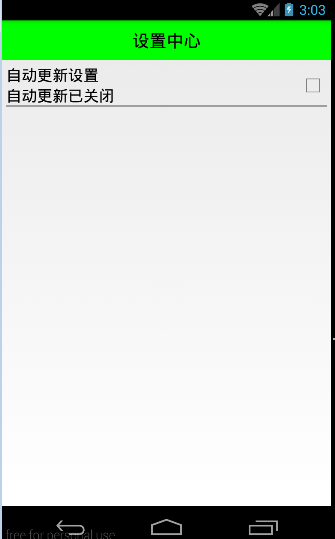
这样只需要简单的几行代码就可以完成布局文件的调用
<?xml version="1.0" encoding="utf-8"?>

<LinearLayout xmlns:android="http://schemas.android.com/apk/res/android"

    android:layout_width="match_parent"

    android:layout_height="match_parent"

    android:orientation="vertical" >

    <TextView

        style="@style/TitleStyle"

        android:text="设置中心" />

    <!--

    <RelativeLayout

        android:layout_width="match_parent"

        android:layout_height="wrap_content"

        android:padding="5dp" >

        <TextView

            android:id="@+id/tv_title"

            android:layout_width="wrap_content"

            android:layout_height="wrap_content"

            android:text="自动更新设置"

            android:textColor="#000"

            android:textSize="18sp" />

        <TextView

            android:id="@+id/tv_des"

            android:layout_width="wrap_content"

            android:layout_height="wrap_content"

            android:layout_below="@id/tv_title"

            android:text="自动更新已关闭"

            android:textColor="#000"

            android:textSize="18sp" />

        <CheckBox

            android:id="@+id/cb_box"

            android:layout_alignParentRight="true"

            android:layout_centerVertical="true"

            android:layout_width="wrap_content"

            android:layout_height="wrap_content" />

        <View

            android:layout_below="@id/tv_des"

            android:background="#000"

            android:layout_width="match_parent"

            android:layout_height="1dp"

            />

    </RelativeLayout>

    -->

    <com.wuyudong.mobilesafe.view.SettingItemView

        android:layout_width="match_parent"

        android:layout_height="wrap_content" >

    </com.wuyudong.mobilesafe.view.SettingItemView>

</LinearLayout>
运行项目后,有如下效果:
Android 手机卫士--自定义组合控件构件布局结构的更多相关文章
- [android] 手机卫士自定义组合控件
设置中心 新建SettingActivity 设置GridView条目的点击事件 调用GridView对象的setOnItemClickListenner()方法,参数:OnItemClickList ...
- [android] 手机卫士自定义滚动控件
TextView控件设置单行显示 android:singleLine=”true” 设置TextView开始的位置显示省略号,android:ellipsize=”start” 设置滚动属性,and ...
- Android自定义控件之自定义组合控件
前言: 前两篇介绍了自定义控件的基础原理Android自定义控件之基本原理(一).自定义属性Android自定义控件之自定义属性(二).今天重点介绍一下如何通过自定义组合控件来提高布局的复用,降低开发 ...
- Android开发之自定义组合控件
自定义组合控件的步骤1.自定义一个View,继承ViewGroup,比如RelativeLayout2.编写组合控件的布局文件,在自定义的view中加载(使用View.inflate())3.自定义属 ...
- Android自定义控件之自定义组合控件(三)
前言: 前两篇介绍了自定义控件的基础原理Android自定义控件之基本原理(一).自定义属性Android自定义控件之自定义属性(二).今天重点介绍一下如何通过自定义组合控件来提高布局的复用,降低开发 ...
- android自定义控件(五) 自定义组合控件
转自http://www.cnblogs.com/hdjjun/archive/2011/10/12/2209467.html 代码为自己编写 目标:实现textview和ImageButton组合, ...
- Android Studio自定义组合控件
在Android的开发中,为了能够服用代码,会把有一定共有特点的控件组合在一起定义成一个自定义组合控件. 本文就详细讲述这一过程.虽然这样的View的组合有一个粒度的问题.粒度太大了无法复用,粒度太小 ...
- Android自定义组合控件详细示例 (附完整源码)
在我们平时的Android开发中,有时候原生的控件无法满足我们的需求,或者经常用到几个控件组合在一起来使用.这个时候,我们就可以根据自己的需求创建自定义的控件了,一般通过继承View或其子类来实现. ...
- Android开发学习笔记-自定义组合控件的过程
自定义组合控件的过程 1.自定义一个View 一般来说,继承相对布局,或者线性布局 ViewGroup:2.实现父类的构造方法.一般来说,需要在构造方法里初始化自定义的布局文件:3.根据一些需要或者需 ...
随机推荐
- OpenJudge2728:摘花生 解题报告
2728:摘花生 总时间限制: 1000ms 内存限制: 65536kB 描述 Hello Kitty 想摘点花生送给她喜欢的米老鼠.她来到一片有网格状道路的矩形花生地(如下图),从西北角进去,东南 ...
- UI自动化测试框架(项目实战)python、Selenium(日志、邮件、pageobject)
其实百度UI自动化测试框架,会出来很多相关的信息,不过就没有找到纯项目的,无法拿来使用的:所以我最近就写了一个简单,不过可以拿来在真正项目中可以使用的测试框架. 项目的地址:https://githu ...
- 用原生JS读写CSS样式的方法总结
为了日后方便查询,本人翻阅了一些资料总结了以下方法,仅限原生JS,如有不对的地方欢迎指出!只求大家看完觉得有学到点什么就OK了! 一.可以通过DOM节点对象的style对象(即CSSStyleDe ...
- 再一个客户端设置多个git账号
步骤一:用ssh-keygen命令生成一组新的id_rsa_new和id_rsa_new.pub. ssh-keygen -t rsa -C "new email" 平时我们都是直 ...
- WinPhone学习笔记(一)——页面导航与页面相关
最近学一下Windows Phone(接下来简称“WinPhone”)的开发,在很久很久前稍探究一下WinPhone中对一些传感器的开发,那么现在就从头来学学WinPhone的开发.先从WinPhon ...
- 关于.net页面提交后css样式不生效的发现
一直以来没有解决的问题,今天在老师的提示下终于得到解决. 问题:asp.net页面,提交后,或者举例最简单的例子通俗的说,当登陆页面,某一项输入错误,并且使用Response.Write(" ...
- SEO技巧汇集
每个人都喜欢好用的技巧,对吗?这里有55个用于搜索引擎优化的小技巧,甚至你的老妈用起来都易如反掌.哦,不是我的老妈,但你明白我的意思.这意味着网页设计师和SEO新手中大部分人都能迅速上手,没有任何困难 ...
- 暴风冯鑫:去美国香港的99%都亏,互联网公司打死都要回A股
“上市之后,我回答得最多的两句话:一句是运气好:另一句是有好运气要好好地使用它.” 5月18日,暴风科技上市55天后,首享科技大厦办公室里,暴风科技CEO冯鑫这样对我说. 在经历了36个涨停之 ...
- 【译】java.lang.ThreadLocal
This class provides thread-local variables. These variables differ from their normal counterparts(副本 ...
- 【Java每日一题】20161108
package Nov2016; import java.util.TreeSet; public class Ques1108 { public static void main(String[] ...